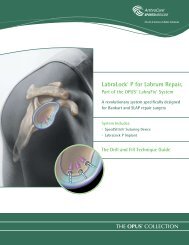
The OPUS® LabraFix® System for Labral Repair - ArthroCare ...
The OPUS® LabraFix® System for Labral Repair - ArthroCare ...
The OPUS® LabraFix® System for Labral Repair - ArthroCare ...

You also want an ePaper? Increase the reach of your titles
YUMPU automatically turns print PDFs into web optimized ePapers that Google loves.
Surgical Technique<br />
Placing the <strong>Labral</strong> Stitch<br />
Step 1 Insert the closed suturing device into the<br />
glenohumeral joint through an anterior portal,<br />
using an 8.2mm cannula or greater. Closing the<br />
telescoping jaw using the silver handle ensures<br />
that the jaw does not inadvertently catch tissue<br />
during insertion. Insert the jaw of the suturing<br />
device into the space between the glenoid<br />
bone and the labral tissue. <strong>The</strong>n open the jaw<br />
and manipulate the SpeedStitch to engage the<br />
labral tissue into the jaw. This usually requires a<br />
simple 90-degree rotation.<br />
Step 2 Next, squeeze the silver lever of the SpeedStitch<br />
to advance the telescopic jaw.<br />
Step 3 Once the tissue is stabilized, squeeze the gold<br />
needle driver lever fully, followed by a gentle<br />
release. <strong>The</strong> stitch is now placed.<br />
Step 4 Release the tissue by pressing the ratchet<br />
release button on the silver lever of the<br />
SpeedStitch, then close the jaw again and<br />
withdraw the instrument from the shoulder.<br />
Technique Tip: portal placement<br />
It is very important to have a good “angle of attack”<br />
<strong>for</strong> accessing the labrum, drilling holes into the glenoid,<br />
and placing the Mini Magnum. It is advisable to use a<br />
guidewire with the Atlantech ® Caps-Lock cannula or<br />
a spinal needle to identify appropriate portal location.<br />
Step 1<br />
Step 2<br />
Step 3<br />
Step 4<br />
Technique Tip: labrum preparation<br />
An <strong>ArthroCare</strong> CoVator ® ArthroWand ® is specifically<br />
designed to elevate the labral tissue from the glenoid.