The OPUS® LabraFix® System for Labral Repair - ArthroCare ...
The OPUS® LabraFix® System for Labral Repair - ArthroCare ...
The OPUS® LabraFix® System for Labral Repair - ArthroCare ...

You also want an ePaper? Increase the reach of your titles
YUMPU automatically turns print PDFs into web optimized ePapers that Google loves.
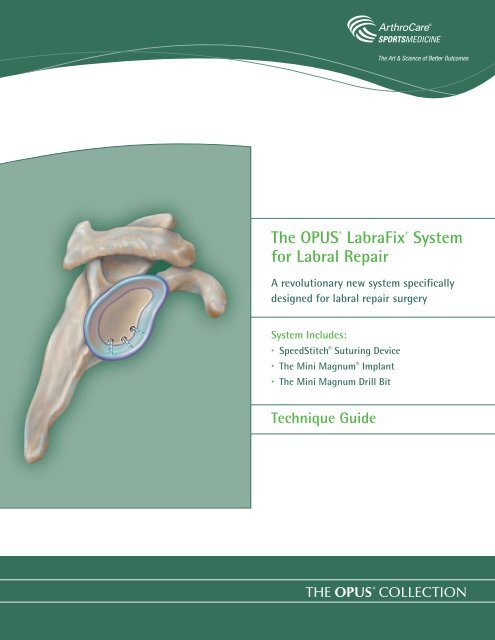
<strong>The</strong> OPUS ®<br />
<strong>for</strong> <strong>Labral</strong> <strong>Repair</strong><br />
LabraFix ®<br />
<strong>System</strong><br />
A revolutionary new system specifically<br />
designed <strong>for</strong> labral repair surgery<br />
<strong>System</strong> Includes:<br />
• SpeedStitch ® Suturing Device<br />
• <strong>The</strong> Mini Magnum ® Implant<br />
• <strong>The</strong> Mini Magnum Drill Bit<br />
Technique Guide
<strong>The</strong> <strong>System</strong><br />
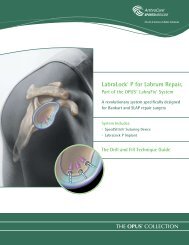
<strong>The</strong> LabraFix <strong>System</strong> from <strong>ArthroCare</strong> Sports Medicine’s OPUS Collection is a groundbreaking<br />
new system specifically designed <strong>for</strong> labral repair surgery. <strong>The</strong> LabraFix <strong>System</strong><br />
enables the surgeon to per<strong>for</strong>m a secure knotless repair of the labrum through rapid<br />
suture and anchor placement combined with an unparalleled TensionLock mechanism<br />
in an arthroscopic or mini-open approach.<br />
<strong>The</strong> SpeedStitch Suturing Device<br />
<strong>The</strong> SpeedStitch suturing device has an integrated grasper and suturing design that allows the surgeon to<br />
stabilize the labral tissue and arthroscopically place a stitch in the tissue in a matter of seconds. <strong>The</strong> unique<br />
design of the SpeedStitch allows <strong>for</strong> easy access to all parts of the labral circumference, along with a deep<br />
bite into the labral and capsular tissue, enabling a strong tissue hold coupled with capsular tightening.<br />
Suturing Device Handle<br />
(OM-7000)<br />
SpeedStitch Suturing Device<br />
<strong>The</strong> Mini Magnum Implant<br />
Suture Cartridge<br />
(OM-808X)<br />
<strong>The</strong> Mini Magnum Implant is uniquely designed <strong>for</strong> use in the glenoid. <strong>The</strong> Mini Magnum combines a small<br />
profile with very strong bone hold. In addition, it provides an efficient mechanism, TensionLock, to transport the<br />
labral tissue to the glenoid and achieves a strong knotless suture fixation in a minimal amount of time.<br />
Ratchet<br />
Release Button<br />
Mini Magnum Implant (OM-2500)<br />
Suture Ratchet Knobs Suture Lock Button<br />
Disposable Inserter Handle<br />
Hand Lever<br />
Needle Driver Lever<br />
Clamp Jaw Lever<br />
Ratchet Release Lever<br />
Distal Snare<br />
Wire Loop<br />
Mini Magnum Implant<br />
Distal Snare Ring
SpeedStitch Suturing Device Preparation<br />
Loading the SpeedStitch Suturing Device Needle (OM-8850)<br />
<strong>The</strong> needle used by the SpeedStitch is provided in a sterile<br />
package and housed inside a needle loader.<br />
Step 1 Load the needle by squeezing the silver<br />
lever of the SpeedStitch and then inserting<br />
the cylindrical end of the loader over the<br />
telescoping jaw of the SpeedStitch.<br />
Step 2 Push in the loader until its plastic tabs<br />
lock into the slots on the sides of the<br />
barrel of the SpeedStitch.<br />
Step 3 Next, squeeze the gold needle driver lever<br />
of the SpeedStitch while holding the needle<br />
loader between thumb and <strong>for</strong>efinger. This<br />
maneuver will load the needle as well as eject<br />
the loader cartridge.<br />
Step 4 Check that the SpeedStitch is ready to use<br />
by actuating both the silver jaw lever and<br />
the gold needle driver lever.<br />
Loading the SpeedStitch Suture Cartridge<br />
Step 5 Remove the SpeedStitch suture cartridge (OM-808X)<br />
from its sterile packaging and carefully insert<br />
its plastic end into the barrel of the SpeedStitch.<br />
Take care not to kink the plastic tubing.<br />
Step 6 Continue feeding the plastic tube into the<br />
barrel until the metal end of the suture<br />
cartridge locks in place. Tug on the metal<br />
end to ensure firm coupling.<br />
<strong>The</strong> SpeedStitch suturing device is now ready<br />
to use.<br />
Step 1<br />
Step 2<br />
Step 3<br />
Step 4<br />
Step 5<br />
Step 6
Surgical Technique<br />
Placing the <strong>Labral</strong> Stitch<br />
Step 1 Insert the closed suturing device into the<br />
glenohumeral joint through an anterior portal,<br />
using an 8.2mm cannula or greater. Closing the<br />
telescoping jaw using the silver handle ensures<br />
that the jaw does not inadvertently catch tissue<br />
during insertion. Insert the jaw of the suturing<br />
device into the space between the glenoid<br />
bone and the labral tissue. <strong>The</strong>n open the jaw<br />
and manipulate the SpeedStitch to engage the<br />
labral tissue into the jaw. This usually requires a<br />
simple 90-degree rotation.<br />
Step 2 Next, squeeze the silver lever of the SpeedStitch<br />
to advance the telescopic jaw.<br />
Step 3 Once the tissue is stabilized, squeeze the gold<br />
needle driver lever fully, followed by a gentle<br />
release. <strong>The</strong> stitch is now placed.<br />
Step 4 Release the tissue by pressing the ratchet<br />
release button on the silver lever of the<br />
SpeedStitch, then close the jaw again and<br />
withdraw the instrument from the shoulder.<br />
Technique Tip: portal placement<br />
It is very important to have a good “angle of attack”<br />
<strong>for</strong> accessing the labrum, drilling holes into the glenoid,<br />
and placing the Mini Magnum. It is advisable to use a<br />
guidewire with the Atlantech ® Caps-Lock cannula or<br />
a spinal needle to identify appropriate portal location.<br />
Step 1<br />
Step 2<br />
Step 3<br />
Step 4<br />
Technique Tip: labrum preparation<br />
An <strong>ArthroCare</strong> CoVator ® ArthroWand ® is specifically<br />
designed to elevate the labral tissue from the glenoid.
Creating the Drill Holes <strong>for</strong> the Mini Magnum Implant<br />
<strong>The</strong> drill hole sites are planned by applying traction on the suture limbs. It is very important to drill the hole 2mm<br />
from the glenoid rim onto the articular surface of the glenoid. This helps create an anatomic “bumper” with the<br />
labrum. For superior implant sites, it is acceptable to drill on the glenoid rim.<br />
Step 1 Through the same cannula, insert the LabraFix drill<br />
guide with the sharp-ended obturator. Place the<br />
tip of the drill guide at the desired site of the drill<br />
hole. Tap the proximal end of the obturator lightly to<br />
create a “starter hole”.<br />
Note:<br />
• Drilling perpendicular is NOT required with<br />
the Mini Magnum. However, drilling at too<br />
shallow of an angle will result in the drill<br />
“walking” or a superficially placed implant.<br />
Step 2 Next, withdraw the obturator and insert the<br />
fluted Mini Magnum drill. Drill until the depthstop<br />
at the distal end of the drill is against the<br />
distal end of the drill guide. This depth corresponds<br />
to a laser etched depth marker on the drill, visible<br />
in the arthroscopic view.<br />
Note:<br />
• While creating the hole, the drill should<br />
be angled into the scapular neck, to avoid<br />
drilling across the lip of the glenoid.<br />
• While drilling the hole, it is important to<br />
hold the sutures taut to avoid tangling of<br />
the sutures on the drill.<br />
Step 3 Once the hole is made, remove the drill and<br />
insert the Mini Magnum PathFinder® into<br />
the hole to maintain alignment while the<br />
Mini Magnum is prepared <strong>for</strong> insertion.
Surgical Technique<br />
Deploying the Mini Magnum Implant<br />
Step 1 Pass both limbs of the suture through the<br />
distal snare wire loop of the Mini Magnum.<br />
Remove the distal snare ring and adjust the<br />
suture so that approximately two inches<br />
of suture extend from the distal end of the<br />
Mini Magnum handle. Avoid pulling the<br />
suture away from the handle while adjusting<br />
the length or the sharp wings of the implant<br />
may sheer the suture.<br />
Step 2 Take up the suture slack by rotating the<br />
suture ratchet knobs in the direction of<br />
the arrows on the inserter handle.<br />
Step 3 Remove the PathFinder and insert the Mini<br />
Magnum through the drill guide into the<br />
pre-drilled hole with the vertical laser mark<br />
facing opposite the suture stitch (towards<br />
the scope). Continue until the tip of the<br />
Mini Magnum is just inside the hole.<br />
Again rotate the suture knobs to take up further<br />
suture slack, until the entire length of suture is<br />
visible, from the labral tissue to the implant.<br />
Step 4 Complete the insertion of the Mini Magnum<br />
until the horizontal laser etched depth marker<br />
on the metal shaft is flush with the glenoid.<br />
Activate the bone lock with a single squeeze<br />
of the black hand lever. Verify bone purchase<br />
with a firm tug.<br />
Alternative technique:<br />
Step 1<br />
Step 2<br />
Step 3<br />
Step 4<br />
With the implant resting just outside the drilled hole, remove all of the suture slack in the joint<br />
be<strong>for</strong>e the implant is inserted. While pressing the ratchet release button, insert the anchor into<br />
the drilled hole. Pushing the ratchet release button allows the suture to pay out during insertion<br />
into the drilled hole.<br />
2"
Step 5 Tension the sutures by rotating the suture<br />
ratchet knobs with both hands in the<br />
direction of the arrows on the inserter<br />
handle.<br />
Step 6 When adequate tension between tendon<br />
and bone is achieved, press the suture lock<br />
button on the side of the inserter handle.<br />
Step 7 Squeeze the black hand lever and release three<br />
times to activate the suture lock and allow<br />
withdrawal of the inserter handle.<br />
Step 8 Trim the sutures at the bone hole to<br />
complete the LabraFix repair.<br />
<strong>The</strong> above sequence is repeated to place the desired<br />
number of implants to complete the labral repair.<br />
Step 5<br />
Step 6<br />
Step 7<br />
Step 8<br />
3x
To order or <strong>for</strong> more in<strong>for</strong>mation, please contact your <strong>ArthroCare</strong> Sports Medicine<br />
representative or customer service at 800-797-6520.<br />
<strong>ArthroCare</strong> Sports Medicine<br />
680 Vaqueros Avenue<br />
Sunnyvale, CA 94085-3523<br />
order entry 800-797-6520<br />
phone 408-736-0224<br />
order entry fax 888-994-2782<br />
arthrocaresportsmedicine.com<br />
<strong>ArthroCare</strong> Europe AB<br />
Baggensgatan 25<br />
111 31 Stockholm<br />
Sweden<br />
phone +46 8 546 172 00<br />
fax +46 8 546 172 39<br />
info@arthrocare.se<br />
CAUTION: Federal (USA) law restricts this device to sale by or on the order of a physician.<br />
© 2008 <strong>ArthroCare</strong> Corporation. <strong>ArthroCare</strong>, Atlantech, Caps-Lock, Coblation, CoVator, LabraFix, Mini Magnum, MagnumWire, OPUS,<br />
PathFinder, TensionLock and SpeedStitch are trademarks and/or registered trademarks of <strong>ArthroCare</strong> Corporation.<br />
P/N A1030 Rev D