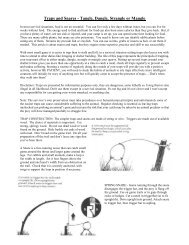

You also want an ePaper? Increase the reach of your titles
YUMPU automatically turns print PDFs into web optimized ePapers that Google loves.
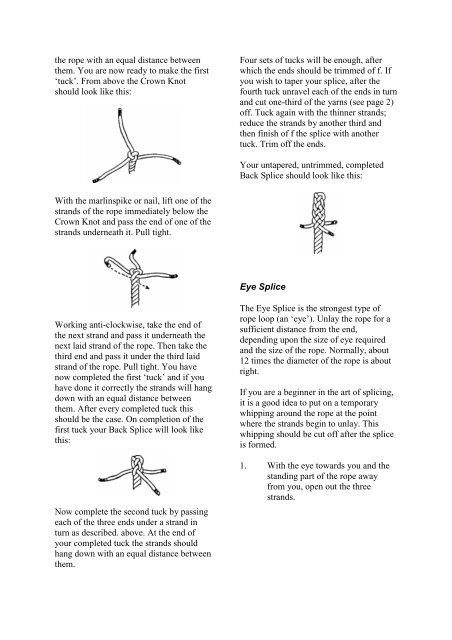
the rope with an equal distance between<br />
them. You are now ready to make the first<br />
‘tuck’. From above the Crown Knot<br />
should look like this:<br />
With the marlinspike or nail, lift one of the<br />
strands of the rope immediately below the<br />
Crown Knot and pass the end of one of the<br />
strands underneath it. Pull tight.<br />
Working anti-clockwise, take the end of<br />
the next strand and pass it underneath the<br />
next laid strand of the rope. Then take the<br />
third end and pass it under the third laid<br />
strand of the rope. Pull tight. You have<br />
now completed the first ‘tuck’ and if you<br />
have done it correctly the strands will hang<br />
down with an equal distance between<br />
them. After every completed tuck this<br />
should be the case. On completion of the<br />
first tuck your Back Splice will look like<br />
this:<br />
Now complete the second tuck by passing<br />
each of the three ends under a strand in<br />
turn as described. above. At the end of<br />
your completed tuck the strands should<br />
hang down with an equal distance between<br />
them.<br />
Four sets of tucks will be enough, after<br />
which the ends should be trimmed of f. If<br />
you wish to taper your splice, after the<br />
fourth tuck unravel each of the ends in turn<br />
and cut one-third of the yarns (see page 2)<br />
off. Tuck again with the thinner strands;<br />
reduce the strands by another third and<br />
then finish of f the splice with another<br />
tuck. Trim off the ends.<br />
Your untapered, untrimmed, completed<br />
Back Splice should look like this:<br />
Eye Splice<br />
The Eye Splice is the strongest type of<br />
rope loop (an ‘eye’). Unlay the rope for a<br />
sufficient distance from the end,<br />
depending upon the size of eye required<br />
and the size of the rope. Normally, about<br />
12 times the diameter of the rope is about<br />
right.<br />
If you are a beginner in the art of splicing,<br />
it is a good idea to put on a temporary<br />
whipping around the rope at the point<br />
where the strands begin to unlay. This<br />
whipping should be cut off after the splice<br />
is formed.<br />
1. With the eye towards you and the<br />
standing part of the rope away<br />
from you, open out the three<br />
strands.