Flo-Torq I Propeller Installation - Mercury Marine
Flo-Torq I Propeller Installation - Mercury Marine
Flo-Torq I Propeller Installation - Mercury Marine

You also want an ePaper? Increase the reach of your titles
YUMPU automatically turns print PDFs into web optimized ePapers that Google loves.
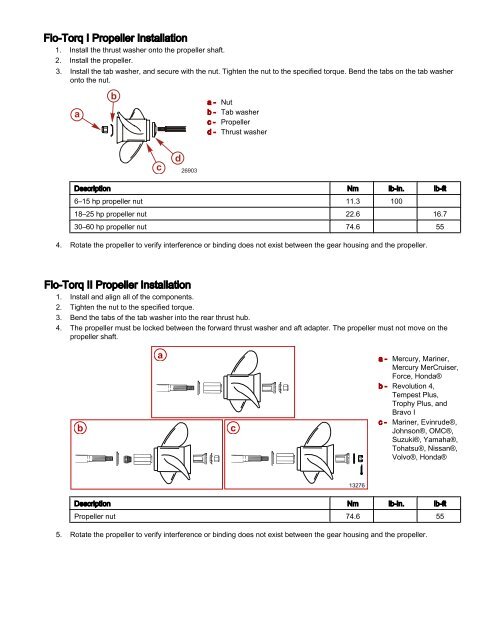
<strong>Flo</strong>‑<strong>Torq</strong> I <strong>Propeller</strong> <strong>Installation</strong><br />
1. Install the thrust washer onto the propeller shaft.<br />
2. Install the propeller.<br />
3. Install the tab washer, and secure with the nut. Tighten the nut to the specified torque. Bend the tabs on the tab washer<br />
onto the nut.<br />
a<br />
a - Nut<br />
b - Tab washer<br />
c - <strong>Propeller</strong><br />
d - Thrust washer<br />
Description Nm lb‑in. lb‑ft<br />
6–15 hp propeller nut 11.3 100<br />
18–25 hp propeller nut 22.6 16.7<br />
30–60 hp propeller nut 74.6 55<br />
4. Rotate the propeller to verify interference or binding does not exist between the gear housing and the propeller.<br />
<strong>Flo</strong>‑<strong>Torq</strong> II <strong>Propeller</strong> <strong>Installation</strong><br />
1. Install and align all of the components.<br />
2. Tighten the nut to the specified torque.<br />
3. Bend the tabs of the tab washer into the rear thrust hub.<br />
4. The propeller must be locked between the forward thrust washer and aft adapter. The propeller must not move on the<br />
propeller shaft.<br />
b<br />
b<br />
c<br />
a<br />
d<br />
26903<br />
c<br />
a - <strong>Mercury</strong>, <strong>Marine</strong>r,<br />
<strong>Mercury</strong> MerCruiser,<br />
Force, Honda®<br />
b - Revolution 4,<br />
Tempest Plus,<br />
Trophy Plus, and<br />
Bravo I<br />
c - <strong>Marine</strong>r, Evinrude®,<br />
Johnson®, OMC®,<br />
Suzuki®, Yamaha®,<br />
Tohatsu®, Nissan®,<br />
Volvo®, Honda®<br />
Description Nm lb‑in. lb‑ft<br />
<strong>Propeller</strong> nut 74.6 55<br />
5. Rotate the propeller to verify interference or binding does not exist between the gear housing and the propeller.<br />
13276
<strong>Flo</strong>‑<strong>Torq</strong> III and <strong>Flo</strong>‑<strong>Torq</strong> IV <strong>Propeller</strong> <strong>Installation</strong><br />
1. Install and align all of the components.<br />
2. Tighten the nut to the specified torque.<br />
3. Bend the tabs of the tab washer into the rear thrust hub.<br />
4. The drive sleeve must be locked between the forward thrust washer and aft adapter.<br />
a b<br />
a - <strong>Flo</strong>‑<strong>Torq</strong> III propellers<br />
b - <strong>Flo</strong>‑<strong>Torq</strong> IV propellers<br />
Description Nm lb‑in. lb‑ft<br />
<strong>Propeller</strong> nut 74.6 55<br />
5. Rotate the propeller to verify interference or binding does not exist between the gear housing and the propeller.<br />
NOTE: A small amount of rotation play and forward aft play is normal.<br />
Page 2 / 7 90-830296005 FEBRUARY 2010<br />
13340