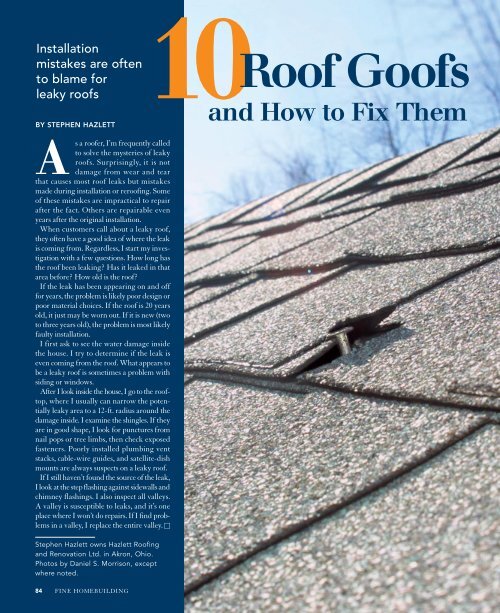
10 Roof Goofs and How to Fix Them - Fine Homebuilding
10 Roof Goofs and How to Fix Them - Fine Homebuilding
10 Roof Goofs and How to Fix Them - Fine Homebuilding

Create successful ePaper yourself
Turn your PDF publications into a flip-book with our unique Google optimized e-Paper software.
Installation<br />
mistakes are often<br />
<strong>to</strong> blame for<br />
leaky roofs<br />
BY STEPHEN HAZLETT<br />
As a roofer, I’m frequently called<br />
<strong>to</strong> solve the mysteries of leaky<br />
roofs. Surprisingly, it is not<br />
damage from wear <strong>and</strong> tear<br />
that causes most roof leaks but mistakes<br />
made during installation or reroofing. Some<br />
of these mistakes are impractical <strong>to</strong> repair<br />
after the fact. Others are repairable even<br />
years after the original installation.<br />
When cus<strong>to</strong>mers call about a leaky roof,<br />
they often have a good idea of where the leak<br />
is coming from. Regardless, I start my investigation<br />
with a few questions. <strong>How</strong> long has<br />
the roof been leaking? Has it leaked in that<br />
area before? <strong>How</strong> old is the roof?<br />
If the leak has been appearing on <strong>and</strong> off<br />
for years, the problem is likely poor design or<br />
poor material choices. If the roof is 20 years<br />
old, it just may be worn out. If it is new (two<br />
<strong>to</strong> three years old), the problem is most likely<br />
faulty installation.<br />
I first ask <strong>to</strong> see the water damage inside<br />
the house. I try <strong>to</strong> determine if the leak is<br />
even coming from the roof. What appears <strong>to</strong><br />
be a leaky roof is sometimes a problem with<br />
siding or windows.<br />
After I look inside the house, I go <strong>to</strong> the roof<strong>to</strong>p,<br />
where I usually can narrow the potentially<br />
leaky area <strong>to</strong> a 12-ft. radius around the<br />
damage inside. I examine the shingles. If they<br />
are in good shape, I look for punctures from<br />
nail pops or tree limbs, then check exposed<br />
fasteners. Poorly installed plumbing vent<br />
stacks, cable-wire guides, <strong>and</strong> satellite-dish<br />
mounts are always suspects on a leaky roof.<br />
If I still haven’t found the source of the leak,<br />
I look at the step flashing against sidewalls <strong>and</strong><br />
chimney flashings. I also inspect all valleys.<br />
A valley is susceptible <strong>to</strong> leaks, <strong>and</strong> it’s one<br />
place where I won’t do repairs. If I find problems<br />
in a valley, I replace the entire valley. <br />
Stephen Hazlett owns Hazlett <strong>Roof</strong>ing<br />
<strong>and</strong> Renovation Ltd. in Akron, Ohio.<br />
Pho<strong>to</strong>s by Daniel S. Morrison, except<br />
where noted.<br />
84<br />
FINE HOMEBUILDING<br />
<strong>Roof</strong> <strong>Goofs</strong> <strong>10</strong><strong>and</strong> <strong>How</strong> <strong>to</strong> <strong>Fix</strong> <strong>Them</strong>
TWO<br />
MISALIGNED STARTER COURSES<br />
It’s surprising how often I see leaks because the butt<br />
joints between starter-course shingles line up perfectly<br />
with the joints between first-course shingles. This layout<br />
translates in<strong>to</strong> a leak every 3 ft. along the bot<strong>to</strong>m edge<br />
of a roof <strong>and</strong> will cause the rafter tails, wall sheathing,<br />
<strong>to</strong>p plates, <strong>and</strong> drywall <strong>to</strong> get wet <strong>and</strong> rot. If the sheathing<br />
is not damaged, the repair is simple: Pull out a few<br />
nails, <strong>and</strong> slip a 5-in. by 7-in. piece of aluminum flashing<br />
between the starter course <strong>and</strong> the first course <strong>to</strong> cover<br />
the exposed joints. You can fasten the flashing with a<br />
single nail or with a bead of caulk between the flashing<br />
<strong>and</strong> the starter course <strong>and</strong> another bead between the<br />
flashing <strong>and</strong> the first course. If the sheathing is damaged,<br />
I remove several courses of shingles, replace the<br />
damaged wood, <strong>and</strong> install waterproof membrane with<br />
a properly aligned starter course.<br />
Drawings: Dan Thorn<strong>to</strong>n<br />
ONE<br />
POORLY FASTENED SHEATHING<br />
Sloppy deck installation on new roofs <strong>and</strong> poorly<br />
prepared decks on reroof jobs are among the most<br />
common problems I investigate. Poorly fastened<br />
sheathing curls along the edges, absorbs water,<br />
<strong>and</strong> swells. This movement causes the nails <strong>to</strong> pop<br />
out. Loose nails puncture the shingles <strong>and</strong> cause<br />
leaks. Tracking down the offending nail is often<br />
harder than the repair itself. Once I find <strong>and</strong><br />
remove the loose nail, I replace the damaged shingle<br />
(sidebar p. 87). Nail pops are <strong>to</strong> be expected<br />
over time. On an older roof, they are not a big<br />
concern. On a new roof, however, nail pops are a<br />
sign of a sloppy installation <strong>and</strong> frequently are followed<br />
by more problems.<br />
Wrong: The butt joints between<br />
the starter course <strong>and</strong> the firstcourse<br />
shingles line up.<br />
Right: The butt joints are offset.<br />
Rake drip edge<br />
First course starts with<br />
half of a tab removed<br />
from the shingle.<br />
<strong>Fix</strong>: Slide a 5-in. by 7-in. piece of<br />
aluminum flashing between the<br />
two courses, covering the seams.<br />
Fasten the flashing with one<br />
roofing nail placed <strong>to</strong> the side.<br />
Waterproof shingle<br />
underlayment<br />
First-course<br />
shingles overhang<br />
drip edge by 3 ⁄4 in.<br />
Drip edge<br />
Starter course: shingles<br />
with the tabs cut off<br />
JUNE/JULY 2005 85
THREE<br />
LAZY NAILING<br />
If shingles are not fastened properly, the<br />
wind can get under them, lift up the edges,<br />
<strong>and</strong> give water an easy path in<strong>to</strong> the roof.<br />
Examples of lazy nailing include <strong>to</strong>o few<br />
fasteners; fasteners placed <strong>to</strong>o high or <strong>to</strong>o<br />
low on the shingle; staples shot in vertically<br />
instead of horizontally; <strong>and</strong> not s<strong>to</strong>rm-<br />
nailing (six nails per shingle in high-wind<br />
areas). Always follow the nailing guidelines<br />
on the shingle wrappers, <strong>and</strong> s<strong>to</strong>rm-nail<br />
shingles on all roofs in high-wind areas or<br />
on roofs steeper than <strong>10</strong>-in-12 pitch.<br />
FOUR<br />
DUMB ROOF DESIGN<br />
<strong>Roof</strong> goofs can occur during design <strong>and</strong><br />
during remodeling. Design mistakes<br />
include misdirected gutter spouts, valleys<br />
draining against a sidewall, bad dormer<br />
locations, chimneys that block water flow,<br />
<strong>and</strong> excessively complicated rooflines.<br />
You can’t do much about these design<br />
flaws once a house is built, but you<br />
should pay close attention <strong>to</strong> areas where<br />
roof design promotes problems.<br />
86<br />
FINE HOMEBUILDING<br />
Typical nailing pattern: four nails per shingle<br />
S<strong>to</strong>rm nailing pattern: six nails per shingle<br />
FIVE<br />
FLAWED SHINGLES<br />
Nail placement is<br />
important. Nails<br />
should be driven<br />
through the nailing<br />
strip, just below<br />
the seal-down strip,<br />
where they’ll be covered<br />
by the tabs of<br />
the next course of<br />
shingles. Exposed<br />
nails give water a way<br />
in<strong>to</strong> the roof.<br />
Seal-down strip<br />
Nailing strip<br />
Here’s one that may surprise you: Shingles with continuous<br />
seal-down strips can cause leaks themselves. Water that gets<br />
under the side edge of a shingle with a continuous adhesive<br />
strip won’t be able <strong>to</strong> escape <strong>and</strong> will migrate sideways until<br />
it finds an exit point, usually a joint between two shingles.<br />
This joint is where the leak begins. Valleys, chimneys,<br />
waste stacks, <strong>and</strong> roof vents are the most likely places<br />
for water <strong>to</strong> get under shingles. These leaks are difficult<br />
<strong>to</strong> track down <strong>and</strong> repair. The solution is <strong>to</strong> use shingles<br />
with breaks in the adhesive strip. And don’t use pieces of shingle<br />
smaller than the sections between breaks. If you must use continuousstrip<br />
shingles, make sure the valley <strong>and</strong> chimney flashing doesn’t dump<br />
water where it easily can find its way under the shingles.
SIX<br />
“BREAKING THE BUNDLES”<br />
Some roofers make a big mistake when they load<br />
shingles on<strong>to</strong> the roof by folding the bundles over<br />
the ridge. Ironically, delivery crews call this “breaking<br />
the bundles,” <strong>and</strong> that’s exactly what happens.<br />
Breaking the bundles can create stress fractures <strong>and</strong><br />
separates shingle laminations, reducing the life span<br />
of a new roof. Always s<strong>to</strong>re shingles flat on the roof.<br />
Because cold shingles are more prone <strong>to</strong> breaking,<br />
limit cold-weather roofing <strong>to</strong> emergency repairs.<br />
Avoid continuous seal-down strips. They may<br />
seem like a good idea, but water that gets under<br />
the shingle can’t escape. Shingles with segmented<br />
seal-down strips (<strong>to</strong>p drawing, facing page) give<br />
water an exit every few inches.<br />
Pho<strong>to</strong>s left, this page: Brian Pon<strong>to</strong>lilo<br />
Don’t bend the shingles<br />
over the ridge. Folding<br />
bundles of shingles over<br />
the ridge can damage the<br />
shingles <strong>and</strong> diminish their<br />
life span. Lay the bundles<br />
flat on the roof, <strong>and</strong> use<br />
a board <strong>to</strong> prevent them<br />
from sliding down the roof.<br />
Removing a damaged shingle<br />
Some roof repairs—nail pops, for example—require replacing<br />
single shingles. Removing the damaged shingle without<br />
damaging the surrounding shingles is the tricky part. This<br />
process is best done while shingles are cool enough not <strong>to</strong><br />
melt underfoot <strong>and</strong> warm enough not <strong>to</strong> crack. In the summer,<br />
I h<strong>and</strong>le this part of the repair before 8 a.m. In the<br />
winter, I do only emergency<br />
repairs.<br />
1 The first step is <strong>to</strong> break<br />
the bond created by the<br />
seal-down strips below <strong>and</strong><br />
on the two courses above<br />
the shingle you want <strong>to</strong><br />
remove. Breaking this bond<br />
may be difficult with some<br />
newer laminated shingles. A<br />
50-year shingle with a 1<strong>10</strong>mph<br />
wind warranty has an<br />
aggressive adhesive bond. In<br />
these cases, I cut the adhesive<br />
strip with a pry bar.<br />
2 With the bonds broken,<br />
I can remove the four nails<br />
holding the damaged shingle.<br />
3 Before I remove the<br />
shingle, though, I have <strong>to</strong> remove<br />
four more nails driven<br />
through the course above.<br />
4 Now I can pull out the<br />
damaged shingle, slip in a<br />
new shingle, <strong>and</strong> renail all<br />
the loosened shingles.<br />
When refastening shingles,<br />
don’t put new nails in the<br />
old nail holes; they’ll pop<br />
right out. Instead, nail next<br />
<strong>to</strong> the holes <strong>and</strong> put a dab<br />
of sealant over the old<br />
holes. While your caulk gun<br />
is h<strong>and</strong>y, seal down all the<br />
loosened shingle tabs with a<br />
dab of sealant.<br />
1<br />
2<br />
3<br />
4<br />
Damaged shingle<br />
JUNE/JULY 2005 87
SEVEN<br />
MISPLACED STEP FLASHING<br />
Another common problem is improperly sized<br />
step flashing. Step flashing should be in line<br />
with the <strong>to</strong>p of the shingle course being flashed<br />
<strong>and</strong> should extend down <strong>to</strong> the <strong>to</strong>p of the<br />
shingle tab, about 7 in. on st<strong>and</strong>ard shingles or<br />
about 8 in. on metric shingles. Even properly<br />
sized step flashing can cause a problem if it is<br />
out of position. Because correctly placed step<br />
flashing covers the adhesive strip on a shingle,<br />
it won’t let the next shingle seal down in that<br />
area. Some people try <strong>to</strong> solve this minor problem<br />
by moving the step flashing up an inch or<br />
so, extending the <strong>to</strong>p edge of the flashing<br />
above the <strong>to</strong>p of the shingle. When the <strong>to</strong>p of<br />
the flashing is nailed, it transforms the <strong>to</strong>p edge<br />
of the shingle in<strong>to</strong> a fulcrum, <strong>and</strong> the flashing<br />
lifts up the bot<strong>to</strong>m edge of the next course,<br />
causing a gap that water can enter. The installer<br />
then tries <strong>to</strong> fix the problem by nailing at the<br />
bot<strong>to</strong>m edge of the flashing. This nail won’t<br />
be covered by the next piece of step flashing<br />
<strong>and</strong> can cause a leak. Improperly installed step<br />
flashing should be stripped <strong>and</strong> replaced.<br />
Chimney flashing is best left <strong>to</strong> the<br />
experts. Chimneys have great potential<br />
for leaks. If masons don’t set counterflashing<br />
in<strong>to</strong> the mortar or if the flashing<br />
fails, nails <strong>and</strong> caulk are not a solution.<br />
The mortar must be cut with a grinder so<br />
that carefully bent new flashing can be<br />
inserted between brick courses.<br />
88<br />
FINE HOMEBUILDING<br />
Step flashing no-no.<br />
Nailing above the <strong>to</strong>p<br />
of the shingle will cause<br />
the flashing <strong>to</strong> lift up the<br />
bot<strong>to</strong>m of the next course<br />
of shingles. An extra nail <strong>to</strong><br />
hold down the flashing is a<br />
potential leak spot.<br />
Step flashing done right.<br />
The flashing should be in<br />
line with the <strong>to</strong>p of the<br />
shingle <strong>and</strong> nailed only<br />
once in the upper corner.<br />
The flashing pieces should<br />
overlap 2 in.<br />
EIGHT<br />
SLOPPY CHIMNEY FLASHING<br />
A lot of roof leaks are blamed on chimney flashing,<br />
<strong>and</strong> for good reason. Before replacing the<br />
chimney flashing, though, spend a little time<br />
<strong>to</strong> rule out other possibilities such as a cracked<br />
mortar cap or missing chimney bricks. The most<br />
common chimney-flashing error is when roofers<br />
don’t take the time <strong>to</strong> insert counterflashing<br />
in<strong>to</strong> the mortar. Properly installed counterflashing<br />
is bent on a sheet-metal brake, producing<br />
sharp, straight, L-shaped bends that seat<br />
cleanly in the mortar between brick courses.<br />
Chimney flashing bent without a brake is a red<br />
flag <strong>to</strong> me; it signifies sloppy detailing. When<br />
I find a roof with poor chimney flashing, I look<br />
closely for additional problems.
NINE<br />
ROOF-MOUNTED UPGRADES<br />
Leaks can be caused easily by the many roof penetrations<br />
inflicted by homeowners <strong>and</strong> remodeling contrac<strong>to</strong>rs.<br />
TV-antenna or satellite-dish mounts, skylights, <strong>and</strong> roof<br />
vents never should be installed haphazardly, yet they<br />
often are. In the natural realm, overgrown branches can<br />
abrade roof shingles, <strong>and</strong> overly shady roofs can<br />
encourage moss growth that will degrade shingles.<br />
<strong>Fix</strong>ing a leaky valley usually<br />
means reshingling the<br />
entire valley. Start at the<br />
<strong>to</strong>p, <strong>and</strong> remove one full<br />
shingle width from each<br />
side of the valley. Neatness<br />
counts a great deal<br />
here because the tidy disassembly<br />
of the valley determines<br />
how well it goes<br />
back <strong>to</strong>gether.<br />
Closed-cut valleys<br />
are often done wrong<br />
Shingles don’t<br />
extend far<br />
enough on<strong>to</strong><br />
adjacent roof.<br />
No flashing membrane<br />
Corners are<br />
not clipped.<br />
New shingles<br />
are cut at each<br />
side of valley<br />
centerline.<br />
TEN<br />
CARELESS VALLEY SHINGLING<br />
I’m surprised by how many valleys have no<br />
flashing. An alarming new practice is using<br />
peel-<strong>and</strong>-stick waterproof membranes as valley<br />
flashing. Some less expensive waterproof<br />
membranes are warranted for only five years.<br />
Fifty-year shingles over a five-year membrane<br />
isn’t a good investment in a valley where lots<br />
of things can go wrong. The only sure way <strong>to</strong><br />
fix a leaky valley is <strong>to</strong> reroof the entire valley. I<br />
install a waterproof membrane <strong>and</strong> W-type valley<br />
flashing on almost all valley repairs. (For a<br />
complete discussion of shingling valleys, go <strong>to</strong><br />
www.finehomebuilding.com).<br />
Open valleys with W-type valley flashing are superior<br />
Waterproof<br />
underlayment<br />
Metal W-type<br />
valley flashing<br />
JUNE/JULY 2005 89