ReadiManager Operations Guide - Polycom
ReadiManager Operations Guide - Polycom
ReadiManager Operations Guide - Polycom

You also want an ePaper? Increase the reach of your titles
YUMPU automatically turns print PDFs into web optimized ePapers that Google loves.
<strong>ReadiManager</strong> ®<br />
<strong>Operations</strong> <strong>Guide</strong>
<strong>ReadiManager</strong> <strong>Operations</strong> <strong>Guide</strong><br />
Trademark Information<br />
<strong>Polycom</strong>®, the Triangles logo, <strong>ReadiManager</strong>®, SoundPoint®, SoundStation®, ViaVideo®, VoiceStation®,<br />
and Vortex are registered trademarks of <strong>Polycom</strong>, Inc. ConveneT , Global Management SystemTM, iPowerTM, MGCTM, People+ContentTM, People On ContentTM, <strong>Polycom</strong> Conference SuiteTM, <strong>Polycom</strong> HD VoiceTM, <strong>Polycom</strong> PathNavigatorTM, <strong>Polycom</strong> VideoPlusTM, <strong>Polycom</strong> VoicePlusTM, PVXTM, RASTM, ReadiConveneTM, RMX 2000TM, RSSTM, V2iUTM, VS4000TM, VSXTM, and VTXTM are trademarks of <strong>Polycom</strong>, Inc.<br />
Other product and corporate names may be trademarks of other companies and are only used as a fair use<br />
reference without intent to infringe.<br />
Patent Information<br />
The accompanying product is protected by one or more U.S. and foreign patents and/or pending patent<br />
applications held by <strong>Polycom</strong>, Inc.<br />
3725-18013-001B3 (08/2008)<br />
3.0.3<br />
© 2008 <strong>Polycom</strong>, Inc. All rights reserved.<br />
<strong>Polycom</strong> Inc.<br />
1765 West 121st Avenue<br />
Westminster, CO 80234-2301 U.S.A.<br />
No part of this document may be reproduced or transmitted in any form or by any means, electronic or<br />
mechanical, for any purpose, without the express written permission of <strong>Polycom</strong>, Inc. Under the law,<br />
reproducing includes translating into another language or format.<br />
As between the parties, <strong>Polycom</strong>, Inc. retains title to, and ownership of, all proprietary rights with respect<br />
to the software contained within its products. The software is protected by United States copyright laws<br />
and international treaty provision. Therefore, you must treat the software like any other copyrighted<br />
material (e.g. a book or sound recording).<br />
Every effort has been made to ensure that the information in this manual is accurate. <strong>Polycom</strong>, Inc. is not<br />
responsible for printing or clerical errors. Information in this document is subject to change without notice.<br />
ii <strong>Polycom</strong>, Inc.
Contents<br />
1 Overview of the <strong>ReadiManager</strong> ® System<br />
Contents<br />
Features and Capabilities . . . . . . . . . . . . . . . . . . . . . . . . . . . . . . . . . . . . . . . . . . 1<br />
Minimum System Requirements . . . . . . . . . . . . . . . . . . . . . . . . . . . . . . . . . . . . 2<br />
Other Requirements . . . . . . . . . . . . . . . . . . . . . . . . . . . . . . . . . . . . . . . . . . . . . . 3<br />
Log Into the <strong>ReadiManager</strong> System . . . . . . . . . . . . . . . . . . . . . . . . . . . . . . . . . 3<br />
Working in the <strong>ReadiManager</strong> System . . . . . . . . . . . . . . . . . . . . . . . . . . . . . . . 4<br />
2 <strong>ReadiManager</strong> System Configuration<br />
3 Scheduler Overview<br />
Configure Redundancy . . . . . . . . . . . . . . . . . . . . . . . . . . . . . . . . . . . . . . . . . . . . 9<br />
License the <strong>ReadiManager</strong> System . . . . . . . . . . . . . . . . . . . . . . . . . . . . . . . . . 11<br />
Configure an External Database . . . . . . . . . . . . . . . . . . . . . . . . . . . . . . . . . . . 12<br />
Configure an LDAP Connection . . . . . . . . . . . . . . . . . . . . . . . . . . . . . . . . . . . 12<br />
Set Up Directory Services . . . . . . . . . . . . . . . . . . . . . . . . . . . . . . . . . . . . . . . . . 13<br />
Set Up Video Call Routing . . . . . . . . . . . . . . . . . . . . . . . . . . . . . . . . . . . . . . . . 14<br />
Set Up Conference Templates . . . . . . . . . . . . . . . . . . . . . . . . . . . . . . . . . . . . . 14<br />
Schedule Conference View . . . . . . . . . . . . . . . . . . . . . . . . . . . . . . . . . . . . . . . . 17<br />
Monitor Conf View . . . . . . . . . . . . . . . . . . . . . . . . . . . . . . . . . . . . . . . . . . . . . . 18<br />
Conference Commands . . . . . . . . . . . . . . . . . . . . . . . . . . . . . . . . . . . . . . . . . . . 18<br />
Log Out of the <strong>ReadiManager</strong> System . . . . . . . . . . . . . . . . . . . . . . . . . . . . . . 19<br />
4 Conference Management <strong>Operations</strong><br />
Add a Conference . . . . . . . . . . . . . . . . . . . . . . . . . . . . . . . . . . . . . . . . . . . . . . . 21<br />
Delete a Conference . . . . . . . . . . . . . . . . . . . . . . . . . . . . . . . . . . . . . . . . . . . . . . 25<br />
Edit a Conference . . . . . . . . . . . . . . . . . . . . . . . . . . . . . . . . . . . . . . . . . . . . . . . . 25<br />
Edit a Participant’s Endpoint Settings . . . . . . . . . . . . . . . . . . . . . . . . . . . . . . 26<br />
Edit a Room’s Endpoint Settings . . . . . . . . . . . . . . . . . . . . . . . . . . . . . . . . . . . 27<br />
Manage an Active Conference . . . . . . . . . . . . . . . . . . . . . . . . . . . . . . . . . . . . . 28<br />
Manage a Participant Device During a Conference . . . . . . . . . . . . . . . . . . . 31<br />
5 Advanced Conference Settings<br />
Advanced Conference Settings . . . . . . . . . . . . . . . . . . . . . . . . . . . . . . . . . . . . 35<br />
Edit Advanced Conference Settings . . . . . . . . . . . . . . . . . . . . . . . . . . . . . . . . 39<br />
<strong>Polycom</strong>, Inc. iii
<strong>ReadiManager</strong> <strong>Operations</strong> <strong>Guide</strong><br />
6 Conference and Participant Fields<br />
7 Device Overview<br />
Conference List . . . . . . . . . . . . . . . . . . . . . . . . . . . . . . . . . . . . . . . . . . . . . . . . . . 41<br />
Conference Details . . . . . . . . . . . . . . . . . . . . . . . . . . . . . . . . . . . . . . . . . . . . . . . 42<br />
Conference Features . . . . . . . . . . . . . . . . . . . . . . . . . . . . . . . . . . . . . . . . . . . . . 44<br />
Bridge (MCU) Features . . . . . . . . . . . . . . . . . . . . . . . . . . . . . . . . . . . . . . . . . . . 46<br />
Participants . . . . . . . . . . . . . . . . . . . . . . . . . . . . . . . . . . . . . . . . . . . . . . . . . . . . . 47<br />
Participant Details . . . . . . . . . . . . . . . . . . . . . . . . . . . . . . . . . . . . . . . . . . . . . . . 47<br />
Participant Settings . . . . . . . . . . . . . . . . . . . . . . . . . . . . . . . . . . . . . . . . . . . . . . 48<br />
Manage Conference - Participants List . . . . . . . . . . . . . . . . . . . . . . . . . . . . . . 50<br />
The Device Views . . . . . . . . . . . . . . . . . . . . . . . . . . . . . . . . . . . . . . . . . . . . . . . 51<br />
The Device Commands . . . . . . . . . . . . . . . . . . . . . . . . . . . . . . . . . . . . . . . . . . . 52<br />
Admin/Monitor View Commands . . . . . . . . . . . . . . . . . . . . . . . . . . . . . 53<br />
Provision View Commands . . . . . . . . . . . . . . . . . . . . . . . . . . . . . . . . . . . 54<br />
Softupdate View Commands . . . . . . . . . . . . . . . . . . . . . . . . . . . . . . . . . . 54<br />
The Device List . . . . . . . . . . . . . . . . . . . . . . . . . . . . . . . . . . . . . . . . . . . . . . . . . . 55<br />
Device Configuration . . . . . . . . . . . . . . . . . . . . . . . . . . . . . . . . . . . . . . . . . . . . 56<br />
Device Passwords . . . . . . . . . . . . . . . . . . . . . . . . . . . . . . . . . . . . . . . . . . . . . . . 56<br />
Supported Third-Party Endpoints . . . . . . . . . . . . . . . . . . . . . . . . . . . . . . . . . 57<br />
8 Device Management <strong>Operations</strong><br />
View Device Details . . . . . . . . . . . . . . . . . . . . . . . . . . . . . . . . . . . . . . . . . . . . . 59<br />
Add an Endpoint Manually . . . . . . . . . . . . . . . . . . . . . . . . . . . . . . . . . . . . . . . 65<br />
Add an MCU Manually . . . . . . . . . . . . . . . . . . . . . . . . . . . . . . . . . . . . . . . . . . 70<br />
Edit a Device . . . . . . . . . . . . . . . . . . . . . . . . . . . . . . . . . . . . . . . . . . . . . . . . . . . . 73<br />
Delete Devices . . . . . . . . . . . . . . . . . . . . . . . . . . . . . . . . . . . . . . . . . . . . . . . . . . 73<br />
View a Device’s Video Feed . . . . . . . . . . . . . . . . . . . . . . . . . . . . . . . . . . . . . . . 74<br />
Clear a Device Help Request . . . . . . . . . . . . . . . . . . . . . . . . . . . . . . . . . . . . . . 74<br />
Send a Message to a Device . . . . . . . . . . . . . . . . . . . . . . . . . . . . . . . . . . . . . . . 75<br />
9 Device Policies and Policy Groups<br />
10 Device Provisioning<br />
Overview of Device Policies and Policy Groups . . . . . . . . . . . . . . . . . . . . . . 77<br />
Device Policy Group Example . . . . . . . . . . . . . . . . . . . . . . . . . . . . . . . . . 78<br />
Overview of Device Provisioning . . . . . . . . . . . . . . . . . . . . . . . . . . . . . . . . . . 81<br />
View the Provisioning List and Details . . . . . . . . . . . . . . . . . . . . . . . . . . . . . 82<br />
Provision Devices . . . . . . . . . . . . . . . . . . . . . . . . . . . . . . . . . . . . . . . . . . . . . . . 84<br />
iv <strong>Polycom</strong>, Inc.
11 Device Softupdate<br />
Contents<br />
Check the Status of Device Provisioning . . . . . . . . . . . . . . . . . . . . . . . . . . . . 84<br />
Clear the Status of Device Provisioning . . . . . . . . . . . . . . . . . . . . . . . . . . . . . 85<br />
Cancel a Scheduled Device Provisioning . . . . . . . . . . . . . . . . . . . . . . . . . . . . 85<br />
Overview of Device Provisioning Profiles . . . . . . . . . . . . . . . . . . . . . . . . . . . 86<br />
Add a Provisioning Profile . . . . . . . . . . . . . . . . . . . . . . . . . . . . . . . . . . . . . . . . 86<br />
Edit a Provisioning Profile . . . . . . . . . . . . . . . . . . . . . . . . . . . . . . . . . . . . . . . . 87<br />
Delete a Provisioning Profile . . . . . . . . . . . . . . . . . . . . . . . . . . . . . . . . . . . . . . 87<br />
Clone a Provisioning Profile . . . . . . . . . . . . . . . . . . . . . . . . . . . . . . . . . . . . . . 87<br />
About Softupdate . . . . . . . . . . . . . . . . . . . . . . . . . . . . . . . . . . . . . . . . . . . . . . . . 89<br />
View Software Update List and Details . . . . . . . . . . . . . . . . . . . . . . . . . . . . . 91<br />
List the Serial Numbers for Devices to be Updated . . . . . . . . . . . . . . . . . . . 92<br />
Download the Required Software Updates . . . . . . . . . . . . . . . . . . . . . . . . . . 93<br />
Request Update Activation Keys . . . . . . . . . . . . . . . . . . . . . . . . . . . . . . . . . . . 93<br />
Upload the Software Update Profile . . . . . . . . . . . . . . . . . . . . . . . . . . . . . . . . 94<br />
Schedule the Software Update for Devices . . . . . . . . . . . . . . . . . . . . . . . . . . 95<br />
Cancel Software Updates . . . . . . . . . . . . . . . . . . . . . . . . . . . . . . . . . . . . . . . . . 96<br />
12 Device Fields and Descriptions<br />
Device Details . . . . . . . . . . . . . . . . . . . . . . . . . . . . . . . . . . . . . . . . . . . . . . . . . . . 97<br />
MCU Device Details . . . . . . . . . . . . . . . . . . . . . . . . . . . . . . . . . . . . . . . . . . . . 103<br />
Provisioning Details . . . . . . . . . . . . . . . . . . . . . . . . . . . . . . . . . . . . . . . . . . . . 107<br />
Softupdate Details . . . . . . . . . . . . . . . . . . . . . . . . . . . . . . . . . . . . . . . . . . . . . . 108<br />
13 System Management Overview<br />
<strong>ReadiManager</strong> System Dashboard . . . . . . . . . . . . . . . . . . . . . . . . . . . . . . . . 111<br />
Automatic Refresh . . . . . . . . . . . . . . . . . . . . . . . . . . . . . . . . . . . . . . . . . . 112<br />
MCUs . . . . . . . . . . . . . . . . . . . . . . . . . . . . . . . . . . . . . . . . . . . . . . . . . . . . . 112<br />
Devices . . . . . . . . . . . . . . . . . . . . . . . . . . . . . . . . . . . . . . . . . . . . . . . . . . . . 112<br />
Today’s Conferences . . . . . . . . . . . . . . . . . . . . . . . . . . . . . . . . . . . . . . . . 112<br />
Device Management . . . . . . . . . . . . . . . . . . . . . . . . . . . . . . . . . . . . . . . . . 112<br />
Licenses . . . . . . . . . . . . . . . . . . . . . . . . . . . . . . . . . . . . . . . . . . . . . . . . . . . 113<br />
Network Summary . . . . . . . . . . . . . . . . . . . . . . . . . . . . . . . . . . . . . . . . . . 113<br />
Services . . . . . . . . . . . . . . . . . . . . . . . . . . . . . . . . . . . . . . . . . . . . . . . . . . . . 113<br />
Configuration . . . . . . . . . . . . . . . . . . . . . . . . . . . . . . . . . . . . . . . . . . . . . . 113<br />
Connected Users . . . . . . . . . . . . . . . . . . . . . . . . . . . . . . . . . . . . . . . . . . . . 113<br />
Utilization . . . . . . . . . . . . . . . . . . . . . . . . . . . . . . . . . . . . . . . . . . . . . . . . . 113<br />
Dashboard Commands . . . . . . . . . . . . . . . . . . . . . . . . . . . . . . . . . . . . . . . . . . 114<br />
<strong>Polycom</strong>, Inc. v
<strong>ReadiManager</strong> <strong>Operations</strong> <strong>Guide</strong><br />
System Management Menu . . . . . . . . . . . . . . . . . . . . . . . . . . . . . . . . . . . . . . 114<br />
14 System Backup and Recovery <strong>Operations</strong><br />
15 Global Address Book<br />
Overview of the <strong>ReadiManager</strong> System Database . . . . . . . . . . . . . . . . . . . 115<br />
Connect to the <strong>ReadiManager</strong> System Serial Console . . . . . . . . . . . . . . . . 116<br />
Backup the <strong>ReadiManager</strong> System Database . . . . . . . . . . . . . . . . . . . . . . . 117<br />
Copy the <strong>ReadiManager</strong> System Database Backup Files . . . . . . . . . . . . . . 117<br />
Overview of Database Restoration . . . . . . . . . . . . . . . . . . . . . . . . . . . . . . . . 119<br />
Restore the <strong>ReadiManager</strong> System Internal Databases . . . . . . . . . . . . 119<br />
Restore the <strong>ReadiManager</strong> System External Database . . . . . . . . . . . . 120<br />
Restore an External Database During Upgrade . . . . . . . . . . . . . . . . . . 120<br />
Recovery <strong>Operations</strong> - Reset First Time Setup . . . . . . . . . . . . . . . . . . . . . . 121<br />
Restart or Shut Down a <strong>ReadiManager</strong> System . . . . . . . . . . . . . . . . . . . . . 122<br />
About the Global Address Book . . . . . . . . . . . . . . . . . . . . . . . . . . . . . . . . . . 125<br />
View the Global Address Book . . . . . . . . . . . . . . . . . . . . . . . . . . . . . . . . . . . 127<br />
Add a User to the Global Address Book . . . . . . . . . . . . . . . . . . . . . . . . . . . 127<br />
Edit a Global Address Book User . . . . . . . . . . . . . . . . . . . . . . . . . . . . . . . . . 128<br />
Delete a Global Address Book User . . . . . . . . . . . . . . . . . . . . . . . . . . . . . . . 128<br />
Edit the Global Address Book Password . . . . . . . . . . . . . . . . . . . . . . . . . . . 129<br />
16 Directory Setup <strong>Operations</strong><br />
Overview of Users, User Roles, and Rooms . . . . . . . . . . . . . . . . . . . . . . . . 131<br />
Users . . . . . . . . . . . . . . . . . . . . . . . . . . . . . . . . . . . . . . . . . . . . . . . . . . . . . . . . . 133<br />
User Roles . . . . . . . . . . . . . . . . . . . . . . . . . . . . . . . . . . . . . . . . . . . . . . . . . . . . . 137<br />
Rooms . . . . . . . . . . . . . . . . . . . . . . . . . . . . . . . . . . . . . . . . . . . . . . . . . . . . . . . . 139<br />
17 Conference Setup <strong>Operations</strong><br />
Conference Configuration Settings . . . . . . . . . . . . . . . . . . . . . . . . . . . . . . . . 143<br />
Conference Templates . . . . . . . . . . . . . . . . . . . . . . . . . . . . . . . . . . . . . . . . . . . 144<br />
View the Conference Templates List . . . . . . . . . . . . . . . . . . . . . . . . . . . . . . 150<br />
Add a Conference Template . . . . . . . . . . . . . . . . . . . . . . . . . . . . . . . . . . . . . 150<br />
Edit a Conference Template . . . . . . . . . . . . . . . . . . . . . . . . . . . . . . . . . . . . . . 150<br />
Delete a Conference Template . . . . . . . . . . . . . . . . . . . . . . . . . . . . . . . . . . . . 151<br />
Conference Settings . . . . . . . . . . . . . . . . . . . . . . . . . . . . . . . . . . . . . . . . . . . . . 151<br />
Disable Conference Auto-Launch . . . . . . . . . . . . . . . . . . . . . . . . . . . . . . . . . 152<br />
Disable Conference Time Warning . . . . . . . . . . . . . . . . . . . . . . . . . . . . . . . . 153<br />
Edit the <strong>ReadiManager</strong> System Email Account . . . . . . . . . . . . . . . . . . . . . 153<br />
vi <strong>Polycom</strong>, Inc.
18 System Reports<br />
Contents<br />
Gatekeeper Message Log . . . . . . . . . . . . . . . . . . . . . . . . . . . . . . . . . . . . . . . . 155<br />
View and Export the Gatekeeper Message Log . . . . . . . . . . . . . . . . . . 157<br />
Define Log Settings . . . . . . . . . . . . . . . . . . . . . . . . . . . . . . . . . . . . . . . . . 157<br />
Clear Events from the Log . . . . . . . . . . . . . . . . . . . . . . . . . . . . . . . . . . . . 157<br />
Pause and Restart Logging . . . . . . . . . . . . . . . . . . . . . . . . . . . . . . . . . . . 158<br />
Site Statistics . . . . . . . . . . . . . . . . . . . . . . . . . . . . . . . . . . . . . . . . . . . . . . . . . . . 158<br />
View Site Statistics . . . . . . . . . . . . . . . . . . . . . . . . . . . . . . . . . . . . . . . . . . 158<br />
Site Link Statistics . . . . . . . . . . . . . . . . . . . . . . . . . . . . . . . . . . . . . . . . . . . . . . 159<br />
View Site Link Statistics . . . . . . . . . . . . . . . . . . . . . . . . . . . . . . . . . . . . . . 159<br />
Call Detail Record Reports . . . . . . . . . . . . . . . . . . . . . . . . . . . . . . . . . . . . . . . 159<br />
Conference Summary Reports . . . . . . . . . . . . . . . . . . . . . . . . . . . . . . . . . . . . 162<br />
System Log Files . . . . . . . . . . . . . . . . . . . . . . . . . . . . . . . . . . . . . . . . . . . . . . . 164<br />
View and Export System Log Files . . . . . . . . . . . . . . . . . . . . . . . . . . . . 164<br />
19 System Troubleshooting<br />
20 System Setup Overview<br />
21 Server Settings<br />
Registration Problems and Solutions . . . . . . . . . . . . . . . . . . . . . . . . . . . 165<br />
Point-to-Point Calling Problems and Solutions . . . . . . . . . . . . . . . . . . 167<br />
MCU and Gateway Dialing Problems and Solutions . . . . . . . . . . . . . 168<br />
Conference On Demand Problems and Solutions . . . . . . . . . . . . . . . . 169<br />
Overview of the System Setup Menu . . . . . . . . . . . . . . . . . . . . . . . . . . . . . . 171<br />
Overview of Site Topology . . . . . . . . . . . . . . . . . . . . . . . . . . . . . . . . . . . . . . . 172<br />
Default <strong>ReadiManager</strong> Dial Plan Settings . . . . . . . . . . . . . . . . . . . . . . . . . . 176<br />
<strong>ReadiManager</strong> System LDAP Integration . . . . . . . . . . . . . . . . . . . . . . . . . . 177<br />
Redundant <strong>ReadiManager</strong> System Configuration . . . . . . . . . . . . . . . . . . . 178<br />
Edit the <strong>ReadiManager</strong> System Network Settings . . . . . . . . . . . . . . . . . . . 181<br />
Edit the <strong>ReadiManager</strong> System Time Settings . . . . . . . . . . . . . . . . . . . . . . 182<br />
Integrate the <strong>ReadiManager</strong> System with an External Database . . . . . . . 183<br />
Revert the <strong>ReadiManager</strong> System to an Internal Database . . . . . . . . . . . . 184<br />
Integrate the <strong>ReadiManager</strong> System with an LDAP Server . . . . . . . . . . . 184<br />
Add <strong>ReadiManager</strong> System Licenses . . . . . . . . . . . . . . . . . . . . . . . . . . . . . . 185<br />
Implement a Redundant <strong>ReadiManager</strong> System . . . . . . . . . . . . . . . . . . . . 186<br />
Failover to a Redundant <strong>ReadiManager</strong> Server . . . . . . . . . . . . . . . . . . . . . 188<br />
Deactivate a Redundant <strong>ReadiManager</strong> Configuration . . . . . . . . . . . . . . . 188<br />
Add a Custom Logo to the User Interface . . . . . . . . . . . . . . . . . . . . . . . . . . 190<br />
<strong>Polycom</strong>, Inc. vii
<strong>ReadiManager</strong> <strong>Operations</strong> <strong>Guide</strong><br />
22 Gatekeeper Settings<br />
Gatekeeper Overview . . . . . . . . . . . . . . . . . . . . . . . . . . . . . . . . . . . . . . . . . . . 191<br />
Primary Gatekeeper . . . . . . . . . . . . . . . . . . . . . . . . . . . . . . . . . . . . . . . . . 191<br />
Alternate Gatekeeper . . . . . . . . . . . . . . . . . . . . . . . . . . . . . . . . . . . . . . . 193<br />
Edit the Primary Gatekeeper Settings . . . . . . . . . . . . . . . . . . . . . . . . . . . . . . 194<br />
Add an Alternate Gatekeeper . . . . . . . . . . . . . . . . . . . . . . . . . . . . . . . . . . . . 194<br />
Edit the Alternate Gatekeeper Settings . . . . . . . . . . . . . . . . . . . . . . . . . . . . 195<br />
23 Management & Security Settings<br />
24 Dial Plan Setup<br />
Edit Security Settings to Implement HTTPS . . . . . . . . . . . 197<br />
Generate a Certificate Request . . . . . . . . . . . . . . . . . . . . . . . . . . . . . . . . 198<br />
Upload a Private Key . . . . . . . . . . . . . . . . . . . . . . . . . . . . . . . . . . . . . . . . 199<br />
Upload a Certificate . . . . . . . . . . . . . . . . . . . . . . . . . . . . . . . . . . . . . . . . . 199<br />
Edit the https Security Setting . . . . . . . . . . . . . . . . . . . . . . . . . . . . . . . . 199<br />
Revert to the Default Key and Certificate . . . . . . . . . . . . . . . . . . . . . . . 200<br />
Configure Client Systems to Accept HTTPS Certificate . . . . . . . . . . . . . . 200<br />
Auto-Provision Endpoints . . . . . . . . . . . . . . . . . . . . . . . . . . . . . . . . . . . . . . . 201<br />
Set Common Passwords for Endpoints . . . . . . . . . . . . . . . . . . . . . . . . . . . . 202<br />
Update the <strong>ReadiManager</strong> Server Software . . . . . . . . . . . . . . . . . . . . . . . . 202<br />
Sites . . . . . . . . . . . . . . . . . . . . . . . . . . . . . . . . . . . . . . . . . . . . . . . . . . . . . . . . . . 203<br />
View the Sites List . . . . . . . . . . . . . . . . . . . . . . . . . . . . . . . . . . . . . . . . . . 206<br />
Add a Site . . . . . . . . . . . . . . . . . . . . . . . . . . . . . . . . . . . . . . . . . . . . . . . . . . 206<br />
Edit Site Settings . . . . . . . . . . . . . . . . . . . . . . . . . . . . . . . . . . . . . . . . . . . . 207<br />
Delete a Site . . . . . . . . . . . . . . . . . . . . . . . . . . . . . . . . . . . . . . . . . . . . . . . . 207<br />
Site Links . . . . . . . . . . . . . . . . . . . . . . . . . . . . . . . . . . . . . . . . . . . . . . . . . . . . . . 208<br />
View the Site Links List . . . . . . . . . . . . . . . . . . . . . . . . . . . . . . . . . . . . . . 209<br />
Add a Site Link . . . . . . . . . . . . . . . . . . . . . . . . . . . . . . . . . . . . . . . . . . . . . 209<br />
Edit a Site Link . . . . . . . . . . . . . . . . . . . . . . . . . . . . . . . . . . . . . . . . . . . . . 210<br />
Delete a Site Link . . . . . . . . . . . . . . . . . . . . . . . . . . . . . . . . . . . . . . . . . . . 210<br />
Gatekeeper Regions . . . . . . . . . . . . . . . . . . . . . . . . . . . . . . . . . . . . . . . . . . . . . 211<br />
View the Gatekeeper Regions List . . . . . . . . . . . . . . . . . . . . . . . . . . . . . 212<br />
Add a Gatekeeper Region . . . . . . . . . . . . . . . . . . . . . . . . . . . . . . . . . . . . 212<br />
Edit a Gatekeeper Region . . . . . . . . . . . . . . . . . . . . . . . . . . . . . . . . . . . . 213<br />
Delete a Gatekeeper Region . . . . . . . . . . . . . . . . . . . . . . . . . . . . . . . . . . 213<br />
Dial Plan Services . . . . . . . . . . . . . . . . . . . . . . . . . . . . . . . . . . . . . . . . . . . . . . . 213<br />
View the Services List . . . . . . . . . . . . . . . . . . . . . . . . . . . . . . . . . . . . . . . 218<br />
Add a Service . . . . . . . . . . . . . . . . . . . . . . . . . . . . . . . . . . . . . . . . . . . . . . 218<br />
viii <strong>Polycom</strong>, Inc.
A Glossary<br />
Contents<br />
Edit a Service . . . . . . . . . . . . . . . . . . . . . . . . . . . . . . . . . . . . . . . . . . . . . . . 219<br />
Delete a Service . . . . . . . . . . . . . . . . . . . . . . . . . . . . . . . . . . . . . . . . . . . . . 219<br />
Dial Rules . . . . . . . . . . . . . . . . . . . . . . . . . . . . . . . . . . . . . . . . . . . . . . . . . . . . . 220<br />
Default Dial Rules . . . . . . . . . . . . . . . . . . . . . . . . . . . . . . . . . . . . . . . . . . . 220<br />
Parts of a Dial Rule . . . . . . . . . . . . . . . . . . . . . . . . . . . . . . . . . . . . . . . . . . 221<br />
Examples of Custom Dial Rules . . . . . . . . . . . . . . . . . . . . . . . . . . . . . . . 222<br />
View the Dial Rules List . . . . . . . . . . . . . . . . . . . . . . . . . . . . . . . . . . . . . 224<br />
Add a Dialing Rule . . . . . . . . . . . . . . . . . . . . . . . . . . . . . . . . . . . . . . . . . . 225<br />
Enable or Disable Dialing Rules . . . . . . . . . . . . . . . . . . . . . . . . . . . . . . . 226<br />
Edit a Dial Rule . . . . . . . . . . . . . . . . . . . . . . . . . . . . . . . . . . . . . . . . . . . . . 226<br />
Least-Cost Routing Tables . . . . . . . . . . . . . . . . . . . . . . . . . . . . . . . . . . . . . . . 226<br />
How Least-Cost Routing Works . . . . . . . . . . . . . . . . . . . . . . . . . . . . . . . 227<br />
Example of Least-Cost Routing . . . . . . . . . . . . . . . . . . . . . . . . . . . . . . . 228<br />
LCR Tables for Three Sites . . . . . . . . . . . . . . . . . . . . . . . . . . . . . . . . 228<br />
Call Scenario One . . . . . . . . . . . . . . . . . . . . . . . . . . . . . . . . . . . . . . . 229<br />
Call Scenario Two . . . . . . . . . . . . . . . . . . . . . . . . . . . . . . . . . . . . . . . 230<br />
Determining Area Codes . . . . . . . . . . . . . . . . . . . . . . . . . . . . . . . . . . . . . 230<br />
Determining Country Codes . . . . . . . . . . . . . . . . . . . . . . . . . . . . . . . . . . 230<br />
Determining the Weighted Cost . . . . . . . . . . . . . . . . . . . . . . . . . . . . . . . 230<br />
View the Least Cost Routing Tables List . . . . . . . . . . . . . . . . . . . . . . . 231<br />
Add a New Least Cost Routing Table . . . . . . . . . . . . . . . . . . . . . . . . . . 232<br />
Edit a Least Cost Routing Table . . . . . . . . . . . . . . . . . . . . . . . . . . . . . . . 232<br />
Delete a Least Cost Routing Table . . . . . . . . . . . . . . . . . . . . . . . . . . . . . 232<br />
B <strong>ReadiManager</strong> System Security and Port Usage<br />
Open Ports on the <strong>ReadiManager</strong> SE200 System . . . . . . . . . . . . . . . . . 245<br />
Outbound Ports Used by the <strong>ReadiManager</strong> SE200 System . . . . . . . 246<br />
C <strong>ReadiManager</strong> System Field Input Requirements<br />
Index . . . . . . . . . . . . . . . . . . . . . . . . . . . . . . . . . . . . . . . 255<br />
<strong>Polycom</strong>, Inc. ix
<strong>ReadiManager</strong> <strong>Operations</strong> <strong>Guide</strong><br />
x <strong>Polycom</strong>, Inc.
Overview of the <strong>ReadiManager</strong> ®<br />
System<br />
Features and Capabilities<br />
1<br />
This chapter provides an overview of the <strong>ReadiManager</strong> system and includes<br />
these topics:<br />
• “Features and Capabilities” on page 1<br />
• “Minimum System Requirements” on page 2<br />
• “Other Requirements” on page 3<br />
• “Log Into the <strong>ReadiManager</strong> System” on page 3<br />
• “Working in the <strong>ReadiManager</strong> System” on page 4<br />
• “<strong>ReadiManager</strong> System Views” on page 4<br />
• “<strong>ReadiManager</strong> Site Map” on page 6<br />
• “Field Input Requirements” on page 7<br />
• “Filter and Search a List” on page 7<br />
The <strong>Polycom</strong>® <strong>ReadiManager</strong>® system is an integrated scheduling and device<br />
management platform for video conferencing. The <strong>ReadiManager</strong> application<br />
functions on the <strong>ReadiManager</strong> SE200 appliance and the ReadiConvene<br />
system, which combines both the <strong>ReadiManager</strong> platform and the MGC+<br />
multicontrol-unit device.<br />
The <strong>ReadiManager</strong> scheduling and management system includes the<br />
following features:<br />
• Conference scheduling through the <strong>ReadiManager</strong> Web Scheduler<br />
• Conference scheduling through the optional, separately-licensed<br />
<strong>ReadiManager</strong> Scheduling Plug-in for Microsoft® Outlook® or<br />
<strong>ReadiManager</strong> Scheduling Plug-in for IBM® Lotus® Notes®<br />
<strong>Polycom</strong>, Inc. 1
<strong>Polycom</strong> <strong>ReadiManager</strong> <strong>Operations</strong> <strong>Guide</strong><br />
Minimum System Requirements<br />
• On-demand conferencing by end-users from video endpoints<br />
• Access to global user and room directories for on-demand and scheduled<br />
calls<br />
• Conference monitoring and management<br />
• Device monitoring and management<br />
• Remote provisioning and software updates of video endpoints<br />
• Advanced H.323 gatekeeper capabilities<br />
The client computer must meet the following minimum system requirements:<br />
• Microsoft Windows® 2000, Microsoft Windows 2003, or Windows XP<br />
• Microsoft Internet Explorer® 6.x or 7.x<br />
• Intel® Pentium® III-class processor (800Mhz or greater)<br />
• 512 MB RAM<br />
• 50 MB free space<br />
• Adobe® Flash® 9.0<br />
Note<br />
The <strong>ReadiManager</strong> system user interface is best viewed with an SXGA display<br />
resolution of at least 1280x1024 pixels. The minimum supported display resolution<br />
is XGA 1024x768 pixels.<br />
In addition:<br />
• The <strong>ReadiManager</strong> Scheduling Plug-in for Microsoft Outlook requires<br />
Microsoft Outlook 2000, SR1 or Microsoft Outlook 2003, SP2<br />
Note<br />
An LDAP Active Directory is required to implement the <strong>ReadiManager</strong> Scheduling<br />
Plug-in for Microsoft Outlook.<br />
• The <strong>ReadiManager</strong> Scheduling Plug-in for IBM Lotus Notes requires IBM<br />
Lotus Notes 7.0.x<br />
• The <strong>ReadiManager</strong> system external database option requires Microsoft<br />
SQL Server 2005<br />
2 <strong>Polycom</strong>, Inc.
Other Requirements<br />
Overview of the <strong>ReadiManager</strong> ® System<br />
Any scheduled call that requires an external MCU requires a <strong>Polycom</strong> MGC or<br />
RMX 2000 device. The Conference on Demand service also requires a <strong>Polycom</strong><br />
MGC or RMX 2000 device.<br />
Log Into the <strong>ReadiManager</strong> System<br />
To log into the <strong>ReadiManager</strong> system, you need:<br />
• An internet browser<br />
• Adobe ® Flash ® Player 9.0<br />
• The IP address or DNS name of the <strong>ReadiManager</strong> SE200 network<br />
appliance and your username, password, and domain. See your<br />
<strong>ReadiManager</strong> system administrator for this information.<br />
To log into the <strong>ReadiManager</strong> system<br />
1 Open a browser window and in the Address field enter the<br />
<strong>ReadiManager</strong> SE200 appliance IP address or DNS name.<br />
If prompted to install the Adobe Flash Player, click OK.<br />
If you receive an HTTPS Security Alert, click Yes. (To eliminate these<br />
HTTPS certificate security alerts in the future, see “Configure Client<br />
Systems to Accept HTTPS Certificate” on page 200.)<br />
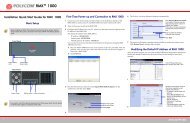
2 When the <strong>ReadiManager</strong> system login screen appears, enter your<br />
Username and Password.<br />
Figure 1-1 <strong>ReadiManager</strong> system Login screen<br />
3 If necessary, select a different Language or Domain.<br />
<strong>Polycom</strong>, Inc. 3
<strong>Polycom</strong> <strong>ReadiManager</strong> <strong>Operations</strong> <strong>Guide</strong><br />
4 Click Login.<br />
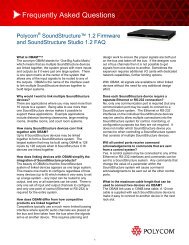
Because the <strong>ReadiManager</strong> system is a role-based system, you see only the<br />
screens and functions available to your roles. If you log in as an<br />
administrator, you see the <strong>ReadiManager</strong> system management<br />
dashboard.<br />
Figure 1-2 <strong>ReadiManager</strong> System Management Dashboard<br />
Working in the <strong>ReadiManager</strong> System<br />
<strong>ReadiManager</strong> System Views<br />
This section includes some general information you must know when working<br />
in the <strong>ReadiManager</strong> system. It includes these topics:<br />
• <strong>ReadiManager</strong> System Views<br />
• <strong>ReadiManager</strong> Site Map<br />
• Field Input Requirements<br />
• Filter and Search a List<br />
When you log into the <strong>ReadiManager</strong> system, the view that appears depends<br />
on your user roles and the permissions assigned to your user roles.<br />
This section describes the functionality assigned to the default <strong>ReadiManager</strong><br />
system user roles. If your <strong>ReadiManager</strong> system has been configured with<br />
specialized user roles, other screens may appear.<br />
4 <strong>Polycom</strong>, Inc.
Overview of the <strong>ReadiManager</strong> ® System<br />
The <strong>ReadiManager</strong> system has three default roles: Administrator, Operator,<br />
and Scheduler.<br />
• When users who are assigned the default Scheduler role log into the<br />
<strong>ReadiManager</strong> system, they see the Conference menu and the Schedule<br />
Conf View. They can schedule, monitor, and manage their own<br />
conferences. They cannot perform any Device, System Management, or<br />
System Setup tasks, and they cannot monitor or manage conferences that<br />
they did not create.<br />
• When users who are assigned the default Operator role log into the<br />
<strong>ReadiManager</strong> system, they see the Conference, Device and System<br />
Management menus and the Monitor Conf View. They can schedule<br />
conferences; monitor and manage all <strong>ReadiManager</strong> system conferences;<br />
monitor all devices; and view reports. They cannot perform any other<br />
Device, System Management, or System Setup tasks.<br />
• When users who are assigned the default Administrator role log into the<br />
<strong>ReadiManager</strong> system, they see the Device, System Management, and<br />
System Setup menus and the system Dashboard. They have access to all<br />
<strong>ReadiManager</strong> functionality except that associated with scheduling,<br />
monitoring, or managing conferences.<br />
All users see the following menu items:<br />
Description<br />
Settings. Displays a Settings dialog box with the following information:<br />
• User Name<br />
• Remote Server<br />
• Software Version<br />
In this dialog box, the user can also change the font size used in their display of the<br />
<strong>ReadiManager</strong> system interface.<br />
Downloads. Displays a Downloads dialog box with the Scheduler Plugin<br />
downloads, Codec downloads, and Documentation downloads.<br />
Log Out. Logs the user out of the <strong>ReadiManager</strong> system.<br />
Help. Links to the <strong>ReadiManager</strong> online help system.<br />
Note<br />
The <strong>ReadiManager</strong> system has an inactivity timer. If a user is logged into the<br />
<strong>ReadiManager</strong> system but does not use the interface for a specified period of time<br />
(30 minutes by default), the <strong>ReadiManager</strong> system automatically logs the user out.<br />
<strong>Polycom</strong>, Inc. 5
<strong>Polycom</strong> <strong>ReadiManager</strong> <strong>Operations</strong> <strong>Guide</strong><br />
<strong>ReadiManager</strong> Site Map<br />
The following figure shows the <strong>ReadiManager</strong> 3.0 system site map illustrating<br />
the organization of the <strong>ReadiManager</strong> system interface.<br />
6 <strong>Polycom</strong>, Inc.
Field Input Requirements<br />
Filter and Search a List<br />
Overview of the <strong>ReadiManager</strong> ® System<br />
While every effort was made to internationalized the <strong>ReadiManager</strong> system,<br />
not all system fields accept Unicode entries. If you work in a language other<br />
than English, be aware that the <strong>ReadiManager</strong> system fields that accept only<br />
ASCII characters are shaded a light yellow.<br />
In the <strong>ReadiManager</strong> system, information is often summarized in a list, for<br />
example the Conference List or Participant List.<br />
Lists that include many items have filters and searchable attribute fields,<br />
which allow you to view a subset of items or search for a specific entry. The<br />
available filtering options depend on the type of information in the list.<br />
For example in the Conference List:<br />
• If you select Custom Date as the filter, a calendar filter field appears<br />
• If you select Ongoing Plus as the filter, an attribute option appears. You<br />
can select the attribute Conference Name and enter a all or part of the<br />
conference name into the associated text field.<br />
In general, most filter fields are ASCII only and the <strong>ReadiManager</strong> system<br />
search function is a case-insensitive, substring search. When you enter a search<br />
string, the <strong>ReadiManager</strong> system looks for that string where ever it occurs<br />
(beginning, middle, or end) in the word or number.<br />
However, if the <strong>ReadiManager</strong> system is integrated with an LDAP<br />
(Light-weight Directory Access Protocol) database, the <strong>ReadiManager</strong> system<br />
uses the LDAP search function for searches of the LDAP database.<br />
LDAP searches are prefix-searches. When you enter a search string, the system<br />
looks for that search string only at the beginning of the word or number. In this<br />
case, to perform a substring search you must type an asterisk (*) at the<br />
beginning and end of the search string.<br />
So, if your <strong>ReadiManager</strong> system is integrated with an LDAP database,<br />
searches for LDAP participants, rooms, and devices will be prefix searches<br />
while searches for local participants, rooms, and devices will be substring<br />
searches.<br />
<strong>Polycom</strong>, Inc. 7
<strong>Polycom</strong> <strong>ReadiManager</strong> <strong>Operations</strong> <strong>Guide</strong><br />
8 <strong>Polycom</strong>, Inc.
2<br />
<strong>ReadiManager</strong> System Configuration<br />
Configure Redundancy<br />
This chapter describes the configuration tasks required (as needed, based<br />
upon your configuration) to finish implementing a <strong>ReadiManager</strong> system once<br />
First Time Setup is complete. It includes these topics:<br />
• Configure Redundancy<br />
• License the <strong>ReadiManager</strong> System<br />
• Configure an External Database<br />
• Configure an LDAP Connection<br />
• Set Up Directory Services<br />
• Set Up Video Call Routing<br />
• Set Up Conference Templates<br />
You can set up the <strong>ReadiManager</strong> system in a fault-tolerant, high-availability,<br />
redundant configuration.<br />
A redundant <strong>ReadiManager</strong> system configuration requires the installation of<br />
two <strong>ReadiManager</strong> SE200 appliances on the same network. During First Time<br />
Setup, you were instructed to assign these two appliances physical IP<br />
addresses and leave them pointed to their internal databases.<br />
Note<br />
In a redundant configuration, one server is licensed as the primary server and the<br />
other server is licensed as the redundant server, so primary server and redundant<br />
server are exclusionary terms. That means that even in a failover situation where<br />
the redundant server is managing the system, the redundant server is not<br />
considered the primary server.<br />
<strong>Polycom</strong>, Inc. 9
<strong>Polycom</strong> <strong>ReadiManager</strong> <strong>Operations</strong> <strong>Guide</strong><br />
This section describes how to complete the configuration of these newly<br />
installed redundant servers. It includes these topics:<br />
• Configure the External Database for Redundancy<br />
• Set the Virtual IP Address for the Redundant System<br />
For information on converting an existing <strong>ReadiManager</strong> system to a<br />
redundant system, see “Implement a Redundant <strong>ReadiManager</strong> System” on<br />
page 186.<br />
Configure the External Database for Redundancy<br />
To configure the two redundant servers to use the same external database<br />
1 Log into both the primary and redundant <strong>ReadiManager</strong> system servers.<br />
2 On the primary server, select System Management > Dashboard ><br />
Shutdown to shut it down.<br />
3 When the primary server has shutdown completely, on the redundant<br />
server:<br />
a Select System Setup > Server Settings > Database.<br />
b On the Database screen, select the Use an external SQL Server<br />
database check box.<br />
c Click Database Setup and download the Remote Database Setup<br />
Utility, DBSetup.exe, to your computer.<br />
d Run the Remote Database Setup Utility and complete the<br />
information requested in the setup screens.<br />
» Make sure you know the path to the Microsoft SQL Server.<br />
» If you use Microsoft Windows authentication, be sure your login<br />
account has administrator privileges on the SQL server (i.e., is a<br />
member of the sysadmin group).<br />
After running the script, the redundant server boots.<br />
e After the redundant server reboots completely, log into it again and<br />
select System Management > Dashboard > Shutdown to shut it<br />
down.<br />
4 When the redundant server has shutdown completely, on the primary<br />
<strong>ReadiManager</strong> system server:<br />
a Turn ON and log into the primary server.<br />
b Select System Setup > Server Settings > Database.<br />
c On the Database screen, select the Use an external SQL Server<br />
database check box.<br />
10 <strong>Polycom</strong>, Inc.
<strong>ReadiManager</strong> System Configuration<br />
d Enter the database server’s IP address or DNS name, SQL server port<br />
number, and the database instance name (if necessary, otherwise<br />
leave it blank).<br />
e Click Update.<br />
The primary server reboots and comes online as the primary server.<br />
5 When the primary server has rebooted completely, turn ON the<br />
redundant server and wait for it to boot completely.<br />
Set the Virtual IP Address for the Redundant System<br />
To set the virtual IP address for the redundant system<br />
1 Log into the primary <strong>ReadiManager</strong> system server.<br />
2 Select System Setup > Server Settings > Redundant Configuration.<br />
If the two <strong>ReadiManager</strong> systems are installed and configured correctly on<br />
the network, both servers are displayed in the table on the Redundant<br />
Configuration screen.<br />
3 Enter the Virtual IP for the redundant system and click Submit. For<br />
information about this virtual IP address, see “Implement a Redundant<br />
<strong>ReadiManager</strong> System” on page 186.<br />
Note<br />
License the <strong>ReadiManager</strong> System<br />
Set the virtual IP for the redundant server on the primary serve only.<br />
To license a non-redundant <strong>ReadiManager</strong> system, see “Add <strong>ReadiManager</strong><br />
System Licenses” on page 185.<br />
To license a redundant system<br />
1 Request a separate software activation key code for the primary and<br />
redundant server as described in “Request a Software Activation Key” on<br />
page 186.<br />
Note<br />
Request a separate activation key code for each server.<br />
2 On the primary server:<br />
<strong>Polycom</strong>, Inc. 11
<strong>Polycom</strong> <strong>ReadiManager</strong> <strong>Operations</strong> <strong>Guide</strong><br />
a Select System Setup > Server Settings > Database and select the<br />
correct database. (If you fail to point the server to the correct database,<br />
you will have to re-enter the license whenyou change databases.)<br />
b Select System Setup > Server Setup > Licenses.<br />
c Enter the activation key code for the primary server into the Add New<br />
License > Activation Key field and click Add.<br />
The license number appears in the list and the number of active<br />
licenses is updated.<br />
d Select System Setup > Server Settings > Redundant Configuration.<br />
and click Switch Server Role.<br />
The system fails over to the redundant server.<br />
3 On the redundant server:<br />
a Log into the <strong>ReadiManager</strong> system using the virtual IP address, and<br />
select System Setup > Server Setup > Licenses.<br />
b Enter the activation key code for the redundant server into the Add<br />
New License > Activation Key field and click Add.<br />
c Select System Management > Dashboard > Restart to reboot the<br />
system.<br />
The system fails over to the primary server.<br />
Configure an External Database<br />
Configure an LDAP Connection<br />
If during First Time Setup you did not configure your <strong>ReadiManager</strong> system<br />
to use an external Microsoft SQL Server database, but wish to do so now, see<br />
“Integrate the <strong>ReadiManager</strong> System with an External Database” on page 183.<br />
Note<br />
You can create the <strong>ReadiManager</strong> system databases manually using Microsoft<br />
SQL scripts. Contact <strong>Polycom</strong> Global Services to request the creation scripts.<br />
If during First Time Setup you did not configure your <strong>ReadiManager</strong> system<br />
to use an LDAP directory, but wish to do so now, see “Integrate the<br />
<strong>ReadiManager</strong> System with an LDAP Server” on page 184.<br />
12 <strong>Polycom</strong>, Inc.
Set Up Directory Services<br />
<strong>ReadiManager</strong> System Configuration<br />
Directory services provide information about all users, devices, and resources<br />
on your video communication network.<br />
To set up <strong>ReadiManager</strong> directory services, complete the following tasks:<br />
1 Register devices.<br />
You must set the gatekeeper or Global Directory Server (GDS) to point to<br />
the <strong>ReadiManager</strong> system IP address or DNS name. Use the same IP<br />
address to prevent data inconsistencies.<br />
Most endpoint information is automatically populated in the<br />
<strong>ReadiManager</strong> system through the gatekeeper or GDS registration. You<br />
must review these devices in the <strong>ReadiManager</strong> Directory Setup screens<br />
and fill in missing information.<br />
You can also register endpoints to the directory from the Directory Setup<br />
screens. Make sure the endpoint is online before you register it.<br />
For devices that have registered automatically, you must assign options.<br />
The <strong>ReadiManager</strong> system provides one default device policy that is<br />
assigned to all devices. Review default settings and make any required<br />
changes.<br />
To select devices when scheduling conferences, you must first associate<br />
them with a user or conference room by editing the specific user or room<br />
settings.<br />
For more information, see “Device Overview” on page 51.<br />
2 Set up users and associate them with devices.<br />
Unless your <strong>ReadiManager</strong> system is integrated with an LDAP directory,<br />
you must enter all user information manually including device<br />
association. If your system is integrated with an LDAP directory, general<br />
user information (First Name, Last Name, UserID, Password, Email<br />
Address) is directly pulled from the directory and cannot be changed.<br />
However, you must still associate LDAP users with devices.<br />
For more information, see “Directory Setup <strong>Operations</strong>” on page 131.<br />
3 Set up rooms and associate them with devices.<br />
Unless your <strong>ReadiManager</strong> system is integrated with an LDAP directory<br />
that includes conference rooms, you must enter all room information<br />
manually including device association.<br />
For more information, see “Directory Setup <strong>Operations</strong>” on page 131.<br />
<strong>Polycom</strong>, Inc. 13
<strong>Polycom</strong> <strong>ReadiManager</strong> <strong>Operations</strong> <strong>Guide</strong><br />
Set Up Video Call Routing<br />
Set Up Conference Templates<br />
The video call routing setup includes the gatekeeper, site topology, dial plan,<br />
system services, gateway and MCU services, and bandwidth management.<br />
You can perform the following tasks:<br />
• Handle inbound ISDN calls and route them to correct endpoints.<br />
• Enable outbound IP- based calls.<br />
• Connect through a firewall using an SBC device.<br />
• Modify default policies system-wide by selecting a default policy group.<br />
• Allow or deny calls to and from unregistered endpoints (rogue calls).<br />
• Enable routing of H.323 calls to neighboring gatekeepers by adding new<br />
regions.<br />
• When you have a third-party MCU that registers with the gatekeeper<br />
using standard H.323 protocol, add gateway and MCU services manually.<br />
• Define new sites and inter-site links.<br />
• Add IP-to-ISDN call routing using least-cost routing.<br />
• Define one region for each neighboring gatekeeper.<br />
• Define a site for each physical location in which a LAN or an ISDN<br />
connection exists. If you use VPN connections, you can consolidate<br />
distinct physical locations into a single logical site to simplify<br />
management tasks.<br />
• For each site, define a set of subnets in which actual video endpoints are<br />
deployed.<br />
Note<br />
It is critical that you make sure the actual IP addresses used by the endpoints<br />
belong to only one subnet in a site.<br />
• Define least-cost routing tables only when you use the least-cost routing<br />
feature.<br />
• Customize default dialing rules.<br />
For more information, see “Dial Plan Setup” on page 203.<br />
The <strong>ReadiManager</strong> system uses conference templates and global conference<br />
settings to manage system and conference behavior.<br />
14 <strong>Polycom</strong>, Inc.
<strong>ReadiManager</strong> System Configuration<br />
The <strong>ReadiManager</strong> system has a Default Conference Template and default<br />
global conference settings. You may want to create additional templates with<br />
different settings or change the global conference settings.<br />
For more information, see “Conference Setup <strong>Operations</strong>” on page 143.<br />
<strong>Polycom</strong>, Inc. 15
<strong>Polycom</strong> <strong>ReadiManager</strong> <strong>Operations</strong> <strong>Guide</strong><br />
16 <strong>Polycom</strong>, Inc.
Scheduler Overview<br />
Schedule Conference View<br />
3<br />
This chapter describes how to log into and out of the <strong>ReadiManager</strong> ® system.<br />
It also describes the conference views, navigation, and commands.<br />
When you log into the <strong>ReadiManager</strong> system with Scheduler role and<br />
permissions, the Schedule Conf View appears. Use the Schedule Conf View<br />
to view and edit future conferences. The Schedule Conf View has these<br />
sections.<br />
Section Description<br />
Commands The context-sensitive set of available commands<br />
Conference List By default the conference list in the Schedule Conf View<br />
displays Future Only conferences, while the conference list<br />
in the Monitor Conf View displays Ongoing Plus<br />
conferences. Filter choices include:<br />
• Future Only - Displays scheduled conferences that<br />
have not yet started<br />
• Today Only - Displays scheduled conferences<br />
(completed, active, or future) for the current day and<br />
active ad hoc conferences<br />
• Custom Date - Displays scheduled conferences<br />
(completed, active, or future) for a selected day. Select<br />
the day from the calendar.<br />
• Ongoing Plus - Displays ongoing and future<br />
conferences for the day. You can further filter this<br />
request by Conference Name.<br />
<strong>Polycom</strong>, Inc. 17
<strong>Polycom</strong> <strong>ReadiManager</strong> <strong>Operations</strong> <strong>Guide</strong><br />
Monitor Conf View<br />
Conference Commands<br />
Section Description<br />
Conference List • Today Plus - Displays scheduled conferences<br />
(completed, active, or future) for the current day, current<br />
ad hoc conferences, and all future conferences. You can<br />
further filter this request by Conference Name.<br />
• Yesterday Plus - Displays completed scheduled<br />
conferences for yesterday and earlier. You can further<br />
filter this request by Conference Name.<br />
For information on filters, see “Filter and Search a List” on<br />
page 7.<br />
Conference Details Displays information about the conference selected in the<br />
Conference List<br />
Conference<br />
Features<br />
Bridge (MCU)<br />
Features<br />
Displays the status of the <strong>ReadiManager</strong> system features<br />
for the selected conference<br />
Displays the status of MCU features for the selected<br />
conference<br />
Participant Details Displays information about the participant selected in the<br />
Participants list<br />
Use the Monitor Conf View, available from the Conference menu, to monitor<br />
and manage ongoing conferences. The Monitor Conf View has the same<br />
sections as the Schedule Conf View but with the Ongoing Plus filter applied.<br />
Access these commands from the Commands section of both the Schedule<br />
Conf View and Monitor Conf View.<br />
Command When selected...<br />
Schedule Conf View Displays the Conference List - Schedule View in the main<br />
window. Use this view to work with future conferences.<br />
Monitor Conf View Displays the Conference List - Monitor View in the main<br />
window. Use this view to work with active conferences.<br />
Refresh View Updates the display with current information<br />
Add Conference Displays the Add Conference screen. Use this link to<br />
create a new audio and/or video conference<br />
18 <strong>Polycom</strong>, Inc.
Note<br />
Scheduler Overview<br />
By default the Schedule Conf View displays future conferences while the Monitor<br />
Conf View displays ongoing and future conferences for the day. You can use the<br />
Filter to customize views. For information on filters, see “Filter and Search a List”<br />
on page 7.<br />
The Commands section may also include these other context-sensitive<br />
commands depending on the type of conference selected:<br />
Command When selected...<br />
Future conferences<br />
Edit Conference Displays the Edit Conference screen for the conference<br />
selected in the Conference List. Use this command to edit<br />
the selected future conference. For information, see “Edit a<br />
Conference” on page 25.<br />
Future and past conferences<br />
Delete Conference Deletes the conference selected in the Conference List.<br />
Use this command to delete the selected past or future<br />
conference. For information, see “Delete a Conference” on<br />
page 25.<br />
Active conferences<br />
Manage<br />
Conference<br />
Terminate<br />
Conference<br />
Log Out of the <strong>ReadiManager</strong> System<br />
To log out of the <strong>ReadiManager</strong> system<br />
Displays the Manage Conference screen for the<br />
conference selected in the Conference List. Use this<br />
command to manage participants and devices in the<br />
selected active conference. For information, see “Manage<br />
an Active Conference” on page 28.<br />
Ends the selected conference. For information, see<br />
“Manage an Active Conference” on page 28.<br />
>> Click Log Out in the top-right corner of the screen.<br />
<strong>Polycom</strong>, Inc. 19
<strong>Polycom</strong> <strong>ReadiManager</strong> <strong>Operations</strong> <strong>Guide</strong><br />
20 <strong>Polycom</strong>, Inc.
4<br />
Conference Management <strong>Operations</strong><br />
Add a Conference<br />
This chapter describes how to schedule, edit, and manage conferences,<br />
participants, and rooms.<br />
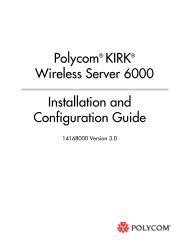
To add a new conference:<br />
1 Click Conference > Add Conference.<br />
Figure 4-1 Add New Conference screen<br />
2 In the Add Conference screen, enter a Conference Name and set a<br />
conference Start Date, Start Time, and either an End Time or Duration.<br />
3 To make the conference recurring:<br />
a Click Recurrence and in the Appointment Recurrence dialog box, set:<br />
<strong>Polycom</strong>, Inc. 21
<strong>Polycom</strong> <strong>ReadiManager</strong> <strong>Operations</strong> <strong>Guide</strong><br />
» Recurrence frequency (Daily, Weekly, or Monthly)<br />
» Recurrence range (Start date and End After occurrences or End<br />
by date)<br />
The maximum number of recurrences is 52.<br />
b Click OK.<br />
4 As necessary, set these conference features.<br />
a For an Audio Only conference, check and change the Conference<br />
Type.<br />
The Default Template changes to the default audio template.<br />
Note<br />
When you create an Audio Only conference, the conference is automatically<br />
identified as Dial-In and requires an MCU.<br />
b To select a template other than the default, click Default Template<br />
and select a template from the list.<br />
Notes<br />
• A meeting template is a collection of settings that the <strong>ReadiManager</strong> system<br />
stores. When you schedule a meeting, the Default Template is selected. If your<br />
<strong>ReadiManager</strong> system administrator created other templates for your use, you<br />
may select a different template to offer invitees a different meeting experience.<br />
• If you have advanced scheduler role and permissions, you see the Edit<br />
Conference Settings button. For information about advanced scheduler<br />
capabilities, see “Edit Advanced Conference Settings” on page 39.<br />
5 To add conference participants from the <strong>ReadiManager</strong> user list:<br />
a Enter all or part of a participant’s Last Name or First Name into one<br />
of the name fields and click Add Participants.<br />
The Add Participants dialog box appears with the list of participant’s<br />
names that meet your search criteria.<br />
Depending on the search domain, the search function may return<br />
different results. For information, see Filter and Search a List.<br />
b Select the participant’s name from the list.<br />
The participant’s name appears in the underlying Selected<br />
Participants and Rooms list.<br />
c Repeat steps a and b to add all domain participants and then click<br />
Close.<br />
6 To add guest participants (participants not available from the<br />
<strong>ReadiManager</strong> user list):<br />
a Click Add Guest.<br />
22 <strong>Polycom</strong>, Inc.
Conference Management <strong>Operations</strong><br />
b In the Add Guest dialog box:<br />
» Enter the participant’s Name and Email address. Note that the<br />
Email address field is ASCII only; for more information, see “Field<br />
Input Requirements” on page 7.<br />
» Select how the participant will join the conference.<br />
» For participants with audio endpoints, set the Dial Type setting to<br />
IP or ISDN as appropriate.<br />
» For participants with video endpoints, set the Bit Rate and Dial<br />
Options settings. (You can change the connection speed for an<br />
endpoint up to the maximum speed set by the conference<br />
template.)<br />
» If you select Dial Out, enter the participant’s number in the<br />
Number field.<br />
c Click OK.<br />
The guest participant’s name appears in the Selected Participants<br />
and Rooms list.<br />
d Repeat steps a through c to add all guest participants.<br />
7 Adjust the conference date and time as needed to match participant and<br />
device availability.<br />
a Review their availability and adjust the conference date and time as<br />
needed.<br />
Notes<br />
• The <strong>ReadiManager</strong> system is time-literal when scheduling conferences, which<br />
means you cannot overlap meeting times. For example, you cannot schedule a<br />
device for 9-10am and 10-11am since the device is required at 10am for both<br />
meetings.<br />
• For participants who are associated with devices, the <strong>ReadiManager</strong> system<br />
schedules their availability according to their device availability.<br />
• For participants with multiple devices, you must check the availability for each<br />
device. The Add Conference dialog box provides a participant device list to do<br />
this.<br />
b Edit their dial settings as needed by selecting the participant and<br />
clicking Edit. See step 5 on page 26.<br />
8 To add conference rooms to the Selected Participants and Rooms list:<br />
a Click Select Site.<br />
b Select a site from the site drop-down list.<br />
The conference room list for the selected site appears.<br />
<strong>Polycom</strong>, Inc. 23
<strong>Polycom</strong> <strong>ReadiManager</strong> <strong>Operations</strong> <strong>Guide</strong><br />
c Select a conference room from the list.<br />
The conference room name appears in the underlying Selected<br />
Participants and Rooms list.<br />
d Repeat steps b and c to add all required conference rooms and then<br />
click OK.<br />
9 Once you’ve added your participants, you can assign them leadership<br />
roles:<br />
a To assign an invitee as lecturer, in the Lecturer field select a<br />
participant’s name from the list.<br />
b To assign an invitee as video chairperson, in the Video Chairperson<br />
field select a participant’s name from the list.<br />
Notes<br />
• If the Lecturer or Video Chairperson features are not available, then the<br />
selected template does not support these features.<br />
• To be assigned Lecturer, a participant must have a manageable video device.<br />
10 When finished, click Schedule.<br />
The Conference Email Notification screen appears with a message<br />
indicating Conference Successfully Scheduled.<br />
11 To exit without sending an email to your invitees, click Skip Email.<br />
12 To send an email to your invitees, in the Conference Email Notification<br />
screen:<br />
a Copy additional people on the notification and/or add notes about<br />
the conference.<br />
b Click Send.<br />
Note that the To, CC, and BCC fields are ASCII only. For more<br />
information, see “Field Input Requirements” on page 7.<br />
The system sends the conference notification email. The Conference<br />
List - Schedule View appears. Your conference appears in the<br />
Conference List.<br />
24 <strong>Polycom</strong>, Inc.
Delete a Conference<br />
Edit a Conference<br />
Conference Management <strong>Operations</strong><br />
You can delete future or past conferences. You cannot delete active<br />
conferences.<br />
To delete a conference<br />
1 Click Conference > Schedule Conf View.<br />
2 To delete a past conference, select the appropriate filter (such as<br />
Yesterday Plus).<br />
3 From the Conference List, select the conference and click Delete<br />
Conference.<br />
If you select a recurring conference, a dialog box appears asking you if you<br />
want to delete just the conference you selected or all conferences in the<br />
series. Make the appropriate choice. Active conferences in the series are<br />
not deleted.<br />
4 Click Delete to confirm the deletion.<br />
The conference is deleted. For future conferences, the system emails the<br />
change to the conference owner and participants and releases the<br />
participant and room reservations.<br />
You can edit future scheduled conferences. You cannot edit active or past<br />
conferences.<br />
Note<br />
Once a conference is scheduled, editing the conference and selecting a different<br />
template does not change the conference settings. The <strong>ReadiManager</strong> system<br />
does not store the template as part of the conference information, only the settings<br />
selected when the conference was created. To use a different template, you must<br />
delete and recreate the conference.<br />
To edit a future conference<br />
1 Click Conference > Schedule Conf View.<br />
2 From the Conference List, select the conference of interest and click Edit<br />
Conference.<br />
3 If you select a recurring conference, a dialog box appears asking if you<br />
want to edit all conferences in the series or just the selected one. Make the<br />
required choice and click Edit.<br />
<strong>Polycom</strong>, Inc. 25
<strong>Polycom</strong> <strong>ReadiManager</strong> <strong>Operations</strong> <strong>Guide</strong><br />
The Edit Conference window appears. Except for the title, it is just like the<br />
Add Conference screen.<br />
4 If you used a template other than the default when you created the<br />
conference, reapply the template.<br />
5 Make the required changes to the conference dates, participants, rooms,<br />
or other settings. For information on performing these tasks, see “Add a<br />
Conference” on page 21.<br />
6 When finished, click Schedule.<br />
The Conference Email Notification screen appears with a message<br />
indicating Conference Successfully Scheduled.<br />
7 To exit without sending an updated email to your invitees, click Skip<br />
Email.<br />
8 To send an updated email to your invitees, in the Conference Email<br />
Notification screen:<br />
a Copy additional people on the notification and/or add notes about<br />
the conference.<br />
b Click Send.<br />
Note that the To, CC, and BCC fields are ASCII only. For more<br />
information, see “Field Input Requirements” on page 7.<br />
The <strong>ReadiManager</strong> system changes required resources as needed.<br />
The Conference List - Schedule View appears.<br />
Edit a Participant’s Endpoint Settings<br />
You can edit the dial settings for a participant’s endpoint for future scheduled<br />
conferences. You cannot edit the dial settings for a participant’s endpoint for<br />
an active conference.<br />
To edit a participant’s endpoint settings<br />
1 Click Conference > Schedule Conf View.<br />
2 From the Conference List, select the conference of interest and click Edit<br />
Conference.<br />
3 If you select a recurring conference, a dialog box appears asking if you<br />
want to edit all conferences in the series or just the selected one. Make the<br />
required choice and click Edit.<br />
4 In the Edit Conference screen, select the participant of interest from the<br />
Selected Participants and Rooms list and click Edit.<br />
5 In the Edit Participant Settings dialog box, edit the participant’s settings<br />
as required.<br />
26 <strong>Polycom</strong>, Inc.
Edit a Room’s Endpoint Settings<br />
Conference Management <strong>Operations</strong><br />
— The participant’s endpoint, if the participant has more than one<br />
available<br />
— Select how the participant will join the conference.<br />
— For participants with audio endpoints, set the Dial Type setting to IP<br />
or ISDN as appropriate.<br />
— For participants with video endpoints, set the Bit Rate and Dial<br />
Options settings. (You can change the connection speed for an<br />
endpoint up to the maximum speed set by the conference template.)<br />
— If you select Dial Out, enter the participant’s number in the Number<br />
field.<br />
6 Click OK.<br />
You can edit the dial settings for a room’s video endpoint for future scheduled<br />
conferences. The changes apply only for the selected conference.<br />
To edit a room’s dialing settings<br />
1 Click Conference > Schedule Conf View.<br />
2 Select the conference of interest and click Edit.<br />
3 If you select a recurring conference, a dialog box appears asking if you<br />
want to edit all conferences in the series or just the selected one. Make the<br />
required choice and click Edit.<br />
4 In the Edit Conference screen, select the room of interest from the<br />
Selected Participants and Rooms list and click Edit.<br />
5 In the Edit Room Settings dialog box, edit the room settings as required.<br />
You can edit:<br />
— The room’s endpoint, if the room has more than one available<br />
— Select how the room will connect to the conference.<br />
— For rooms with audio endpoints, set the Dial Type setting to IP or<br />
ISDN as appropriate.<br />
— For rooms with video endpoints, set the Bit Rate and Dial Options<br />
settings. (You can change the connection speed for an endpoint up to<br />
the maximum speed set by the conference template.)<br />
— If you select Dial Out, enter the number for the room’s endpoint in the<br />
Number field.<br />
6 Click OK.<br />
<strong>Polycom</strong>, Inc. 27
<strong>Polycom</strong> <strong>ReadiManager</strong> <strong>Operations</strong> <strong>Guide</strong><br />
Manage an Active Conference<br />
The Manage Conference screen provides a detailed view of a single active<br />
conference. From the Manage Conference screen you may use these<br />
context-sensitive commands:<br />
Command Select...<br />
Terminate<br />
Conference<br />
To end a conference when:<br />
• Bandwidth or devices are required for another<br />
conference<br />
• The conference was cancelled<br />
• The conference ended early<br />
• Technical difficulties occur that you cannot resolve<br />
Extend Conference To extend a conference. You can do so several times,<br />
provided the resources are available. The time limit per<br />
extension is three hours.<br />
Change Layout To change the video mode layout for active video<br />
conferences being hosted on an MCU.<br />
The initial video mode layout for a conference is<br />
determined when the conference is scheduled. On<br />
MCU-hosted conferences:<br />
• If the initial video mode setting for the active conference<br />
was Switching, you cannot change the video mode<br />
layout.<br />
• If the initial video mode setting for the active conference<br />
was Continuous Presence, then three Quad View<br />
video layouts are disabled and 21 Classic layouts are<br />
enabled.<br />
• If the initial video mode setting for the active conference<br />
was any type of Continuous Presence, then you can<br />
also select Automatic Layout, and the system will use<br />
the number of participants to determine the number of<br />
panels.<br />
Add Participant To add/reserve domain or local dial-out participants and<br />
guest participants to an active conference. Available when<br />
the conference is hosted on an MCU and is not an<br />
audio-only conference.<br />
Add Room To add/reserve domain or local rooms to an active<br />
conference. Available when the conference is hosted on an<br />
MCU and is not an audio-only conference.<br />
28 <strong>Polycom</strong>, Inc.
Conference Management <strong>Operations</strong><br />
To manage an active conference<br />
1 Click Conference > Monitor Conf View.<br />
2 From the Conference List, select the active conference of interest and<br />
click Manage.<br />
The Manage Conference screen appears displaying the Participants list.<br />
Figure 4-2 Manage Conference screen<br />
3 To end the conference:<br />
a Click Terminate Conference.<br />
A Confirm Active Conference Termination dialog box appears<br />
asking you to confirm the termination.<br />
b Click Terminate.<br />
4 To extend the conference:<br />
a Click Extend Conference.<br />
b From the Extend Conference dialog box, click the time menu and<br />
select the number of minutes by which to extend the conference.<br />
c Click Update.<br />
5 To add additional conference participants from within your system<br />
domain:<br />
a Click Add Participant.<br />
b In the Add Participants dialog box, enter all or part of a participant’s<br />
Last Name or First Name into one of the name fields and click Search.<br />
The list of participant’s that meet your search criteria appears. See<br />
Filter and Search a List.<br />
<strong>Polycom</strong>, Inc. 29
<strong>Polycom</strong> <strong>ReadiManager</strong> <strong>Operations</strong> <strong>Guide</strong><br />
c Select the participant’s name from the list.<br />
The participant’s name appears in the underlying New Conference<br />
Participants list.<br />
d Repeat steps a through c to add all domain participants and then click<br />
Close.<br />
e If necessary, edit the new participants’ dial settings. See “Edit a<br />
Participant’s Endpoint Settings” on page 26.<br />
f To dial out to the new participants, click Connect New Participants.<br />
Note<br />
Dial Out is the only Dial Option the system allows for active conferences.<br />
6 To add additional conference participants from outside your system<br />
domain:<br />
a Click Add Participant.<br />
b In the Add Participants dialog box, click Add Guest.<br />
c In the Add Guest dialog box, enter:<br />
» The guest’s Name.<br />
» Select how the guest will join the conference.<br />
» For guests with video endpoints, set the Bit Rate and Dial Type<br />
settings. (You can change the connection speed for an endpoint up<br />
to the maximum speed set by the conference template.)<br />
» Enter the guest’s endpoint number.<br />
d Click OK.<br />
The participant’s name appears in the underlying New Conference<br />
Participants list.<br />
e Repeat steps b through d to add all guest participants.<br />
f Click Close.<br />
The guest participant’s name appears in the underlying New<br />
Conference Participants list.<br />
g If necessary, edit the new participants’ dial settings. See “Edit a<br />
Participant’s Endpoint Settings” on page 26.<br />
h To dial out to the new guest participants, select them from the list and<br />
click Connect New Participants.<br />
Note<br />
Dial Out is the only Dial Option the system allows for active conferences.<br />
30 <strong>Polycom</strong>, Inc.
Conference Management <strong>Operations</strong><br />
7 To change the layout for the conference:<br />
a Click Change Layout.<br />
b From the Choose Video Mode dialog box, select the desired<br />
conference layout. For more information about video mode, see “Edit<br />
Advanced Conference Settings” on page 39.<br />
c Click Update.<br />
Manage a Participant Device During a Conference<br />
The Manage Conference screen (Figure 2-2 on page 13) also allows you to<br />
manage conference participant’s endpoints. Essentially, you become the<br />
conference moderator.<br />
From the Participant List on the Manage Conference screen, you may use<br />
these context-sensitive commands:<br />
Command Select...<br />
Mute/Unmute<br />
participant<br />
Connect/Disconnect<br />
participant<br />
To mute and unmute the sound to a conference for a<br />
registered participant. The audio icon shows the current<br />
status of this setting. This icon appears only when the<br />
conference is running on an external MCU<br />
To disconnect and reconnect the device associated with a<br />
participant. Disconnected participants and their devices are<br />
still associated with the conference and are not available<br />
for other conferences.<br />
Remove participant To remove a participant from the conference participant list<br />
at which time the participant becomes available for another<br />
conference<br />
Send message (Users with administrator or operator permissions only)<br />
To send a message to a participant’s registered <strong>Polycom</strong><br />
endpoints. The message appears briefly on the monitor for<br />
the selected video endpoint.<br />
Acknowledge help (Users with administrator or operator permissions only)<br />
To acknowledge a request for help and send a message to<br />
the requesting endpoint<br />
Notes<br />
• These context-sensitive commands only appear when the participant’s endpoint<br />
supports the action.<br />
• These commands work for rooms on the participant list as well.<br />
<strong>Polycom</strong>, Inc. 31
<strong>Polycom</strong> <strong>ReadiManager</strong> <strong>Operations</strong> <strong>Guide</strong><br />
To manage a participant’s device<br />
1 Click Conference > Monitor Conf View.<br />
2 From the Conference List, select a conference to manage and click<br />
Manage.<br />
The Manage Conference screen appears (Figure 2-2 on page 14)<br />
displaying the Participants list.<br />
3 From the Participants List, select a participant to manage.<br />
4 To mute or unmute a participant’s endpoint:<br />
a Select a participant from the Participant list.<br />
b Click the available command Mute Participant or Unmute<br />
Participant, depending on the participant’s current state.<br />
The participant’s state changes.<br />
5 To connect or disconnect a participant:<br />
a Select a participant from the Participant list.<br />
b Click the available command Connect Participant or Disconnect<br />
Participant, depending on the participant’s current state.<br />
The participant’s state changes.<br />
6 To remove a participant from the conference:<br />
a Click Remove Participant.<br />
A Confirm Removal of Participant dialog box appears asking you to<br />
confirm the removal.<br />
b Click the appropriate box.<br />
If you click Remove, the participant is disconnected from the<br />
conference and removed from the Participant list. If you click Do Not<br />
Remove, the participant remains in the Participant list.<br />
7 To send a message to a participant’s endpoint:<br />
a Click Send Message.<br />
A Send Message dialog box appears.<br />
b Type the message to send.<br />
c Click Send.<br />
The message is sent to the endpoint’s screen.<br />
32 <strong>Polycom</strong>, Inc.
Conference Management <strong>Operations</strong><br />
8 To acknowledge a participant’s request for help:<br />
a Click Acknowledge Help.<br />
A Send Message dialog box appears.<br />
b Type a message to send to the device to acknowledge the help request.<br />
c Click Send.<br />
The message is sent to the endpoint’s screen.<br />
d Click Close.<br />
<strong>Polycom</strong>, Inc. 33
<strong>Polycom</strong> <strong>ReadiManager</strong> <strong>Operations</strong> <strong>Guide</strong><br />
34 <strong>Polycom</strong>, Inc.
Advanced Conference Settings<br />
Advanced Conference Settings<br />
5<br />
This chapter describes how a user with advanced scheduler permissions can<br />
edit some conference settings.<br />
You can overwrite certain conference template settings as described here.<br />
However, be careful when doing so. If you have an environment with mixed<br />
MCU types (e.g., with both MGC and RMX 2000 devices), and the conference<br />
you schedule lands on the RMX 2000 platform, some of the settings you<br />
specify here may be overridden by the RMX profile. See Table 5-1.<br />
Notes<br />
Setting Description<br />
• A profile is a collection of advanced conference settings that reside on the MCU<br />
(MGC or RMX). Only an RMX profile can override conference template settings.<br />
For more information about conference templates, profiles, and your<br />
conferencing configuration, contact your <strong>ReadiManager</strong> administrator.<br />
• Two conferences scheduled with the same template may have different settings<br />
and behavior if they land on different types of MCUs. You can minimize or<br />
eliminate such differences by ensuring that all MCUs are similarly configured<br />
and that all <strong>ReadiManager</strong> templates are synchronized with RMX profiles.<br />
Table 5-1 Advanced Conference Settings<br />
Conference Password The system assigns a four-digit Conference Password and provides this<br />
password to participants within the content of the conference notification email.<br />
You can change this password to another four-digit number.<br />
<strong>Polycom</strong>, Inc. 35
<strong>Polycom</strong> <strong>ReadiManager</strong> <strong>Operations</strong> <strong>Guide</strong><br />
Setting Description<br />
Table 5-1 Advanced Conference Settings<br />
Enable Chairperson You can select a video chairperson to control the conference from his or her video<br />
endpoint. The video chairperson must have a video endpoint and Chairperson<br />
conferences require an MCU.<br />
Notes<br />
• If the conference template has the Conference Requires Chairperson<br />
parameter enabled, then Enable Chairperson is automatically selected and<br />
cannot be changed.<br />
• If a conference is scheduled on an RMX2000 MCU and the RMX profile has<br />
Conference Requires Chairperson selected but the template does not, and<br />
the conference is scheduled without a chairperson, then all users will be stuck<br />
in the waiting room and will not be able to join the conference.<br />
Chairperson Password If Enable Chairperson is selected, the chairperson must enter this four-digit<br />
password at their endpoint to assume control.<br />
The system sends a separate email with this password to the video chairperson. It<br />
is not included in the conference notification email.<br />
Dial Options You have three options:<br />
• To create a conference for which dial information and a PIN code are assigned<br />
to all conference participants, use the Dial-In setting. This setting allows any<br />
audio or video endpoint to dial in, and all participants can connect to the same<br />
conference on the MCU.<br />
• To dial out to all participants in the conference, use the Dial-Out setting.<br />
• To allow participants both options, select Dial-In+Dial-Out.<br />
Note<br />
When you change a conference from Dial-In to Dial In+Dial Out, the selected<br />
resources remain set to Dial-In. You must change them manually.<br />
Always Use MCU This setting forces the conference to an MCU and prevents video endpoints from<br />
connecting to each other directly. This setting is automatically selected and cannot<br />
be changed when Audio Only is the conference type or when Enable<br />
Chairperson is selected.<br />
36 <strong>Polycom</strong>, Inc.
Setting Description<br />
Table 5-1 Advanced Conference Settings<br />
Advanced Conference Settings<br />
Video Mode Determines the initial screen layout on an endpoint's monitor for a multipoint<br />
conference that requires an MCU. The options are:<br />
• Switching. Indicates that the display changes each time the speaker<br />
•<br />
changes, and everyone sees the current speaker.<br />
Continuous Presence. Displays several panels on the screen, each showing<br />
a different participant, and allows you to see all meeting participants at once.<br />
You can select a specific layout, with a certain number of windows open.<br />
• Automatic Layout is a continuous presence layout, in which the number of<br />
participants determines the number of panels.<br />
Bit Rate Specifies the maximum connection speed for endpoints in the conference.<br />
Individual endpoints that specify a lower connection speed connect at that lower<br />
speed. Endpoints that specify a higher connection speed connect at the speed<br />
identified in the conference template.<br />
If you select a higher speed than an endpoint can support, the speed for that<br />
endpoint is reduced; however, the conference uses the default connection speed<br />
for endpoints that can match it. If you place the calls through an endpoint with an<br />
embedded MCU, the behavior depends on the capabilities of that device.<br />
When the dial speed is higher than the number of channels defined in the H.320<br />
service for the endpoint, you receive a warning. To continue, lower the dial speed to<br />
less than or equal to the ISDN capability of the endpoint.<br />
Higher speed is important for high-quality video in a meeting. Because higher<br />
speeds use greater bandwidth, scheduling a high-bandwidth meeting may limit the<br />
number of conferences that you can reserve at one time.<br />
Note<br />
The bit rate can be set at the network level, the device level, and the conference<br />
level. If there is a discrepancy between these bit rate settings, the system<br />
implements the lowest bit rate setting. The only exception, is that the bit rate in the<br />
RMX profile takes precedence over the bit rate in the conference settings.<br />
<strong>Polycom</strong>, Inc. 37
<strong>Polycom</strong> <strong>ReadiManager</strong> <strong>Operations</strong> <strong>Guide</strong><br />
Setting Description<br />
Table 5-1 Advanced Conference Settings<br />
People + Content Controls the ability for one endpoint to send two types of data—a data stream and a<br />
video stream—over the same bandwidth to display people and content. The<br />
receiving endpoint handles the two video streams differently and may display on<br />
separate screens or through the video switching mode.<br />
Endpoints that do not support the selected method connect with either video<br />
through IP or audio only through ISDN.<br />
Select from these available settings:<br />
• None. Select this option when dual data streams are not required.<br />
• People +Content. This enables the industry standard H.239 dual streams for<br />
endpoints that support H.239 or the <strong>Polycom</strong> proprietary People+Content dual<br />
streams for older <strong>Polycom</strong> endpoints without H.239 capabilities.<br />
• People and Content VO. This <strong>Polycom</strong> proprietary technology works with<br />
PictureTel endpoints. Select this option for older endpoints.<br />
• Visual Concert PC. Select this option for use with <strong>Polycom</strong> ViewStation<br />
MP/512/SP/323 endpoints.<br />
• Visual Concert FX. Select this option for use with <strong>Polycom</strong> ViewStation FX/EX<br />
and VS4000 endpoints.<br />
• Duo Video. This setting supports IP and ISDN and is available with Tandberg<br />
endpoints, in which one part of the conference is set as the video conference<br />
and the other as the presentation conference.<br />
Note<br />
The MCU requires that conferences with People + Content use a minimum speed<br />
of 192 K.<br />
T.120 Mode Selects the protocols and specifications for multipoint data communication.<br />
From the T.120 menu, select the speed for the T.120 connection. See your IT<br />
department to determine the best combinations for your conferences. To disable<br />
the T.120 mode, select None.<br />
If you select T.120, these options may be available, according to the participant’s<br />
endpoint and software:<br />
• Application Sharing. Allows two or more participants to work on the same<br />
document or application, even when only one participant has the application. In<br />
application sharing, one participant launches the application, and it runs<br />
simultaneously on all other computers.<br />
• File Transfer. Enables participants to send files to each other.<br />
• Chat or Whiteboard. Allows participants to communicate with each other by<br />
writing.<br />
In all of these modes, participants can view and hear each other.<br />
Note<br />
This setting applies to MGC-hosted conferences only.<br />
38 <strong>Polycom</strong>, Inc.
Edit Advanced Conference Settings<br />
Advanced Conference Settings<br />
You can edit conference settings only for scheduled conferences. You cannot<br />
edit conference settings for active conferences.<br />
To edit the conference settings<br />
1 When you add a conference or edit a scheduled conference, on the<br />
Conference Resources tab, click Edit Conference Settings.<br />
2 As required, edit the conference settings. The settings that you can edit<br />
depend on the template selected.<br />
3 Click OK.<br />
<strong>Polycom</strong>, Inc. 39
<strong>Polycom</strong> <strong>ReadiManager</strong> <strong>Operations</strong> <strong>Guide</strong><br />
40 <strong>Polycom</strong>, Inc.
Conference and Participant Fields<br />
Conference List<br />
This chapter lists the <strong>ReadiManager</strong> field names and descriptions for<br />
reference. It includes these topics:<br />
• Conference List<br />
• Conference Details<br />
• Conference Features<br />
• Bridge (MCU) Features<br />
• Participants<br />
• Participant Details<br />
• Participant Settings<br />
• Participant Settings<br />
The Conference List has these fields.<br />
Table 6-1 Fields of the Conference List<br />
Section Description<br />
Status The state of the conference. Possible values include:<br />
• Conference ending<br />
• Active<br />
• Active with alerts<br />
• Completed<br />
• Declined<br />
• Future<br />
6<br />
<strong>Polycom</strong>, Inc. 41
<strong>Polycom</strong> <strong>ReadiManager</strong> <strong>Operations</strong> <strong>Guide</strong><br />
Conference Details<br />
Table 6-1 Fields of the Conference List<br />
Section Description<br />
Type The type of conference. Possible values include:<br />
• Audio Only<br />
• Video<br />
• Recurring<br />
Conference Name The name assigned to the conference when it was created<br />
Start Time For a scheduled conference, the start date and time of the<br />
conference and the time difference between the local time<br />
and the standard time.<br />
For an unscheduled conference, the date and time the<br />
conference started.<br />
Owner The name of the person who created the conference. As a<br />
scheduler, you only see the conferences you own.<br />
Actions The actions you can perform on the conference. Possible<br />
buttons include:<br />
• Delete<br />
• Edit<br />
• Manage<br />
The Conference Details section has these fields.<br />
Table 6-2 Fields of the Conference Details section<br />
Section Description<br />
Owner The name of the person who created the conference.<br />
Schedulers only see the conferences they own.<br />
Not applicable for ad hoc conferences.<br />
Start Date/Time For a scheduled conference, the start date and time of the<br />
conference and the time difference between the local time<br />
and the standard time.<br />
For an unscheduled conference, the date and time the<br />
conference started.<br />
Duration For a scheduled conference, how long the conference is<br />
scheduled to last.<br />
For a completed conference, how long the conference<br />
actually lasted.<br />
End Date/Time The date and time the conference ended<br />
42 <strong>Polycom</strong>, Inc.
Table 6-2 Fields of the Conference Details section<br />
Section Description<br />
Conference and Participant Fields<br />
Type The type of conference. Possible values include:<br />
• Audio<br />
• Audio-Video<br />
Status The state of the conference. Possible values include:<br />
• Active<br />
• Declined<br />
• Finished<br />
• Future<br />
Recurring Whether or not the conference was scheduled as a<br />
recurring conference<br />
Connection Connection information about the conference. Possible<br />
values include:<br />
• Multipoint<br />
• Point To Point<br />
• Gateway<br />
Bit Rate The rate (in kbps) at which to transfer the conference audio<br />
or video data<br />
Schedule ID System-assigned ID used for troubleshooting<br />
Conf Monitoring ID System-assigned ID used for troubleshooting<br />
Video Layout The video layout for the conference: Continuous Presence<br />
or Video Switching.<br />
Video Format For a conference hosted on an MCU, the video format of the<br />
conference data stream. Possible values include:<br />
• Auto<br />
• CIF<br />
• QCIF<br />
• 4CIF<br />
• 16CIF<br />
• VGA<br />
• SVGA<br />
• XGA<br />
• NTSC<br />
Video Protocol For a conference hosted on an MCU, the video protocol of<br />
the conference data stream. Possible values include:<br />
• Auto<br />
• H.261<br />
• H.263<br />
• H.264<br />
<strong>Polycom</strong>, Inc. 43
<strong>Polycom</strong> <strong>ReadiManager</strong> <strong>Operations</strong> <strong>Guide</strong><br />
Conference Features<br />
Table 6-2 Fields of the Conference Details section<br />
Section Description<br />
Audio Algorithm For a conference hosted on an MCU, the audio<br />
compression ratio of the conference data stream. Possible<br />
values are:<br />
• AUTO<br />
• G.711<br />
• G.722<br />
• Siren 7 (16 kbps)<br />
• Siren 14 (24 kbps)<br />
• Siren 14 (32 kbps)<br />
• Siren 14 (48 kbps)<br />
See the device documentation for more information.<br />
The Conference Features section has these fields.<br />
Table 6-3 Fields of the Conference Features section<br />
Section Description<br />
Conference<br />
Password<br />
Chairperson<br />
Required<br />
Chairperson<br />
Password<br />
The conference password, which is assigned either by the<br />
system or the scheduler<br />
Whether or not the conference requires a chairperson<br />
The password the chairperson must enter. Not applicable<br />
when no chairperson is designated.<br />
Chairperson The name of the chairperson. Not applicable when no<br />
chairperson is designated.<br />
Lecture Mode The type of Lecture Mode, if any, that was selected when<br />
the conference was created. Possible values are:<br />
• None<br />
• Presentation<br />
Lecturer The name of the lecturer. Not applicable when Lecture<br />
Mode is None.<br />
Lecture View<br />
Switching<br />
Indicates whether or not automatic switching between<br />
participants is enabled<br />
44 <strong>Polycom</strong>, Inc.
Table 6-3 Fields of the Conference Features section<br />
Section Description<br />
Dual Stream Mode Possible values are:<br />
• None<br />
• People+Content<br />
• Duo Video<br />
• Visual Concert PC<br />
T120 Rate Possible values are:<br />
• None<br />
• HMLP - Var<br />
• HMLP - 384<br />
• HMLP - 320<br />
• HMLP - 256<br />
• HMLP - 192<br />
• HMLP - 128<br />
• HMLP - 6.4<br />
• HMLP - 62.4<br />
• HMLP - 14.4<br />
• MLP - Var<br />
• MLP - 64.4<br />
Conference and Participant Fields<br />
• Visual Concert FX<br />
• Unknown<br />
• MLP - 62.4<br />
• MLP - 46.4<br />
• MLP - 40<br />
• MLP - 38.4<br />
• MLP - 32<br />
• MLP - 30.4<br />
• MLP - 24<br />
• MLP - 22.4<br />
• MLP - 16<br />
• MLP - 14.4<br />
• MLP - 6.4<br />
• MLP - 4<br />
End Time Alert Whether or not the system alerts participants to the end of<br />
the conference by playing an end tone<br />
Entry Tone Whether or not an entry tone is played to all connected<br />
participants when a participant joins the conference<br />
Exit Tone Whether or not an exit tone is played to all connected<br />
participants when a participant disconnects from the<br />
conference<br />
<strong>Polycom</strong>, Inc. 45
<strong>Polycom</strong> <strong>ReadiManager</strong> <strong>Operations</strong> <strong>Guide</strong><br />
Bridge (MCU) Features<br />
The Bridge (MCU) Features section, which applies only for conferences that<br />
use an MCU, has these fields.<br />
Table 6-4 Fields of the Bridge (MCU) Features section<br />
Section Description<br />
MCU Name The MCU device name hosting the conference. Not<br />
applicable when the conference is not being hosted on an<br />
MCU.<br />
Numeric ID The unique conference identifier assigned by the MCU<br />
Entry Queue<br />
Access<br />
Whether or not the conference has an entry queue enabled<br />
Note<br />
The <strong>ReadiManager</strong> system enables entry queues on a per<br />
MGC basis and all conferences on an entry queue enabled<br />
MGC will be scheduled with entry queue access.<br />
Meet Me per Conf Whether or not the a conference is a Meet Me conference,<br />
for which a dial-in number is assigned, so that undefined<br />
participants can connect to the conference<br />
Conference on Port (MGC only) Indicates whether or not the MGC is set to<br />
Conference on Port, which conserves bandwidth and ports.<br />
In this case, all participants are on a single video port and<br />
use the same connection speed and video format.<br />
Message Service<br />
Type<br />
Message Service<br />
Name<br />
Displays the type of messages participants joining the<br />
conference hear. Possible values are:<br />
• None<br />
• Welcome (No wait)<br />
• Attended (Wait)<br />
• IVR<br />
Name on the MCU of the Message Service. So, for<br />
example, a service name IVR70 which provides the IVR<br />
service<br />
46 <strong>Polycom</strong>, Inc.
Participants<br />
Participant Details<br />
The Participants section has these fields.<br />
Table 6-5 Fields of the Participants section<br />
Section Description<br />
Name The participant’s name<br />
The Participant Details section has these fields.<br />
Conference and Participant Fields<br />
Call Info How the participant joined the call. Possible values include:<br />
• Video Dial-Out<br />
• Audio Dial-In@<br />
• Video Dial-In@<br />
• In Person<br />
• Room Only<br />
Table 6-6 Fields of the Participant Details section<br />
Section Description<br />
Name The participant’s name<br />
Type The type of conference connection. Possible values<br />
include:<br />
• Audio Only<br />
• Audio-Video<br />
• Other (for In Person and Room Only participants)<br />
Device Name The name assigned to the participant’s endpoint when<br />
added to the system<br />
Connection Status The state of the participant’s endpoint connection. Possible<br />
values include:<br />
• Connected<br />
• Connecting<br />
• Declined<br />
• Disconnected<br />
• Disconnecting<br />
• Error<br />
• Unknown<br />
<strong>Polycom</strong>, Inc. 47
<strong>Polycom</strong> <strong>ReadiManager</strong> <strong>Operations</strong> <strong>Guide</strong><br />
Participant Settings<br />
Table 6-6 Fields of the Participant Details section<br />
Section Description<br />
Interface Type The interface protocol of the participant’s endpoint. Possible<br />
values include:<br />
• IP<br />
• ISDN<br />
Address The IP address or phone number of the participant’s<br />
endpoint (if a dial-out) or the participant’s port address on<br />
the MCU (if a dial-in)<br />
Bit Rate The audio or video data transfer rate (in kbps) of the<br />
participant’s endpoint<br />
The Participant Settings dialog box has these fields.<br />
Table 6-7 Fields of the Participant Settings dialog box<br />
Section Description<br />
Name The participant’s name<br />
Devices The participant’s managed device(s) if available<br />
Email The participant’s email address (ASCII only a ) for<br />
participants or guests without managed devices<br />
Type The type of participant. Possible values include:<br />
• Domain User<br />
• Local User<br />
• Domain Resource (a room)<br />
• Local Resource (a room)<br />
• Guest<br />
How will this<br />
participant join the<br />
conference?<br />
How the participant will join the conference. Possible values<br />
include:<br />
• In Person (requires no dial settings)<br />
• Room Only<br />
• Audio Only (Dial in)<br />
• Use Video<br />
48 <strong>Polycom</strong>, Inc.
Table 6-7 Fields of the Participant Settings dialog box<br />
Section Description<br />
Conference and Participant Fields<br />
Bit Rate The audio or video data transfer rate (in kbps) of the<br />
participant’s endpoint<br />
Dial Options Available only if the participant is joining via a video<br />
endpoint. Possible values include:<br />
• Dial-In<br />
• Dial-Out<br />
Dial Type The protocol the audio or video endpoint uses.<br />
a. For more information on field limitations, see “Field Input Requirements” on page 1-7.<br />
If you select a Dial Option of Dial-Out for a participant without a managed<br />
endpoint, the Participant Settings dialog box has these additional fields.<br />
Table 6-8 Fields of the Participant Settings dialog box<br />
Section Description<br />
Country (H.320 dial type only) The country to which the system will<br />
dial out to the participant<br />
Area/City Code (H.320 dial type only) The area code to which the system<br />
will dial out to the participant<br />
Number (H.323 and H.320 dial types) The participant’s phone<br />
number<br />
Use Modified Dial<br />
Number<br />
(H.320 dial type only) Click this check box to add a<br />
specific prefix to the participant’s phone number. The<br />
Number field becomes active<br />
Number (H.320 dial type only) The complete modified dial number<br />
as required to include PBX exit codes, dialing prefixes, or<br />
other installation-specific dial string requirements.<br />
<strong>Polycom</strong>, Inc. 49
<strong>Polycom</strong> <strong>ReadiManager</strong> <strong>Operations</strong> <strong>Guide</strong><br />
Manage Conference - Participants List<br />
The Manage Conference - Participants list has these fields.<br />
Table 6-9 Fields of the Manage Conference - Participant list<br />
Section Description<br />
Status The state of the participant’s connection. Possible states<br />
include:<br />
• Connected<br />
• Disconnected<br />
• Help request<br />
• Updating<br />
• New dial-in participant<br />
• New dial-out participant<br />
Type The type of conference. Possible values include:<br />
• Audio Only<br />
• Video<br />
• VIP<br />
Name The participant’s name<br />
Device The name assigned to the participant’s endpoint when it<br />
was added to the system<br />
Mute The state of the participant’s audio connection. Possible<br />
values include:<br />
• Muted by other<br />
• Self muted<br />
• Not muted<br />
Access The endpoint’s network interface type. Possible values<br />
include:<br />
• H323<br />
• ISDN<br />
Address The IP address or ISDN number of the participant’s<br />
endpoint (if a dial-out)<br />
Bit Rate The audio or video data transfer rate (in kbps) of the<br />
participant’s endpoint<br />
Dial Mode How the participant joined the call. Possible values include:<br />
• Dial-In<br />
• Dial-Out<br />
50 <strong>Polycom</strong>, Inc.
Device Overview<br />
The Device Views<br />
7<br />
This chapter provides an overview of the <strong>ReadiManager</strong> device management<br />
menu. It includes these topics:<br />
• The Device Views<br />
• The Device Commands<br />
• The Device List<br />
• Device Configuration<br />
• Device Passwords<br />
• Supported Third-Party Endpoints<br />
The <strong>ReadiManager</strong> system Device menu offers three different views of device<br />
information.<br />
• Admin/Monitor View. Use this view to add, monitor, and manage<br />
devices. By default, the Device List in this view lists all devices on the<br />
system, in alphanumeric order. The Device List in this view can be filtered<br />
by Type, Alerts, Connection Status, Name, IP Address, ISDN Video<br />
Number, Alias, or Site.<br />
• Provision View. Use this view to provision or push device settings to one<br />
or more devices at a time. By default, the Device List in this view lists only<br />
those devices registered to the system that can be provisioned remotely.<br />
Devices are filtered by device type (i.e., V-series, HD-series, Viewstation,<br />
and Viewstation FX & EX devices).<br />
• Softupdate View. Use this view to update the software on one or more<br />
devices at the same time. By default, the Device List in this view lists only<br />
those devices registered to the system that can be updated remotely.<br />
Devices are listed in alphanumeric order. The Device List in this view can<br />
be filtered by Type, Name, IP Address, ISDN Video Number, Alias, or<br />
Site.<br />
<strong>Polycom</strong>, Inc. 51
<strong>Polycom</strong> <strong>ReadiManager</strong> <strong>Operations</strong> <strong>Guide</strong><br />
The Device Commands<br />
Each device view has these sections.<br />
Table 7-1 Sections of the Device List<br />
Section Description<br />
Commands The context-sensitive set of commands available in the<br />
selected view for the selected device. For more information<br />
on these commands, see “The Device Commands”.<br />
Device List The device list and filters that are relevant to the selected<br />
view. Use the Filter to customize view.<br />
For more information on filters, see “Filter and Search a<br />
List” on page 4.<br />
Device Summary Displays detailed information about the device selected in<br />
the Device List<br />
Device Status Displays the status of the selected device<br />
Call Info Displays detailed information about the conference. Only<br />
populated when the selected device is in a conference.<br />
Device Alerts Displays any device errors or warning<br />
Provisioning Details Displays information about how and when the selected<br />
device was last provisioned<br />
SoftUpdate Details Displays information about how and when the device<br />
software was last updated<br />
These two commands are available from all three device views.<br />
Table 7-2 Device Navigation Commands<br />
Command Use this command to....<br />
Add Device Manually add a device to the <strong>ReadiManager</strong> system.<br />
For information about manually adding a device, see<br />
“Device Management <strong>Operations</strong>” on page 59.<br />
Refresh Device List Update the screen with current status<br />
52 <strong>Polycom</strong>, Inc.
Admin/Monitor View Commands<br />
Device Overview<br />
The Command section for the Admin/Monitor View may also include these<br />
context-sensitive commands:<br />
Table 7-3 Additional Device Commands - Admin/Monitor View<br />
Command Use this command to ...<br />
All device types<br />
View Device Details Display all of the Device Details for the selected device.<br />
Clear Help Clear help for the selected device on the <strong>ReadiManager</strong><br />
system.<br />
Edit Device Open the Edit Device dialog box and change connection<br />
settings for the selected device. Note that if this is a<br />
managed device, the device may overwrite settings entered<br />
manually.<br />
❑ Delete Device Delete the selected device or devices. To select devices for<br />
this operation, you must click the checkboxes for the<br />
device. You can delete multiple devices at one time.<br />
Manage User Open the Edit User dialog box and change information for<br />
the selected user. This command is applicable only when<br />
the user is associated with a device.<br />
Selected device types<br />
Manage Device Open the selected device’s management interface in a<br />
separate browser window. This command is not available<br />
for the following device types: MGC, GW/MCU, Tandberg,<br />
iPower, PVX, and Other.<br />
Send Message Open the Send Message dialog box and send a text<br />
message (ASCII only a , 100 characters maximum) to the<br />
selected device’s video screen. This command is not<br />
available for the following device types: MGC, RMX,<br />
GW/MCU, Tandberg, iPower, and Other.<br />
Reboot Device Reboot the selected device. This command is only available<br />
for H-series and V-Series with a Connection Status of<br />
Online.<br />
a. For more information on field limitations, see “Field Input Requirements” on page 7.<br />
For information about these device commands, see “Device Management<br />
<strong>Operations</strong>” on page 59.<br />
<strong>Polycom</strong>, Inc. 53
<strong>Polycom</strong> <strong>ReadiManager</strong> <strong>Operations</strong> <strong>Guide</strong><br />
Provision View Commands<br />
Softupdate View Commands<br />
The Command section for the Provision View may also include these<br />
context-sensitive commands:<br />
Table 7-4 Additional Device Commands - Provision View<br />
Command Use this command to ...<br />
❑ Provision Schedule provisioning for the selected device(s). To select<br />
devices, you must click the checkbox for the device.<br />
You can provision multiple devices of the same type at one<br />
time using the same provisioning profile.<br />
❑ Cancel Provision Cancel a previously scheduled provisioning operation. To<br />
select devices, you must click the checkbox for the device.<br />
You can cancel provisioning for multiple devices at one<br />
time. You cannot cancel device provisioning once it has<br />
started.<br />
❑ Clear Status Change the status column for a device to the Clear state<br />
For information about these device commands, see “Device Provisioning” on<br />
page 81.<br />
The Command section for the Softupdate View may also include these<br />
context-sensitive commands:<br />
Table 7-5 Additional Device Commands - Softupdate View<br />
Command Use this command to ...<br />
❑ Software Update Schedule software updates for the selected device(s). To<br />
select devices, you must click the checkbox for the device.<br />
You can update multiple devices of the same type at one<br />
time using the same softupdate profile.<br />
❑ Cancel Update Cancel a previously scheduled software update operation.<br />
To select devices, you must click the checkbox for the<br />
device.<br />
You can cancel software updates for multiple devices at one<br />
time. You cannot cancel a software update once it has<br />
started.<br />
❑ Clear Status Change the status column for a device to the Clear state<br />
For information about these device commands, see “Device Softupdate” on<br />
page 89.<br />
54 <strong>Polycom</strong>, Inc.
The Device List<br />
Device Overview<br />
The Device List provides a comprehensive list of all devices managed by the<br />
<strong>ReadiManager</strong> system, including those devices that are registered with the<br />
gatekeeper or directory services, and other devices that you add for<br />
monitoring.<br />
The Device List includes devices that registered automatically with the<br />
<strong>ReadiManager</strong> system and devices that were registered manually. The<br />
registration policy set in the System Setup > Gatekeeper Settings > Primary<br />
Gatekeeper screen determines whether devices automatically register with<br />
the system.<br />
• An open gatekeeper registration policy (All Endpoints) allows any device<br />
that can register with the <strong>ReadiManager</strong> system to do so automatically.<br />
With this policy, any device and the registration settings entered at the<br />
device automatically appear in the Device List. This setting is the default.<br />
• With a secure gatekeeper policy (Predefined Endpoints Only), devices<br />
are automatically added to the Device List via the Global Address Book.<br />
• With a moderately open registration policy (Endpoints in Defined Sites),<br />
devices at identified <strong>ReadiManager</strong> system sites may automatically<br />
register with the <strong>ReadiManager</strong> system.<br />
• You can also manually add devices that you want to manage, but which<br />
are not registered with the gatekeeper.<br />
Even when a device registers automatically with the <strong>ReadiManager</strong> system,<br />
you must enter some settings manually, such as Admin User ID and<br />
Password.<br />
If you have one or more MCUs, you must add a device record for each unit,<br />
even when you use the open gatekeeper policy for registration. This process<br />
creates a device record for the controller unit.<br />
Note<br />
In the Administrator View > List of Devices and Operator View > Device<br />
Monitoring screens, a <strong>ReadiManager</strong> system displays MCUs as two separate<br />
Device Types, the MCU type and a GW/MCU device. The GW/MCU designation<br />
represents the network interface.<br />
If automatic registration is allowed, individual H.323 cards/IP blades in the<br />
MGC automatically register separately and appear as GW/MCU devices. If<br />
automatic registration is not allowed, you must add a device record for each<br />
H.323 card and IP blade.<br />
<strong>Polycom</strong>, Inc. 55
<strong>Polycom</strong> <strong>ReadiManager</strong> <strong>Operations</strong> <strong>Guide</strong><br />
Device Configuration<br />
Device Passwords<br />
You can configure devices either through the device’s own management<br />
system or through the <strong>ReadiManager</strong> device management system.<br />
Configuration options in the <strong>ReadiManager</strong> system allow you to:<br />
• Associate a device with a policy group, which determines maximum bit<br />
rate and other settings related to call handling<br />
Note<br />
The bit rate can be set at the network level, the device level, and the conference<br />
level. If there is a discrepancy between these bit rate settings, the system<br />
implements the lowest bit rate setting. The only exception, is that the bit rate in the<br />
RMX profile takes precedence over the bit rate in the conference settings.<br />
• Make the device schedulable (or not)<br />
• Assign certain devices as VIP for monitoring<br />
• For <strong>Polycom</strong> MCUs, specify conference-related settings<br />
Note<br />
You can use use Provisioning to make configuration changes to those endpoints<br />
that support provisioning or you can make configuration changes at the device.<br />
<strong>ReadiManager</strong> can manage <strong>Polycom</strong> endpoints only when the password in the<br />
device record matches the password in the device. Matching passwords are<br />
required to:<br />
• Provision a device through <strong>ReadiManager</strong><br />
• Use the Softupdate feature<br />
• Monitor the device from the Device > Admin/Monitor View<br />
For security reasons, you must set a password at the endpoint first and then in<br />
the <strong>ReadiManager</strong> system. (The password field is ASCII only; for more<br />
information, see “Field Input Requirements” on page 7.)<br />
After you have entered the matching password in the <strong>ReadiManager</strong> system,<br />
you can update the password for certain devices through provisioning. In this<br />
case, you must instruct end-users not to change the password.<br />
Note<br />
Some companies select an administrative password that is used for all endpoints<br />
and regularly updated through provisioning.<br />
56 <strong>Polycom</strong>, Inc.
Device Overview<br />
For third-party devices, passwords are frequently required to access available<br />
device management software.<br />
For information about restrictions in changing passwords for a specific device,<br />
see the documentation for the device.<br />
Supported Third-Party Endpoints<br />
The <strong>ReadiManager</strong> system supports gatekeeper registration of the following<br />
third-party endpoints:<br />
• Sony PCS Version 03.00<br />
• Tandberg MXP Series Version F1.2 NTSC<br />
• Aethra Maia Starr Version 5.1.35<br />
• VCON (Galaxy and Vigo) Version 0202.M05.D28.H12<br />
• VTEL, all versions<br />
<strong>Polycom</strong>, Inc. 57
<strong>Polycom</strong> <strong>ReadiManager</strong> <strong>Operations</strong> <strong>Guide</strong><br />
58 <strong>Polycom</strong>, Inc.
Device Management <strong>Operations</strong><br />
View Device Details<br />
This chapter describes how to perform many device management tasks.<br />
• View Device Details<br />
• Add an Endpoint Manually<br />
• Add an MCU Manually<br />
• Edit a Device<br />
• Delete Devices<br />
• View a Device’s Video Feed<br />
• Clear a Device Help Request<br />
• Send a Message to a Device<br />
Device details may include the following information.<br />
Table 8-1 Fields of the Device List<br />
Field Description<br />
Identification<br />
8<br />
System Name The name of the device.<br />
• Device names must be unique.<br />
• The name must be in ASCII onlya and may have an<br />
unlimited number of characters. Spaces, dashes, and<br />
underscores are valid.<br />
• When retrieved from a video endpoint, the name is<br />
taken from the H.323 ID if the device registered with the<br />
gatekeeper and it is a third-party system. In other cases,<br />
it is the system name, which might be different than the<br />
H.323 ID.<br />
• For an MGC or RMX 2000 device, you must enter a<br />
device name.<br />
<strong>Polycom</strong>, Inc. 59
<strong>Polycom</strong> <strong>ReadiManager</strong> <strong>Operations</strong> <strong>Guide</strong><br />
Table 8-1 Fields of the Device List (continued)<br />
Field Description<br />
Device Type The type of device. Device types include:<br />
• ViewStation<br />
• ViewStation FX and EX<br />
• V-series<br />
• PVX<br />
• iPower<br />
• MGC<br />
• RMX<br />
• Tandberg<br />
• Other<br />
• GW/MCU<br />
• HD-Series<br />
Note<br />
H.323 cards and IP blades in <strong>Polycom</strong> MGCs are assigned<br />
the device type of Other during registration. The<br />
<strong>ReadiManager</strong> system cannot control endpoints with a<br />
device type of Other and cannot direct these devices to<br />
initiate point-to-point calls. A scheduled point-to-point call<br />
between two video endpoints with a device type of Other<br />
requires the use of an MCU.<br />
IP Address The assigned IP address of the device<br />
Owner (Endpoints only) The user associated with the device<br />
Site The network site for the device. By default, devices are<br />
added to the Primary Site.<br />
Product ID The product model within the device type group<br />
Description A free-form text field (Extended ASCII only a ) in which<br />
information about the device can be added<br />
Serial Number The serial number (ASCII only a ) of the device.The device<br />
provides the serial number if it registered successfully or is<br />
managed.<br />
Software Version The version of the software installed on the device (ASCII<br />
only a ). The device provides the version number if it<br />
registered successfully or is managed.<br />
60 <strong>Polycom</strong>, Inc.
Table 8-1 Fields of the Device List (continued)<br />
Field Description<br />
Device Management <strong>Operations</strong><br />
HTTP URL (Endpoints only) The management URL for the device, if<br />
available (ASCII onlya ). This URL allows operators to<br />
manage the device from the Device > Admin/Monitor<br />
View > Manage Device screen.<br />
All <strong>Polycom</strong> endpoints provide device management through<br />
a browser. For these devices, this field is completed when<br />
the device registers with the <strong>ReadiManager</strong> system.<br />
For third-party endpoints and devices that do not register<br />
using an IP address, you must enter the URL.<br />
HTTP Port (Endpoints only) The HTTP port number for the device. The<br />
device provides the port number if it registered successfully<br />
and is managed.<br />
Addresses<br />
Aliases The alias to connect to the device. The <strong>ReadiManager</strong><br />
system converts the aliases to the IP address associated<br />
with the device.<br />
• Alias Type. Possible types include E.164, H.323 ID,<br />
URL, Transport Address, E-mail, Party Number, and<br />
Unknown.<br />
• Alias Value. Value for the alias type shown.<br />
• The value for the H.323 ID is the device name if the<br />
device registered with the gatekeeper and it is a<br />
third-party system. In other cases, the device name is<br />
the system name, which might be different then the<br />
H323 ID.<br />
• The value of the E.164 alias is the extension dialed to<br />
reach this endpoint.<br />
• To add another alias, select the type, enter the value<br />
(ASCII onlya ), and click Add Alias.<br />
• To remove an alias, select it and click Delete Selected<br />
Row.<br />
ISDN Video<br />
Number<br />
Note<br />
The following Alias Values are ASCII only a : H323 ID, URL,<br />
Transport Address, and Unknown.<br />
For ISDN devices only, the country code + city/area code +<br />
phone number for the device.<br />
When you add an endpoint without native ISDN, the ISDN<br />
gateway, country code, and area code are not captured.<br />
The <strong>ReadiManager</strong> system only supports native ISDN.<br />
LAN Host Name (Endpoints only) The host name of the LAN on which the<br />
device is resident<br />
Call Signaling<br />
Address<br />
(Endpoints only) The IP address and port used to<br />
communicate H.225 call control messages<br />
<strong>Polycom</strong>, Inc. 61
<strong>Polycom</strong> <strong>ReadiManager</strong> <strong>Operations</strong> <strong>Guide</strong><br />
Table 8-1 Fields of the Device List (continued)<br />
Field Description<br />
RAS Address (Endpoints only) The IP address that includes the port for<br />
communicating registration, admission, and status<br />
messages<br />
Capabilities<br />
Supported<br />
Protocols<br />
Capabilities<br />
Enabled<br />
Available to<br />
Schedule<br />
The communications protocols that the device can support.<br />
Possible values include:<br />
• IP (H.323) - A standard that defines the protocols used<br />
for multimedia communications on packet-based<br />
networks, such as IP.<br />
• ISDN (H.320) - A standard that defines the protocols<br />
used for multimedia communications on switched<br />
networks, such as ISDN.<br />
For devices with the type Unknown, select H.323.<br />
The device automatically provides the protocols if it<br />
registered successfully or is managed.<br />
Notes<br />
• If an endpoint is configured as a gateway (ISDN), only<br />
the H.323 checkbox is selected. If the endpoint supports<br />
true ISDN, the H.323 and ISDN checkboxes are<br />
selected.<br />
• RMX 2000 devices support only the H.323 protocol.<br />
Capabilities to enable on this device. Options are:<br />
• MCU - The device can act as a control unit for multipoint<br />
conferences<br />
• Gateway - The device can act as a gateway for call<br />
management<br />
The MCU provides the capability if it registered successfully<br />
or is managed.<br />
Note<br />
Currently, RMX 2000 devices cannot be Gateway devices.<br />
Select this option to make the device available when users<br />
are scheduling conferences<br />
Note<br />
The Available to schedule field is empty and disabled for<br />
MGC and RMX 2000 devices.<br />
Monitoring Level The monitoring level for the device. Possible values include:<br />
• Standard. This device is monitored.<br />
• VIP. This device is monitored closely. The VIP identifier<br />
and filters are available to operators to monitor and<br />
manage conferences.<br />
62 <strong>Polycom</strong>, Inc.
Table 8-1 Fields of the Device List (continued)<br />
Field Description<br />
Device Management <strong>Operations</strong><br />
Policy Group The policy group to which this device is assigned. The<br />
policy group sets maximum bit rate and alternate routing<br />
policy.<br />
Call Info - Sites (Endpoints Only)<br />
Connection Status See Status<br />
Call Type The connection protocol for the call in which the device is<br />
participating. Possible values include: H.323, H.320, and<br />
SIP<br />
Far Site Information Information about the far site, including:<br />
• Far Site Name. The H.323ID of the far site device to<br />
which the selected endpoint is connected. When<br />
multiple endpoints are connected through the device's<br />
embedded MCU, this field displays a concatenation of<br />
each endpoint's H.323ID separated by ' | ', e.g.<br />
'ISDN-CO1-7-1 | Vsfx-9-1'.<br />
• Far Site Number. The address of the far site device to<br />
which the selected endpoint is connected. The address<br />
value for the calling device appears to be the dialed<br />
address. The address value for the called device<br />
appears to be the IP Address.<br />
• Encryption. The status of encryption for the call.<br />
Possible values include: Off, Disabled, AES, and<br />
DH-1024<br />
Call Details (Endpoints Only)<br />
Video Protocol The video connection protocol, both transmission (Tx) and<br />
reception (Rx), the device is using. Possible values include:<br />
• H.261<br />
H.261 is an ITU standard designed for two-way<br />
communication over ISDN lines and supports data<br />
rates which are multiples of 64Kbit/s. H.261 supports<br />
CIF and QCIF resolutions.<br />
• H.263<br />
H.263 is based on H.261 with enhancements that<br />
improve video quality over modems. It supports CIF,<br />
QCIF, SQCIF, 4CIF and 16CIF resolutions.<br />
• H.264<br />
Video Format The video format, both transmission (Tx) and reception<br />
(Rx), the device is using.<br />
Video Frame Rate Device data. See your endpoint documentation.<br />
Video Rate Used Device data. See your endpoint documentation.<br />
Video Format Rate Device data. See your endpoint documentation.<br />
<strong>Polycom</strong>, Inc. 63
<strong>Polycom</strong> <strong>ReadiManager</strong> <strong>Operations</strong> <strong>Guide</strong><br />
Table 8-1 Fields of the Device List (continued)<br />
Field Description<br />
Video FEC Errors Device data. See your endpoint documentation.<br />
Cause Code Standard H.323 cause code that reflects normal call<br />
termination or the nature of an internal failure, e.g., '16' or<br />
'211'.<br />
Audio Protocol The audio connection protocol, both transmission (Tx) and<br />
reception (Rx), the device is using. Possible values include:<br />
• G.711<br />
• G.722<br />
• G.728<br />
Audio Rate Device data. See the particular device documentation.<br />
Quality of Service (QoS)<br />
Far Site Details<br />
System Alerts<br />
Statistics, both transmission (Tx) and reception (Rx), that<br />
characterize call quality including:<br />
• Total Packet Loss<br />
• % Packet Loss<br />
• Audio Packet Loss<br />
• Video Packet Loss<br />
• Audio Jitter<br />
• Video Jitter<br />
Good QoS indicates a high data rate that is uncompromised<br />
by low bit error rate.<br />
On packet-switched networks, QoS is not guaranteed.<br />
Detailed information about the far site device to which the<br />
selected endpoint is connected including:<br />
• Tx Call Speed<br />
• Rx Call Speed<br />
• Error<br />
• Sync<br />
• Call Type<br />
Errors Device error message text, e.g., GK Registration error<br />
Warnings Device warning message text, e.g., Low Battery<br />
a. For more information on field limitations, see “Field Input Requirements” on page 7.<br />
64 <strong>Polycom</strong>, Inc.
Add an Endpoint Manually<br />
To view detailed information about a managed device<br />
1 Select Device > Admin/Monitor View.<br />
2 Select the device and click View Device Details.<br />
The Device Details dialog box appears.<br />
Device Management <strong>Operations</strong><br />
Generally, the devices the <strong>ReadiManager</strong> system manages are either<br />
endpoints or MCUs. This section describes adding endpoints to a<br />
<strong>ReadiManager</strong> system.<br />
For most <strong>Polycom</strong> devices, you enter basic information. The <strong>ReadiManager</strong><br />
system then contacts the device and retrieves device details. When adding an<br />
endpoint manually, you enter the following information:<br />
Table 8-2 Fields of the Device List<br />
Field Description<br />
Find Device on Network<br />
Device Type The type of device. Device types include:<br />
• ViewStation<br />
• ViewStation FX and EX<br />
• V-series<br />
• PVX<br />
• iPower<br />
• MGC<br />
• RMX<br />
• Tandberg<br />
• Other<br />
• GW/MCU<br />
• HD-Series<br />
Note<br />
H.323 cards and IP blades in <strong>Polycom</strong> MGCs are assigned<br />
the device type of Other during registration. The<br />
<strong>ReadiManager</strong> system cannot control endpoints with a<br />
device type of Other and cannot direct these devices to<br />
initiate point-to-point calls. A scheduled point-to-point call<br />
between two video endpoints with a device type of Other<br />
requires the use of an MCU.<br />
IP Address The assigned IP address of the device<br />
<strong>Polycom</strong>, Inc. 65
<strong>Polycom</strong> <strong>ReadiManager</strong> <strong>Operations</strong> <strong>Guide</strong><br />
Table 8-2 Fields of the Device List (continued)<br />
Field Description<br />
System Name The name of the device.<br />
• Device names must be unique.<br />
• The name must be in ASCII onlya and may have an<br />
unlimited number of characters. Spaces, dashes, and<br />
underscores are valid.<br />
• When retrieved from a video endpoint, the name is<br />
taken from the H.323 ID if the device registered with the<br />
gatekeeper and it is a third-party system. In other cases,<br />
it is the system name, which might be different than the<br />
H.323 ID.<br />
• For an MGC or RMX 2000 device, you must type in a<br />
device name.<br />
Admin ID The administrator ID for the device<br />
Password The administrator password for the device<br />
Identification<br />
System Name The name of the device.<br />
• Device names must be unique.<br />
• The name must be in ASCII onlya and may have an<br />
unlimited number of characters. Spaces, dashes, and<br />
underscores are valid.<br />
• When retrieved from a video endpoint, the name is<br />
taken from the H.323 ID if the device registered with the<br />
gatekeeper and it is a third-party system. In other cases,<br />
it is the system name, which might be different than the<br />
H.323 ID.<br />
• For an MGC or RMX 2000 device, you must type in a<br />
device name.<br />
Description A free-form text field (Extended ASCII only a ) in which<br />
information about the device can be added<br />
Site The network site for the device. By default, devices are<br />
added to the Primary Site.<br />
Serial Number The serial number (ASCII only a ) of the device.The device<br />
provides the serial number if it registered successfully or is<br />
managed.<br />
Software Version The version of the software installed on the device (ASCII<br />
only a ). The device provides the version number if it<br />
registered successfully or is managed.<br />
66 <strong>Polycom</strong>, Inc.
Table 8-2 Fields of the Device List (continued)<br />
Field Description<br />
Device Management <strong>Operations</strong><br />
HTTP URL (Endpoints only) The management URL for the device, if<br />
available (ASCII onlya ). This URL allows operators to<br />
manage the device from the Device > Admin/Monitor<br />
View > Manage Device screen.<br />
All <strong>Polycom</strong> endpoints provide device management through<br />
a browser. For these devices, this field is completed when<br />
the device registers with the <strong>ReadiManager</strong> system.<br />
For third-party endpoints and devices that do not register<br />
using an IP address, you must enter the URL.<br />
HTTP Port (Endpoints only) The HTTP port number for the device. The<br />
device provides the port number if it registered successfully<br />
and is managed.<br />
Addresses<br />
DNS Name Name for the device as assigned at the Domain Name<br />
Service<br />
Aliases The alias to connect to the device. The <strong>ReadiManager</strong><br />
system converts the aliases to the IP address associated<br />
with the device.<br />
• Alias Type. Possible types include E.164, H.323 ID,<br />
URL, Transport Address, E-mail, Party Number, and<br />
Unknown.<br />
• Alias Value. Value for the alias type shown.<br />
• The value for the H.323 ID is the device name if the<br />
device registered with the gatekeeper and it is a<br />
third-party system. In other cases, the device name is<br />
the system name, which might be different then the<br />
H323 ID.<br />
• The value of the E.164 alias is the extension dialed to<br />
reach this endpoint.<br />
• To add another alias, select the type, enter the value<br />
(ASCII onlya ), and click Add Alias.<br />
• To remove an alias, select it and click Delete Selected<br />
Row.<br />
ISDN Video<br />
Number<br />
Note<br />
The following Alias Values are ASCII only a : H323 ID, URL,<br />
Transport Address, and Unknown.<br />
For ISDN devices only, the country code + city/area code +<br />
phone number for the device.<br />
When you add an endpoint without native ISDN, the ISDN<br />
gateway, country code, and area code are not captured.<br />
The <strong>ReadiManager</strong> system only supports native ISDN.<br />
<strong>Polycom</strong>, Inc. 67
<strong>Polycom</strong> <strong>ReadiManager</strong> <strong>Operations</strong> <strong>Guide</strong><br />
Table 8-2 Fields of the Device List (continued)<br />
Field Description<br />
Capabilities<br />
Supported<br />
Protocols<br />
Capabilities<br />
Enabled<br />
Available to<br />
Schedule<br />
The communications protocols that the device can support.<br />
Possible values include:<br />
• IP (H.323) - A standard that defines the protocols used<br />
for multimedia communications on packet-based<br />
networks, such as IP.<br />
• ISDN (H.320) - A standard that defines the protocols<br />
used for multimedia communications on switched<br />
networks, such as ISDN.<br />
For devices with the type Unknown, select H.323.<br />
The device automatically provides the protocols if it<br />
registered successfully or is managed.<br />
Notes<br />
• If an endpoint is configured as a gateway (ISDN), only<br />
the H.323 checkbox is selected. If the endpoint supports<br />
true ISDN, the H.323 and ISDN checkboxes are<br />
selected.<br />
• RMX 2000 devices support only the H.323 protocol.<br />
Capabilities to enable on this device. Options are:<br />
• MCU - The device can act as a control unit for multipoint<br />
conferences<br />
• Gateway - The device can act as a gateway for call<br />
management<br />
The MCU provides the capability if it registered successfully<br />
or is managed.<br />
Note<br />
Currently, RMX 2000 devices cannot be Gateway devices.<br />
Select this option to make the device available when users<br />
are scheduling conferences<br />
Note<br />
The Available to schedule field is empty and disabled for<br />
MGC and RMX 2000 devices.<br />
Monitoring Level The monitoring level for the device. Possible values include:<br />
• Standard. This device is monitored.<br />
• VIP. This device is monitored closely. The VIP identifier<br />
and filters are available to operators to monitor and<br />
manage conferences.<br />
Policy Group The policy group to which this device is assigned. The<br />
policy group sets maximum bit rate and alternate routing<br />
policy.<br />
a. For more information on field limitations, see “Field Input Requirements” on page 7.<br />
68 <strong>Polycom</strong>, Inc.
Device Management <strong>Operations</strong><br />
If the <strong>ReadiManager</strong> gatekeeper registration policy allows devices to register<br />
automatically (i.e., a gatekeeper setting of Allow Registration of All<br />
Endpoints or Allow Registration of Endpoints in a Defined Site), those<br />
registered devices (<strong>Polycom</strong> devices or third-party devices) are automatically<br />
added to the Device List. If a device is not registered with the gatekeeper and<br />
it has a web-based interface, you can enter the device information manually<br />
and manage the device directly from the Device > Admin/Monitor View.<br />
If the <strong>ReadiManager</strong> gatekeeper registration policy does not allow devices to<br />
register automatically (i.e., a gatekeeper setting of Allow Registration of<br />
Predefined Endpoints Only), you must manually enter all video endpoints<br />
and MCUs to the <strong>ReadiManager</strong> system. However, devices registered to the<br />
Global Address Book are automatically added to the <strong>ReadiManager</strong> system.<br />
Note<br />
You can also manually add devices to the <strong>ReadiManager</strong> system for monitoring<br />
purposes only.<br />
To add an endpoint to a <strong>ReadiManager</strong> system<br />
1 From one of the Device views, select Add Device.<br />
2 In the Add New Device dialog box, select the Device Type from the<br />
drop-down list. For third-party devices, select a Device Type of Other.<br />
Supported third-party devices are listed on page 57.<br />
3 Enter the IP Address of the device.<br />
4 If applicable, enter the Password.<br />
5 Click Find Device.<br />
— If the <strong>ReadiManager</strong> system can plumb the device for information, the<br />
Add New Device dialog box is populated with that information.<br />
Review any information retrieved from the device.<br />
— If the <strong>ReadiManager</strong> system cannot find the device, a Device Not<br />
Found dialog box appears. Click OK.<br />
6 Complete the Identification, Addresses, and Capabilities sections of the<br />
Add New Device dialog box. At a minimum, assign the device a System<br />
Name.<br />
Pay particular attention to the Capabilities options, because the settings<br />
on it determine how the device is used throughout <strong>ReadiManager</strong>. For<br />
example, you can select it as a VIP device and determine whether it will<br />
be Available to Schedule through the scheduling interface.<br />
Note that many fields in this dialog box are ASCII only. For information<br />
about field input requirements, see “Field Input Requirements” on page 7.<br />
For information about the fields, see “Device Fields and Descriptions” on<br />
page 97.<br />
<strong>Polycom</strong>, Inc. 69
<strong>Polycom</strong> <strong>ReadiManager</strong> <strong>Operations</strong> <strong>Guide</strong><br />
Add an MCU Manually<br />
7 Click Add.<br />
The device appears in the Device List. By default, the system:<br />
— Adds the device to the applicable site<br />
— Sets the HTTP Port to 80<br />
— Adds an Alias for the device<br />
— Makes the device Available to Schedule<br />
— Sets the Monitoring Level to Standard<br />
— Assigns the device to the Default Device Policy group<br />
Note<br />
For third-party endpoints, the HTTP URL, serial number, and DNS name are not<br />
captured during endpoint registration.<br />
Once you’ve added a device, you can associate it with a user. See “Assign<br />
Users Roles and Devices” on page 136.<br />
Generally, <strong>ReadiManager</strong> system devices are either endpoints or MCUs. This<br />
section describes adding MCUs to a <strong>ReadiManager</strong> system.<br />
Note<br />
Back-end communication with the RMX 2000 control units and IP service blades<br />
must be enabled.<br />
When you add an MCU device, MCU services are added automatically when<br />
the IP card registers with the SE200.<br />
When you add a gateway device, use the Services screen to specify the<br />
network services available for the device.<br />
The available network services may include:<br />
• H.323 Service--Indicates a connection to an IP network using the H.323<br />
protocol.<br />
• H.320 Service--Indicates a connection to an ISDN phone line using the<br />
H.320 protocol.<br />
• Gateway Service--Indicates a connection to both IP and ISDN to enable<br />
conversion from one protocol to the other.<br />
• Direct Service--Indicates a direct connection between an MCU and a<br />
video endpoint, using a serial cable.<br />
70 <strong>Polycom</strong>, Inc.
Device Management <strong>Operations</strong><br />
Notes<br />
• RMX 2000 devices may only have H.323 service.<br />
• These network services are not the same as the Dial Plan Services such as<br />
Simplified Dialing and Conference on Demand. Network services describe<br />
the physical connection that the device supports. Dial plan services provide<br />
access to specific features used for routing calls by dialing a prefix.<br />
When you enter network service information manually, remember that the<br />
<strong>ReadiManager</strong> system does not create the service at the device. The service<br />
must have already been defined at the device. Enter information in the<br />
<strong>ReadiManager</strong> system that matches the information in the device.<br />
If you do not define network services, you may not use an MCU or gateway in<br />
a conference. For example, if you do not define H.323 service on the MCU,<br />
when the <strong>ReadiManager</strong> system tries to schedule a video conference that<br />
requires this service, it tries to locate another MCU with this service. If another<br />
MCU with this service is not available, the conference may not be scheduled.<br />
MCU device details include these fields.<br />
Table 8-3 Fields in the MCU H.320 Service Dialog Box (MGC Only)<br />
Field Description<br />
Service Name Name of the H.320 ISDN service<br />
Channels Number of 64K channels dedicated to the MCU<br />
Number Range Dial-in number range of service. These ISDN numbers are<br />
available on an MCU for all endpoints to use. Also called<br />
direct inward dialing (DID).<br />
LCR Table The least-cost routing table for calls made through this<br />
gateway<br />
Local Prefix The prefix required to place a call to a local number outside<br />
the enterprise. For example, if you dial 9 to reach an<br />
outside line, the Local Prefix is 9.<br />
Non-Local Prefix The prefix required to dial long distance. For example, in<br />
certain states in the United States, you must dial 1 before<br />
you can dial a non-local number.<br />
International Prefix The prefix required to dial an international number. For<br />
example, in many countries, the international prefix is 00.<br />
Local Area Code A list of local area codes, separated by commas<br />
Priority The priority order for this service<br />
<strong>Polycom</strong>, Inc. 71
<strong>Polycom</strong> <strong>ReadiManager</strong> <strong>Operations</strong> <strong>Guide</strong><br />
To add or register an MCU to a <strong>ReadiManager</strong> system<br />
1 From one of the Device views, select Add Device.<br />
2 In the Add New Device dialog box, select the Device Type from the<br />
drop-down list.<br />
3 Enter the IP Address of the device.<br />
4 If applicable, enter the Admin ID and Password.<br />
5 Click Find Device.<br />
— If the <strong>ReadiManager</strong> system can plumb the device for information, the<br />
Add New Device dialog box is populated with that information.<br />
Review any information retrieved from the device.<br />
— If the <strong>ReadiManager</strong> system cannot find the device, a Device Not<br />
Found dialog box appears. Click OK.<br />
6 Complete the Identification, Addresses, Capabilities, MCU Services<br />
and MCU Resources sections of the Add New Device dialog box.<br />
Pay particular attention to the Capabilities options, because the settings<br />
on it determine how the device is used throughout <strong>ReadiManager</strong>. For<br />
example, you can designate a <strong>Polycom</strong> MGC as a Gateway device.<br />
Note that many fields in this dialog box are ASCII only. For information<br />
about field input requirements, see “Field Input Requirements” on page 7.<br />
For information about the fields, see “Device Fields and Descriptions” on<br />
page 97.<br />
7 Click Add.<br />
The device appears in the Device List. By default, the system:<br />
— Adds the device to the Primary Site<br />
— Sets the HTTP Port to 80<br />
— Adds an Alias Type for the devices<br />
For endpoint devices, the system also:<br />
Notes<br />
• In the Device List, a <strong>ReadiManager</strong> system displays a single MCU as two<br />
separate Device Types (an RMX or MGC device and a GW/MCU device). The<br />
GW/MCU designation represents the network interface.<br />
• For third-party endpoints, the HTTP URL, serial number, and DNS name are not<br />
captured during endpoint registration.<br />
72 <strong>Polycom</strong>, Inc.
Edit a Device<br />
Delete Devices<br />
Device Management <strong>Operations</strong><br />
The <strong>ReadiManager</strong> system automatically detects IP address changes and<br />
updates its database with the new information for <strong>Polycom</strong> and third-party<br />
devices that are registered with the <strong>ReadiManager</strong> system.<br />
To edit a device in the <strong>ReadiManager</strong> system<br />
1 From the Device > Admin/Monitor View, select the device in the device<br />
list and click Edit Device.<br />
2 As required, edit the Addresses, Capabilities, and if applicable MCU<br />
Services and MCU Resources, sections of the Edit Device dialog box.<br />
Note that many fields in this dialog box are ASCII only. For information<br />
about field input requirements, see “Field Input Requirements” on page 7.<br />
For information about the fields, see “Device Fields and Descriptions” on<br />
page 97.<br />
3 Click Update.<br />
Note<br />
Editing information for device management by the <strong>ReadiManager</strong> system does not<br />
change the information in the device. To make changes in the device information,<br />
use Provisioning or change it in the device. Note that for managed devices, the<br />
device may overwrite settings entered manually.<br />
To delete device(s) from the <strong>ReadiManager</strong> system<br />
1 From the Device > Admin/Monitor View, click the selection checkbox<br />
for the device(s) of interest and click Delete Device.<br />
2 In the Confirm Delete dialog box, click Yes.<br />
The Device List is updated.<br />
Note<br />
If your gatekeeper registration policy allows devices to register automatically with<br />
the <strong>ReadiManager</strong> system (i.e., a gatekeeper setting of Allow Registration of All<br />
Endpoints or Allow Restoration of Endpoints in a Defined Site), a device that<br />
you delete may reappear in the Device List.<br />
<strong>Polycom</strong>, Inc. 73
<strong>Polycom</strong> <strong>ReadiManager</strong> <strong>Operations</strong> <strong>Guide</strong><br />
View a Device’s Video Feed<br />
Note<br />
Clear a Device Help Request<br />
This procedure is available on the following device types:<br />
• HD-Series<br />
• Tandberg<br />
• V-series<br />
• ViewStation<br />
To view the video feed for a device (near site or far site)<br />
1 From the Device > Admin/Monitor View, select the device and click<br />
View Device Details.<br />
The Device Details dialog box appears. For information about the fields<br />
in this dialog box, see “Device Fields and Descriptions” on page 97.<br />
2 Click Call Info to expand the Call Info tree and select Video Feed.<br />
The Device Video section shows the video feed from the near and far site.<br />
3 To view updated feed information, refresh your display manually.<br />
To clear a device help request from the <strong>ReadiManager</strong> system<br />
1 From the Device > Admin/Monitor View, click the selection checkbox<br />
for the device and click Clear Help.<br />
The Confirm Device Help Clear dialog box appears.<br />
2 To send a message to the device as well as clear the help request, click the<br />
Also send message to device checkbox.<br />
3 Click Yes.<br />
4 If you selected the Also send message to device checkbox, enter the text<br />
message to send the device in the Send Message to Device dialog box<br />
and click Send. (Note that the text-message field is ASCII only; for more<br />
information, see “Field Input Requirements” on page 7.)<br />
The Device List is updated and alerts for the device are cleared.<br />
Note<br />
If the reason for the original alert still exists on the device, the alert will likely<br />
reappear in the Device List.<br />
74 <strong>Polycom</strong>, Inc.
Send a Message to a Device<br />
Device Management <strong>Operations</strong><br />
In some situations, such as in response to a help request, you can send a<br />
message to some types of devices.<br />
To send a message to a device from the <strong>ReadiManager</strong> system<br />
1 From the Device > Admin/Monitor View, click the selection checkbox<br />
for the device.<br />
If the device is of a type that can receive text messages, a Send Message<br />
option appears in the Command menu.<br />
2 Click Send Message.<br />
The Confirm Device Alert dialog box appears.<br />
3 In the Send Message to Device dialog box, enter a text message and click<br />
Send. (Note that the text-message field is ASCII only; for more<br />
information, see “Field Input Requirements” on page 7.)<br />
The message is sent to the device.<br />
<strong>Polycom</strong>, Inc. 75
<strong>Polycom</strong> <strong>ReadiManager</strong> <strong>Operations</strong> <strong>Guide</strong><br />
76 <strong>Polycom</strong>, Inc.
Device Policies and Policy Groups<br />
This chapter discusses device provisioning. It includes these topics:<br />
• Overview of Device Policies and Policy Groups<br />
• View the Device Policy Group List<br />
• Add a Device Policy Group<br />
• Edit a Device Policy Group<br />
• Delete a Device Policy Group<br />
Overview of Device Policies and Policy Groups<br />
9<br />
The <strong>ReadiManager</strong> system uses policy groups to assign conference call speed<br />
(bit rate), monitoring status, and alternate routing policies to devices.<br />
The <strong>ReadiManager</strong> system includes a default policy group that is<br />
automatically assigned to all devices that register with it. The values for the<br />
default policy group are:<br />
• Maximum call bandwidth. 768 Kbps<br />
Note<br />
The bit rate can be set at the network level, the device level, and the conference<br />
level. If there is a discrepancy between these bit rate settings, the system<br />
implements the lowest bit rate setting. The only exception, is that the bit rate in the<br />
RMX profile takes precedence over the bit rate in the conference settings.<br />
• Monitoring level. Standard<br />
• Alternate routing policy. IP with reduction, then ISDN<br />
You can change the values for the default policy group and create additional<br />
policy groups to assign to specific devices. Be sure to name and apply device<br />
policies appropriately and to assign endpoint device policies to endpoints and<br />
MCU device policies to MCUs.<br />
<strong>Polycom</strong>, Inc. 77
<strong>Polycom</strong> <strong>ReadiManager</strong> <strong>Operations</strong> <strong>Guide</strong><br />
Device Policy Group Example<br />
If you enter devices manually in the <strong>ReadiManager</strong> system, you can also<br />
assign them a policy group.<br />
Table 9-1 Fields in the Add Role or Policy Group Screen<br />
Field Description<br />
Name The name (ASCII only a ) of the policy group<br />
Description A description (ASCII only a ) of the policy group<br />
Maximum Bit Rate The maximum bit rate available for devices assigned<br />
this policy group, or for devices associated with rooms<br />
or users assigned this role<br />
Note<br />
This bit rate affects only outbound calls.<br />
Alternate Routing Policy The alternate routing policy determines call routing<br />
behavior when the available bandwidth for video<br />
between sites is already at the maximum. For example,<br />
you can assign devices for executives to a role or policy<br />
group that automatically routes calls to ISDN.<br />
Possible values include:<br />
• IP Only: Requested bit rate only. All call requests<br />
must be fulfilled at the requested bit rate. The bit rate<br />
is not reduced for a specific call. If resources are not<br />
available, the call is rejected.<br />
• IP Only: Allow bit rate reduction. Calls can only be<br />
routed through IP, but the bit rate may be reduced to<br />
128 Kbps. If 128 Kbps is not available, the call is<br />
rejected.<br />
• IP with Reduction, then ISDN. If the call cannot<br />
occur at the requested bit rate, reduce it to 128<br />
Kbps. If the call bit rate still cannot be achieved<br />
through IP, then route the call through ISDN at the<br />
best available call bit rate. To use this setting,<br />
devices must have an ISDN number associated with<br />
them.<br />
a. For more information, see “Field Input Requirements” on page 7.<br />
This example describes one scenario for creating a new policy group and how<br />
the policy group affects device settings.<br />
When a video endpoint is configured to register with <strong>ReadiManager</strong>, it is<br />
initially assigned the Default Policy Group, which includes a monitoring level<br />
of Standard and a maximum bit rate of 768 Kbps.<br />
Create a policy group called Executive, set a bit rate of up to 2000 Kbps. The<br />
enhanced bit rate ensures quality connections, and you can monitor the<br />
devices associated with those executives in the Admin/Monitor View.<br />
78 <strong>Polycom</strong>, Inc.
View the Device Policy Group List<br />
Add a Device Policy Group<br />
Device Policies and Policy Groups<br />
After you create the policy group, you assign it to the devices associated with<br />
the executives.<br />
To view the Device Policy Group list<br />
>> Select System Management > Profiles/Policies > Device Policy Groups.<br />
The Device Policy Groups list appears. It can be filtered by Name and<br />
Description.<br />
Table 9-2 Information in the Device Policy Group List<br />
Column Description<br />
Name Name of the policy group<br />
Description Description of the policy group<br />
To add a new device policy group<br />
1 Select System Management > Profiles/Policies > Device Policy Group.<br />
2 From the Device Policy Groups list, click Add Policy Group.<br />
3 Complete the Name and Description sections of the Add Policy Group<br />
dialog box.<br />
4 Enter the Maximum Bit Rate for the devices in the policy group and<br />
select an Alternate Routing Policy. See Table 9-2.<br />
Note<br />
The bit rate can be set at the network level, the device level, and the conference<br />
level. If there is a discrepancy between these bit rate settings, the system<br />
implements the lowest bit rate setting. The only exception, is that the bit rate in the<br />
RMX profile takes precedence over the bit rate in the conference settings.<br />
5 Click Save.<br />
The device policy group appears in the list.<br />
<strong>Polycom</strong>, Inc. 79
<strong>Polycom</strong> <strong>ReadiManager</strong> <strong>Operations</strong> <strong>Guide</strong><br />
Edit a Device Policy Group<br />
Delete a Device Policy Group<br />
You can change settings in the default policy group and policy groups that an<br />
administrator has created. You cannot change the name of the default group.<br />
To edit a device policy group<br />
1 Select System Management > Profiles/Policies > Device Policy Group.<br />
2 From the Device Policy Groups list, select the policy group of interest<br />
and click Edit Policy Group.<br />
3 As required, edit the device policy group settings. See Table 9-2.<br />
4 Click Save.<br />
To delete a device policy group<br />
1 Select System Management > Profiles/Policies > Device Policy Group.<br />
2 From the Device Policy Groups list, select the policy group of interest<br />
and click Delete Policy Group.<br />
3 In the Delete Device Policy dialog box, click Yes.<br />
The selected device policy is deleted from the <strong>ReadiManager</strong> system.<br />
80 <strong>Polycom</strong>, Inc.
Device Provisioning<br />
This chapter discusses device provisioning. It includes these topics:<br />
• Overview of Device Provisioning<br />
• Provision Devices<br />
• View the Provisioning List and Details<br />
• Provision Devices<br />
• Clear the Status of Device Provisioning<br />
• Cancel a Scheduled Device Provisioning<br />
• Overview of Device Provisioning Profiles<br />
• Add a Provisioning Profile<br />
• Edit a Provisioning Profile<br />
• Delete a Provisioning Profile<br />
• Clone a Provisioning Profile<br />
Overview of Device Provisioning<br />
10<br />
Device provisioning eliminates the need to enter maximum bit rate and<br />
routing policy information at each device, because it “pushes” this<br />
information to the device.<br />
The <strong>ReadiManager</strong> system can provision these device types:<br />
• ViewStation<br />
• ViewStation FX & EX<br />
• V-Series<br />
• HD-Series<br />
Only administrators with System Setup permissions can provision devices.<br />
They can provision one device or a group of devices; and they can schedule<br />
provisioning to occur immediately or for a date and time in the future.<br />
<strong>Polycom</strong>, Inc. 81
<strong>Polycom</strong> <strong>ReadiManager</strong> <strong>Operations</strong> <strong>Guide</strong><br />
Some notes about provisioning devices:<br />
• Use a provisioning profile to configure a group of similar devices. For<br />
more information on provisioning profiles, see System Management.<br />
• If a device scheduled for provisioning is In a Call, the <strong>ReadiManager</strong><br />
system waits until the call ends before provisioning the device. The system<br />
checks the endpoint at 15 minute intervals.<br />
• If a device scheduled for provisioning is Offline, the <strong>ReadiManager</strong><br />
attempts to connect to the device every hour until the device is Online.<br />
• Until the <strong>ReadiManager</strong> successfully provisions a device scheduled for<br />
provisioning, provisioning remains in the Pending state and the<br />
<strong>ReadiManager</strong> system attempts to provision the device until it succeeds or<br />
until the provisioning is cancelled.<br />
• Provisioning may reboot the device<br />
View the Provisioning List and Details<br />
Table 10-1 Fields of the Provisioning Details section<br />
Field Description<br />
Last Profile Applied The name of the last provisioning profile that was or was not<br />
successfully applied to the device. The Provisioning<br />
Status will be either Success or Failed.<br />
Provisioning Status The device’s current provisioning status. Possible values<br />
include:<br />
• Clear. No provisioning has been done or an<br />
administrator cleared the last provisioning event.<br />
• Pending. Provisioning is scheduled for this device.<br />
• In Progress. The device is currently being provisioned.<br />
• Success. Provisioning has been completed<br />
successfully on this device.<br />
• Failed. Provisioning was not completed on this device.<br />
Pending Profile The name of the provisioning profile that is scheduled to be<br />
applied to the device. In this case, the Provisioning Status<br />
will be either Pending or In Progress.<br />
This field is blank if the device is not scheduled for<br />
provisioning.<br />
Scheduled The date and time, in the default format of yyyy-mm-dd<br />
hh:mm, when the device is schedule to be provisioned.<br />
This field is blank if the device is not scheduled for<br />
provisioning.<br />
82 <strong>Polycom</strong>, Inc.
Table 10-1 Fields of the Provisioning Details section<br />
Field Description<br />
Last Attempt<br />
Date/Time<br />
Device Provisioning<br />
The date and time, in the default format of yyyy-mm-dd<br />
hh:mm, of the last provisioning message exchanged with the<br />
device.<br />
Failure Reason A text description of the reason the provisioning failed.<br />
Causes for failure include:<br />
• The provisioning profile does not exist<br />
• The provisioning profile does not include provisioning<br />
information<br />
• The <strong>ReadiManager</strong> system no longer manages the<br />
device<br />
• A password for the device is set in the video endpoint,<br />
and you must enter it in the <strong>ReadiManager</strong> system<br />
• The device is busy<br />
• A network error occurred<br />
• An incomplete transfer of provisioning information<br />
occurred<br />
• Provisioning has timed out<br />
• An internal error occurred on the device, and you must<br />
reboot it<br />
• An unknown error occurred. Reboot the device.<br />
Log Message A read-only text box that contains messages related to the<br />
device provisioning status<br />
To view information about device provisioning<br />
1 Select Device > Provision View.<br />
2 From the Filter menu on the Provision View list, select the device type<br />
for the device of interest.<br />
3 Select the device of interest.<br />
4 Expand the Provisioning Details tab in the Device Details section.<br />
For information about the fields in this section, see “View the Provisioning<br />
List and Details” on page 82.<br />
<strong>Polycom</strong>, Inc. 83
<strong>Polycom</strong> <strong>ReadiManager</strong> <strong>Operations</strong> <strong>Guide</strong><br />
Provision Devices<br />
<strong>ReadiManager</strong> cannot provision an endpoint when it is in a call, offline, or<br />
during a software update. If the endpoint is in the middle of a call or a software<br />
update, <strong>ReadiManager</strong> retries provisioning in 15 minutes. If the endpoint is<br />
offline, <strong>ReadiManager</strong> retries provisioning at 60 minute intervals.<br />
To provision devices<br />
1 Select Device > Provision View.<br />
2 From the Filter menu on the Provision View list, select the device type<br />
for the device you want to provision.<br />
3 Click the checkbox to select the device to provision. To select all devices<br />
of that type, click the top-most checkbox in the list.<br />
4 Click Provision.<br />
5 In the Schedule Device Provisioning dialog box, select the appropriate<br />
provisioning profile.<br />
6 In the Schedule field, select Now or Later.<br />
7 If you select Later, enter a Date and Time for the provisioning.<br />
8 Select either Use Server Date/Time or Use Device Date/Time as these<br />
may differ.<br />
9 Click Schedule.<br />
The Provision View reappears.<br />
10 Click Refresh Device List and check the Pending column for the<br />
provisioning status.<br />
For each device you selected, the name of the profile appears in the<br />
Pending column, and the date and time you entered appears in the<br />
Scheduled column.<br />
Check the Status of Device Provisioning<br />
To check the status of device provisioning<br />
1 Select Device > Provision View.<br />
2 From the Filter menu on the Provision View Device List, select the<br />
device type for the device of interest.<br />
3 Select the device of interest.<br />
4 Expand the Provisioning Details tab in the Device Details section.<br />
84 <strong>Polycom</strong>, Inc.
Device Provisioning<br />
For information about the fields in this section, see “View the Provisioning<br />
List and Details” on page 82.<br />
Clear the Status of Device Provisioning<br />
To clear the status of device provisioning<br />
1 Select Device > Provision View.<br />
2 From the Filter menu on the Provision View Device List, select the<br />
device type for the device of interest. To select all devices of that type,<br />
select the top-most checkbox.<br />
3 Click Clear Status.<br />
The device provisioning status returns to Clear.<br />
Cancel a Scheduled Device Provisioning<br />
You can only cancel provisioning of a Pending profile. You cannot cancel the<br />
provisioning of a device while it is In Progress.<br />
To cancel a pending device provisioning operation<br />
1 Select Device > Provision View.<br />
2 From the Filter menu on the Provision View Device List, select the<br />
device type for the device of interest. To select all devices of that type,<br />
select the top-most checkbox in the Device List.<br />
3 Click Cancel Provision.<br />
The provision operation is cancelled and the device provisioning status<br />
returns to Clear.<br />
<strong>Polycom</strong>, Inc. 85
<strong>Polycom</strong> <strong>ReadiManager</strong> <strong>Operations</strong> <strong>Guide</strong><br />
Overview of Device Provisioning Profiles<br />
Add a Provisioning Profile<br />
You create a new provisioning profile to apply device settings remotely to a<br />
device or group of devices. Only administrators with System Setup<br />
permissions can provision devices.<br />
Some examples of when to use provisioning profiles follow.<br />
• To apply a standard set of options to each new device<br />
By creating templates of standard settings for different types of devices, or<br />
for the needs of different users, you can have the <strong>ReadiManager</strong> system<br />
apply all the settings at once. After the device is connected and registered<br />
with the <strong>ReadiManager</strong> system, you can use a provisioning profile that<br />
defines a range of other options.<br />
• To update the password for all devices of a particular type<br />
For security, you can create a provisioning profile to update the password<br />
for endpoints on a regular basis and reuse the same profile quarterly. You<br />
might have several profiles, one for each type of device you want to<br />
update.<br />
• To change the IP address of the gatekeeper feature in the <strong>ReadiManager</strong><br />
system when the device is moved<br />
To add a provisioning profile<br />
1 Select System Management > Profiles/Policies > Provision Device<br />
Profiles.<br />
2 From the Provision Device Profiles list, click Add Profile.<br />
The Add Profile dialog box appears.<br />
3 Select the Device Type for the provisioning profile, enter a name for the<br />
profile, and click Next.<br />
The Add Provisioning Profile dialog box appears with default content<br />
based on the Device Type you selected. For more information about the<br />
endpoint fields displayed here, see the endpoint documentation.<br />
4 Complete the sections of the Add Provisioning Profile dialog box. The<br />
sections are different depending on the device type selected.<br />
5 Click OK.<br />
Your new provisioning profile appears in the updated Provision Device<br />
Profiles list.<br />
86 <strong>Polycom</strong>, Inc.
Edit a Provisioning Profile<br />
Delete a Provisioning Profile<br />
Clone a Provisioning Profile<br />
Device Provisioning<br />
To edit a provisioning profile<br />
1 Select System Management > Profiles/Policies > Provision Device<br />
Profiles.<br />
2 Select the profile of interest from the Provision Device Profiles list and<br />
click Edit Profile.<br />
3 Select the Device Type for the provisioning profile, enter a name for the<br />
profile, and click Next.<br />
4 As required, edit the sections of the Add Provisioning Profile dialog box.<br />
The sections may be different depending on the device type selected.<br />
5 Click OK.<br />
To delete a provisioning profile<br />
1 Select System Management > Profiles/Policies > Provision Device<br />
Profiles.<br />
2 Click the selection checkbox for the profile of interest in the Provision<br />
Device Profiles list and click Delete Profile.<br />
3 In the Confirm Delete dialog box, click Yes.<br />
The profile is deleted from the <strong>ReadiManager</strong> system.<br />
To clone a provisioning profile<br />
1 Select System Management > Profiles/Policies > Provision Device<br />
Profiles.<br />
2 Select the profile of interest from the Provision Device Profiles list and<br />
click Clone Profile.<br />
3 In the Clone Profile dialog box, enter a name for the new profile and click<br />
Save.<br />
The profile is saved to the Provision Device Profiles list.<br />
<strong>Polycom</strong>, Inc. 87
<strong>Polycom</strong> <strong>ReadiManager</strong> <strong>Operations</strong> <strong>Guide</strong><br />
88 <strong>Polycom</strong>, Inc.
Device Softupdate<br />
About Softupdate<br />
11<br />
This chapter describes how to use <strong>ReadiManager</strong> to update the software on<br />
<strong>Polycom</strong> devices when new software is available. It includes these topics:<br />
• About Softupdate<br />
• List the Serial Numbers for Devices to be Updated<br />
• Download the Required Software Updates<br />
• Request Update Activation Keys<br />
• Upload the Software Update Profile<br />
• Schedule the Software Update for Devices<br />
• Cancel Software Updates<br />
Softupdate eliminates the need to update the device software for each<br />
individual device. Instead you can schedule an update and the <strong>ReadiManager</strong><br />
system will manage the update process.<br />
The Softupdate process requires these steps:<br />
1 “List the Serial Numbers for Devices to be Updated” on page 92<br />
2 “Download the Required Software Updates” on page 93<br />
3 “Request Update Activation Keys” on page 93<br />
4 “Upload the Software Update Profile” on page 94<br />
5 “Schedule the Software Update for Devices” on page 95<br />
The <strong>ReadiManager</strong> system can update the software on these device types:<br />
• ViewStation<br />
• ViewStation FX & EX<br />
• V-Series<br />
• HD-Series<br />
<strong>Polycom</strong>, Inc. 89
<strong>Polycom</strong> <strong>ReadiManager</strong> <strong>Operations</strong> <strong>Guide</strong><br />
You can schedule a software update for one device or a group of devices, and<br />
you can do so for now or for a date and time in the future. Some notes about<br />
updating devices via the <strong>ReadiManager</strong> system:<br />
• Use a softupdate profile to manage the update process for a group of<br />
similar devices. For more information on softupdate profiles, see “Upload<br />
the Software Update Profile” on page 94.<br />
Note<br />
Software update features that are available at the device may not be available<br />
through the <strong>ReadiManager</strong> software update management system.<br />
• If a device scheduled for update is In a Call, the <strong>ReadiManager</strong> system<br />
waits until the call ends before updating the device. The system checks the<br />
endpoint at 15 minute intervals.<br />
• If a device scheduled for update is Offline, the <strong>ReadiManager</strong> system<br />
attempts to connect to the device every hour until the device is Online.<br />
• Until the <strong>ReadiManager</strong> system successfully updates a device scheduled<br />
for updating, the update remains in the Pending or In Progress state and<br />
the <strong>ReadiManager</strong> system attempts to update the device until it succeeds<br />
or until the update is cancelled.<br />
• Software update may reboot the device.<br />
In a redundant configuration, upload the same software update files to both<br />
servers. This ensures that a software update that was scheduled via the<br />
primary system occurs correctly in the event of a failover to the redundant<br />
system.<br />
90 <strong>Polycom</strong>, Inc.
View Software Update List and Details<br />
Table 11-1 Fields of the Softupdate Details section<br />
Field Description<br />
Device Softupdate<br />
Softupdate Status The device’s software update status. Possible values<br />
include:<br />
• Clear. A software update has not been done.<br />
• Pending. A software update has been scheduled and is<br />
pending. The device may be offline or in a call.<br />
• In Progress. The software update is in progress.<br />
• Success. A software update has completed<br />
successfully.<br />
• Failed. A software update could not be performed.<br />
Scheduled The date and time, in the default format of yyyy-mm-dd<br />
hh:mm, when the device software is schedule to be updated.<br />
This field is blank if the device is not scheduled for<br />
provisioning.<br />
Last Attempt<br />
Date/Time<br />
The date and time, in the default format of yyyy-mm-dd<br />
hh:mm:ss, of the last software update message exchanged<br />
with the device.<br />
Failure Reason A text description of the reason the software update failed.<br />
Causes for failure may include:<br />
• The software update file location does not exist.<br />
• A password for the device is set in the video endpoint,<br />
and you must enter it in <strong>ReadiManager</strong>.<br />
• A network error has occurred.<br />
• The update has timed out.<br />
• An internal error occurred on the device, and you must<br />
reboot it.<br />
• A profile has not been configured.<br />
• An endpoint is offline.<br />
• An incorrect activation key is in the key file.<br />
• An unknown error has occurred. Reboot the device<br />
Log Message A read-only text box that contains the log message text<br />
recorded during the execution of the software update.<br />
To view information about device provisioning:<br />
1 Select Device > Provision View.<br />
2 From the Filter menu on the Provision View list, select the device type<br />
for the device of interest.<br />
3 Expand the Provisioning Details tab in the Device Details section.<br />
<strong>Polycom</strong>, Inc. 91
<strong>Polycom</strong> <strong>ReadiManager</strong> <strong>Operations</strong> <strong>Guide</strong><br />
List the Serial Numbers for Devices to be Updated<br />
To list the serial numbers for devices to be updated<br />
1 Select System Management > Profiles/Policies > Software Update<br />
Profiles.<br />
2 On the Software Update Profiles list, click the checkbox to select the<br />
appropriate Device Type and Device Model combination for the<br />
device(s) to update. To select all devices in the list, click the top-most<br />
checkbox in the list.<br />
3 Click Get Serial Number.<br />
The Device Serial Number List appears listing the devices of the selected<br />
type and model.<br />
4 Select the specific device(s) to be updated. To select all devices in the list,<br />
click the top-most checkbox in the list.<br />
5 Click Get Serial Numbers.<br />
The serial number(s) appear in the text box below.<br />
6 When updating a single device:<br />
a Record the serial number:_____________<br />
b Click Close.<br />
The Software Update Profiles list reappears.<br />
c Go to “Download the Required Software Updates” on page 93.<br />
7 When updating multiple devices:<br />
a Copy and paste the serial numbers from the Device Serial Number<br />
List to a .txt file that you can submit to the <strong>Polycom</strong> Product<br />
Activation site. Put one serial number per line as shown in the<br />
following example.<br />
82071007E1DACD<br />
82070407E010CD<br />
820418048078B2<br />
82040903E00FB0<br />
b Return to the Device Serial Number List and click Close.<br />
The Software Update Profiles list reappears.<br />
c Repeat steps 2 through 7 for the each device or set of devices to be<br />
updated. You may include all of the serial numbers for all of the<br />
different device types in the same .txt file.<br />
d Save the .txt file.<br />
e Go to “Download the Required Software Updates” on page 93.<br />
92 <strong>Polycom</strong>, Inc.
Download the Required Software Updates<br />
Request Update Activation Keys<br />
Device Softupdate<br />
To download the software required to update the devices<br />
1 On your local system, create a directory to which to save the software<br />
upgrade files (if one does not already exist).<br />
2 With a web browser, go to www.polycom.com/support.<br />
3 In the Downloads section, select the Product and Category of the<br />
required download.<br />
A list appears of the available downloads for the selected product and<br />
category.<br />
4 Click/select the required software.<br />
5 When the File Download dialog box appears, click Save.<br />
6 When the Save As dialog box appears, browse to the directory created in<br />
step 1 and click Save.<br />
A .zip file containing the software .exe file(s) is saved to your local<br />
system.<br />
7 On your local system, extract the .exe file(s) from the downloaded .zip<br />
file.<br />
8 Repeat steps 3 through 7 for each device type and model to be updated.<br />
9 Go to “Request Update Activation Keys” on page 93<br />
To request upgrade activation keys<br />
1 Go to http://www.polycom.com/activation.<br />
2 Log in or create a New User Account.<br />
3 Select Product Activation.<br />
4 In the Software Upgrade KeyCode section, click Retrieve Software<br />
KeyCode.<br />
5 When upgrading a single device:<br />
a Enter the serial number of the device to be updated into the Serial<br />
Number field of the Single Upgrade Key Code section.<br />
b Enter the version number to which you are upgrading and click<br />
Retrieve.<br />
The key code is returned on the screen.<br />
<strong>Polycom</strong>, Inc. 93
<strong>Polycom</strong> <strong>ReadiManager</strong> <strong>Operations</strong> <strong>Guide</strong><br />
c Record the key code and create a .txt file with the Serial Number -<br />
Key Code combination to be updated.<br />
d Close the Product Activation screens and go to “Upload the Software<br />
Update Profile” on page 94.<br />
6 When updating multiple devices from a prepared .txt file (step 7 on<br />
page 92):<br />
a In the Multiple Upgrade KeyCode section, click Add Attachment.<br />
b Browse to the location of the .txt file you created in step 7 on page 92<br />
and click Upload.<br />
A file containing the Serial Number - Key Code combinations will be<br />
emailed to the specified email account.<br />
c When you receive the .txt file, save it to your local system.<br />
d Close the Product Activation screens and go to “Upload the Software<br />
Update Profile” on page 94.<br />
Upload the Software Update Profile<br />
After you receive a new software update for a <strong>Polycom</strong> device, upload the<br />
software update to the <strong>ReadiManager</strong> system and create a software update<br />
profile to use for the update.<br />
To upload the software update file and create a software update profile<br />
1 Select System Management > Profiles/Policies > Software Update<br />
Profiles.<br />
2 On the Software Update Profiles list, click the checkbox to select the<br />
appropriate Device Type and Device Model combination for the<br />
device(s) to be updated. To select all devices of that type, click the<br />
top-most checkbox in the list.<br />
3 Click Upload Software Update Profile.<br />
The Upload Software Update Profile dialog box appears.<br />
4 If an activation key code is required to activate the software update, click<br />
the Update Requires Key checkbox and browse to the .txt key file<br />
(received in “Request Update Activation Keys” on page 93) in the<br />
Software Update Key File field.<br />
Note<br />
The key is generated from the endpoint serial number and version number, and<br />
<strong>Polycom</strong> sends it as a text (.txt) file to the customer when new software is<br />
available. Customers can review their key history at<br />
http://www.polycom.com/support.<br />
94 <strong>Polycom</strong>, Inc.
Device Softupdate<br />
5 Browse to the Software Update File.<br />
6 As required, edit the Description of the update. (Note that the field is<br />
ASCII only; for more information, see “Field Input Requirements” on<br />
page 7.)<br />
7 Click OK.<br />
8 Go to “Schedule the Software Update for Devices” on page 95.<br />
Schedule the Software Update for Devices<br />
To update device software<br />
1 Select Device > Softupdate View.<br />
2 Use the Filter on the Softupdate View list to customize the view.<br />
3 Click the checkbox to select the device(s) to update and then click<br />
Software Update. To select all devices in the list, select the top-most<br />
checkbox.<br />
The Schedule Device Softupdate dialog box appears.<br />
4 In the Schedule Software Update screen, specify when the update<br />
should occur.<br />
5 In the Schedule field, select Now or Later.<br />
6 If you select Later, enter a Date and Time for the update.<br />
7 Select either Use Server Date/Time or Use Device Date/Time as these<br />
may differ.<br />
8 Select from these options.<br />
Fields Description<br />
Remove address book<br />
entries<br />
Select this checkbox to have all local address book<br />
entries removed after the update.<br />
Remove System Files Select this checkbox to have all endpoint settings<br />
removed after the update. You must then<br />
reconfigure the device.<br />
Allow endpoint to be a<br />
DHCP server<br />
Select this checkbox to allow the endpoint to be a<br />
DHCP server.<br />
Applies to V-Series and ViewStation devices only.<br />
For more information, see the endpoint’s user<br />
guide.<br />
<strong>Polycom</strong>, Inc. 95
<strong>Polycom</strong> <strong>ReadiManager</strong> <strong>Operations</strong> <strong>Guide</strong><br />
Cancel Software Updates<br />
Fields Description<br />
Passive Mode Select this checkbox to perform a software update<br />
in passive FTP mode.<br />
Applies to V-Series and ViewStation devices only.<br />
For more information, see the endpoint’s user<br />
guide.<br />
Note<br />
You may apply a single softupdate request to multiple device models. If the request<br />
includes one or more scheduling options that are not valid for a selected device<br />
model, the system applies only the options that are valid.<br />
9 Click Schedule.<br />
For each device you selected, the date and time you entered appears in the<br />
Scheduled column.<br />
You can cancel Pending software updates for a device.<br />
To cancel pending software updates<br />
1 Select Device > Softupdate View.<br />
2 Use the Filter on the Softupdate View list to customize the view.<br />
3 Click the checkbox to select the device that is scheduled for an update.<br />
4 Click Cancel Update.<br />
The software update operation is cancelled.<br />
96 <strong>Polycom</strong>, Inc.
Device Fields and Descriptions<br />
Device Details<br />
12<br />
This chapter lists the fields found in the <strong>ReadiManager</strong> system device views.<br />
It includes these topics:<br />
• Device Details<br />
• MCU Device Details<br />
• Provisioning Details<br />
• Softupdate Details<br />
Device details may include the following fields.<br />
Table 12-1 Fields of the Device List<br />
Field Description<br />
Device Summary<br />
Name The name of the device.<br />
• Device names must be unique.<br />
• The name must be in ASCII onlya and may have an<br />
unlimited number of characters. Spaces, dashes, and<br />
underscores are valid.<br />
• When retrieved from a video endpoint, the name is<br />
taken from the H.323 ID if the device registered with the<br />
gatekeeper and it is a third-party system. In other cases,<br />
it is the system name, which might be different than the<br />
H.323 ID.<br />
• For an MGC or RMX 2000 device, you must enter a<br />
device name.<br />
<strong>Polycom</strong>, Inc. 97
<strong>Polycom</strong> <strong>ReadiManager</strong> <strong>Operations</strong> <strong>Guide</strong><br />
Table 12-1 Fields of the Device List (continued)<br />
Field Description<br />
Type The type of device. Device types include:<br />
• ViewStation<br />
• ViewStation FX and EX<br />
• V-series<br />
• PVX<br />
• iPower<br />
• MGC<br />
• RMX<br />
• Tandberg<br />
• Other<br />
• GW/MCU<br />
• HD-Series<br />
Note<br />
H.323 cards and IP blades in <strong>Polycom</strong> MGCs are assigned<br />
the device type of Other during registration. The<br />
<strong>ReadiManager</strong> system cannot control endpoints with a<br />
device type of Other and cannot direct these devices to<br />
initiate point-to-point calls. A scheduled point-to-point call<br />
between two video endpoints with a device type of Other<br />
requires the use of an MCU.<br />
Owner (Endpoints only) The user associated with the device<br />
IP Address The assigned IP address of the device<br />
ISDN Video<br />
Number<br />
For ISDN devices only, the country code + city/area code +<br />
phone number for the device.<br />
When you add an endpoint without native ISDN, the ISDN<br />
gateway, country code, and area code are not captured.<br />
The <strong>ReadiManager</strong> system only supports native ISDN.<br />
Site The network site for the device. By default, devices are<br />
added to the Primary Site.<br />
Software Version The version of the software installed on the device (ASCII<br />
only a ). The device provides the version number if it<br />
registered successfully or is managed.<br />
Serial Number The serial number (ASCII only a ) of the device.The device<br />
provides the serial number if it registered successfully or is<br />
managed.<br />
Available to<br />
Schedule<br />
Select this option to make the device available when users<br />
are scheduling conferences<br />
Note<br />
The Available to schedule field is empty and disabled for<br />
MGC and RMX 2000 devices.<br />
98 <strong>Polycom</strong>, Inc.
Table 12-1 Fields of the Device List (continued)<br />
Field Description<br />
Device Fields and Descriptions<br />
Monitoring Level The monitoring level for the device. Possible values include:<br />
• Standard. This device is monitored.<br />
• VIP. This device is monitored closely. The VIP identifier<br />
and filters are available to operators to monitor and<br />
manage conferences.<br />
Policy Group The policy group to which this device is assigned. The<br />
policy group sets maximum bit rate and alternate routing<br />
policy.<br />
Capabilities<br />
Enabled<br />
Supported<br />
Protocols<br />
Capabilities to enable on this device. Options are:<br />
• MCU - The device can act as a control unit for multipoint<br />
conferences<br />
• Gateway - The device can act as a gateway for call<br />
management<br />
The MCU provides the capability if it registered successfully<br />
or is managed.<br />
Note<br />
Currently, RMX 2000 devices cannot be Gateway devices.<br />
The communications protocols that the device can support.<br />
Possible values include:<br />
• IP (H.323) - A standard that defines the protocols used<br />
for multimedia communications on packet-based<br />
networks, such as IP.<br />
• ISDN (H.320) - A standard that defines the protocols<br />
used for multimedia communications on switched<br />
networks, such as ISDN.<br />
For devices with the type Unknown, select H.323.<br />
The device automatically provides the protocols if it<br />
registered successfully or is managed.<br />
Notes<br />
• If an endpoint is configured as a gateway (ISDN), only<br />
the H.323 checkbox is selected. If the endpoint supports<br />
true ISDN, the H.323 and ISDN checkboxes are<br />
selected.<br />
• RMX 2000 devices support only the H.323 protocol.<br />
<strong>Polycom</strong>, Inc. 99
<strong>Polycom</strong> <strong>ReadiManager</strong> <strong>Operations</strong> <strong>Guide</strong><br />
Table 12-1 Fields of the Device List (continued)<br />
Field Description<br />
Alias The alias to connect to the device. The <strong>ReadiManager</strong><br />
system converts the aliases to the IP address associated<br />
with the device.<br />
• Alias Type. Possible types include E.164, H.323 ID,<br />
URL, Transport Address, E-mail, Party Number, and<br />
Unknown.<br />
• Alias Value. Value for the alias type shown.<br />
• The value for the H.323 ID is the device name if the<br />
device registered with the gatekeeper and it is a<br />
third-party system. In other cases, the device name is<br />
the system name, which might be different then the<br />
H323 ID.<br />
• The value of the E.164 alias is the extension dialed to<br />
reach this endpoint.<br />
• To add another alias, select the type, enter the value<br />
(ASCII onlya ), and click Add Alias.<br />
• To remove an alias, select it and click Delete Selected<br />
Row.<br />
Device Status<br />
Note<br />
The following Alias Values are ASCII only a : H323 ID, URL,<br />
Transport Address, and Unknown.<br />
LAN Host Name (Endpoints only) The host name of the LAN on which the<br />
device is resident<br />
Call Signaling<br />
Address<br />
(Endpoints only) The IP address and port used to<br />
communicate H.225 call control messages<br />
RAS Address (Endpoints only) The IP address that includes the port for<br />
communicating registration, admission, and status<br />
messages<br />
Capabilities<br />
Call Info - Sites (Endpoints Only)<br />
Connection Status See Status<br />
Call Type The connection protocol for the call in which the device is<br />
participating. Possible values include: H.323, H.320, and<br />
SIP<br />
100 <strong>Polycom</strong>, Inc.
Table 12-1 Fields of the Device List (continued)<br />
Field Description<br />
Device Fields and Descriptions<br />
Far Site Information Information about the far site, including:<br />
• Far Site Name. The H.323ID of the far site device to<br />
which the selected endpoint is connected. When<br />
multiple endpoints are connected through the device's<br />
embedded MCU, this field displays a concatenation of<br />
each endpoint's H.323ID separated by ' | ', e.g.<br />
'ISDN-CO1-7-1 | Vsfx-9-1'.<br />
• Far Site Number. The address of the far site device to<br />
which the selected endpoint is connected. The address<br />
value for the calling device appears to be the dialed<br />
address. The address value for the called device<br />
appears to be the IP Address.<br />
• Encryption. The status of encryption for the call.<br />
Possible values include: Off, Disabled, AES, and<br />
DH-1024<br />
Call Details (Endpoints Only)<br />
Video Protocol The video connection protocol, both transmission (Tx) and<br />
reception (Rx), the device is using. Possible values include:<br />
• H.261<br />
H.261 is an ITU standard designed for two-way<br />
communication over ISDN lines and supports data<br />
rates which are multiples of 64Kbit/s. H.261 supports<br />
CIF and QCIF resolutions.<br />
• H.263<br />
H.263 is based on H.261 with enhancements that<br />
improve video quality over modems. It supports CIF,<br />
QCIF, SQCIF, 4CIF and 16CIF resolutions.<br />
• H.264<br />
Video Format The video format, both transmission (Tx) and reception<br />
(Rx), the device is using.<br />
Video Frame Rate Device data. See your endpoint documentation.<br />
Video Rate Used Device data. See your endpoint documentation.<br />
Video Format Rate Device data. See your endpoint documentation.<br />
Video FEC Errors Device data. See your endpoint documentation.<br />
Cause Code Standard H.323 cause code that reflects normal call<br />
termination or the nature of an internal failure, e.g., '16' or<br />
'211'.<br />
<strong>Polycom</strong>, Inc. 101
<strong>Polycom</strong> <strong>ReadiManager</strong> <strong>Operations</strong> <strong>Guide</strong><br />
Table 12-1 Fields of the Device List (continued)<br />
Field Description<br />
Audio Protocol The audio connection protocol, both transmission (Tx) and<br />
reception (Rx), the device is using. Possible values include:<br />
• G.711<br />
• G.722<br />
• G.728<br />
Audio Rate Device data. See the particular device documentation.<br />
Quality of Service (QoS)<br />
Far Site Details<br />
System Alerts<br />
Statistics, both transmission (Tx) and reception (Rx), that<br />
characterize call quality including:<br />
• Total Packet Loss<br />
• % Packet Loss<br />
• Audio Packet Loss<br />
• Video Packet Loss<br />
• Audio Jitter<br />
• Video Jitter<br />
Good QoS indicates a high data rate that is uncompromised<br />
by low bit error rate.<br />
On packet-switched networks, QoS is not guaranteed.<br />
Detailed information about the far site device to which the<br />
selected endpoint is connected including:<br />
• Tx Call Speed<br />
• Rx Call Speed<br />
• Error<br />
• Sync<br />
• Call Type<br />
Errors Device error message text, e.g., GK Registration error<br />
Warnings Device warning message text, e.g., Low Battery<br />
Product ID The product model within the device type group<br />
Description A free-form text field (Extended ASCII only a ) in which<br />
information about the device can be added<br />
102 <strong>Polycom</strong>, Inc.
MCU Device Details<br />
Table 12-1 Fields of the Device List (continued)<br />
Field Description<br />
MCU device details include these fields.<br />
Device Fields and Descriptions<br />
HTTP URL (Endpoints only) The management URL for the device, if<br />
available (ASCII onlya ). This URL allows operators to<br />
manage the device from the Device > Admin/Monitor<br />
View > Manage Device screen.<br />
All <strong>Polycom</strong> endpoints provide device management through<br />
a browser. For these devices, this field is completed when<br />
the device registers with the <strong>ReadiManager</strong> system.<br />
For third-party endpoints and devices that do not register<br />
using an IP address, you must enter the URL.<br />
HTTP Port (Endpoints only) The HTTP port number for the device. The<br />
device provides the port number if it registered successfully<br />
and is managed.<br />
a. For more information on field limitations, see “Field Input Requirements” on page 7.<br />
Table 12-2 Fields in the MCU H.320 Service Dialog Box (MGC Only)<br />
Field Description<br />
MCU H.32O Service<br />
Service Name Name of the H.320 ISDN service<br />
Channels Number of 64K channels dedicated to the MCU<br />
Number Range Dial-in number range of service. These ISDN numbers are<br />
available on an MCU for all endpoints to use. Also called<br />
direct inward dialing (DID).<br />
LCR Table The least-cost routing table for calls made through this<br />
gateway<br />
Local Prefix The prefix required to place a call to a local number outside<br />
the enterprise. For example, if you dial 9 to reach an<br />
outside line, the Local Prefix is 9.<br />
Non-Local Prefix The prefix required to dial long distance. For example, in<br />
certain states in the United States, you must dial 1 before<br />
you can dial a non-local number.<br />
International Prefix The prefix required to dial an international number. For<br />
example, in many countries, the international prefix is 00.<br />
Local Area Code A list of local area codes, separated by commas<br />
<strong>Polycom</strong>, Inc. 103
<strong>Polycom</strong> <strong>ReadiManager</strong> <strong>Operations</strong> <strong>Guide</strong><br />
Table 12-2 Fields in the MCU H.320 Service Dialog Box (MGC Only) (continued)<br />
Field Description<br />
Priority The priority order for this service<br />
Table 12-3 Fields in the MCU H.323 Service Dialog Box<br />
Field Description<br />
Service Name The name of the H.323 service (ASCII only a ) defined in<br />
the MCU.<br />
Dialing Prefix Prefix to select this service.<br />
The prefix for the MGC is located in the H.323 Service<br />
Properties dialog box of the MGC Manager.<br />
Service IP Address IP address associated with this network service and<br />
with this H.323 card in the MCU.<br />
Alias Alias for the service defined in the MCU.<br />
Note<br />
<strong>Polycom</strong> recommends using E.164 as the alias for this<br />
service.<br />
The number that is dialed if the endpoints are registered<br />
with the same gatekeeper. If the endpoints are not<br />
registered with the same gatekeeper, they use their<br />
assigned IP address to connect.<br />
Port Number of IP connections available.<br />
Priority The priority order for this service.<br />
a. For more information, see “Field Input Requirements” on page 7.<br />
Table 12-4 Fields in the MCU Gateway Service Dialog Box (MGC Only)<br />
Field Description<br />
Service Name The name of the H.323 service defined in the MCU.<br />
Dialing Prefix Prefix to select this service.<br />
The prefix for the MGC is located in the H.323 Service<br />
Properties dialog box of the MGC Manager.<br />
H320 Service Name Select a defined H320 service<br />
Channels Number of 64K channels dedicated to the MCU.<br />
Priority The priority order for this service.<br />
104 <strong>Polycom</strong>, Inc.
Table 12-5 Fields in the MGC MCU Resources Dialog Box<br />
Field Description<br />
Device Fields and Descriptions<br />
Max Total Conferences Maximum number of total conferences allowed at<br />
once on this MCU.<br />
Max CP Conferences Maximum number of continuous presence (CP)<br />
conferences allowed, based on the number of<br />
licenses available.<br />
Max Total Participants Maximum number of total MCU participants<br />
allowed at once on this MCU.<br />
Max Transcoding Ports Maximum number of transcoding ports on which<br />
both ISDN and IP participants can be connected.<br />
Total IP Parties<br />
(Embedded MCU devices)<br />
Total ISDN Parties<br />
(Embedded MCU devices)<br />
Total Transcoded Parties<br />
(Embedded MCU devices)<br />
Maximum number of IP calls that can be made<br />
from this endpoint.<br />
Maximum number of ISDN calls that can be made<br />
from this endpoint.<br />
Maximum number of transcoded calls (IP and ISDN<br />
calls combined) that can be made from this<br />
endpoint.<br />
Use Entry Queue Indicates whether the MGC device supports an<br />
IVR.<br />
Entry Queue Number ID The IP number that conference participants dial to<br />
access the IVR prompt to join a meeting.<br />
Entry Queue ISDN Number The ISDN-allocated phone number of the IVR.<br />
ISDN devices only.<br />
Table 12-6 Fields in the RMX2000 MCU Resources Dialog Box<br />
Field Description<br />
Max Total Conferences Maximum number of total conferences allowed at<br />
once on this MCU.<br />
Max CP Conferences Maximum number of continuous presence (CP)<br />
conferences allowed, based on the number of<br />
licenses available.<br />
Max Video Ports Maximum number of video ports on which<br />
participants can be connected.<br />
Max Licensed Video Ports Maximum number of total video participants<br />
allowed at once on this MCU.<br />
Use Entry Queue Indicates whether the RMX 2000 device supports<br />
an IVR.<br />
<strong>Polycom</strong>, Inc. 105
<strong>Polycom</strong> <strong>ReadiManager</strong> <strong>Operations</strong> <strong>Guide</strong><br />
Table 12-6 Fields in the RMX2000 MCU Resources Dialog Box (continued)<br />
Field Description<br />
Entry Queue Number ID The IP number that conference participants dial to<br />
access the IVR prompt to join a meeting.<br />
Audio & Video Settings: The following parameters must be set manually to<br />
synchronize the with the RMX 2000 device. See the RMX 2000 documentation for<br />
more information about these settings.<br />
RMX API Version Choose Pre-2.0 if you have an RMX 1.x system.<br />
Choose 2.0 or greater if you have an RMX 2.x<br />
system.<br />
Max Voice Ports Only available when RMX API Version is 2.0 or<br />
greater. Set this to the maximum number of audio<br />
ports configured on the RMX device.<br />
Refer to the RMX 2000 Administrator’s <strong>Guide</strong> for<br />
more information about this field.<br />
Note<br />
Up to 10 blocks of RMX video ports can be<br />
converted to 50 audio-only ports, up to a maximum<br />
of 200 audio-only ports.<br />
Max CP Resolution Only available when RMX API Version is 2.0 or<br />
greater. Set this to the highest available video<br />
format. Choices are: None, CIF, SD15, and SD30.<br />
Refer to the RMX 2000 Administrator’s <strong>Guide</strong> for<br />
more information about this field.<br />
106 <strong>Polycom</strong>, Inc.
Provisioning Details<br />
The Provisioning Details section has these fields.<br />
Table 12-7 Fields of the Provisioning Details section<br />
Field Description<br />
Device Fields and Descriptions<br />
Last Profile Applied The name of the last provisioning profile that was or was not<br />
successfully applied to the device. The Provisioning<br />
Status will be either Success or Failed.<br />
Provisioning Status The device’s current provisioning status. Possible values<br />
include:<br />
• Clear. No provisioning has been done.<br />
• Pending. Provisioning is scheduled for this device.<br />
• In Progress. The device is currently being provisioned.<br />
• Success. Provisioning has been completed<br />
successfully on this device.<br />
• Failed. Provisioning was not completed on this device.<br />
Pending Profile The name of the provisioning profile that is scheduled to be<br />
applied to the device. In this case, the Provisioning Status<br />
will be either Pending or In Progress.<br />
This field is blank if the device is not scheduled for<br />
provisioning.<br />
Scheduled The date and time, in the default format of yyyy-mm-dd<br />
hh:mm, when the device is schedule to be provisioned.<br />
This field is blank if the device is not scheduled for<br />
provisioning.<br />
Last Attempt<br />
Date/Time<br />
The date and time, in the default format of yyyy-mm-dd<br />
hh:mm:ss, of the last provisioning message exchanged with<br />
the device.<br />
<strong>Polycom</strong>, Inc. 107
<strong>Polycom</strong> <strong>ReadiManager</strong> <strong>Operations</strong> <strong>Guide</strong><br />
Softupdate Details<br />
Table 12-7 Fields of the Provisioning Details section (continued)<br />
Field Description<br />
Failure Reason A text description of the reason the provisioning failed.<br />
Causes for failure include:<br />
• The provisioning profile does not exist<br />
• The provisioning profile does not include provisioning<br />
information<br />
• The <strong>ReadiManager</strong> system no longer manages the<br />
device<br />
• A password for the device is set in the video endpoint,<br />
and you must enter it in the <strong>ReadiManager</strong> system<br />
• The device is busy<br />
• A network error occurred<br />
• An incomplete transfer of provisioning information<br />
occurred<br />
• Provisioning has timed out<br />
• An internal error occurred on the device, and you must<br />
reboot it<br />
• An unknown error occurred. Reboot the device.<br />
Log Message A read-only text box that contains messages related to the<br />
device provisioning status<br />
The Softupdate section has these fields.<br />
Table 12-8 Fields of the Softupdate Details section<br />
Field Description<br />
Softupdate Status The device’s software update status. Possible values<br />
include:<br />
• Clear. A software update has not been done.<br />
• Pending. A software update has been scheduled and is<br />
pending. The device may be offline or in a call.<br />
• In Progress. The software update is in progress.<br />
• Success. A software update has completed<br />
successfully.<br />
• Failed. A software update could not be performed.<br />
Scheduled The date and time, in the default format of yyyy-mm-dd<br />
hh:mm, when the device software is schedule to be updated.<br />
This field is blank if the device is not scheduled for<br />
provisioning.<br />
108 <strong>Polycom</strong>, Inc.
Table 12-8 Fields of the Softupdate Details section (continued)<br />
Field Description<br />
Last Attempt<br />
Date/Time<br />
Device Fields and Descriptions<br />
The date and time, in the default format of yyyy-mm-dd<br />
hh:mm:ss, of the last software update message exchanged<br />
with the device.<br />
Failure Reason A text description of the reason the software update failed.<br />
Causes for failure may include:<br />
• The software update file location does not exist.<br />
• A password for the device is set in the video endpoint,<br />
and you must enter it in <strong>ReadiManager</strong>.<br />
• A network error has occurred.<br />
• The update has timed out.<br />
• An internal error occurred on the device, and you must<br />
reboot it.<br />
• A profile has not been configured.<br />
• An endpoint is offline.<br />
• An incorrect activation key is in the key file.<br />
• An unknown error has occurred. Reboot the device<br />
Log Message A read-only text box that contains the log message text<br />
recorded during the execution of the software update.<br />
<strong>Polycom</strong>, Inc. 109
<strong>Polycom</strong> <strong>ReadiManager</strong> <strong>Operations</strong> <strong>Guide</strong><br />
110 <strong>Polycom</strong>, Inc.
System Management Overview<br />
13<br />
This chapter describes the System Management Dashboard, menu, and<br />
commands. It includes these topics:<br />
• <strong>ReadiManager</strong> System Dashboard<br />
• Dashboard Commands<br />
• System Management Menu<br />
<strong>ReadiManager</strong> System Dashboard<br />
The <strong>ReadiManager</strong> system Dashboard displays information about system<br />
health and activity levels. The sections that follow describe the Dashboard in<br />
more detail.<br />
Figure 13-1 <strong>ReadiManager</strong> System Dashboard<br />
<strong>Polycom</strong>, Inc. 111
<strong>Polycom</strong> <strong>ReadiManager</strong> <strong>Operations</strong> <strong>Guide</strong><br />
Automatic Refresh<br />
MCUs<br />
Devices<br />
Today’s Conferences<br />
Device Management<br />
By default, the system Dashboard refreshes every 5 seconds. You can change<br />
this to a value of 5 through 60.<br />
The Last Update field flashes when the system refreshes the Dashboard or<br />
when you click Refresh.<br />
If for some reason the system is unable to populate the Dashboard data, the<br />
border around the section is highlighted in a blurry red. In this case, the data<br />
in that section may not be accurate.<br />
Note that all Dashboard information may become stale between automatic<br />
refreshes. The next refresh brings the information up to date.<br />
This section displays information about the current health and status of the<br />
<strong>Polycom</strong> MCUs (MGC or RMX 2000) registered to the <strong>ReadiManager</strong> system.<br />
The summary view displays the number of MCUs registered and whether or<br />
not any of the MCUs has errors or warnings. The detailed view identifies the<br />
MCU Name, Type, IP Address, and Status.<br />
This section displays information about the current health and status of the<br />
endpoints (including GW/MCU devices) registered to the <strong>ReadiManager</strong><br />
system. The summary view displays the number of endpoints registered and<br />
whether or not any of the endpoints has alerts or pending help requests. The<br />
detailed view displays graphically the number of endpoints that are In Call,<br />
Online, and Offline.<br />
This section displays information about the number and status of scheduled<br />
and unscheduled (ad hoc) conferences for the current day (as determined by<br />
the client system’s time) including Completed, Active, and Future<br />
conferences.<br />
This section displays information about the number and status of device<br />
Provisioning and Softupdate events and their current state: Pending, In<br />
Progress, Success or Failed.<br />
112 <strong>Polycom</strong>, Inc.
Licenses<br />
Network Summary<br />
Services<br />
Configuration<br />
Connected Users<br />
Utilization<br />
System Management Overview<br />
This section displays information about the number of installed, used, and<br />
unused <strong>ReadiManager</strong> system licenses.<br />
This section displays information about network usage. The summary view<br />
displays the percentage of bandwidth currently in use by site. The detailed<br />
view displays the site links and network performance information for the link<br />
including Name, Bandwidth, Calls, Delay, Jitter, and Packet Loss.<br />
You can enable Real-Time Statistics for the network summary via the Primary<br />
Gatekeeper settings. See “Edit the Primary Gatekeeper Settings” on page 194.<br />
This section displays information about the service processes running on the<br />
<strong>ReadiManager</strong> system. The summary view displays the number of Running<br />
and Stopped services. The detailed view displays a list of the service processes<br />
and Service Name and Status.<br />
This section displays information about the configuration of the<br />
<strong>ReadiManager</strong> system. The summary view displays the current software<br />
version. The detailed view displays the amount of Physical Memory installed,<br />
whether or not the system is configured to use an LDAP directory, whether the<br />
Database the system uses is internal or external, whether the Time Source is<br />
internal or external, and whether or not the system is configured for<br />
Redundancy. The Redundancy field may also show two configuration errors:<br />
Need Virtual IP or Secondary Is Down.<br />
This section displays information about all users currently connected to the<br />
<strong>ReadiManager</strong> system. The summary view displays the total number of<br />
connected users. The detailed view provides a breakdown of the number of<br />
users according to the standard <strong>ReadiManager</strong> system user roles and<br />
permissions (Administrator, Operator, and Scheduler). It lists users by<br />
Username, Role, and Login Timestamp.<br />
This section displays information about system usage. The detailed view<br />
graphically displays the percentage of CPU and Paging File usage.<br />
<strong>Polycom</strong>, Inc. 113
<strong>Polycom</strong> <strong>ReadiManager</strong> <strong>Operations</strong> <strong>Guide</strong><br />
Dashboard Commands<br />
Four commands are available from the System Management > Dashboard.<br />
They are:<br />
Table 13-1 Dashboard Commands<br />
System Management Menu<br />
Command Use this command to....<br />
Refresh Update the screen with current status<br />
System Log Files Lists the <strong>ReadiManager</strong> system log files<br />
Restart Shuts down and restarts the <strong>ReadiManager</strong> system. See<br />
“Restart or Shut Down a <strong>ReadiManager</strong> System” on<br />
page 122.<br />
Shutdown Shuts down the <strong>ReadiManager</strong> system. See “Restart or<br />
Shut Down a <strong>ReadiManager</strong> System” on page 122.<br />
The System Management menu gives users with administrative permissions<br />
access to the day-to-day management tasks they need to monitor, maintain,<br />
and troubleshoot the <strong>ReadiManager</strong> system. Besides the Dashboard, it<br />
displays these selections:<br />
Table 13-2 Dashboard Commands<br />
Selection Description<br />
Database Backup<br />
FIles<br />
Use this selection to view or backup the <strong>ReadiManager</strong><br />
system internal database backup file<br />
Conference Setup Use this option to add, edit, or delete conference templates<br />
Directory Setup Use this option to add, edit, or delete users and rooms to<br />
the <strong>ReadiManager</strong> directory and to manage the Global<br />
Address Book<br />
Profiles/Policies Use this option to add, edit, or delete provisioning profiles,<br />
software update profiles, device policy groups, and user<br />
roles<br />
Reports Use this option to view or export<br />
Each selection has its own context-sensitive command list.<br />
114 <strong>Polycom</strong>, Inc.
System Backup and Recovery<br />
<strong>Operations</strong><br />
14<br />
This chapter describes the System Management tasks. It includes these topics:<br />
• Overview of the <strong>ReadiManager</strong> System Database<br />
• Connect to the <strong>ReadiManager</strong> System Serial Console<br />
• Backup the <strong>ReadiManager</strong> System Database<br />
• Copy the <strong>ReadiManager</strong> System Database Backup Files<br />
• Restore the <strong>ReadiManager</strong> System Internal Databases<br />
• Restore the <strong>ReadiManager</strong> System External Database<br />
• Restore an External Database During Upgrade<br />
• Recovery <strong>Operations</strong> - Reset First Time Setup<br />
• Restart or Shut Down a <strong>ReadiManager</strong> System<br />
Overview of the <strong>ReadiManager</strong> System Database<br />
<strong>ReadiManager</strong> system information is stored in these databases:<br />
Table 14-1 <strong>ReadiManager</strong> System Databases<br />
Database Description<br />
<strong>ReadiManager</strong> The general <strong>ReadiManager</strong> system database that includes<br />
all data for scheduling, devices, dial rules, device<br />
registration, and site topology<br />
Logger The <strong>ReadiManager</strong> system database for call detail records<br />
and gatekeeper diagnostic logs<br />
master<br />
model<br />
msdb<br />
The <strong>ReadiManager</strong> system Microsoft MSDE system<br />
databases<br />
<strong>Polycom</strong>, Inc. 115
<strong>Polycom</strong> <strong>ReadiManager</strong> <strong>Operations</strong> <strong>Guide</strong><br />
The <strong>ReadiManager</strong> system automatically optimizes its database on an ongoing<br />
basis. It backs up its internal databases daily. The backup files are stored on the<br />
<strong>ReadiManager</strong> system hard disk.<br />
The <strong>ReadiManager</strong> system maintains the last four backups. To keep backups<br />
for a longer time period, copy them regularly to a different location. For more<br />
information, see “Copy the <strong>ReadiManager</strong> System Database Backup Files” on<br />
page 117.<br />
You can also perform manual backups and restore existing backups through<br />
the <strong>ReadiManager</strong> system serial console or Microsoft Enterprise Manager.<br />
You can back up databases as follow.<br />
From ... To ...<br />
Internal Internal<br />
Internal External<br />
External External<br />
Connect to the <strong>ReadiManager</strong> System Serial Console<br />
To connect to the <strong>ReadiManager</strong> system serial console<br />
1 Using a RS-232 serial cable, connect a computer to the 9-pin serial port on<br />
the <strong>ReadiManager</strong> appliance.<br />
2 Turn on the computer.<br />
3 From the Start menu, choose Accessories > Communications><br />
HyperTerminal.<br />
4 In the Connection Description dialog box, type <strong>ReadiManager</strong> in the<br />
Name field and click OK.<br />
5 In the Connect To dialog box, select COM1 in the Connect using<br />
drop-down list and click OK.<br />
6 In the Properties dialog box, define the following properties and click<br />
OK.<br />
— Bits per second: 19200<br />
— Data bits: 8<br />
— Parity: None<br />
— Stop bits: 1<br />
— Flow control: None<br />
The SE200 - HyperTerminal appears.<br />
116 <strong>Polycom</strong>, Inc.
Backup the <strong>ReadiManager</strong> System Database<br />
System Backup and Recovery <strong>Operations</strong><br />
To back up a database from the <strong>ReadiManager</strong> SE200 serial port<br />
1 Connect to the <strong>ReadiManager</strong> system serial console, as described in<br />
“Connect to the <strong>ReadiManager</strong> System Serial Console” on page 116.<br />
2 From the Root menu, select 4. Database <strong>Operations</strong>.<br />
3 From the Database <strong>Operations</strong> menu, select 1. Backup Local Databases.<br />
If you have a previous backup that you created earlier, a warning appears<br />
stating: “The following backup database files will be deleted.<br />
To keep these files, enter ‘N’ to exit and then use the Copy<br />
Database operation to copy them to an external location. Do<br />
You Wish to Continue?”<br />
— To save a previous backup, select N and then select 4. Copy Database<br />
files TO <strong>ReadiManager</strong> to copy these files to an external location.<br />
See “Copy the <strong>ReadiManager</strong> System Database Backup Files” on<br />
page 117.<br />
— To delete the previous backup database files, select Y.<br />
4 When prompted, enter the administrator user name and password.<br />
The system backs up the database. When the backup is complete, a success<br />
message for the completed backup displays on the console screen.<br />
Copy the <strong>ReadiManager</strong> System Database Backup Files<br />
In addition to backing up and restoring database files, you can copy the<br />
database backup files to and from the <strong>ReadiManager</strong> system to an external<br />
location.<br />
You have two options for copying the <strong>ReadiManager</strong> system backup files: the<br />
<strong>ReadiManager</strong> system web interface and the <strong>ReadiManager</strong> system serial<br />
console. Copying the database backup files using the web interface saves them<br />
to a local system. Copy them using the serial port puts them on a USB drive.<br />
You can also use the <strong>ReadiManager</strong> system serial port to copy the database<br />
backup file onto the <strong>ReadiManager</strong> system.<br />
To copy the <strong>ReadiManager</strong> system database backup files using the web interface<br />
1 Select System Management > Database Backup Files.<br />
The Database Backup Files list appears showing all of the backup files<br />
stored on the <strong>ReadiManager</strong> system. Files with a timestamp included in<br />
the name are system-generated backup files. Files without a timestamp are<br />
user forced backups.<br />
<strong>Polycom</strong>, Inc. 117
<strong>Polycom</strong> <strong>ReadiManager</strong> <strong>Operations</strong> <strong>Guide</strong><br />
2 From the Database Backup Files list, select the backup files of interest<br />
and click Save.<br />
3 In the Save As dialog box, browse to a location and click Save.<br />
To copy the database backup files from the <strong>ReadiManager</strong> system onto a USB<br />
flash drive<br />
1 Connect to the <strong>ReadiManager</strong> system serial console, as described in<br />
“Connect to the <strong>ReadiManager</strong> System Serial Console” on page 116.<br />
2 From the Root menu, select 4. Database <strong>Operations</strong>.<br />
3 From the Database <strong>Operations</strong> menu, select 4. Copy Database files TO<br />
<strong>ReadiManager</strong>.<br />
4 Select the source and destination locations to copy database files.<br />
Note<br />
Make sure you create a folder for the database backup files before you copy the<br />
files or the operation will fail.<br />
5 Enter the full path of the folder to which the database files will be copied.<br />
For example, if the folder is on the root, type backslash (\).<br />
The system copies the files. When the backup is complete, the Database<br />
<strong>Operations</strong> menu reappears.<br />
6 Exit the serial console.<br />
To copy the database backup files to the <strong>ReadiManager</strong> system from a USB flash<br />
drive<br />
1 Connect to the <strong>ReadiManager</strong> system serial console, as described in<br />
“Connect to the <strong>ReadiManager</strong> System Serial Console” on page 116.<br />
2 From the Root menu, select 4. Database <strong>Operations</strong>.<br />
3 From the Database <strong>Operations</strong> menu, select 3. Copy Database files<br />
FROM <strong>ReadiManager</strong>.<br />
4 Select the source location on the USB flash drive from which you want to<br />
copy database files.<br />
5 Enter the full path and file name of the database backup files (.bak) or<br />
just the file names if they are on the root.<br />
The system copies the files. When the backup is complete, the Database<br />
<strong>Operations</strong> menu reappears.<br />
6 Exit the serial console.<br />
118 <strong>Polycom</strong>, Inc.
Overview of Database Restoration<br />
System Backup and Recovery <strong>Operations</strong><br />
To restore an internal <strong>ReadiManager</strong> system database, follow the procedures<br />
in this section. To restore an external Microsoft SQL Server databases, use<br />
Microsoft SQL Server Management Studio. Refer to your Microsoft SQL Server<br />
Management Studio documentation for more information.<br />
When you restore internal or external databases:<br />
• Do not allow users to connect to the server during the restoration process<br />
• Restore the <strong>ReadiManager</strong> and Logger databases at the same time<br />
• Restore the <strong>ReadiManager</strong> and Logger databases from backups that were<br />
taken at the same time<br />
• Reboot the <strong>ReadiManager</strong> SE200 appliance when the restoration process is<br />
finished<br />
Restore the <strong>ReadiManager</strong> System Internal Databases<br />
To restore the <strong>ReadiManager</strong> system internal databases<br />
1 Back up the databases as described in “Backup the <strong>ReadiManager</strong> System<br />
Database” on page 117.<br />
2 When the Database <strong>Operations</strong> reappears, select 2. Restore Local<br />
Databases.<br />
3 When prompted, enter the database name.<br />
4 Enter the administrator username and password.<br />
A list of database backup files appear, with corresponding backup dates.<br />
5 Select the number of the database backup file to restore.<br />
The system restores the database. When the restoration is complete, a<br />
success message for the completed backup displays on the console screen<br />
and the Database <strong>Operations</strong> menu reappears.<br />
6 Repeat step 5 to restore the next database backup file.<br />
7 After you have restored both databases, exit the serial console and reboot<br />
the <strong>ReadiManager</strong> SE200 appliance.<br />
<strong>Polycom</strong>, Inc. 119
<strong>Polycom</strong> <strong>ReadiManager</strong> <strong>Operations</strong> <strong>Guide</strong><br />
Restore the <strong>ReadiManager</strong> System External Database<br />
You can restore an external Microsoft SQL Server database using Microsoft<br />
SQL Server Management Studio or Microsoft SQL Query Analyzer.<br />
Note<br />
The database name is part of each backup file name. Make sure you restore the<br />
correct backup file for each database.<br />
To restore external databases<br />
1 Restore both <strong>ReadiManager</strong> database backup files as described in<br />
“Restore the <strong>ReadiManager</strong> System Internal Databases” on page 119.<br />
2 Run the following command using Microsoft SQL Server Management<br />
Studio or Microsoft SQL Query Analyzer.<br />
EXEC <strong>ReadiManager</strong>.dbo.pr_FixOrphanUsers<br />
Note<br />
You must have an system administrator or <strong>ReadiManager</strong> administrator account or<br />
the SysAdmin or db_owner role to execute this command.<br />
3 Reboot the <strong>ReadiManager</strong> SE200 appliance.<br />
Restore an External Database During Upgrade<br />
You can use a local <strong>ReadiManager</strong> database backup file and restore the<br />
database to an external Microsoft SQL Server during the upgrade process.<br />
To restore an external database during an upgrade from <strong>ReadiManager</strong> v. 2.x<br />
>> After you have restored all database backup files, run the following<br />
commands, using Microsoft SQL Server Management Studio or Microsoft<br />
SQL Query Analyzer.<br />
USE <strong>ReadiManager</strong><br />
GO<br />
EXEC sp_change_users_login 'Update_one', PLCMUser,PLCMUser<br />
GO<br />
USE Logger<br />
GO<br />
EXEC sp_change_users_login 'Update_one', PLCMUser,PLCMUser<br />
GO<br />
120 <strong>Polycom</strong>, Inc.
System Backup and Recovery <strong>Operations</strong><br />
To restore an external database during an upgrade from <strong>ReadiManager</strong> v. 3.x<br />
>> After you have restored all database backup files, run the following<br />
commands, using Microsoft SQL Server Management Studio or Microsoft<br />
SQL Query Analyzer.<br />
USE <strong>ReadiManager</strong><br />
GO<br />
EXEC <strong>ReadiManager</strong>.dbo.pr_FixOrphanUsers<br />
GO<br />
USE Logger<br />
GO<br />
EXEC <strong>ReadiManager</strong>.dbo.pr_FixOrphanUsers<br />
GO<br />
Note<br />
You must have a system administrator or <strong>ReadiManager</strong> administrator account or<br />
the SysAdmin or db_owner role to run this command.<br />
Recovery <strong>Operations</strong> - Reset First Time Setup<br />
To recovery after a disaster, you must Reset First Time Setup. This:<br />
• Re-enables the First Time Setup screens<br />
• Allows you to reconfigure the <strong>ReadiManager</strong> system network, database,<br />
and LDAP settings<br />
Note<br />
Reset First Time Setup preserves all user data and does not change any<br />
configuration settings, such as licenses, system, network, database, or LDAP.<br />
To Reset First Time Setup, you connect to the <strong>ReadiManager</strong> serial console.<br />
Before you re-enable the First Time Setup screens, make sure you know a<br />
valid <strong>ReadiManager</strong> system administrator username and password. You’ll<br />
need it to log into the <strong>ReadiManager</strong> system and the factory-set username and<br />
password may have changed.<br />
To reset First Time Setup<br />
1 Connect to the <strong>ReadiManager</strong> system serial console, as described in<br />
“Connect to the <strong>ReadiManager</strong> System Serial Console” on page 116.<br />
2 On the Root menu, select 6. Disaster Recovery.<br />
<strong>Polycom</strong>, Inc. 121
<strong>Polycom</strong> <strong>ReadiManager</strong> <strong>Operations</strong> <strong>Guide</strong><br />
3 Select 1. Reset First Time Setup.<br />
The system resets itself to its first time setup state. When the reset is<br />
complete, a success message displays on the console screen.<br />
4 Exit the serial console.<br />
5 Review the First Time Setup screens and make required changes to any<br />
settings.<br />
The system has been restored and is ready for use.<br />
Restart or Shut Down a <strong>ReadiManager</strong> System<br />
You have three options when shutting down the <strong>ReadiManager</strong> system.<br />
• In emergency situations, switch off the power switch on the rear panel of<br />
the <strong>ReadiManager</strong> SE200 appliance<br />
Use this option only when you must immediately cut power to the<br />
appliance.<br />
• In non-emergency situations, you can stop future scheduled conferences<br />
from starting automatically on the system, wait for active conferences to<br />
end, and then either Shutdown the system or Restart the system.<br />
— Use the Shutdown option when you must disconnect the<br />
<strong>ReadiManager</strong> SE200 appliance for some reason, e.g., to move it. All<br />
<strong>ReadiManager</strong> system functionality is stopped during a Shutdown.<br />
— Use the Restart option when you must cycle the <strong>ReadiManager</strong><br />
system for some reason, e.g., if the system locks up.<br />
During a restart, the system will drop all IP conferences. In general,<br />
ISDN conferences will not drop. Also, devices registered to the<br />
gatekeeper will drop. IP devices not registered with the gatekeeper<br />
can continue in conference.<br />
To restart or shut down a <strong>ReadiManager</strong> system<br />
1 (Optional) To stop future scheduled conferences from starting before you<br />
perform the restart or shutdown:<br />
a Select System Management > Conference Setup > Conference<br />
Settings.<br />
b Check the Conference Auto-Launch Disabled checkbox.<br />
c Select System Management > Dashboard.<br />
d Monitor the Today’s Conferences section to determine when all<br />
active conferences are completed.<br />
122 <strong>Polycom</strong>, Inc.
System Backup and Recovery <strong>Operations</strong><br />
2 Click Restart or Shutdown, as appropriate.<br />
In a redundant <strong>ReadiManager</strong> configuration, the system displays a<br />
warning indicating that it is initiating a failover.<br />
If you select Restart, it may take the <strong>ReadiManager</strong> system up to 10<br />
minutes to shutdown and then restart all server processes.<br />
<strong>Polycom</strong>, Inc. 123
<strong>Polycom</strong> <strong>ReadiManager</strong> <strong>Operations</strong> <strong>Guide</strong><br />
124 <strong>Polycom</strong>, Inc.
Global Address Book<br />
15<br />
This chapter describes how to work with the <strong>ReadiManager</strong> system Global<br />
Address Book. It includes these topics:<br />
• About the Global Address Book<br />
• View the Global Address Book<br />
• Add a User to the Global Address Book<br />
• Edit a Global Address Book User<br />
• Delete a Global Address Book User<br />
• Edit the Global Address Book Password<br />
About the Global Address Book<br />
The <strong>ReadiManager</strong> system Global Address Book is a shared directory<br />
managed by the <strong>ReadiManager</strong> system that allows users to look up and call<br />
other users (with devices) in their video communications network. The Global<br />
Address Book can also include contact information for endpoints outside your<br />
network, third-party endpoints, and other endpoints that cannot register with<br />
the gatekeeper, such as ISDN-only endpoints. The administrator must add<br />
these endpoints manually.<br />
Note<br />
Often when manually registering third-party endpoints, you must configure the<br />
endpoint with the (case-sensitive) path to the Global Address Book.<br />
Manual entries are also called static entries, because they are not updated<br />
when information at the endpoint changes.<br />
When an endpoint registers with the <strong>ReadiManager</strong> system, its information is<br />
automatically entered into the Global Address Book.<br />
Once registered, endpoints endpoints check for GAB updates every 20<br />
minutes. Also, when information changes at the endpoint, it updates the<br />
Global Address Book automatically.<br />
<strong>Polycom</strong>, Inc. 125
<strong>Polycom</strong> <strong>ReadiManager</strong> <strong>Operations</strong> <strong>Guide</strong><br />
Only administrators can add, edit, or delete information in the Global Address<br />
Book. If an endpoint is configured to Allow Directory Changes, additions and<br />
deletions to the Global Address Book are pushed to the endpoint.<br />
Note<br />
• The <strong>ReadiManager</strong> system Global Address Book lists devices. Devices may or<br />
may not have users (or rooms) associated with them. The Global Address Book<br />
cannot list users unless they have devices associated with them.<br />
• If your company has more than 100 endpoints, don’t limit the Global Address<br />
Book on the endpoint side or the user won’t have access to all Global Address<br />
Book entries.<br />
From a video endpoint, end-users can locate other users’ devices by name in<br />
the Global Address Book and initiate a call without knowledge of another<br />
user’s equipment.<br />
Note<br />
Endpoints also have an address book. Users can add personal entries to their<br />
endpoint address book. These entries are not communicated to the Global Address<br />
Book.<br />
The user information found in the Global Address Book includes:<br />
Table 15-1 Information in the Global Address Book<br />
Column Description<br />
User/Resource The associated user or resource ID<br />
Device Name The name of the associated device<br />
Type The type of endpoint<br />
IP Address The IP address of the endpoint<br />
Phone Number The phone number of the endpoint<br />
Alias The alias associated with this device<br />
Table 15-2 Fields in the Global Address Book Entry Screen<br />
Field Description<br />
Name The name (ASCII only a ) of the endpoint<br />
IP Video (H.323)<br />
IP Address The IP address of the video endpoint<br />
E.164 alias The alias associated with this endpoint<br />
126 <strong>Polycom</strong>, Inc.
View the Global Address Book<br />
Table 15-2 Fields in the Global Address Book Entry Screen (continued)<br />
Field Description<br />
To view the Global Address Book<br />
Global Address Book<br />
Rate The maximum speed at which this endpoint can be<br />
called<br />
ISDN Video (H.320)<br />
Country Code The country code to dial to reach the endpoint<br />
City Code The area or city code in which the endpoint is located<br />
Number A The ISDN number of the endpoint<br />
Number B If the endpoint has a 2x64 ISDN line configuration, enter<br />
the second ISDN number of this endpoint<br />
Extension The extension number of the unit with gateway +<br />
extension dialing<br />
Rate The maximum speed at which this unit can be called<br />
a. For more information, see “Field Input Requirements” on page 7.<br />
>> Select System Management > Directory Setup > Global Address Book.<br />
The Global Address Book appears. It can be filtered by Address Type<br />
(Static, Dynamic, or All) or Attribute (Device Name, IP Address, or All).<br />
Add a User to the Global Address Book<br />
To add a user to the Global Address Book<br />
1 Select System Management > Directory Setup > Global Address Book.<br />
2 From the Global Address Book, click Add GAB User.<br />
3 Complete the IP Video(H.323) and/or ISDN Video (H.320) sections of<br />
the Add GAB User dialog box.<br />
4 Click OK.<br />
<strong>Polycom</strong>, Inc. 127
<strong>Polycom</strong> <strong>ReadiManager</strong> <strong>Operations</strong> <strong>Guide</strong><br />
Edit a Global Address Book User<br />
You must edit the Global Address Book when the address information (ISDN<br />
number or IP address) for a static user changes. You cannot edit the Global<br />
Address Book for a dynamic user; their information comes from the endpoint<br />
registration.<br />
To edit a static address in the Global Address Book<br />
1 Select System Management > Directory Setup > Global Address Book.<br />
The Global Address Book appears. It can be filtered by Address Type<br />
(Static, Dynamic, or All) or Attribute (Device Name, IP Address, or All).<br />
2 Select a user and click Edit GAB User.<br />
3 In the Edit GAB User dialog box, make the appropriate changes and click<br />
OK.<br />
Delete a Global Address Book User<br />
You can delete users from the Global Address Book. However, if the user’s<br />
endpoint registered with the Global Address Book dynamically, the user<br />
continues to reappear in the Global Address Book until you clear the Publish<br />
option at the endpoint.<br />
Note<br />
The Publish option may have different names on different endpoints. For example,<br />
on a ViewStation device, it is called Register this system when Powered On.<br />
To delete a user from the Global Address Book<br />
1 Select System Management > Directory Setup > Global Address Book.<br />
The Global Address Book appears. It can be filtered by Address Type<br />
(Static, Dynamic, or All) or Attribute (Device Name, IP Address, or All).<br />
2 Click the selection checkbox for the user. To delete all users, select the<br />
top-most checkbox in the Global Address Book.<br />
3 Click Delete GAB User.<br />
4 In the Confirm Delete dialog box, click Yes.<br />
The selected user(s) are deleted from the Global Address Book.<br />
128 <strong>Polycom</strong>, Inc.
Edit the Global Address Book Password<br />
Global Address Book<br />
You can edit the password that must be entered at the endpoint to allow it to<br />
access the Global Address Book.<br />
To edit the password for the Global Address Book<br />
1 Select System Management > Directory Setup > Global Address Book.<br />
2 In the Global Address Book, click Set GAB Password.<br />
3 In the Set Client Password dialog box, enter the Old Password and the<br />
New Password. (Note that the password fields are ASCII only; for more<br />
information, see “Field Input Requirements” on page 7.)<br />
4 Enter the new password again to confirm it and click Save.<br />
<strong>Polycom</strong>, Inc. 129
<strong>Polycom</strong> <strong>ReadiManager</strong> <strong>Operations</strong> <strong>Guide</strong><br />
130 <strong>Polycom</strong>, Inc.
Directory Setup <strong>Operations</strong><br />
16<br />
This chapter includes information on managing users, roles, and rooms. It<br />
includes these topics:<br />
• Overview of Users, User Roles, and Rooms<br />
• Users<br />
• User Roles<br />
• Rooms<br />
Overview of Users, User Roles, and Rooms<br />
The <strong>ReadiManager</strong> system is a role and permissions based system.<br />
• Users are assigned one or more user roles<br />
• User roles are assigned a set of permissions<br />
• Users see only the screens and functions available to their role(s) and<br />
associated permissions<br />
User Roles<br />
A <strong>ReadiManager</strong> system administrator with System Setup permissions<br />
controls user roles and permissions. This administrator has three options<br />
when implementing user roles.<br />
• Implement the system default user roles of Administrator, Operator, and<br />
Scheduler and keep the standard permissions assigned to these roles<br />
• Implement the system default user roles of Administrator, Operator, and<br />
Scheduler but change the permissions assigned to the Operator, and<br />
Scheduler roles.<br />
• Create unique, workflow-driven user roles and determine which<br />
permissions to assign to each user role<br />
To ensure <strong>ReadiManager</strong> system access and stability, the default roles cannot<br />
be deleted and the Administrator role cannot be edited.<br />
<strong>Polycom</strong>, Inc. 131
<strong>Polycom</strong> <strong>ReadiManager</strong> <strong>Operations</strong> <strong>Guide</strong><br />
Permission Limited to...<br />
Administrator ><br />
Directory Setup<br />
Administrator ><br />
Dial Plan Setup<br />
Administrator ><br />
Conference Setup<br />
Administrator ><br />
System Setup<br />
Operator ><br />
Monitoring<br />
Operator ><br />
Scheduling<br />
The following table describes the standard <strong>ReadiManager</strong> system user roles<br />
and permissions.<br />
Table 16-1 Standard <strong>ReadiManager</strong> Roles and Permissions<br />
Role Set of Permissions<br />
Administrator • Directory Setup<br />
• Dial Plan Setup<br />
• Conference Setup<br />
• System Setup<br />
Operator • Monitoring<br />
• Scheduling<br />
• Reports<br />
• Troubleshooting<br />
Scheduler • Schedule Conferences with a Scheduling Level of Basic<br />
Permissions<br />
Permissions are further associated with screens and functions. The following<br />
table describes the <strong>ReadiManager</strong> system user interface elements related to<br />
each set of permissions.<br />
Table 16-2 Standard <strong>ReadiManager</strong> Roles and Permissions<br />
System Management > Directory Setup > All functions<br />
System Setup > Dial Plan > All functions<br />
System Management > Conference Setup > All functions<br />
System Management > Dashboard > All functions<br />
System Management > Database Backup Files > All functions<br />
System Management > Profiles/Policies > All functions<br />
System Management > Reports > All functions<br />
System Setup > Server Settings > All functions<br />
System Setup > Gatekeeper Settings > All functions<br />
System Setup > Management&Security > All functions<br />
Device > All functions<br />
Conference > Monitor Conf View > All functions (Own conferences only)<br />
Device > Admin/Monitor View > All functions (Own devices only)<br />
Conference > Monitor Conf View > All functions (All conferences)<br />
132 <strong>Polycom</strong>, Inc.
Permission Limited to...<br />
Operator ><br />
Monitoring AND<br />
Operator ><br />
Scheduling*<br />
Operator ><br />
Reports<br />
Operator ><br />
Troubleshooting<br />
Scheduler ><br />
Schedule<br />
Conferences<br />
(Basic)<br />
Scheduler ><br />
Schedule<br />
Conferences<br />
(Advanced) ++<br />
Users<br />
Conference > Monitor Conf View > All functions (All conferences)<br />
Device > Admin/Monitor View > All functions (All devices)<br />
Directory Setup <strong>Operations</strong><br />
System Management > Reports > IP Call Detail Records and ISDN Call Detail Records only<br />
System Management > Reports > Gatekeeper Message Log only<br />
Conference > Schedule Conf View > All functions except Edit Conference Settings (Own<br />
conferences only)<br />
Conference > Monitor Conf View > All functions (Own conferences only)<br />
Conference > Schedule Conf View > All functions including Edit Conference Settings (Own<br />
conferences only)<br />
Conference > Monitor Conf View > All functions (Own conferences only)<br />
* Best practice: Use these two permssion sets together<br />
++ Best practice: Create an Advanced Scheduler user role<br />
Table 16-2 Standard <strong>ReadiManager</strong> Roles and Permissions (continued)<br />
Note that users assigned a user role with any one of the Administrator<br />
Permissions are generally referred to as administrators. Users assigned a user<br />
role with any one of the Operator Permissions and none of the Administrator<br />
Permissions are referred to as Operators. Users assigned a user role with<br />
Scheduler Permissions and none of the Administrator or Operator<br />
Permissions are referred to as Schedulers.<br />
Devices<br />
The <strong>ReadiManager</strong> system is based on the premise that users will be associated<br />
with devices. You can associate more than one device with a user, but one<br />
device is designated as the primary device. When scheduling a user, the<br />
<strong>ReadiManager</strong> system will, by default, schedule the user’s primary device.<br />
The <strong>ReadiManager</strong> system also knows the capabilities and requirements of<br />
most devices and can the schedule devices accordingly.<br />
A <strong>ReadiManager</strong> system administrator with System Setup permissions can<br />
add users to the system in two ways. You can:<br />
• Add users manually to the <strong>ReadiManager</strong> system. When adding users<br />
manually, you must assign them roles and associate them with devices.<br />
<strong>Polycom</strong>, Inc. 133
<strong>Polycom</strong> <strong>ReadiManager</strong> <strong>Operations</strong> <strong>Guide</strong><br />
View the Users List<br />
Table 16-7 shows the user information the <strong>ReadiManager</strong> system records.<br />
Table 16-3 Information in the System Records<br />
Field Description<br />
First Name The user’s first name<br />
Last Name The user’s last name<br />
User ID The user’s login name<br />
Password The user’s password<br />
Confirm Password Retype the password to verify that you entered it<br />
correctly<br />
Email Address The user’s email address. (The Email address is an<br />
ASCII-only field. a )<br />
Note<br />
Without LDAP integration, an e-mail address is required<br />
for scheduling from the <strong>ReadiManager</strong> Scheduling<br />
Plugin for IBM Lotus Notes. The <strong>ReadiManager</strong><br />
Scheduling Plugin for Microsoft Outlook requires an<br />
LDAP Active Directory.<br />
a. For more information, see “Field Input Requirements” on page 7.<br />
• Integrate the <strong>ReadiManager</strong> system with an LDAP directory.<br />
Businesses that have implemented Microsoft’s Active Directory to<br />
manage user data can enable LDAP integration with <strong>ReadiManager</strong>. This<br />
integration allows users to log into <strong>ReadiManager</strong> system with their<br />
LDAP user names and passwords. For more information, see<br />
“<strong>ReadiManager</strong> System Configuration” on page 9.<br />
When a <strong>ReadiManager</strong> system is integrated with an LDAP directory, the<br />
LDAP users are automatically added as <strong>ReadiManager</strong> system users with<br />
a Scheduler role and displayed in the <strong>ReadiManager</strong> system Users list. An<br />
administrator should then associate each LDAP user with a device and a<br />
assign them a different role, as required.<br />
To view the Users list:<br />
>> Select System Management > Directory Setup > User.<br />
The Users list appears. It can be filtered by First Name, Last Name, and<br />
User ID. If you logged into a domain other than Local, you can also filter<br />
users according to their Domain.<br />
134 <strong>Polycom</strong>, Inc.
Add a User<br />
Table 16-4 Information in the List of Users Screen<br />
Column Description<br />
User ID The user’s login name<br />
First Name The user’s first name<br />
Last Name The user’s last name<br />
Domain The domain associated with the user<br />
Directory Setup <strong>Operations</strong><br />
Email Address The user’s email address. (The Email address is an<br />
ASCII-only field. a )<br />
Associated Device The device associated with this user<br />
a. For more information, see “Field Input Requirements” on page 7.<br />
When you manually add a user to the <strong>ReadiManager</strong> system, you generally<br />
add the user’s login information, assign them one or more roles to control their<br />
access to screens and functions, and associate them with one or more devices.<br />
At a minimum, you must enter their First Name or Last Name, their User ID,<br />
and their Password. When you enter the minimum information, the<br />
<strong>ReadiManager</strong> system automatically assigns them the basic Scheduler role.<br />
If users have access to the <strong>ReadiManager</strong> Scheduling Plugin for IBM Lotus<br />
Notes, and the <strong>ReadiManager</strong> system is not integrated with an LDAP<br />
directory, enter the email address for each user. <strong>ReadiManager</strong> identifies<br />
plugin users and their associated devices by email address.<br />
Note<br />
The <strong>ReadiManager</strong> Scheduling Plugin for Microsoft Outlook requires an LDAP<br />
Active Directory.<br />
After you set up users in <strong>ReadiManager</strong>, provide them with the following<br />
information:<br />
• The <strong>ReadiManager</strong> system IP address<br />
• Their <strong>ReadiManager</strong> system user name, password, and domain, which for<br />
LDAP users is their LDAP login credentials<br />
To add a user<br />
1 Select System Management > Directory Setup > User.<br />
2 From the User list, click Add User.<br />
<strong>Polycom</strong>, Inc. 135
<strong>Polycom</strong> <strong>ReadiManager</strong> <strong>Operations</strong> <strong>Guide</strong><br />
Edit a User<br />
Delete a User<br />
Assign Users Roles and Devices<br />
3 Complete the General Info of the Add New User dialog box and assign<br />
the user permissions and devices as required. See Table 16-2 and<br />
Table 16-5.<br />
4 List the devices in order of priority, with the primary device first. To<br />
reorder the list, highlight an item and click Move up or Move Down.<br />
5 Click OK.<br />
For users added manually to the <strong>ReadiManager</strong> system, you can change all<br />
user information except the user ID.<br />
For users added by the LDAP directory, you can change their roles and<br />
associate them to devices, but you cannot change user names, user IDs, or<br />
passwords.<br />
To edit a user<br />
1 Select System Management > Directory Setup > User.<br />
2 From the User list, select the user of interest and click Edit User.<br />
3 As required, edit the General Info, Associated Devices, and Associated<br />
Roles sections of the Edit User dialog box. See “Users” on page 133.<br />
4 Click OK.<br />
You can only delete users from the Local domain that were entered into the<br />
<strong>ReadiManager</strong> system manually. You cannot delete users added by the LDAP<br />
directory.<br />
To delete a user<br />
1 Select System Management > Directory Setup > User.<br />
2 From the User list, select the user of interest and click Delete User.<br />
3 In the Delete User dialog box, click Yes.<br />
The user is deleted from the <strong>ReadiManager</strong> system.<br />
You can assign users, including LDAP users, roles and associate them with<br />
devices.<br />
136 <strong>Polycom</strong>, Inc.
User Roles<br />
Directory Setup <strong>Operations</strong><br />
To assign a role and video endpoint to a user<br />
1 From the Directory Setup menu, choose Users.<br />
2 On the List of Users, select the user whose settings you want to change<br />
and click Edit.<br />
3 In the Devices section of the screen, select the device you want to<br />
associate with the user and move it to the Selected Devices column. If<br />
you have multiple devices, the first device listed is the default.<br />
4 Click Finish.<br />
In the <strong>ReadiManager</strong> system, only users with Directory Setup permissions<br />
can view, add, edit or delete user roles.<br />
Table 16-5 Fields on the Add Role Dialog Box<br />
Field Description<br />
Name The unique name (ASCII only a ) of the user role<br />
Description (Optional) A userful description (ASCII only a ) of the user role<br />
Administrator<br />
Permissions<br />
Operator<br />
Permissions<br />
Scheduler<br />
Permissions<br />
Identifies which <strong>ReadiManager</strong> system administrator screens<br />
and functions are available to the user role.<br />
Identifies which <strong>ReadiManager</strong> system operator screens and<br />
functions are available to the user role.<br />
Identifies which <strong>ReadiManager</strong> system scheduling screens and<br />
functions are available to the user role.<br />
Scheduling Level. This setting determines the level of<br />
scheduling available through this role. Possible values are:<br />
• Basic. Users can schedule conferences using the<br />
conference templates defined for them. They cannot<br />
access or edit the advanced Conference Settings.<br />
• Advanced. Users can schedule conferences using the<br />
conference templates defined for them. They can also<br />
access and edit the advanced Conference Settings.<br />
a. For more information, see “Field Input Requirements” on page 7.<br />
<strong>Polycom</strong>, Inc. 137
<strong>Polycom</strong> <strong>ReadiManager</strong> <strong>Operations</strong> <strong>Guide</strong><br />
View the User Roles List<br />
Add a User Role<br />
To view the User Roles list<br />
Edit Permissions for a User Role<br />
>> Select System Management > Profiles/Policies > User Roles.<br />
The User Roles list appears. It can be filtered by Name and Description.<br />
Table 16-6 Information in the User Roles List<br />
Column Description<br />
Name The unique name of the user role<br />
Description An optional dscription of the role<br />
When you add a user role, you also specify permissions for the role.<br />
To add a new user role<br />
1 Select System Management > Directory Setup > User Roles.<br />
2 On the User Roles list, click Add Role.<br />
3 Complete the Name and Description fields of the Add Role dialog box<br />
and assign permissions to the new role. See Table 16-2 and Table 16-5.<br />
4 Click Save.<br />
The new user role appears in the <strong>ReadiManager</strong> system.<br />
You can change permissions for the default Operator and Scheduler roles, as<br />
well as for other user roles that were created. You cannot change permissions<br />
for the default Administrator role.<br />
To edit the permissions for a user role<br />
1 Select System Management > Profiles/Policies > User Roles.<br />
2 From the User Roles list, select the role of interest and click Edit Role.<br />
3 Edit the Description field of the Add Role dialog box and edit<br />
permissions for the role. See Table 16-2 and Table 16-5.<br />
4 Click Save.<br />
138 <strong>Polycom</strong>, Inc.
Delete a User Role<br />
Assign Default User Roles to an LDAP<br />
Rooms<br />
Directory Setup <strong>Operations</strong><br />
You can delete a user role from the <strong>ReadiManager</strong> system, provided no users<br />
are currently assigned to it.<br />
Note<br />
You cannot delete User Roles for LDAP Groups. They can only be deleted<br />
through the LDAP system.<br />
To delete a user role<br />
1 Select System Management > Profiles/Policies > User Roles.<br />
2 From the User Roles list, select the role of interest and click Delete Role.<br />
3 In the Delete User Role dialog box, click Yes.<br />
The user role is deleted from the ReadiManaer system.<br />
You can assign the default roles for any group of LDAP users.<br />
To assign roles to individual LDAP users, see “Edit a User” on page 136.<br />
To assign an LDAP group a default user roles<br />
1 Select System Management > Profiles/Policies > User Roles for LDAP<br />
Groups.<br />
The LDAP Groups list. It can be filtered by Group Name.<br />
2 From the LDAP Groups list, select the LDAP Domain of interest.<br />
3 From the LDAP Groups list, select the LDAP group of interest and click<br />
Assign Roles.<br />
4 In the Assign Roles dialog box, select and move the required role(s) to<br />
Selected Roles list. Move the unwanted role(s) to the Selected Roles list.<br />
Press Shift-click or Ctrl-click to select multiple items in the list.<br />
5 Click Save.<br />
Only a <strong>ReadiManager</strong> system administrator with Directory Setup<br />
permissions can view, add, edit, or delete rooms.<br />
Table 16-7 shows the room information in the <strong>ReadiManager</strong> system records.<br />
<strong>Polycom</strong>, Inc. 139
<strong>Polycom</strong> <strong>ReadiManager</strong> <strong>Operations</strong> <strong>Guide</strong><br />
View the Rooms List<br />
Add a Room<br />
Table 16-7 Room Information<br />
Field Description<br />
Room Name The name of the room, which appears in the address book<br />
for associated devices<br />
Description (Optional) A useful description (ASCII only a ) of the room<br />
Email (Optional) The email address of the room administrator<br />
Site (Optional) The site in which the room is located<br />
Note<br />
Rooms and the endpoint associated with them must be<br />
assigned to the same site.<br />
Available Devices The list of unassigned devices that are managed by the<br />
<strong>ReadiManager</strong> system<br />
Selected Devices The list of devices assigned to the room. The device at the<br />
top of the list is the primary device. You can change the order<br />
of device priority by selecting a device and clicking Move Up<br />
or Move Down.<br />
a. For more information, see “Field Input Requirements” on page 7.<br />
To view the Rooms list<br />
>> Select System Management > Directory Setup > Rooms.<br />
The Rooms list appears. It can be filtered by Site.<br />
Table 16-8 Information in Rooms List<br />
Column Description<br />
Resource Name The unique and required name of the room<br />
Description The optional description of the room<br />
Associated Devices The primary device associated with this room. A set of<br />
elipses (...) indicates the room has more than one<br />
associated device.<br />
When you add a room, you specify settings for it and associate one or more<br />
devices with it.<br />
140 <strong>Polycom</strong>, Inc.
Directory Setup <strong>Operations</strong><br />
If your <strong>ReadiManager</strong> system is integrated with an LDAP directory, the<br />
directory may have rooms that are configured as users. In this case, you can<br />
search for the rooms to configure.<br />
To add a roomin a non-LDAP environment<br />
1 Select System Management > Directory Setup > Rooms.<br />
2 On the Rooms list, click Add Room.<br />
The Add New Room dialog box appears.<br />
3 Complete the General Info and Associated Devices sections of the Add<br />
New Room dialog box. See Table 16-7.<br />
4 Click OK.<br />
The new room appears in the list.<br />
To add a roomin an LDAP environment<br />
1 Select System Management > Directory Setup > Rooms.<br />
2 On the Rooms list, click Add Room.<br />
The Add New Room dialog box appears that includes a Find Room in<br />
LDAP search box.<br />
3 To find a room in the LDAP directory:<br />
a Select the required LDAP Domain.<br />
b Select a Search Attribute on which to search the LDAP directory and<br />
enter a Search Value. For information on searching see “Filter and<br />
Search a List” on page 7.<br />
c Click Search.<br />
A list of the LDAP users that meet the search criteria appears. If the<br />
search found more than 500 matching entries, only the first 500 are<br />
displayed.<br />
d Select the room of interest and click Define Details.<br />
4 To add a room manually, click Manually Define.<br />
5 Complete the General Info and Associated Devices sections of the Add<br />
New Room dialog box. See Table 16-7.<br />
6 Click OK.<br />
The room is added to the <strong>ReadiManager</strong> system.<br />
<strong>Polycom</strong>, Inc. 141
<strong>Polycom</strong> <strong>ReadiManager</strong> <strong>Operations</strong> <strong>Guide</strong><br />
Edit a Room<br />
Delete a Room<br />
To edit a room<br />
1 Select System Management > Directory Setup > Rooms.<br />
2 From the Rooms list, select the room of interest and click Edit.<br />
3 As required, edit the General Info and Associated Devices sections of<br />
the Edit Room dialog box. See Table 16-7.<br />
4 Click OK.<br />
To delete a room<br />
1 Select System Management > Directory Setup > Rooms.<br />
2 From the Rooms list, select the room of interest and click Delete.<br />
3 In the Delete Room dialog box, click Yes.<br />
The room is deleted from the <strong>ReadiManager</strong> system.<br />
142 <strong>Polycom</strong>, Inc.
Conference Setup <strong>Operations</strong><br />
17<br />
This chapter includes information about conference options and tasks. It<br />
includes these topics:<br />
• Conference Configuration Settings<br />
• Conference Templates<br />
• View the Conference Templates List<br />
• Add a Conference Template<br />
• Edit a Conference Template<br />
• Delete a Conference Template<br />
• Disable Conference Auto-Launch<br />
• Disable Conference Time Warning<br />
• Edit the <strong>ReadiManager</strong> System Email Account<br />
Conference Configuration Settings<br />
Two types of configuration settings relate to scheduled conferences:<br />
• Conference Templates define most of the settings that become the<br />
defaults for a conference.<br />
• Conference Settings are global system-wide settings that apply to all<br />
scheduled conferences.<br />
<strong>Polycom</strong>, Inc. 143
<strong>Polycom</strong> <strong>ReadiManager</strong> <strong>Operations</strong> <strong>Guide</strong><br />
Conference Templates<br />
Conference templates allow you to create various combinations of settings to<br />
apply to scheduled conferences.<br />
• For scheduled conferences that land on MGC devices, the conference<br />
template explicitly identifies the settings the MGC should use to control<br />
the conference.<br />
• For scheduled conferences that land on RMX devices, the conference<br />
template explicitly identifies the RMX profile which identifies the settings<br />
the RMX should use to control the conference.<br />
Administrators with Conference Setup permissions can add or edit<br />
Conference Templates. They can also identify (by user role) which users have<br />
access to which Conference Templates and which users have Advanced<br />
scheduling permissions. Then users select from the different templates<br />
available to them to switch between different combinations of conference<br />
settings.<br />
<strong>ReadiManager</strong> comes with a Default Template. Administrators with<br />
Conference Setup permissions can edit the Default Template and create<br />
additional templates with different settings.<br />
When scheduling a conference, the Default Template, which is available to all<br />
users, is selected by default. Schedulers can select a different conference<br />
template from the list of templates an administrator has made available to<br />
them. Users with advanced scheduling permissions can edit the template<br />
settings for a specific scheduled conference. These changes apply only to the<br />
specified conference.<br />
Use these best practices when working with conference templates.<br />
• For the Default Template, select settings that are the lowest common<br />
values for all device types. This ensures that all conferences scheduled<br />
with the Default Template can successfully launch on whatever devices<br />
the system has available at the time.<br />
• When creating new templates, give them meaningful purposes and names<br />
so that your users can easily identify the differences between template<br />
choices. For example, identify templates according to maximum bit rate,<br />
specific features implemented by the template (for example, Lecture Mode<br />
or Chairperson Control), and/or supported MCU type (MGC or RMX).<br />
Table 17-1 Fields in the Add/Edit Conference Template Screen<br />
Field Description<br />
General Info<br />
Name A meaningful name for the template, which can be up to<br />
32 characters long<br />
Description A description (ASCII only a ) of the conference settings<br />
template<br />
144 <strong>Polycom</strong>, Inc.
Conference Setup <strong>Operations</strong><br />
Table 17-1 Fields in the Add/Edit Conference Template Screen (continued)<br />
Field Description<br />
Template Avail For The roles to which users must be assigned to select this<br />
template when scheduling conferences<br />
Video Settings<br />
Video Dial Options These settings apply only to video conferences. The<br />
video dial options are:<br />
• Dial-In Only (all participants dial in to the<br />
conference)<br />
• Dial-Out Only (all participants are called)<br />
• Dial-In + Dial-Out (The person setting up the<br />
conference can specify which individual resources<br />
dial in or dial out.)<br />
Video Mode Sets the video layout for the conference. The default is<br />
video switching mode. To change to a Continuous<br />
Presence layout or mode, click the switching icon.<br />
The video mode determines the initial screen layout on<br />
an endpoint’s monitor during a multipoint conference.<br />
This option requires an MCU.<br />
Note<br />
Make sure you have defined video endpoints and<br />
boards so that they are available for selection in<br />
continuous presence layouts.<br />
Video Algorithm Sets the compression algorithm that the MCU uses to<br />
process video. Possible values include:<br />
• AUTO<br />
• H.261. An ITU standard designed for two-way<br />
communication over ISDN lines and supports data<br />
rates which are multiples of 64Kbit/s. H.261<br />
supports CIF and QCIF resolutions.<br />
• H.263. Based on H.261 with enhancements that<br />
improve video quality over modems. It supports CIF,<br />
QCIF, SQCIF, 4CIF and 16CIF resolutions.<br />
• H.264<br />
The default is Auto.<br />
Notes<br />
• Selecting a video algorithm doesn't guarantee that it<br />
will be chosen for a conference since the MCU<br />
device may negotiate a different algorithm with the<br />
endpoints, depending on the endpoint’s capabilities.<br />
• Not user-configurable for RMX devices<br />
<strong>Polycom</strong>, Inc. 145
<strong>Polycom</strong> <strong>ReadiManager</strong> <strong>Operations</strong> <strong>Guide</strong><br />
Table 17-1 Fields in the Add/Edit Conference Template Screen (continued)<br />
Field Description<br />
People and Content Enable this setting when you have equipment that<br />
supports the display of people and content. Sets the<br />
format type of the content. Possible values include:<br />
• None<br />
• People+Content<br />
• People and Content V0. To show both the<br />
presenter and the content on a single display using<br />
HD-series products.<br />
• <strong>Polycom</strong> Visual Concert PC. To show live PC<br />
content using standard ViewStation® systems<br />
• <strong>Polycom</strong> Visual Concert FX. To integrate a laptop<br />
with graphics into a video call using ViewStation®<br />
products<br />
• DuoVideo<br />
None is the default.<br />
Notes<br />
• The MGC requires that conferences with People<br />
and Content use a minimum speed of 192 K.<br />
• Not supported on RMX devices. H.239 multimedia is<br />
set in the RMX profile for RMX devices.<br />
Lecture Mode Possible values include:<br />
• None. All participants see the conference in the<br />
video mode defined elsewhere.<br />
• Presentation Mode. In this mode, when a<br />
participant’s speech exceeds a predefined time (30<br />
seconds), the system identifies the participant as<br />
the lecturer. The video mode for the other<br />
participant’s automatically changes to full screen,<br />
displaying the lecturer, while the lecturer’s endpoint<br />
displays participants in the video mode defined<br />
previously. When another participant starts talking,<br />
Presentation Mode is cancelled and the<br />
conference returns to its predefined video layout.<br />
Note<br />
Set in the RMX profile for RMX devices<br />
146 <strong>Polycom</strong>, Inc.
Conference Setup <strong>Operations</strong><br />
Table 17-1 Fields in the Add/Edit Conference Template Screen (continued)<br />
Field Description<br />
Speed Sets the speed for the conference, which applies to both<br />
point-to-point and multipoint calls. Possible values are<br />
between 128 to 4096 Kbps and Bridged Audio. The<br />
default is 384 Kbps.<br />
Notes<br />
• This setting does not apply to Audio Only<br />
conferences.<br />
• For conferences that may land on an RMX device,<br />
the speed designated here is used to reserve<br />
bandwidth and must match the line rate defined in<br />
the RMX profile that is identified in the Profile Name<br />
field.<br />
Lecture View Switching Enables automatic switching of participants on the<br />
Lecturer’s screen when Lecture Mode is set to<br />
Presentation Mode and the number of participants<br />
exceeds the number of windows identified by the video<br />
mode defined elsewhere.<br />
High Definition Select for an ultra-high quality video resolution enabling<br />
compliant endpoints to connect to conferences at<br />
resolutions of 1280x720 (720p) and at bit rates up to<br />
4Mb.<br />
Video Quality Optimizes the video quality based on the amount of<br />
movement contained in the conference video. Possible<br />
values include:<br />
• Motion. Provides a higher frame rate without<br />
increased resolution<br />
• Sharpness. Provides a higher video resolution and<br />
requires more system resources<br />
MCU Settings<br />
Supported MCUs Specify the supported MCU types. Possible values<br />
include:<br />
• MGC<br />
• RMX<br />
RMX Profile Name Identifies the RMX profile for the conference, if the<br />
conference ends up on an RMX device.<br />
Note<br />
Conferences fail if they land on an RMX device and a<br />
valid RMX profile is not specified.<br />
Always Use MCU When selected, an MCU is used for the scheduled<br />
conference, regardless of the number of participants.<br />
When not selected, an MCU is used only when<br />
necessary.<br />
<strong>Polycom</strong>, Inc. 147
<strong>Polycom</strong> <strong>ReadiManager</strong> <strong>Operations</strong> <strong>Guide</strong><br />
Table 17-1 Fields in the Add/Edit Conference Template Screen (continued)<br />
Field Description<br />
Conf Settings<br />
Meet Me Per<br />
Conference<br />
When selected, only one dial-in number is assigned to<br />
the conference. When cleared, each dial-in participant is<br />
assigned a different dial-in number.<br />
Note<br />
Not supported on RMX devices.<br />
Conference on Port When selected, this option conserves bandwidth and<br />
ports by putting all participants on a single port. When<br />
Conference on Port is enabled, the Video Mode must be<br />
set to one of the Continuous Presence layouts.<br />
Note<br />
Not supported on RMX devices.<br />
Conference Requires<br />
Chairperson<br />
Select this option to enable an endpoint to control the<br />
conference.<br />
When this option is implemented, the conference<br />
scheduler can specify a four-digit number that the<br />
conference chair must use to control the conference.<br />
H.243 chair control allows an endpoint to control the<br />
conference using the H.243 chair control feature. The<br />
chairperson can disconnect participants, force the use<br />
of a continuous presence video layout, and terminate<br />
the conference.<br />
H.243 cascade control allows the MGC-50 or MGC-100<br />
to support a cascading configuration of conferences<br />
with the capabilities of H.243.<br />
Note<br />
Set in the RMX profile for RMX devices<br />
Entry Tone Sets an entry tone sound when a participant enters a<br />
conference.<br />
Note<br />
Not user-configurable for RMX devices<br />
Exit Tone Sets an exit tone sound when a participant leaves a<br />
conference.<br />
Note<br />
Not user-configurable for RMX devices<br />
End Time Alert Tone Sets an alert tone to sound near the end of the<br />
conference.<br />
Note<br />
Not user-configurable for RMX devices<br />
148 <strong>Polycom</strong>, Inc.
Conference Setup <strong>Operations</strong><br />
Table 17-1 Fields in the Add/Edit Conference Template Screen (continued)<br />
Field Description<br />
Talk Hold Time (sec) Indicates the minimum period that a participant has to<br />
speak to become the main speaker. During this period,<br />
no other participant may become the main speaker. The<br />
range is from 1.5 seconds to 10 seconds, in increments<br />
of 0.01 seconds.<br />
Note<br />
Not user-configurable for RMX devices<br />
End Time Alert<br />
(minutes)<br />
Specifies the number of minutes before the conference<br />
end that the End Time Alert Tone should sound.<br />
<strong>Polycom</strong>, Inc. 149<br />
Note<br />
Not user-configurable for RMX devices<br />
T120 Rate Determines whether T.120 is enabled, and if so, the<br />
default transfer rate. Enable this setting when you have<br />
equipment that supports T.120 display of data. Options<br />
are: 6.4, 14.4, 16, 22.4, 24, 30.4, 32, 38.4, 40, 46.4,<br />
54.4, and 62.4.<br />
Notes<br />
• Because this setting uses resources on the MCU<br />
device, it is recommended that you select None.<br />
• Not supported on RMX devices.<br />
Audio Algorithm Sets the compression algorithm that the MGC uses to<br />
process audio.<br />
The default is Auto.<br />
Notes<br />
• Selecting a certain video/audio algorithm doesn't<br />
guarantee that it will be chosen for a conference<br />
since an MGC device may negotiate a different<br />
algorithm with the endpoints, depending on the<br />
endpoint’s capabilities.<br />
• Not user-configurable for RMX devices<br />
Audio Mix Depth (sites) Sets the number of participants with the loudest voices<br />
who can speak at once during a conference. If<br />
additional participants speak, their comments are not<br />
heard.<br />
Note<br />
Not user-configurable for RMX devices<br />
a. For more information, see “Field Input Requirements” on page 7.<br />
Note<br />
Third-party MCUs are not supported in <strong>ReadiManager</strong> scheduling. Template<br />
settings apply only to the MGC or RMX devices.
<strong>Polycom</strong> <strong>ReadiManager</strong> <strong>Operations</strong> <strong>Guide</strong><br />
View the Conference Templates List<br />
To view the Conference Template list<br />
Add a Conference Template<br />
Edit a Conference Template<br />
>> Select System Management > Conference Setup > Conference<br />
Templates.<br />
The Conference Templates list appears.<br />
To add a conference template<br />
1 Select System Management > Conference Setup > Conference<br />
Templates.<br />
2 On the Conference Templates list, click Add Conference Template.<br />
3 Complete the General Info, Video Settings, MCU Settings, and Conf<br />
Settings sections of the Add Conference Template dialog box. See<br />
Table 17-1.<br />
4 Click OK.<br />
The new template appears in the Conference Template list.<br />
Note<br />
<strong>ReadiManager</strong> does not validate the Conference Template settings. When you<br />
create a new conference template, you must make certain that the settings match<br />
the capabilities of the MCUs (MGC or RMX device) or endpoints.<br />
To edit a conference template<br />
1 Select System Management > Conference Setup > Conference<br />
Templates.<br />
2 On the Conference Templates list, select the template of interest and<br />
click Edit Conference Template.<br />
3 Edit the General Info, Video Settings, MCU Settings, and Conf Settings<br />
sections of the Add Conference Template dialog box as required. See<br />
Table 17-1.<br />
150 <strong>Polycom</strong>, Inc.
4 Click OK.<br />
Delete a Conference Template<br />
Conference Settings<br />
Conference Setup <strong>Operations</strong><br />
To delete a conference template<br />
1 From the Conference Setup menu, choose Conference Templates.<br />
2 Select the template or templates you want to delete, and then click<br />
Delete.<br />
3 When a confirmation message appears asking whether you want to<br />
delete the selected template or templates, click Yes.<br />
Conference settings apply to all conferences scheduled using the<br />
<strong>ReadiManager</strong> system. These settings include:<br />
Table 17-2 Fields in the Conference Settings Screen<br />
Field Description<br />
Conference Auto<br />
Launch<br />
Conference Time<br />
Warning<br />
When Disable is selected, scheduled conferences do<br />
not start. This is useful if you wish to stop future<br />
scheduled conferences from starting before you perform<br />
the restart or shutdown.<br />
Specifies whether or not a message is sent to video<br />
endpoints to let users know that the conference is<br />
ending soon. The video endpoint must support this<br />
feature. By default, Conference Time Warning is<br />
enabled.<br />
<strong>Polycom</strong>, Inc. 151
<strong>Polycom</strong> <strong>ReadiManager</strong> <strong>Operations</strong> <strong>Guide</strong><br />
SE200-generated<br />
Emails<br />
To specify conference settings<br />
1 Select System Management > Conference Setup > Conference Settings.<br />
2 When the Conference Settings screen appears, make the appropriate<br />
selections.<br />
3 Click Update.<br />
Disable Conference Auto-Launch<br />
Table 17-2 Fields in the Conference Settings Screen (continued)<br />
Field Description<br />
Specifies information the <strong>ReadiManager</strong> system uses to<br />
send conference email notifications.<br />
• From Address. Specify the email account (ASCII<br />
onlya ) from which the <strong>ReadiManager</strong> system will<br />
send conference notification emails.<br />
• SMTP Server. Specify the IP address of the mail<br />
server from which the <strong>ReadiManager</strong> system will<br />
send conference notification emails.<br />
By default, the <strong>ReadiManager</strong> system emails are<br />
addressed as PanAlert@vtcmanager.com.<br />
Notes<br />
• Many E-mail servers will block or discard emails<br />
without a qualified From: address. To avoid this<br />
issue, make sure each person with Scheduler<br />
permissions has a valid email address.<br />
• Many E-mail servers will block or discard emails<br />
from un-trusted domains, in which case you may<br />
need to change the default <strong>ReadiManager</strong> system<br />
email address to one in a trusted domain.<br />
a. For more information, see “Field Input Requirements” on page 7.<br />
To disable conference auto-launch<br />
1 Select System Management > Conference Setup > Conference Settings.<br />
2 In the Conference Auto-Launch section of the Conference Settings<br />
screen appears, check the Disable checkbox.<br />
3 Click Update.<br />
152 <strong>Polycom</strong>, Inc.
Disable Conference Time Warning<br />
Conference Setup <strong>Operations</strong><br />
To disable the conference time warning<br />
1 Select System Management > Conference Setup > Conference Settings.<br />
2 In the Conference Auto Launch section of the Conference Settings<br />
screen appears, uncheck the Enabled checkbox.<br />
3 Click Update.<br />
Edit the <strong>ReadiManager</strong> System Email Account<br />
To edit the <strong>ReadiManager</strong> system email account<br />
1 Select System Management > Conference Setup > Conference Settings.<br />
2 In the SE200-generated Emails section of the Conference Settings screen<br />
appears, enter the required From Address and SMTP Server IP.<br />
3 Click Update.<br />
<strong>Polycom</strong>, Inc. 153
<strong>Polycom</strong> <strong>ReadiManager</strong> <strong>Operations</strong> <strong>Guide</strong><br />
154 <strong>Polycom</strong>, Inc.
System Reports<br />
Gatekeeper Message Log<br />
18<br />
This chapter describes how to view and export reports available for the<br />
<strong>ReadiManager</strong> system. It includes these topics:<br />
• Gatekeeper Message Log<br />
• Site Statistics<br />
• Site Link Statistics<br />
• Call Detail Record Reports<br />
• Conference Summary Reports<br />
• System Log Files<br />
Use the Gatekeeper Message Log screen to:<br />
• View messages that endpoints send to the gatekeeper<br />
• Define which messages are logged<br />
• Pause and restart message logging<br />
• Clear the log<br />
• Export the log to another file<br />
<strong>Polycom</strong>, Inc. 155
<strong>Polycom</strong> <strong>ReadiManager</strong> <strong>Operations</strong> <strong>Guide</strong><br />
The Gatekeeper Message Log has these fields:<br />
Table 18-1 Information on Gatekeeper Message Log<br />
Column Description<br />
Type These types of messages display:<br />
• Information, which indicates normal<br />
communications between <strong>ReadiManager</strong> and the<br />
endpoint.<br />
• Warning, which indicates an unscheduled call and<br />
the inability to assign E.164 and ISDN numbers to<br />
an endpoint.<br />
• Error, which indicates the registration of an endpoint<br />
or a call failed, or a lack of resources for this<br />
gateway or MCU exists.<br />
Date/Time Date and time of the event.<br />
Category Specifies whether an event is a registration, call, or<br />
neighboring gatekeeper request.<br />
Description Displays the message sent to or received from the<br />
endpoint, identified by the IP address.<br />
Logging starts when you define the Log Settings. Logging stops only when<br />
you clear all of the Log Settings. Logging can include these types of messages:<br />
• Warnings/Errors. Messages displayed for all warnings or errors that occur<br />
on registered <strong>Polycom</strong> endpoints<br />
• Rogues. Messages displayed for all calls from unregistered endpoints<br />
• Events. Messages display about these events:<br />
— Registration<br />
— Call detail<br />
— Neighboring gatekeeper<br />
While you can pause logging, the <strong>ReadiManager</strong> system always logs device<br />
errors and warnings.<br />
You can also:<br />
• Clear the log, which removes data from the database<br />
• Export the log to a a comma-separated value (CSV) file. You can export<br />
only the data that displays on-screen, and exporting the log may take a<br />
long time depending on the number of entries in the log.<br />
156 <strong>Polycom</strong>, Inc.
View and Export the Gatekeeper Message Log<br />
Define Log Settings<br />
Clear Events from the Log<br />
System Reports<br />
To see more details about a log message<br />
1 Select System Management > Reports > Gatekeeper Message Log.<br />
2 Use the Filter on the Gatekeeper Message Log list to customize the list.<br />
3 Select a message.<br />
The Call Details box is populated with the message information.<br />
4 To export a message:<br />
a Select a log and click Export Log.<br />
b In the Export Log dialog box, click Yes.<br />
A GKexport file appears in your default text editor.<br />
c Save the file.<br />
To define which messages should be logged<br />
1 Select System Management > Reports > Gatekeeper Message Log.<br />
2 When the Gatekeeper Message Log screen appears, click Log Settings.<br />
3 In the Gatekeeper Log Settings dialog box, select the events to log and<br />
click OK.<br />
<strong>ReadiManager</strong> begins logging the types of messages you selected.<br />
To clear all events from the log<br />
1 Select System Management > Reports > Gatekeeper Message Log.<br />
2 When the Gatekeeper Message Log screen appears, click Clear Events.<br />
3 In the Confirm Clear Events dialog box, click Yes.<br />
The Gatekeeper Message Log is cleared.<br />
<strong>Polycom</strong>, Inc. 157
<strong>Polycom</strong> <strong>ReadiManager</strong> <strong>Operations</strong> <strong>Guide</strong><br />
Pause and Restart Logging<br />
Site Statistics<br />
View Site Statistics<br />
To pause logging<br />
1 Select System Management > Reports > Gatekeeper Message Log.<br />
2 When the Gatekeeper Message Log screen appears, click Pause Log.<br />
3 In the Stop Logging dialog box, click Yes.<br />
The Start Log button is available and the system stops logging device<br />
messages to the Gatekeeper Message Log.<br />
4 Click Start Log to restart logging.<br />
Use the Site Statistics report to check call rate and call quality statistics for the<br />
sites. You can view the data in a grid or graphically.<br />
To view Site Statistics<br />
1 Select System Management > Reports > Site Statistics.<br />
The Site Statistics list appears with the data displayed in a grid.<br />
2 To view the Site Statistics graphically, click View Chart.<br />
3 From the Site Name list, select the site(s) to chart.<br />
4 From the Y-Axis list, select the statistic(s) to chart.<br />
5 In the Data Limit field, enter the time frame in minutes for which to chart<br />
the data. The default is 60 minutes.<br />
158 <strong>Polycom</strong>, Inc.
Site Link Statistics<br />
View Site Link Statistics<br />
Call Detail Record Reports<br />
System Reports<br />
Use the Site Link Statistics report to check call rate and call quality statistics<br />
for the defined site links.<br />
To view Site Link Statistics<br />
1 Select System Management > Reports > Site Link Statistics.<br />
The Site Link Statistics list appears with the data displayed in a grid.<br />
2 To view the Site Link Statistics graphically, click View Chart.<br />
3 From the Site Name list, select the site(s) to chart.<br />
4 From the Y-Axis list, select the statistic(s) to chart.<br />
5 In the Data Limit field, enter the time frame in minutes for which to chart<br />
the data. The default is 60 minutes.<br />
Two report screens provide call detail record (CDR) information: CDR Table:<br />
IP View and CDR Table: ISDN View. You can view CDR reports and export<br />
them as comma-separated value (CSV) files to spreadsheet programs, such as<br />
Microsoft Excel.<br />
The CDR report automatically lists all IP or ISDN calls made to or from every<br />
device for the current date. Using the Filter by: drop-down list, you can filter<br />
the list by date, time, device type, IP address, and system to show a specific set<br />
of call data. To view the complete CDR report select Clear Filter from the Filter<br />
by: list.<br />
The following tables describe the fields of the IP and ISDN Call Detail Record<br />
Reports.<br />
Table 18-2 Information in the CDR Table - IP View Screen<br />
Column Description<br />
Call ID ID automatically generated for the call.<br />
Conf ID The GUID (global unique identifier) for the conference.<br />
Date/Time Date and time the call started, provided in local time for the<br />
appliance.<br />
Source Name, IP, or alias of the device that originated the call.<br />
<strong>Polycom</strong>, Inc. 159
<strong>Polycom</strong> <strong>ReadiManager</strong> <strong>Operations</strong> <strong>Guide</strong><br />
Table 18-2 Information in the CDR Table - IP View Screen (continued)<br />
Column Description<br />
Source Address IP address of the device that originated the call.<br />
Destination Name, IP address, or alias of the device that received the<br />
call.<br />
Destination Address IP address of the device that received the call.<br />
Call Type The type of call: scheduled or unscheduled.<br />
Bandwidth (Kbps) Bandwidth that was used for the call.<br />
Duration (min) Length of the call in minutes, up to a maximum of 999.<br />
Q.850 Code Standard cause code for call termination.<br />
Table 18-3 Information in the CDR Table - ISDN View Screen<br />
Column Description<br />
Call ID ID automatically generated for the call.<br />
Conf ID The alphanumeric value that identifies the conference.<br />
Note<br />
This value is only available for multipoint conferences.<br />
Date/Time Date and time the call started, provided in local time for the<br />
appliance.<br />
System Name Name, IP, or alias of the device that originated the call.<br />
Remote Site Name, IP, or alias of the device that received the call.<br />
Direction Indicates whether the call was inbound or outbound.<br />
Call Type The type of call: scheduled or unscheduled.<br />
Bandwidth (Kbps) Bandwidth that was used for the call.<br />
Duration (min) Length of call in minutes, up to a maximum of 999.<br />
Cause Code Standard Q.850 cause code for call termination.<br />
You can use data from the reports to troubleshoot problems, provide<br />
information about network traffic, and ensure accurate billing for video calls.<br />
Note<br />
To be included in the ISDN CDR, endpoints in the call do not need to be currently<br />
registered with the gatekeeper or global directory server. To be included in the IP<br />
CDR, endpoints must be registered through the gatekeeper.<br />
160 <strong>Polycom</strong>, Inc.
View and Export the IP Call Detail Records<br />
System Reports<br />
To view and export the IP Call Detail Records<br />
1 Select System Management > Reports > IP Call Detail Records.<br />
The IP Call Detail Records list appears. The calls are listed in order of date<br />
and time, with the earliest call shown first.<br />
Note<br />
IP calls through the Global Address Book that are not registered to the gatekeeper<br />
do not display in this report.<br />
2 Use the Filter on the IP Call Detail Records list to customize the list by<br />
Date, IP Address, Device Type, Call Type and Duration.<br />
3 To export the report:<br />
a Click Export.<br />
b From the File Download dialog box, click Save.<br />
c In the Save As dialog box, browse to a location and click Save.<br />
View and Export the ISDN Call Detail Records<br />
To view and export the ISDN Call Detail Records<br />
1 Select System Management > Reports > ISDN Call Detail Records.<br />
The ISDN Call Detail Records list appears. The calls are listed in order of<br />
date and time, with the earliest call shown first.<br />
2 Use the Filter on the ISDN Call Detail Records list to customize the list<br />
by Date, System Name, Device Type, Call Type and Duration.<br />
3 To export the report:<br />
a Click Export.<br />
b From the File Download dialog box, click Save.<br />
c In the Save As dialog box, browse to a location and click Save.<br />
<strong>Polycom</strong>, Inc. 161
<strong>Polycom</strong> <strong>ReadiManager</strong> <strong>Operations</strong> <strong>Guide</strong><br />
Conference Summary Reports<br />
Use the Conference Summary Report option to review monthly summary<br />
information about past <strong>ReadiManager</strong> system conferences. These reports may<br />
be helpful in understanding and optimizing your conferencing system usage<br />
and creating useful <strong>ReadiManager</strong> system templates and RMX 2000 profiles.<br />
The following tables describe the fields of the Conference Summary Report.<br />
Table 18-4 Information in the Conference Summary Report<br />
Column Description<br />
Date Information is displayed on a month-by-month basis and an<br />
average for the selected months<br />
Scheduled Confs The number of conferences scheduled via one of the<br />
<strong>ReadiManager</strong> scheduling interfaces (that is, the<br />
<strong>ReadiManager</strong> system application, the <strong>ReadiManager</strong><br />
Scheduling Plugin for Microsoft Outlook, or the<br />
<strong>ReadiManager</strong> Scheduling Plugin for IBM Lotus Notes)<br />
Adhoc Confs The number of conferences that used one or more devices<br />
for which the <strong>ReadiManager</strong> system was the gatekeeper,<br />
but that weren’t scheduled via one of the <strong>ReadiManager</strong><br />
scheduling interfaces<br />
MP Confs The number of multipoint conferences scheduled using one<br />
of the <strong>ReadiManager</strong> scheduling interfaces<br />
P2P Confs The number of point-to-point conferences scheduled using<br />
one of the <strong>ReadiManager</strong> scheduling interfaces<br />
Gateway Confs The number of scheduled conferences that used a gateway<br />
to reach one or more devices<br />
Embedded MP<br />
Confs<br />
The number of scheduled multipoint conferences that used<br />
the MCU embedded in a VSX or HDX device rather than an<br />
external MCU such as an MGC or RMX 2000<br />
P2P Confs on MCU The number of scheduled point-to-point conferences that<br />
used an external MCU such as an MGC or RMX 2000 even<br />
through point-to-point conferences do not usually require<br />
MCU resources<br />
Short Confs The number of scheduled conferences that were scheduled<br />
to last 30 minutes or more, but which actually lasted less<br />
than 30 minutes<br />
Scheduled Minutes The sum of the scheduled minutes for all <strong>ReadiManager</strong><br />
scheduled conferences<br />
162 <strong>Polycom</strong>, Inc.
Table 18-4 Information in the Conference Summary Report (continued)<br />
Column Description<br />
Executed Minutes The sum of the actual minutes for all <strong>ReadiManager</strong><br />
scheduled conferences<br />
Total Parts The sum of the participants that joined <strong>ReadiManager</strong><br />
scheduled conferences<br />
Avg Parts in MP<br />
Confs<br />
System Reports<br />
The average number of participants that joined scheduled<br />
<strong>ReadiManager</strong> multipoint conferences<br />
In addition, you can create graphical reports for the following conference data.<br />
Table 18-5 Conference Summary Report Chart Options<br />
Column Description<br />
Scheduled vs.<br />
Adhoc<br />
A chart that compares the number of scheduled<br />
conferences to the number of adhoc conferences for each<br />
month<br />
Scheduled Types A chart that compares the number of point-to-point,<br />
multipoint, gateway, and embedded multipoint conferences<br />
for each month<br />
Scheduled vs.<br />
Executed Mins<br />
Avg Parts in MP<br />
Confs<br />
Point-to-Point Confs<br />
on MCUs<br />
A chart that compares the number of scheduled minutes to<br />
the number executed minutes for each month<br />
A chart that displays the average number of participants in<br />
multipoint conferences for each month<br />
A chart that displays the number of point-to-point<br />
conferences hosted on an external MCU for each month<br />
To create a Conference Summary Report<br />
1 Select System Management > Reports > Conference Summary Report.<br />
A blank Conference Summary Report screen appears.<br />
2 As needed, change the From: and To: dates to select the date range for the<br />
report, and click View.<br />
3 To create one of the conference summary report charts, click the chart<br />
name.<br />
4 To export the report:<br />
a Click Export.<br />
b From the File Download dialog box, click Save.<br />
c In the Save As dialog box, browse to a location and click Save.<br />
<strong>Polycom</strong>, Inc. 163
<strong>Polycom</strong> <strong>ReadiManager</strong> <strong>Operations</strong> <strong>Guide</strong><br />
System Log Files<br />
View and Export System Log Files<br />
Many of the <strong>ReadiManager</strong> system components can write a System Log File<br />
when they experience an error or issue.<br />
To view System Log Files<br />
1 Select System Management > Reports > System Logs.<br />
The System Log Files list appears listing all of the logs for the last ??<br />
period.<br />
2 To view a log file:<br />
a Select the log file from the list<br />
b Click Open.<br />
3 To export a log file in .txt format:<br />
a Select the file from the list.<br />
b Click Save.<br />
c In the Save As dialog box, browse to a location and click Save.<br />
164 <strong>Polycom</strong>, Inc.
System Troubleshooting<br />
Registration Problems and Solutions<br />
19<br />
This chapter has <strong>ReadiManager</strong> system troubleshooting information. It<br />
includes the following topics:<br />
• Registration Problems and Solutions<br />
• Point-to-Point Calling Problems and Solutions<br />
• MCU and Gateway Dialing Problems and Solutions<br />
• Conference On Demand Problems and Solutions<br />
Note<br />
Some recommended solutions require access to screens in the <strong>ReadiManager</strong><br />
Administrator View. The default Operator permissions do not provide access to this<br />
view. See the <strong>ReadiManager</strong> Administrator to access the information you need.<br />
Problem Description Solutions<br />
When the gatekeeper<br />
registration is set to auto-<br />
discovery, endpoints do not<br />
register.<br />
An endpoint cannot register<br />
with <strong>ReadiManager</strong>.<br />
When auto-discovery is used, a<br />
GRQ message is broadcast and<br />
sent over multicast. However,<br />
<strong>ReadiManager</strong> must be able to<br />
receive one of these messages and<br />
does not respond to this message if<br />
it is not the default gatekeeper.<br />
The endpoint is configured to use<br />
<strong>ReadiManager</strong> as its gatekeeper,<br />
but is being rejected during<br />
registration.<br />
In the gatekeeper diagnostic log, an<br />
error has occurred during the<br />
RRQ/RCF process that caused the<br />
registration to fail.<br />
• Verify that the Default Gatekeeper<br />
check box is selected in the<br />
Administrator View > System Setup ><br />
Gatekeeper Settings screen.<br />
• Verify that a UDP broadcast from the<br />
endpoint’s network can reach<br />
<strong>ReadiManager</strong>, or that multicast is<br />
enabled on all routers between the<br />
endpoint and <strong>ReadiManager</strong>.<br />
• Review the gatekeeper diagnostic logs<br />
for the RRQ attempt by the endpoint<br />
and determine the RRJ reason.<br />
• Verify that the endpoint alias is not a<br />
duplicate of other endpoint aliases.<br />
• Verify that the endpoint does not have<br />
NAT enabled.<br />
• Verify that enough licenses remain.<br />
<strong>Polycom</strong>, Inc. 165
<strong>Polycom</strong> <strong>ReadiManager</strong> <strong>Operations</strong> <strong>Guide</strong><br />
Problem Description Solutions<br />
Endpoints cannot register<br />
with <strong>ReadiManager</strong>.<br />
The MCU (or MGC) cannot<br />
register with <strong>ReadiManager</strong>.<br />
An endpoint shows the<br />
gatekeeper is not registered<br />
in the Registration Status<br />
field of the Device<br />
Information Detail View.<br />
The RadVision OnLAN<br />
MCU continually changes<br />
state: from online to offline<br />
and offline to online.<br />
Some endpoints are not<br />
assigned ISDN numbers.<br />
Endpoints that were<br />
previously registered and<br />
auto-assigned ISDN<br />
numbers are being rejected<br />
when attempting to register.<br />
An endpoint cannot register with<br />
<strong>ReadiManager</strong>, but the gatekeeper<br />
diagnostics do not indicate a<br />
problem.<br />
The gatekeeper sent the RCF<br />
message, but the endpoint did not<br />
receive it.<br />
Some MCU vendors register with a<br />
GRQ message instead of an RRQ<br />
message.<br />
Some MCU vendors do not retry<br />
registration after a first attempt has<br />
failed.<br />
<strong>ReadiManager</strong> receives the RRQ<br />
message, but not the LWRRQ<br />
message from this endpoint.<br />
The endpoint did not send a<br />
LWRRQ message within the offline<br />
timeout period specified in the<br />
Administrator View > System Setup<br />
> Gatekeeper Settings screen.<br />
The Radvision OnLAN MCU ignores<br />
the RCF Time to Live (TTL) field,<br />
which is filled in with the value that<br />
the Administrator specified in the<br />
offline timeout field in the<br />
Administrator View > System Setup<br />
> Registration Settings screen.<br />
A registered H.323-only system was<br />
not assigned an ISDN number. The<br />
system could belong to a network<br />
that does not have ISDN number<br />
ranges assigned to it.<br />
No ISDN numbers are available to<br />
assign.<br />
Inconsistent configuration in ISDN<br />
number assignment has occurred.<br />
• Verify that the IP address that the<br />
gatekeeper sent to the endpoint is<br />
correct.<br />
• Verify that the Default Gatekeeper<br />
check box is selected in the<br />
Administrator View > System Setup ><br />
Gatekeeper Settings screen.<br />
• Reset the MCU or MGC card to force<br />
registration to occur.<br />
• Reboot the endpoint.<br />
• Set the TTL field to 195 in<br />
<strong>ReadiManager</strong> or reconfigure the<br />
Radvision OnLAN MCU to send the<br />
registration requests in the same time<br />
period specified in <strong>ReadiManager</strong>.<br />
• Add the MCU manually.<br />
• Reboot the MCU to force registration to<br />
occur.<br />
• Verify that the endpoint belongs to the<br />
site that has assigned ISDN number<br />
ranges. To do so, go to Administrator<br />
View > Dial Plan Setup > Sites and<br />
make sure the site has the correct ISDN<br />
range specified in the ISDN Number<br />
Assignment screen.<br />
• Verify that ISDN numbers are available<br />
to assign.<br />
• Verify that the RCF message “Can’t find<br />
ISDN free pool” from the gatekeeper<br />
returns to the endpoint.<br />
• Verify that the previous ISDN range was<br />
changed.<br />
166 <strong>Polycom</strong>, Inc.
Problem Description Solutions<br />
When <strong>ReadiManager</strong> is<br />
restarted, some registrants<br />
that were previously online<br />
are now offline.<br />
Some endpoints do not reregister<br />
when <strong>ReadiManager</strong> goes down.<br />
Some MCUs do not reregister<br />
automatically after two retries.<br />
Point-to-Point Calling Problems and Solutions<br />
Problem Description Solutions<br />
ViewStation and ViaVideo<br />
have an incorrect RAS IP<br />
address.<br />
A call with an alias as the<br />
dial string from a registered<br />
endpoint cannot be placed<br />
to another registered<br />
endpoint. The two endpoints<br />
are in different sites.<br />
These endpoints are configured with<br />
a NAT address and may not receive<br />
the RCF message from the<br />
gatekeeper.<br />
• The inter-site link between the<br />
sites in which the endpoints<br />
reside is not correctly defined or<br />
is missing.<br />
• No bandwidth is available in the<br />
inter-site link.<br />
• The calling bit rate is higher<br />
than the bit rate defined in the<br />
inter-site link.<br />
• ISDN alternate routing is not<br />
available.<br />
• Dialing rules may not be<br />
enabled or may be set to block<br />
instead of route.<br />
Dialing by IP address fails. A registered endpoint cannot call an<br />
unregistered endpoint by IP address<br />
within the same site.<br />
A dialing rule is not enabled or is set<br />
to block instead of route.<br />
• Reboot the MCU.<br />
System Troubleshooting<br />
The endpoints need to be reconfigured to<br />
disable NAT.<br />
• Go to Administrator View > Dial Plan<br />
> Inter-site Links and make sure that<br />
an inter-site link exists from Network A<br />
to Network B.<br />
• Make sure that the IP addresses of<br />
both endpoints are included in their<br />
respective sites.<br />
• If site topology is defined for both<br />
endpoints, verify that there is enough<br />
bandwidth in the inter-site links<br />
between the two sites.<br />
• Verify that the dialing bit rate is lower or<br />
equal to that of the maximum bit rate<br />
defined for the inter-site links.<br />
• Verify that the LocalDS dialing rule is<br />
enabled and the action setting is route.<br />
• If the endpoint is ISDN capable, verify<br />
that the ISDN parameter is correct.<br />
• Check the Gatekeeper Diagnostics<br />
Log for error messages.<br />
• Verify that the registered endpoint is<br />
registered.<br />
• Verify that the Deny calls to/from<br />
unregistered endpoints in this<br />
region (rogues) check box is cleared.<br />
Go to Administrator View > System<br />
Setup > Gatekeeper Settings to<br />
change this setting.<br />
• Verify that the IP address dialing rule is<br />
enabled and set to route.<br />
<strong>Polycom</strong>, Inc. 167
<strong>Polycom</strong> <strong>ReadiManager</strong> <strong>Operations</strong> <strong>Guide</strong><br />
MCU and Gateway Dialing Problems and Solutions<br />
Problem Description Solutions<br />
Call fails when using an<br />
MCU service.<br />
Dialing an MCU service<br />
results in a network error.<br />
Simplified dialing does not<br />
work.<br />
When you dial 9, you<br />
receive a network error.<br />
The call using the MCU service is<br />
rejected because of one of the<br />
following:<br />
• The MCU is not registered.<br />
• The MCU is offline.<br />
• The MCU prefix is not<br />
registered as an E.164 alias.<br />
• The MCU resource issue was<br />
sent through resource<br />
allocation indication or resource<br />
allocation.<br />
• The dialing rule is not enabled.<br />
• The priority of the dialing rule<br />
may be too high.<br />
• Services are not enabled.<br />
The call using the simplified dialing<br />
service is rejected because of one<br />
of the following:<br />
• The simplified dialing prefix<br />
service in the system<br />
configuration is disabled.<br />
• No gateway services are<br />
available.<br />
• There is insufficient BRI/PRI<br />
bandwidth.<br />
• The call uses a higher bit rate<br />
than the device policy group<br />
allows.<br />
• Review the Gatekeeper Diagnostic<br />
screen for the ARJ reason to<br />
determine why the call failed.<br />
• Verify that the MCU is registered.<br />
Select it on the Monitoring Devices<br />
screen and view the device’s status.<br />
• Verify that the MCU device in the<br />
Monitoring Devices list is online. If the<br />
device is offline, reboot it.<br />
• Verify that the MCU service is<br />
available. Go to the Administrator<br />
View > Dial Plan Setup > Services<br />
screen. Verify that the MCU service<br />
prefix is enabled and listed.<br />
• Check the Gatekeeper Diagnostics log<br />
for error messages.<br />
• Verify that the simplified dialing service<br />
prefix is enabled. Go to Administrator<br />
View > Dial Plan Setup > Services.<br />
• Verify that the gateway is registered.<br />
• Verify that the gateway prefix is defined<br />
and enabled. Go to Administrator<br />
View > Dial Plan Setup > Services.<br />
• Verify that the LocalDS dialing rule is<br />
enabled and the action setting is route.<br />
• Verify that the device policy bit rate limit<br />
has not been exceeded.<br />
168 <strong>Polycom</strong>, Inc.
Conference On Demand Problems and Solutions<br />
Problem Description Solutions<br />
Dialing a Conference On Demand<br />
fails.<br />
Inviting other endpoints into a<br />
conference using the CON service<br />
fails.<br />
The endpoint dials a CON service,<br />
and the call is rejected because of<br />
one of the following:<br />
• The MGC is not registered or is<br />
offline.<br />
• <strong>ReadiManager</strong> cannot log into<br />
the MGC.<br />
• The MGC has no resource<br />
available for the call.<br />
• The MGC’s IP address is not<br />
entered in <strong>ReadiManager</strong>.<br />
System Troubleshooting<br />
• Check the diagnostics log for an<br />
ARJ reason from this endpoint.<br />
• Verify that the MGC card is<br />
registered with <strong>ReadiManager</strong><br />
and is online.<br />
• Verify that the MGC cards<br />
registered with <strong>ReadiManager</strong><br />
have the MGC’s IP address<br />
filled out in the Devices list.<br />
• Verify that the MGC login ID and<br />
password for the CON service<br />
are correct.<br />
• Verify that the H.323 network<br />
service that the MGC is using is<br />
set as the default service.<br />
• Verify that the MGC has enough<br />
available resources to start this<br />
conference.<br />
• Verify that the LocalDS dialing<br />
rule is enabled and the action<br />
setting is route.<br />
• Verify that the device policy bit<br />
rate limit has not been<br />
exceeded.<br />
• Verify that the CON service is<br />
enabled. Go to Administrator<br />
View > Dial Plan Setup ><br />
Services.<br />
<strong>Polycom</strong>, Inc. 169
<strong>Polycom</strong> <strong>ReadiManager</strong> <strong>Operations</strong> <strong>Guide</strong><br />
170 <strong>Polycom</strong>, Inc.
System Setup Overview<br />
20<br />
This chapter provides an overview of the <strong>ReadiManager</strong> System Setup menu.<br />
It includes these topics:<br />
• Overview of the System Setup Menu<br />
• Overview of Site Topology<br />
• Site Topology and Site Link Examples<br />
• Default <strong>ReadiManager</strong> Dial Plan Settings<br />
• <strong>ReadiManager</strong> System LDAP Integration<br />
See “<strong>ReadiManager</strong> System Configuration” on page 163 for information on<br />
implementing your <strong>ReadiManager</strong> system configuration.<br />
Overview of the System Setup Menu<br />
Use the System Setup menu to implement the <strong>ReadiManager</strong> system<br />
configuration identified in your solution design, site survey, and/or network<br />
design. The System Setup menu includes these items:<br />
• Server Settings. These selections for the server, network, database, and<br />
directory service are entered during the <strong>ReadiManager</strong> system First Time<br />
Setup process and do not change frequently. Use the Server Settings<br />
option, when you do need to change them.<br />
• Gatekeeper Settings. By default <strong>ReadiManager</strong> is made the primary<br />
gatekeeper during the <strong>ReadiManager</strong> system First Time Setup process.<br />
Use the Gatekeeper Settings option to modify the primary gatekeeper<br />
behavior or to add an alternate gatekeeper.<br />
Gatekeeper settings affect how devices register and calls are made in your<br />
video communications network. These settings allow you to:<br />
— Identify the gatekeeper with an identifier and description.<br />
— Specify registration-related settings, including the default gatekeeper,<br />
which endpoints register, the registration timeout period, and the<br />
offline timeout.<br />
<strong>Polycom</strong>, Inc. 171
<strong>Polycom</strong> <strong>ReadiManager</strong> <strong>Operations</strong> <strong>Guide</strong><br />
Overview of Site Topology<br />
Regions<br />
— Set the maximum number of neighboring gatekeeper hop counts.<br />
— Specify how to handle calls to and from unregistered endpoints.<br />
• Management and Security Settings. Management settings allow you to<br />
upgrade the <strong>ReadiManager</strong> system software and enable<br />
auto-provisioning of endpoints. Security settings allow you to implement<br />
HTTPS for the <strong>ReadiManager</strong> system.<br />
• Dial Plan Settings. Edit the default <strong>ReadiManager</strong> system Dial Plan<br />
Settings (which includes the definition of sites, site links, regions, dialing<br />
rules, services, and least-cost routing tables) to support your site topology<br />
and video call routing.<br />
When setting up your site topology for a <strong>ReadiManager</strong> system envision three<br />
hierarchical levels (Region > Sites > Subnet) and the links between them.<br />
A region corresponds to the total area within a network that is managed by a<br />
single <strong>ReadiManager</strong> system (or two <strong>ReadiManager</strong> systems in a redundant<br />
configuration). A region is equivalent to a gatekeeper zone in H.323<br />
configurations.<br />
A region is a group of sites that share a common <strong>ReadiManager</strong> appliance and<br />
gatekeeper. When you first set up <strong>ReadiManager</strong>, a default region and a<br />
default site exist, and the default site is automatically associated with the<br />
default region. You may change the name of the default region and assign the<br />
sites you have created. You may create additional neighboring regions, if<br />
needed. When you create a new region, you define gatekeeper settings only. A<br />
region functions as a neighboring gatekeeper. You cannot add sites to a newly<br />
created region.<br />
When a call originates from the <strong>ReadiManager</strong> gatekeeper and the gatekeeper<br />
is unable to resolve the dialed address, the call can be forwarded to another<br />
gatekeeper for resolution. To enable call forwarding, create a neighboring<br />
region and a dialing rule that routes calls using a particular prefix to the<br />
neighboring gatekeeper.<br />
If you have a <strong>Polycom</strong> PathNavigator installed, it can act as a neighboring<br />
gatekeeper or region to a <strong>ReadiManager</strong>.<br />
Note<br />
To prevent a site from participating in a dial plan, do not assign it to a region.<br />
172 <strong>Polycom</strong>, Inc.
Sites<br />
Subnets<br />
Site Links<br />
System Setup Overview<br />
Sites represent the different local area networks (LANs) within the region that<br />
the <strong>ReadiManager</strong> system serves. A site usually corresponds to a geographic<br />
location such as a branch office or a particular building in an extended<br />
campus. The LANs provide high bandwidth for IP traffic and may include<br />
multiple gateways to connect the IP network to the PSTN network. The<br />
<strong>ReadiManager</strong> system manages bandwidth across sites, not simply within a<br />
single site.<br />
A subnet, which consists of a subnet IP network address and a subnet mask<br />
definition. This definition corresponds to the actual subnet mask used within<br />
the network, but can be either smaller or larger, depending on requirements<br />
for video. For example, if a single site has eight Class C subnets numbered<br />
sequentially, you can list all eight subnets individually within the site or a<br />
single, larger subnet that encompasses all eight subnets.<br />
Notes<br />
• Do not use a class A subnet. Examples 172.0.0.0 and 255.0.0.0 will not be<br />
recognized or work. As a minimum, use a class B network mask (for example,<br />
172.22.0.0 and 255.255.0.0).<br />
• You can assign a subnet to only one site. <strong>ReadiManager</strong> does not allow<br />
overlapping subnets.<br />
If devices have an IP with an undefined subnet in <strong>ReadiManager</strong>, their access<br />
to <strong>ReadiManager</strong> features is limited.<br />
Site links, which define the connections that exist between sites and indicate<br />
how routing occurs on your network. A site link is usually a<br />
limited-bandwidth wide-area network (WAN) or virtual private network<br />
(VPN) connection that links two physical locations.<br />
There are two types of site links:<br />
• Direct links are connections between two sites through a leased line, frame<br />
relay, or an asynchronous transfer mode (ATM) network, or from a site to<br />
the Internet. In addition, direct links are used for secure connections over<br />
the Internet, such as VPN. For each direct link:<br />
— You must define the maximum available bandwidth and bit rate for<br />
calls.<br />
<strong>Polycom</strong>, Inc. 173
<strong>Polycom</strong> <strong>ReadiManager</strong> <strong>Operations</strong> <strong>Guide</strong><br />
Site Topology and Site Link Examples<br />
Note<br />
The bit rate can be set at the network level, the device level, and the conference<br />
level. If there is a discrepancy between these bit rate settings, the system<br />
implements the lowest bit rate setting. The only exception, is that the bit rate in the<br />
RMX profile takes precedence over the bit rate in the conference settings.<br />
— Network settings can have a higher bandwidth and bit rate than<br />
<strong>ReadiManager</strong> settings.<br />
• Multisite links are connections that require routing through a series of<br />
sites and may include a secure Internet connection.<br />
Two examples of site links follow: a simple, direct link and a complex,<br />
multisite link.<br />
Figure 20-1 shows Company ABC, based in San Jose, CA. Company ABC has<br />
three sites in the United States: two in California (San Jose and Monterey) and<br />
one in Washington, D.C.<br />
The San Jose site has a direct site link with a maximum bandwidth of 10 MB<br />
that connects it to the Washington, DC site. A second site link connects the San<br />
Jose site to the Monterey site. This link uses a virtual private network (VPN)<br />
connection so the connection between them is not direct, it is considered a<br />
multisite link. All three sites share the same the <strong>ReadiManager</strong> system.<br />
Figure 20-1 Site Topology Example<br />
In the <strong>ReadiManager</strong> system, define the site topology as:<br />
• Three sites: Monterey, San Jose, and Washington<br />
• Three direct site links, which include:<br />
— San Jose to Washington<br />
— San Jose to the Internet<br />
174 <strong>Polycom</strong>, Inc.
System Setup Overview<br />
— Monterey to the Internet<br />
• Two multisite links, which include<br />
— San Jose to Monterey (using links to the Internet)<br />
— Washington to Monterey (using links to the Internet)<br />
Figure 20-2 shows the same Company ABC with two additional sites in Paris<br />
and Tel Aviv.<br />
Figure 20-2 Connecting Sites Through Multisite Links<br />
In the <strong>ReadiManager</strong> system, define the site topology as:<br />
• Five sites: Monterey, San Jose, Washington, Paris, and Tel Aviv<br />
• Six direct site links, which include:<br />
— Monterey to Internet<br />
— San Jose to Internet<br />
— San Jose to Washington<br />
— San Jose to Paris<br />
— San Jose to Tel Aviv<br />
— Tel Aviv to Washington<br />
• Seven multisite links, which include<br />
— Monterey to San Jose<br />
— Monterey to Paris<br />
— Monterey to Washington<br />
— Monterey to Tel Aviv<br />
— San Jose to Tel Aviv (via Washington)<br />
<strong>Polycom</strong>, Inc. 175
<strong>Polycom</strong> <strong>ReadiManager</strong> <strong>Operations</strong> <strong>Guide</strong><br />
— Paris to Washington<br />
— Paris to Tel Aviv<br />
Also note, there are two routes between San Jose and Tel Aviv. If one route is<br />
less expensive, you can enter least-cost routing information to make sure that<br />
route is used and maintain the other route as a backup.<br />
Default <strong>ReadiManager</strong> Dial Plan Settings<br />
The <strong>ReadiManager</strong> system ships with a default dial plan configuration, which<br />
includes a region, site (but not subnet within the site), dialing rules, and IP call<br />
routing. The default dial plan allows your video network to operate<br />
immediately. If necessary, you can modify the default dial plan to add<br />
functionality.<br />
The default dial plan has these features and settings:<br />
• The default gatekeeper region is called My Region. This default region<br />
includes the default site at which you have installed the <strong>ReadiManager</strong><br />
system. Gatekeeper region settings include the Gatekeeper IP Address,<br />
Port, and Gatekeeper Identifier.<br />
• The default site is called Primary Site, which is the location at which you<br />
have installed the <strong>ReadiManager</strong> system.<br />
• The default policy group is called Default Device Policy, which provides<br />
a maximum bandwidth of 768K for all endpoints.<br />
• All rogue calls are blocked by the gatekeeper when the Primary<br />
Gatekeeper setting Deny calls to/from unregistered endpoints is checked<br />
• All MGC and/or gateway services registered with the gatekeeper are<br />
available to all endpoints<br />
You can enable most features not available through the default dial plan by<br />
editing the default site. This includes these features:<br />
• Automatic provisioning of E.164 aliases to IP H.323 endpoints<br />
• Routing of inbound ISDN calls to correct endpoints<br />
• Enabling outbound IP calls<br />
• Allowing access through a firewall using an SBC device<br />
• Modifying policies system-wide by selecting a default policy group<br />
You can add these features to your dial plan and video call routing setups:<br />
• Routing H.323 calls to neighboring gatekeepers by adding new<br />
neighboring regions<br />
• Adding gateway and MCU services manually if you have a third-party<br />
MCU that registers with the gatekeeper using a standard H.323<br />
mechanism<br />
176 <strong>Polycom</strong>, Inc.
System Setup Overview<br />
• Adding bandwidth management capabilities by defining new sites and<br />
site links<br />
• Adding IP to ISDN call routing using least-cost routing.<br />
<strong>ReadiManager</strong> System LDAP Integration<br />
All <strong>ReadiManager</strong> system users work within an assigned domain—a set of<br />
users and devices on a network that are administered as a unit.<br />
Domains are important in the ReadiVoice system because when users search<br />
for participants and rooms to add to a conference, they can only select from:<br />
• Local users and rooms (i.e., users and rooms added directly to the<br />
<strong>ReadiManager</strong> system)<br />
• Users and rooms in their domain<br />
To add participants or devices outside these domains, users must add them as<br />
guest participants.<br />
<strong>ReadiManager</strong> system administrator’s can set up and manage users and<br />
domains in two ways. They can add users directly to the <strong>ReadiManager</strong><br />
system Local domain or they can implement the Lightweight Directory Access<br />
Protocol (LDAP).<br />
LDAP is a client-server protocol that authenticates users automatically, which<br />
eliminates the need to re-enter IDs and passwords. LDAP also provides a<br />
uniform way to store and locate end-user information.<br />
Note<br />
The <strong>ReadiManager</strong> system supports only the Microsoft Active Directory<br />
implementation of LDAP.<br />
LDAP integration provides these features:<br />
• Access to user information<br />
• Assignment of different roles to users in different LDAP groups<br />
• Identification of LDAP resources, such as rooms, so that they can be<br />
treated as resources in <strong>ReadiManager</strong><br />
<strong>ReadiManager</strong> also supports child domains.<br />
<strong>Polycom</strong>, Inc. 177
<strong>Polycom</strong> <strong>ReadiManager</strong> <strong>Operations</strong> <strong>Guide</strong><br />
Redundant <strong>ReadiManager</strong> System Configuration<br />
How Redundancy Works<br />
A redundant <strong>ReadiManager</strong> system configuration offers higher reliability and<br />
greater call success by ensuring that a <strong>ReadiManager</strong> server is always<br />
available.<br />
A redundant <strong>ReadiManager</strong> system configuration requires two <strong>ReadiManager</strong><br />
SE200 appliances and three IP addresses on the same network—one physical<br />
IP address for each of the appliances and one virtual IP address dedicated to<br />
endpoint registration.<br />
In a redundant configuration:<br />
• One <strong>ReadiManager</strong> SE200 appliance is designated the primary server and<br />
the other is designated the redundant server. Each server must be licensed.<br />
The licenses identify which server is the primary server and which is the<br />
redundant server.<br />
• The two servers share the external <strong>ReadiManager</strong> system database, so<br />
what is recorded by one <strong>ReadiManager</strong> system is read by the other<br />
<strong>ReadiManager</strong> system. An external Microsoft SQL Server database is<br />
required.<br />
• If the primary server goes down for any reason, the system fails over and<br />
the redundant server takes over. Note that failures in services do not<br />
initiate a failover, only a server failure.<br />
• An administrator can force a failover via the Switch Server Roles function<br />
in the <strong>ReadiManager</strong> system user interface. Failover does not require a<br />
system restart or server reboot.<br />
• The <strong>ReadiManager</strong> database information—call records, endpoint<br />
registration information, and network topology configurations—remains<br />
consistent and available during a failover because both servers point to the<br />
same database.<br />
• The failover to the redundant server seems to occur seamlessly because<br />
the endpoints are registered with the virtual IP address, which remains<br />
constant.<br />
During a system failover, which takes approximately 5 minutes:<br />
• Active conferences are dropped from the system. Conference participants<br />
can call back in using the same conference information.<br />
• Users logged into the <strong>ReadiManager</strong> system user interface are<br />
disconnected and returned to main <strong>ReadiManager</strong> system web page.<br />
Users can log back in once failover is completed.<br />
• Users in the middle of an operation may get an error message, because the<br />
system is not available to respond to a request.<br />
178 <strong>Polycom</strong>, Inc.
System Setup Overview<br />
Some system settings affect how rapidly a redundant system returns to full<br />
functionality. The gatekeeper Registration Timeout and Registration Refresh<br />
affect how quickly endpoints re-register with the redundant server after a<br />
failover. And if Deny calls to/from unregistered endpoints is checked, the<br />
gatekeeper rejects calls from endpoints that have not re-registered with the<br />
redundant server after a failover. Therefore, in a redundant system<br />
configuration, use a short refresh period (30 seconds) unless you have many<br />
endpoints or a large amount of network traffic.<br />
Once a failover to a redundant server occurs, the redundant server manages<br />
all system operations until an administrator switches back to the original<br />
primary server via the Switch Server Roles function in the <strong>ReadiManager</strong><br />
system user interface.<br />
Notes<br />
• The <strong>ReadiManager</strong> system does not automatically switch to the primary server<br />
when the primary server becomes available. An administrator must Switch<br />
Server Roles.<br />
• A failover or system restart initiates an encryption routine that changes the<br />
private key for a redundant system. Therefore, after a failover or system restart,<br />
schedulers who use one of the scheduling plug-ins will be prompted to re-enter<br />
their login settings to access the system.<br />
Redundant Configuration System Administration<br />
Because the two servers share the external <strong>ReadiManager</strong> system database,<br />
most of their configuration information is shared. However, certain<br />
information is not stored in the database, so an administrator must manually<br />
synchronize this information. This includes:<br />
• Basic network settings such as IP, default gateway, and DNS server<br />
settings<br />
• External database configuration<br />
• Time and external NTP server settings<br />
• Common Device Management Password<br />
• LDAP server settings<br />
• Current System Log Level<br />
• Custom logo--upload the same logo to both servers<br />
• Softupdate profiles--upload the same update files to both servers<br />
Whenever you change information in one of these sections on one server you<br />
should also change it on the other server.<br />
Licensing and upgrading a redundant system is slightly more complex. The<br />
primary and redundant server required different licenses.<br />
<strong>Polycom</strong>, Inc. 179
<strong>Polycom</strong> <strong>ReadiManager</strong> <strong>Operations</strong> <strong>Guide</strong><br />
Documented procedures for redundancy include:<br />
• “Configure Redundancy” on page 9<br />
• “Configure the External Database for Redundancy” on page 10<br />
• “Set the Virtual IP Address for the Redundant System” on page 11<br />
• “To license a redundant system” on page 11<br />
• “Implement a Redundant <strong>ReadiManager</strong> System” on page 186<br />
• “Failover to a Redundant <strong>ReadiManager</strong> Server” on page 188<br />
• “Deactivate a Redundant <strong>ReadiManager</strong> Configuration” on page 188<br />
180 <strong>Polycom</strong>, Inc.
Server Settings<br />
21<br />
This chapter describes how to update server configuration settings, many of<br />
which were entered during First Time Setup. It includes these topics:<br />
• Edit the <strong>ReadiManager</strong> System Network Settings<br />
• Edit the <strong>ReadiManager</strong> System Time Settings<br />
• Integrate the <strong>ReadiManager</strong> System with an External Database<br />
• Revert the <strong>ReadiManager</strong> System to an Internal Database<br />
• Integrate the <strong>ReadiManager</strong> System with an LDAP Server<br />
• Add <strong>ReadiManager</strong> System Licenses<br />
• Implement a Redundant <strong>ReadiManager</strong> System<br />
• Failover to a Redundant <strong>ReadiManager</strong> Server<br />
• Add a Custom Logo to the User Interface<br />
Edit the <strong>ReadiManager</strong> System Network Settings<br />
Edit the system Network settings to change the basic network information for<br />
the <strong>ReadiManager</strong> SE200 server. Network settings include these fields:<br />
Table 21-1 System Network Settings<br />
Field Description<br />
System Name The NetBIOS name (ASCII only a ) of the Microsoft<br />
Windows server. Must be between 6 and 16 characters<br />
long; dashes and underscores are valid characters.<br />
IP Address The static IP address for the server<br />
Subnet Mask The network subnet mask for the server IP address<br />
Default Gateway The static IP address of the server gateway<br />
DNS Server The IP address of the DNS server<br />
<strong>Polycom</strong>, Inc. 181
<strong>Polycom</strong> <strong>ReadiManager</strong> <strong>Operations</strong> <strong>Guide</strong><br />
a. For more information on field limitations, see “Field Input Requirements” on page 7.<br />
Changing network settings may require a system restart.<br />
To edit the <strong>ReadiManager</strong> system network settings<br />
1 Select System Setup > Server Settings > Network.<br />
2 On the Network screen, make the appropriate changes. See Table 21-2.<br />
3 Click Update.<br />
If you change the IP address, the system prompts you to restart the<br />
<strong>ReadiManager</strong> system. We also recommend that you restart the system if<br />
you change the subnet mask.<br />
4 Restart the system.<br />
Edit the <strong>ReadiManager</strong> System Time Settings<br />
Edit the System Time server settings to change the <strong>ReadiManager</strong> server time<br />
or to synchronize the server with an external NTP server. The system time<br />
settings include these fields:<br />
Table 21-2 Fields in the Server Settings Screen<br />
Field Description<br />
System Time Zone The time zone in which the appliance resides<br />
Auto Adjust for Daylight<br />
Savings?<br />
Select this checkbox to adjust the clock automatically for<br />
daylight savings time.<br />
Use Current Time Select this checkbox to input the current date and time.<br />
Current Date The system date for the <strong>ReadiManager</strong> system<br />
Current Time The system time for the <strong>ReadiManager</strong> system.<br />
Use External NTP<br />
Server Time<br />
Synchronization<br />
IP address or DNS<br />
resolved name<br />
Minutes between<br />
synchronization<br />
attempts<br />
Select this checkbox to synchronize the <strong>ReadiManager</strong><br />
system date and time with an external NTP server.<br />
The IP address or fully qualified domain name (ASCII<br />
only a ) of the NTP server<br />
Input how often the <strong>ReadiManager</strong> server synchronize<br />
with the NTP server<br />
The default is 60 minutes.<br />
a. For more information on field limitations, see “Field Input Requirements” on page 7.<br />
182 <strong>Polycom</strong>, Inc.
To edit the <strong>ReadiManager</strong> system time settings<br />
1 Select System Setup > Server Settings > System Time.<br />
2 On the System Time screen, make the appropriate changes. See<br />
Table 21-2.<br />
Notes<br />
3 Click Update.<br />
Integrate the <strong>ReadiManager</strong> System with an External<br />
Database<br />
Server Settings<br />
• Make sure the current system time is correct before synchronizing with an NTP<br />
server. If you set the system to use an external NTP server when the current<br />
date and time are incorrect, the system time may be wrong for the amount of<br />
time specified in the Minutes between synchronization attempts.<br />
• If the <strong>ReadiManager</strong> system is already running when you connect to an NTP<br />
server for the first time, you must reboot the <strong>ReadiManager</strong> system to ensure<br />
the time is synchronized correctly.<br />
Edit the Database Integration server setting to integrate the <strong>ReadiManager</strong><br />
system with an external Microsoft SQL Server.<br />
Notes<br />
• We recommend that when you reboot the external database server, you also<br />
restart the <strong>ReadiManager</strong> system in the same maintenance window.<br />
• You can create the <strong>ReadiManager</strong> system databases manually using Microsoft<br />
SQL scripts. Contact <strong>Polycom</strong> Global Services to request the scripts.<br />
To integrate <strong>ReadiManager</strong> with an external database for the first time<br />
1 Select System Setup > Server Settings > Database.<br />
2 On the Database screen, select the Use an external SQL Server database<br />
check box.<br />
3 Click Database Setup and download the Remote Database Setup<br />
Utility, DBSetup.exe, to your computer.<br />
Note<br />
If you are installing a redundant <strong>ReadiManager</strong> system configuration, perform step<br />
4 on the primary server only. When performing this procedure on the secondary<br />
server, skip to step 5.<br />
<strong>Polycom</strong>, Inc. 183
<strong>Polycom</strong> <strong>ReadiManager</strong> <strong>Operations</strong> <strong>Guide</strong><br />
4 Run the Remote Database Setup Utility and complete the information<br />
requested in the setup screens.<br />
— Make sure you know the path to the Microsoft SQL server.<br />
— If you use Microsoft Windows authentication, be sure the login ID has<br />
administrator privileges on the SQL server.<br />
— If you use Microsoft SQL authentication, be sure the login ID is a<br />
member of the sysadmin role.<br />
— If a <strong>ReadiManager</strong> database was installed previously on the server,<br />
make sure you overwrite it.<br />
5 Enter the database server’s IP address, SQL server port number, and the<br />
database instance name (if necessary, otherwise leave it blank) in the<br />
Database screen. (Note that the database instance name field is ASCII<br />
only; for more information on field limitations, see “Field Input<br />
Requirements” on page 7.)<br />
6 Click Update.<br />
<strong>ReadiManager</strong> connects to the server. When the connection is successful,<br />
the Database Status screen appears.<br />
Revert the <strong>ReadiManager</strong> System to an Internal Database<br />
To revert from an external database to an internal database<br />
1 Select System Setup > Server Settings > Database.<br />
2 On the Database screen, deselect the Use an external SQL Server<br />
database check box and click Update.<br />
Integrate the <strong>ReadiManager</strong> System with an LDAP Server<br />
Edit the LDAP server setting to integrate the <strong>ReadiManager</strong> system with an<br />
LDAP server.<br />
To integrate <strong>ReadiManager</strong> with an LDAP server<br />
1 Select System Setup > Server Settings > LDAP.<br />
2 On the LDAP screen, select the Integrate with LDAP server check box.<br />
3 Enter the LDAP Server IP Address or DNS Name of the LDAP server.<br />
184 <strong>Polycom</strong>, Inc.
Server Settings<br />
Note<br />
When entering the DNS Name of the LDAP server:<br />
• Enter the fully qualified domain name e.g., <br />
• Use ASCII only. For more information on field limitations, see “Field Input<br />
Requirements” on page 7.<br />
4 Enter the LDAP User ID and Password required to access the LDAP<br />
server and click Update.<br />
Notes<br />
• This User ID must have read access to the LDAP server.<br />
• This User ID is automatically associated to a <strong>ReadiManager</strong> Administrator role.<br />
Add <strong>ReadiManager</strong> System Licenses<br />
The initial <strong>ReadiManager</strong> system includes a trial license for 25 seats, which<br />
allows you to start using the system immediately. The trial license is valid for<br />
up to 60 days, starting from the date of first-time setup.<br />
You should receive one or more License Certificates, according to your order.<br />
You must activate each License Certificate to receive an activation key, which<br />
you enter in the <strong>ReadiManager</strong> system.<br />
Notes<br />
• Licenses are available in 25, 50, 100, 250 and 500 seats. The <strong>ReadiManager</strong><br />
system supports a maximum of 2025 seats.<br />
• Installation of a new license key completely and immediately replaces the<br />
functionality provided by the existing license key<br />
So licensing your <strong>ReadiManager</strong> system is a two step process:<br />
• Request a Software Activation Key.<br />
• Enter the <strong>ReadiManager</strong> System License Number<br />
These steps are described in the following sections.<br />
<strong>Polycom</strong>, Inc. 185
<strong>Polycom</strong> <strong>ReadiManager</strong> <strong>Operations</strong> <strong>Guide</strong><br />
Request a Software Activation Key<br />
To request a software activation key<br />
1 Select System Setup > Server Setup > Licenses and record the<br />
<strong>ReadiManager</strong> SE200 appliance serial number:<br />
____________________.<br />
2 Go to http://polycom.com/activation.<br />
3 Log in or create a New User Account.<br />
4 Select Product Activation.<br />
5 Enter the software license number listed on your License Certificate and<br />
the serial number you recorded in step 1.<br />
6 Click Generate.<br />
7 When the activation key appears, record it:<br />
__________-__________-_________-___________<br />
Enter the <strong>ReadiManager</strong> System License Number<br />
To enter the license number in <strong>ReadiManager</strong><br />
1 Select System Setup > Server Setup > Licenses.<br />
2 Enter the new license number into the Add New License > Activation<br />
Key field and click Add. (Note that the field is ASCII only; for more<br />
information, see “Field Input Requirements” on page 7.)<br />
The license number appears in the list and the number of active licenses is<br />
updated.<br />
Implement a Redundant <strong>ReadiManager</strong> System<br />
You can set up <strong>ReadiManager</strong> in a fault-tolerant, high-availability, redundant<br />
configuration. A redundant <strong>ReadiManager</strong> configuration requires two<br />
<strong>ReadiManager</strong> SE200 appliances on the same network. It also requires an<br />
external Microsoft SQL Server database.<br />
This section describes how to convert an existing <strong>ReadiManager</strong> system to a<br />
redundant <strong>ReadiManager</strong> system. For information on installing a new<br />
redundant <strong>ReadiManager</strong> system, see the <strong>ReadiManager</strong> Getting Started <strong>Guide</strong><br />
and follow up with “Configure Redundancy” on page 163.<br />
186 <strong>Polycom</strong>, Inc.
Server Settings<br />
To add a redundant <strong>ReadiManager</strong> system to an existing <strong>ReadiManager</strong> system<br />
1 Install the redundant <strong>ReadiManager</strong> system as described in the<br />
<strong>ReadiManager</strong> Getting Started <strong>Guide</strong>. During installation, point the<br />
redundant <strong>ReadiManager</strong> system to its internal database.<br />
2 Request the required software activation key code for the redundant<br />
server as described in “Request a Software Activation Key” on page 186.<br />
3 Log into both the primary and redundant <strong>ReadiManager</strong> system servers.<br />
4 Point the primary server to an external Microsoft SQL Server database<br />
and re-enter the license as described in “Integrate the <strong>ReadiManager</strong><br />
System with an External Database” on page 183.<br />
5 On the primary server:<br />
a Select System Setup > Server Settings > Redundant Configuration.<br />
If the two <strong>ReadiManager</strong> systems are installed and configured<br />
correctly on the network, both servers are displayed in the<br />
Redundant Configuration screen.<br />
b Enter the Virtual IP for the redundant system and click Submit.<br />
6 On the redundant server:<br />
a Select System Setup > Server Settings > Database.<br />
b On the Database screen, select the Use an external SQL Server<br />
database check box.<br />
c Enter the database information from the primary server i.e., the<br />
database server’s IP address, SQL server port number, and the<br />
database instance name (if necessary, otherwise leave it blank) in the<br />
Database screen. (Note that the Database Instance Name field is<br />
ASCII only; for more information on field limitations, see “Field Input<br />
Requirements” on page 7.)<br />
d Click Update.<br />
<strong>ReadiManager</strong> connects to the server and the redundant server<br />
reboots and comes online.<br />
7 On the primary server, fail over to the redundant server. See “Failover to<br />
a Redundant <strong>ReadiManager</strong> Server” on page 188.<br />
8 Once the failover is complete, on the redundant server:<br />
a Log into the <strong>ReadiManager</strong> system using the virtual IP address, and<br />
select System Setup > Server Setup > Licenses.<br />
b Enter the activation key code for the redundant server into the Add<br />
New License > Activation Key field and click Add. (Note that the<br />
field is ASCII only; for more information, see “Field Input<br />
Requirements” on page 7.)<br />
c Select System Management > Dashboard > Restart to reboot the<br />
system.<br />
<strong>Polycom</strong>, Inc. 187
<strong>Polycom</strong> <strong>ReadiManager</strong> <strong>Operations</strong> <strong>Guide</strong><br />
This system fails over to the primary server.<br />
Failover to a Redundant <strong>ReadiManager</strong> Server<br />
In a redundant configuration, the <strong>ReadiManager</strong> system automatically fails<br />
over from the primary server to the redundant server. However, you can also<br />
manually initiate a failover.<br />
To manually initiate a failover<br />
1 On either server, select System Setup > Server Settings > Redundant<br />
Configuration.<br />
2 On the Redundant Configuration screen, click Switch Server Role.<br />
The system initiates a failover to the other server.<br />
Deactivate a Redundant <strong>ReadiManager</strong> Configuration<br />
In some circumstances, you may need to deactivate redundancy. Use this<br />
procedure to do so, but only when the system is in a valid redundant state.<br />
To deactivate a redundant <strong>ReadiManager</strong> configuration:<br />
1 Log into the <strong>ReadiManager</strong> system using the virtual IP address.<br />
2 Failover to the redundant server. See page 188.<br />
3 On the redundant server:<br />
a Select System Setup > Server Settings > Database.<br />
b On the Database screen, deselect the Use an external SQL Server<br />
database check box.<br />
c Click Update.<br />
The redundant server reboots.<br />
4 On the primary server:<br />
a Select System Setup > Server Settings > Redundant Configuration.<br />
b On the Redundant Configuration screen, click Reset Redundant<br />
Configuration.<br />
The primary system reboots.<br />
188 <strong>Polycom</strong>, Inc.
Server Settings<br />
When the system reboots, you can no longer access the system via the virtual<br />
IP. The redundant server is now a stand-alone system with an internal<br />
database, and the primary server is a stand-alone system with an external<br />
database.<br />
To return to a redundant configuration, see “Implement a Redundant<br />
<strong>ReadiManager</strong> System” on page 186.<br />
<strong>Polycom</strong>, Inc. 189
<strong>Polycom</strong> <strong>ReadiManager</strong> <strong>Operations</strong> <strong>Guide</strong><br />
Add a Custom Logo to the User Interface<br />
You can place your company logo on the <strong>ReadiManager</strong> application screens.<br />
To avoid distortion, we recommend a logo in a GIF, JPG, or PNG graphics<br />
format with a size no greater than 300 x 44 pixels.<br />
In redundant configurations, upload the company logo to both servers.<br />
To upload the company logo<br />
1 Select System Setup > Server Settings > Custom Logo.<br />
2 On the Custom Logo screen, click Upload...<br />
3 In the Select file dialog box, browse to the logo image and select the file.<br />
4 Click Open.<br />
190 <strong>Polycom</strong>, Inc.
Gatekeeper Settings<br />
Gatekeeper Overview<br />
Primary Gatekeeper<br />
22<br />
This chapter describes how to work with gatekeepers. It includes these topics:<br />
• Gatekeeper Overview<br />
• Edit the Primary Gatekeeper Settings<br />
• Add an Alternate Gatekeeper<br />
• Edit the Alternate Gatekeeper Settings<br />
During the First Time Setup procedure, the <strong>ReadiManager</strong> system is<br />
automatically designated as the primary gatekeeper and the default<br />
gatekeeper settings are implemented.<br />
You can add an alternate gatekeeper or change the primary gatekeeper<br />
settings via the Gatekeeper Settings menu. An alternate gatekeeper ensures<br />
endpoint availability. The endpoint remains registered with the alternate<br />
gatekeeper unless it goes down. The endpoint then registers with the<br />
gatekeeper with the highest priority that can respond to the registration<br />
request.<br />
Primary Gatekeeper Settings affect how devices register and calls are made<br />
in the video communications network. The Primary Gatekeeper Settings:<br />
• Identify the primary gatekeeper<br />
• Specify registration-related settings, including the default gatekeeper,<br />
which endpoints register, the registration timeout period, and the offline<br />
timeout<br />
• Set the maximum number of neighboring gatekeeper hop counts<br />
• Specify how to handle calls to and from rogue (unregistered) endpoints<br />
The Primary Gatekeeper Settings include these fields:<br />
<strong>Polycom</strong>, Inc. 191
<strong>Polycom</strong> <strong>ReadiManager</strong> <strong>Operations</strong> <strong>Guide</strong><br />
Table 22-1 Fields in Primary Gatekeeper Settings screen<br />
Field Description<br />
Gatekeeper Identifier The gatekeeper identifier (ASCII-onlya ) on the network,<br />
which is used by the endpoints and <strong>ReadiManager</strong> for<br />
communication.<br />
The maximum number of characters is 254. All ASCII<br />
characters are valid.<br />
Gatekeeper Description The description (ASCII only a ) of this gatekeeper on the<br />
network<br />
Default Gatekeeper Select this check box to identify the default gatekeeper<br />
to endpoints seeking registration OR select this check<br />
box to enable automatic registration when you have<br />
more than one gatekeeper on the network.<br />
192 <strong>Polycom</strong>, Inc.<br />
Note<br />
To register an MGC-50 or MGC-100 with<br />
<strong>ReadiManager</strong>, you must select this check box.<br />
Allow Registration of Informs the gatekeeper of which endpoints to register.<br />
• All Endpoints. Provides an open registration policy.<br />
This is the default policy.<br />
• Predefined Endpoints Only. Provides a secure<br />
gatekeeper policy.<br />
• Endpoints in Defined Sites. Provides a modified<br />
open registration policy, which restricts registration<br />
to <strong>ReadiManager</strong> sites.<br />
Registration Timeout<br />
(day)<br />
Registration Refresh<br />
(seconds)<br />
The number of days that the <strong>ReadiManager</strong> gatekeeper<br />
maintains the endpoint registration information, in case<br />
the endpoint has not yet received any.<br />
The default is 30 days.<br />
Enter 999 to prevent endpoint registrations from<br />
expiring automatically.<br />
The interval at which <strong>ReadiManager</strong> sends “keep-alive”<br />
messages to registered endpoints to determine whether<br />
they are online. The default is 300 seconds.<br />
If the endpoint responds with a registration request<br />
message, the endpoint is online. If not, the endpoint is<br />
offline.<br />
When the endpoint is registered to another gatekeeper,<br />
<strong>ReadiManager</strong> still shows the endpoint’s status.<br />
To view the endpoint’s state (Online or Offline), select<br />
Device > Admin/Monitor View.<br />
Note<br />
Endpoints are Offline when they have been turned off<br />
or have been removed from the network. Endpoints<br />
return to an Online state when they have been turned<br />
on or have reregistered with <strong>ReadiManager</strong>.
Alternate Gatekeeper<br />
Table 22-1 Fields in Primary Gatekeeper Settings screen (continued)<br />
Field Description<br />
Maximum Neighbor<br />
Gatekeeper Hop<br />
Counts<br />
Log calls to/from<br />
unregistered endpoints<br />
Deny calls to/from<br />
unregistered endpoints<br />
Enable Real-Time<br />
Statistics<br />
Gatekeeper Settings<br />
Limits the number of connections to make when an<br />
endpoint seeks dialing resolution. The default is 3.<br />
Logs calls to and from rogue endpoints. To view call<br />
logs, select System Management > Reports ><br />
Gatekeeper Message Log.<br />
Prevents calls to and from rogue endpoints.<br />
IRR frequency The frequency of the gatekeeper’s response to the<br />
calling or receiving endpoint. The default is 0.<br />
a. For more information, see “Field Input Requirements” on page 7.<br />
Alternate Gatekeeper Settings affect how devices register with the alternate<br />
gatekeeper when the primary gatekeeper cannot respond to a request. These<br />
settings:<br />
• Identify the alternate gatekeeper<br />
• Identify the port the alternate gatekeeper uses to communicate with the<br />
endpoints<br />
Note<br />
An alternate gatekeeper is not a redundant gatekeeper.<br />
Use the Alternate Gatekeeper screen to enter information about an alternate<br />
gatekeeper that devices can use when the primary gatekeeper (<strong>ReadiManager</strong>)<br />
cannot respond to a request.<br />
The Alternate Gatekeeper Settings include these fields:<br />
<strong>Polycom</strong>, Inc. 193
<strong>Polycom</strong> <strong>ReadiManager</strong> <strong>Operations</strong> <strong>Guide</strong><br />
Edit the Primary Gatekeeper Settings<br />
Add an Alternate Gatekeeper<br />
Table 22-2 Fields in Alternate Gatekeeper Settings Screen<br />
Field Description<br />
Need to Register Check this box to require that a device register with the<br />
alternate gatekeeper before sending other registration<br />
admission status requests.The default setting is<br />
unchecked.<br />
Alternate Gatekeeper ID The alternate gatekeeper’s network identifier (ASCII<br />
only a )<br />
IP Address The IP address of the alternate gatekeeper<br />
Port The port number (usually 1719) that the alternate<br />
gatekeeper uses to communicate with endpoints<br />
Priority Indicates the alternate gatekeeper’s priority for endpoint<br />
registration. A lower number has higher priority (the<br />
range is 0 to 127), so endpoints would first register with<br />
an alternate gatekeeper with a priority of 0. The default<br />
setting is 0.<br />
a. For more information, see “Field Input Requirements” on page 7.<br />
To edit the primary <strong>ReadiManager</strong> gatekeeper settings<br />
1 Select System Setup > Gatekeeper Settings > Primary Gatekeeper.<br />
2 On the Primary Gatekeeper screen, make the appropriate changes. See<br />
Table 22-1.<br />
3 Click Update.<br />
To add an alternate gatekeeper<br />
1 Select System Setup > Gatekeeper Settings > Alternate Gatekeeper.<br />
2 On the Alternate Gatekeeper screen, make the appropriate changes. See<br />
Table 22-2.<br />
3 Click Update.<br />
194 <strong>Polycom</strong>, Inc.
Edit the Alternate Gatekeeper Settings<br />
Gatekeeper Settings<br />
To edit the alternate <strong>ReadiManager</strong> gatekeeper settings<br />
1 Select System Setup > Gatekeeper Settings > Alternate Gatekeeper.<br />
2 On the Alternate Gatekeeper screen, make the appropriate changes. See<br />
Table 22-2.<br />
3 Click Update.<br />
<strong>Polycom</strong>, Inc. 195
<strong>Polycom</strong> <strong>ReadiManager</strong> <strong>Operations</strong> <strong>Guide</strong><br />
196 <strong>Polycom</strong>, Inc.
Management & Security Settings<br />
23<br />
This chapter describes the system management and security tasks you can<br />
perform via the Management and Security menu. It includes these topics:<br />
• Edit Security Settings to Implement HTTPS<br />
• Auto-Provision Endpoints<br />
• Set Common Passwords for Endpoints<br />
• Update the <strong>ReadiManager</strong> Server Software<br />
Edit Security Settings to Implement HTTPS<br />
By default, the <strong>ReadiManager</strong> system uses standard http for its data<br />
interchanges. Edit the Security settings to implement the https protocol,<br />
which is a combination of normal http interchange over an encrypted Secure<br />
Sockets Layer (SSL) or Transport Layer Security (TLS) connection.<br />
If you are implementing https you have the following decisions to make:<br />
Decision... If yes, then perform these tasks...<br />
Use the <strong>ReadiManager</strong><br />
system default key and<br />
certificate?<br />
Use your own existing<br />
private key and certificate,<br />
if your company is<br />
self-authorizing?<br />
Use a private key and<br />
certificate requested by<br />
the <strong>ReadiManager</strong><br />
system?<br />
• “Edit the https Security Setting” on page 199<br />
• “Upload a Private Key” on page 199<br />
• “Upload a Certificate” on page 199<br />
• “Edit the https Security Setting” on page 199<br />
• “Generate a Certificate Request” on page 198<br />
• “Upload a Certificate” on page 199<br />
• “Edit the https Security Setting” on page 199<br />
<strong>Polycom</strong>, Inc. 197
<strong>Polycom</strong> <strong>ReadiManager</strong> <strong>Operations</strong> <strong>Guide</strong><br />
Generate a Certificate Request<br />
Because the key and certificate are stored in the <strong>ReadiManager</strong> database, you<br />
implement https on the primary server only.<br />
Note The <strong>ReadiManager</strong> system always stores the default key and certificate. However,<br />
it stores only the last private key generated or uploaded to the system and the last<br />
certificate uploaded to the system.<br />
To generate a certificate request on a <strong>ReadiManager</strong> system<br />
1 Select System Setup > Management and Security Settings > Security<br />
Settings.<br />
2 Click Generate Certificate Request.<br />
The system displays a warning that “This action will overwrite any<br />
previously generated or uploaded private key. “<br />
3 To continue, click Yes.<br />
4 Complete the Certificate Request Data dialog box.<br />
The following table describes the information needed to generate a<br />
<strong>ReadiManager</strong> system certificate request. All fields are required.<br />
Table 23-1 Fields in the Certificate Request Data dialog box<br />
Field Description<br />
Country Name Two-letter (ASCII only a ) ISO 3166 country code<br />
State or Province Name Full name (ASCII only a )<br />
Locality Name City (ASCII only a )<br />
Organization Name Company Who (ASCII only a )<br />
Organization Unit Name Section (ASCII only a )<br />
Common Name Server’s hostname (ASCII only a )<br />
Email Address (ASCII only a )<br />
a. For more information on field limitations, see “Field Input Requirements” on page 7.<br />
5 Save the Certificate Request Data to a file and submit the file to the<br />
Certificate Authority of your choice.<br />
198 <strong>Polycom</strong>, Inc.
Upload a Private Key<br />
Upload a Certificate<br />
Edit the https Security Setting<br />
Management & Security Settings<br />
To upload a private key to a <strong>ReadiManager</strong> system<br />
1 Select System Setup > Management and Security Settings > Security<br />
Settings.<br />
2 Click Upload Private Key.<br />
The system displays a warning that “This action will overwrite any<br />
previously generated or uploaded private key. “<br />
3 To continue, click Yes.<br />
4 Browse to the private key file location and select the file.<br />
5 Click Open.<br />
An Upload Successful dialog box appears.<br />
To upload a certificate from a Certificate Authority<br />
1 If necessary, save the certificate file to a system on the network.<br />
2 Select System Setup > Management and Security Settings > Security<br />
Settings.<br />
3 Click Upload Certificate.<br />
4 Browse to the certificate file location and select the file.<br />
5 Click Open.<br />
The certificate is checked against the private key in the database to verify<br />
that they match. If they do, an Upload Successful dialog box appears. The<br />
certificate file is registered. If https is already activated, the web server<br />
will restart so that it can load the certificate authority.<br />
To edit the https security setting on a <strong>ReadiManager</strong> system<br />
1 Select System Setup > Management and Security Settings > Security<br />
Settings.<br />
2 On the Security Settings screen, check Use HTTPS.<br />
<strong>Polycom</strong>, Inc. 199
<strong>Polycom</strong> <strong>ReadiManager</strong> <strong>Operations</strong> <strong>Guide</strong><br />
Revert to the Default Key and Certificate<br />
3 Click Update.<br />
The system displays a warning that this action will restart the webserver<br />
and all client sessions will be lost<br />
4 To continue, click Yes.<br />
The <strong>ReadiManager</strong> system webserver restarts.<br />
After you’ve implemented a certificate from a Certificate Authority, you can<br />
return to the default certificate.<br />
To revert to the default key and certificate<br />
1 Select System Setup > Management and Security Settings > Security<br />
Settings.<br />
2 Click Revert to Default Certificate.<br />
3 Click OK.<br />
The system displays a warning that this action will restart the webserver<br />
and all client sessions will be lost<br />
4 To continue, click Yes.<br />
The <strong>ReadiManager</strong> system webserver restarts.<br />
Configure Client Systems to Accept HTTPS Certificate<br />
When you implement HTTPS on the <strong>ReadiManager</strong> system, client systems<br />
that access the system interface receive the following HTTPS certificate<br />
security alert until they are configured to accept the <strong>ReadiManager</strong> SE200<br />
system HTTPS certificate.<br />
200 <strong>Polycom</strong>, Inc.
Auto-Provision Endpoints<br />
Management & Security Settings<br />
To configure client systems to accept the HTTPS cerficate without errors<br />
1 Add the <strong>ReadiManager</strong> system IP address or DNS name to the DNS<br />
server hosts file.<br />
2 Instruct client users to install the <strong>ReadiManager</strong> SE200 HTTPS certificate<br />
as follows:<br />
a Open a browser window and in the Address field enter the<br />
<strong>ReadiManager</strong> SE200 appliance IP address or DNS name.<br />
b When the HTTPS Security Alert appears, click View Certificate.<br />
c In the General tab of the Certificate dialog box, click Install<br />
Certificate.<br />
d When the Certificate Import Wizard appears, click Next<br />
e Click Next again, to accept the default setting of Automatically select<br />
the certificate store based on the type of certificate.<br />
The wizard indicates that “You have successfully completed the<br />
Certificate Import wizard.”<br />
f Click Finish.<br />
A Security Warning indicates that “You are about to install a<br />
certificate from a certification authority claiming to represent: se200”<br />
and asking you “Do you want to install this certificate?”<br />
g Click Yes.<br />
The <strong>ReadiManager</strong> system interface appears. The next time you<br />
access the <strong>ReadiManager</strong> system interface, the Security Alert<br />
indicates “The security certificate is from a trusted certifying<br />
authority.”<br />
After first-time setup, you can configure the <strong>ReadiManager</strong> system to<br />
provision and configure any endpoints that register automatically with<br />
<strong>ReadiManager</strong> through the gatekeeper or Global Directory Server.<br />
If auto-provisioning is not successful, you can add endpoints through<br />
standard provisioning.<br />
Note<br />
Auto-provisioning works only for endpoints that register with the gatekeeper of<br />
Global Directory Server after the Auto Provision setting is enabled; it does not<br />
auto-provision existing endpoints. In addition, the <strong>ReadiManager</strong> system only<br />
supports auto-provisioning for V-series and H-series endpoints.<br />
<strong>Polycom</strong>, Inc. 201
<strong>Polycom</strong> <strong>ReadiManager</strong> <strong>Operations</strong> <strong>Guide</strong><br />
To auto-provision additional endpoints<br />
1 Select System Setup > Management and Security Settings > Device<br />
Management Settings.<br />
The Device Management Settings screen appears.<br />
2 To provision endpoints automatically, check Auto Provision Endpoints<br />
and click Update.<br />
After you have changed this setting, all endpoints you add are<br />
automatically provisioned.<br />
Set Common Passwords for Endpoints<br />
The Common Password feature allows you to manage endpoints that have the<br />
same global administrative password. However, it cannot reset the<br />
administrative password on the video endpoint.<br />
If you use the Common Password feature, access to password-protected data<br />
within the endpoint is granted if the specified common password matches the<br />
endpoint's Administrator Password.<br />
To set common passwords for endpoints<br />
1 Select System Setup > Management and Security Settings > Device<br />
Management Settings.<br />
The Device Management Settings screen appears.<br />
2 Select the Use a Common Password checkbox.<br />
3 Enter the common password in the Password and Verify fields and click<br />
Update.<br />
Note<br />
Leave these three settings blank if your <strong>Polycom</strong> video endpoints require individual<br />
passwords or do not have passwords. To configure a global administrative<br />
password for all <strong>Polycom</strong> video endpoints, use standard provisioning.<br />
Update the <strong>ReadiManager</strong> Server Software<br />
You can upgrade the <strong>ReadiManager</strong> server software. Follow the instructions<br />
in the <strong>ReadiManager</strong> Upgrade <strong>Guide</strong> for the version of software to which you are<br />
upgrading.<br />
202 <strong>Polycom</strong>, Inc.
Dial Plan Setup<br />
Sites<br />
24<br />
This chapter describes how to edit the default <strong>ReadiManager</strong> system Dial Plan<br />
settings (which includes the definition of sites, site links, regions, dial rules,<br />
services, and least-cost routing tables) to support your site topology and video<br />
call routing. It includes these topics:<br />
• Sites<br />
• Site Links<br />
• Gatekeeper Regions<br />
• Dial Plan Services<br />
• Dial Rules<br />
• Least-Cost Routing Tables<br />
Table 24-1 Fields on the Site Editor: General Information Screen<br />
Field Description<br />
General Info<br />
Site Name The physical location of the site. The name can be up to<br />
32 characters long, and may include spaces, dashes,<br />
and underscores.<br />
Description Description (ASCII only a ) of the site.<br />
Override ITU Dialing<br />
Rules<br />
Check this box to override the standard dialing rules<br />
established by the International Telecommunications<br />
Union.<br />
PBX Access Code The access code required to enter the site’s PBX<br />
system.<br />
Country Code The country code for the country in which the site is<br />
located.<br />
<strong>Polycom</strong>, Inc. 203
<strong>Polycom</strong> <strong>ReadiManager</strong> <strong>Operations</strong> <strong>Guide</strong><br />
Table 24-1 Fields on the Site Editor: General Information Screen (continued)<br />
Field Description<br />
Area Code The city or area code for the site. Do not include a<br />
leading zero. For example, the city code for Paris is 01;<br />
however, enter 1 in this field.<br />
# of Digits in Subscriber<br />
Number<br />
The number of digits in a phone number. For example,<br />
in the United States, subscriber numbers have seven<br />
digits.<br />
Default LCR Table The default least-cost routing table (LCR) for this site.<br />
This LCR table is used for all calls originating from<br />
devices associated with this site. The default is None.<br />
Assignment Method The ISDN number assignment method for the site.<br />
Possible values include:<br />
• No Auto Assignment. Select this option when<br />
ISDN numbers are not assigned to IP devices.<br />
• DID (Direct Inward Dial). Select this option when<br />
you assign a range of phone numbers received from<br />
the telephone company service.<br />
• Gateway Extension Dialing. Select this option<br />
when you have a single gateway phone number and<br />
a range of extensions (E.164 aliases) that are<br />
internal to the company. In this case, calls go<br />
through a gateway. Endpoints are differentiated by<br />
the extension at the end of the dial string.<br />
When a site is assigned an automatic assignment<br />
method, devices without an ISDN number are assigned<br />
one when they register. These numbers allow inbound<br />
calls to reach specific video endpoints. After an ISDN<br />
number is assigned to an endpoint, it is reserved for use<br />
as long as that endpoint remains registered with the<br />
<strong>ReadiManager</strong> system.<br />
Note<br />
If you do not assign ISDN numbers automatically, you<br />
cannot call IP-only endpoints through an ISDN line.<br />
ISDN Number Assignment—DID (Direct Inward Dial)<br />
# Digits in Call Line<br />
Identifier<br />
Enter the number of digits in the Call Line Identifier<br />
(CLID), which is the dialed number. The maximum is 17.<br />
• For example, in the United States, the number of<br />
digits in the CLID is often 7 for outside local calls, 4<br />
for internal calls, or 11 for callers in a different area<br />
code.<br />
• This number indicates what part of the full dial string<br />
is sent to the gatekeeper for address resolution.<br />
204 <strong>Polycom</strong>, Inc.
Table 24-1 Fields on the Site Editor: General Information Screen (continued)<br />
Field Description<br />
# Digits in Short Phone<br />
Number<br />
ISDN Number Range -<br />
Start<br />
ISDN Number Range -<br />
End<br />
Dial Plan Setup<br />
Enter the number of digits in the short form of the dialing<br />
number.<br />
• For example, in the United States, internal<br />
extensions are usually four or five digits.<br />
• This number indicates what part of the dial string is<br />
sent to the gatekeeper for address resolution in<br />
gateway + extension dialing.<br />
The starting ISDN number to assign automatically to IP<br />
devices<br />
The ending ISDN number to assign automatically to IP<br />
devices<br />
ISDN Number Assignment—Gateway Extension Dialing<br />
Gateway Phone<br />
Number<br />
Phone number of the site gateway<br />
E164 Start • The starting number in a range of available<br />
extensions to assign automatically to IP devices<br />
• When a device without native ISDN registers, a<br />
number within the start and end range is assigned,<br />
so that the device can be called through an ISDN<br />
line<br />
E164 End The ending number in the range of available extensions<br />
to assign automatically to IP devices<br />
Site Routing<br />
Internet calls are not<br />
allowed<br />
Allowed via H.323<br />
aware firewall<br />
Disables call routing through the Internet<br />
Enables call routing through the Internet, using an<br />
H.323-aware firewall<br />
Notes<br />
• For an outbound call to the Internet, you must enter<br />
the firewall gateway service (e.g. a <strong>Polycom</strong> V2IU<br />
appliance) code before the IP address in the dial<br />
string.<br />
• If you select Allowed via H.323 aware firewall you<br />
must create a site link between this site and the<br />
Internet/VPN site.<br />
<strong>Polycom</strong>, Inc. 205
<strong>Polycom</strong> <strong>ReadiManager</strong> <strong>Operations</strong> <strong>Guide</strong><br />
View the Sites List<br />
Add a Site<br />
Table 24-1 Fields on the Site Editor: General Information Screen (continued)<br />
Field Description<br />
Allowed via H.323<br />
aware SBC or ALG<br />
To view the Sites list<br />
>> Select System Setup > Dial Plan > Sites.<br />
The Sites list appears. It includes this information:<br />
To add a site<br />
1 Select System Setup > Dial Plan > Sites.<br />
2 From the Sites list, click Add Site.<br />
Enables call routing via the Internet, using an<br />
H.323-aware SBC (Session Border Control) or ALG<br />
(Application Level Gateway) server<br />
Note<br />
For an outbound call to the Internet, you must enter the<br />
firewall gateway service (e.g. a <strong>Polycom</strong> V2IU<br />
appliance) code before the IP address in the dial string.<br />
Call Signaling Address IP address of the SBC or ALG server. Supports only<br />
IPv4<br />
Port Port address of SBC or ALG server<br />
Site Subnet<br />
Subnet IP<br />
Address/Mask<br />
a. For more information, see “Field Input Requirements” on page 7.<br />
Table 24-2 Information in the Sites List<br />
Column Description<br />
Name The physical location of the site<br />
Description Description of the site<br />
Country Code The country code for the site<br />
Area Code The area code for the site<br />
206 <strong>Polycom</strong>, Inc.
Edit Site Settings<br />
Delete a Site<br />
Dial Plan Setup<br />
3 In the Add Site dialog box, enter a Site Name and Description for the<br />
site.<br />
4 Complete the General Info, Site Routing, Site Subnet, and if applicable<br />
ISDN Number Assignment, sections of the Add Site dialog box. See<br />
Table 24-1.<br />
5 Click OK.<br />
The new site is added to the system.<br />
Note<br />
Changing network topology may affect the accuracy of reports based on this<br />
information. To retain historical data for the current network topology, generate<br />
reports before making changes.<br />
To edit settings for a site<br />
1 Select System Setup > Dial Plan > Sites.<br />
2 From the Sites list, select the site of interest and click Edit Site.<br />
3 Edit the General Info, Site Routing, Site Subnet, and if applicable ISDN<br />
Number Assignment, sections of the Edit Site dialog box. See Table 24-1.<br />
4 Click OK.<br />
The Sites list reappears.<br />
Note<br />
Devices that belonged to a deleted site are automatically reassigned to support<br />
Internet and VPN calls.<br />
To delete a site<br />
1 Select System Setup > Dial Plan > Sites.<br />
2 From the Sites list, select the site of interest and click Delete Site.<br />
3 Click Yes to confirm the deletion.<br />
<strong>Polycom</strong>, Inc. 207
<strong>Polycom</strong> <strong>ReadiManager</strong> <strong>Operations</strong> <strong>Guide</strong><br />
Site Links<br />
When you add a site link, you enter the starting and ending sites of the link<br />
and the maximum bandwidth and bit rates available for video calls that use<br />
the link.<br />
Note<br />
The bit rate can be set at the network level, the device level, and the conference<br />
level. If there is a discrepancy between these bit rate settings, the system<br />
implements the lowest bit rate setting. The only exception, is that the bit rate in the<br />
RMX profile takes precedence over the bit rate in the conference settings.<br />
When you define site topology, define the direct links first so you can use them<br />
to define multisite links.<br />
You create multisite links by defining a network path that consists of multiple<br />
direct links. You can define only the most cost-efficient path or create multiple<br />
paths and use least-cost routing tables.<br />
Note<br />
Links are bidirectional. After you have created a link from Site A to Site B, you<br />
automatically have a link from Site B to Site A, although the link appears as<br />
unidirectional.<br />
Table 24-3 Fields on the Link Editor Screen<br />
Field Description<br />
Link Name Name (ASCII only a ) of the inter-site link<br />
Description Description (ASCII only a ) of the inter-site link<br />
From Site Identifies the first site to be linked. The drop-down list<br />
includes all defined sites and the Internet.<br />
To Site Identifies the other site to be linked. The drop-down list<br />
includes all defined sites and an Internet or VPN option.<br />
Link Type Specifies a direct link between two physical sites or a<br />
multisite link, for which a path of links is defined<br />
Bandwidth (Kbps) The maximum available bandwidth for audio and video,<br />
which you set at the gateway or router. Only applies to<br />
direct links. The bandwidth on multisite links is the<br />
lowest respective value from the list of direct links.<br />
Maximum Bit Rate<br />
(Kbps)<br />
The maximum bit rate allowed for an audio and video<br />
call. Only applies to direct links. The bit rate on multisite<br />
links is the lowest value in the list of direct links.<br />
a. For more information, see “Field Input Requirements” on page 7.<br />
208 <strong>Polycom</strong>, Inc.
View the Site Links List<br />
Add a Site Link<br />
Table 24-4 Information in the Site Links List<br />
Column Description<br />
Name Name of the link<br />
Description Description of the link<br />
From Site First site reached in the call route<br />
To Site Final site reached through this call link<br />
To view the Site Links list<br />
>> Select System Setup > Dial Plan > Site-Links.<br />
The Site-Links list appears.<br />
To add a site link<br />
1 Select System Setup > Dial Plan > Site-Links.<br />
2 From the Site-Links list, click Add Site-Link.<br />
Dial Plan Setup<br />
Link Type Indicates a direct link from one site to another or a multisite<br />
link, which may use a path through several different sites and<br />
the Internet<br />
Max Bandwidth The maximum bandwidth (Mbps) for video available on this link<br />
(for direct links only)<br />
Table 24-5 Information in the List of Inter-site Links Screen<br />
Column Description<br />
Link Name Name of the link.<br />
Description Description of the link.<br />
From Site First site reached in the call route.<br />
To Site Final site reached through this call link.<br />
Link Type Indicates a direct link from one site to another or a<br />
multisite link, which may use a path through several<br />
different sites and the Internet.<br />
Max Bandwidth The maximum bandwidth (Mbps) for video available<br />
on this link (for direct links only).<br />
<strong>Polycom</strong>, Inc. 209
<strong>Polycom</strong> <strong>ReadiManager</strong> <strong>Operations</strong> <strong>Guide</strong><br />
Edit a Site Link<br />
Delete a Site Link<br />
3 In the Add Site-Link dialog box, enter a Name and Description for the<br />
link and select the starting (From Site) and ending (To Site) sites.<br />
4 To add a direct site links, enter the Bandwidth and Max Bit Rate and<br />
click Save. See Table 24-5<br />
5 To add a multisite link:<br />
a Click MultiSite.<br />
b Select the first site from the Available Direct Links column and move<br />
it to the Selected Direct Links column.<br />
c Select the second site from the Available Direct Links column and<br />
move it to the Selected Direct Links column.<br />
Note<br />
If you receive a Select Destination Place dialog box, click OK and continue.<br />
d Add additional site links as required.<br />
e Click Save.<br />
The new link appears on the List of site Links screen.<br />
You may need to edit site link when network changes are made.<br />
If you make a bandwidth change, the current load is not affected; however, the<br />
bandwidth available for future conferences may be affected.<br />
To edit a site link<br />
1 Select System Setup > Dial Plan > Site-Links.<br />
2 From the Site-Links list, select the link of interest and click Edit<br />
Site-Link.<br />
3 In the Edit Site-Link dialog box, edit the Name, Description, Bandwidth<br />
or Max Bit Rate. See Table 24-5.<br />
4 Click Save.<br />
You can remove site links from the <strong>ReadiManager</strong> system.<br />
Note<br />
Avoid removing a link on which a scheduled conference depends.<br />
210 <strong>Polycom</strong>, Inc.
Gatekeeper Regions<br />
Dial Plan Setup<br />
To delete a site link<br />
1 Select System Setup > Dial Plan > Site-Links.<br />
2 From the Site-Links list, select the site link of interest and click Delete<br />
Site-Link.<br />
3 Click Yes to confirm the deletion.<br />
A gatekeeper region is a group of sites that share a common <strong>ReadiManager</strong><br />
system and gatekeeper. When you first set up the <strong>ReadiManager</strong> system, a<br />
default region and a default site exist, and the default site is automatically<br />
associated with the default gatekeeper region. You may change the name of<br />
the default gatekeeper region and assign the sites you have created. You may<br />
create additional neighboring gatekeeper regions, if needed. When you create<br />
a new gatekeeper region, you define gatekeeper settings only. A gatekeeper<br />
region functions as a neighboring gatekeeper. You cannot add sites to a newly<br />
created gatekeeper region.<br />
When a call originates from the <strong>ReadiManager</strong> system gatekeeper and the<br />
gatekeeper is unable to resolve the dialed address, the call can be forwarded<br />
to another gatekeeper for resolution. To enable call forwarding, create a<br />
neighboring region and a dialing rule that routes calls using a particular prefix<br />
to the neighboring gatekeeper.<br />
If you have a <strong>Polycom</strong> PathNavigator installed, it can act as a neighboring<br />
gatekeeper region to a <strong>ReadiManager</strong>.<br />
Note<br />
To prevent a site from participating in a dial plan, do not assign it to a region.<br />
Table 24-6 Fields on the Gatekeeper Region<br />
Field Description<br />
Name The name (ASCII only a ) of the region.<br />
Description A description (ASCII only a ) of the region.<br />
<strong>Polycom</strong>, Inc. 211
<strong>Polycom</strong> <strong>ReadiManager</strong> <strong>Operations</strong> <strong>Guide</strong><br />
View the Gatekeeper Regions List<br />
Add a Gatekeeper Region<br />
Table 24-6 Fields on the Gatekeeper Region (continued)<br />
Field Description<br />
Gatekeeper IP Address The IP address for this region. For the default region,<br />
automatically set to the IP address of the<br />
<strong>ReadiManager</strong> appliance.<br />
Port The port for this region. Defaults to the port for the<br />
<strong>ReadiManager</strong> appliance.<br />
Gatekeeper Identifier The unique ID (ASCII onlya ) for the gatekeeper<br />
associated with this region. Automatically filled in for the<br />
default region.<br />
PN: is inserted in front of the gatekeeper identifier.<br />
Example: PN: Silicon Valley Campus<br />
The character limit is 254; all keyboard characters are<br />
supported.”<br />
a. For more information, see “Field Input Requirements” on page 7.<br />
To view the Gatekeeper Regions list<br />
>> Select System Setup > Dial Plan > Gatekeeper Regions.<br />
The Gatekeeper Regions list appears.<br />
Table 24-7 Information in the Gatekeeper Regions List<br />
Column Description<br />
Name The name of the region<br />
Description The description of the region<br />
To enable a gatekeeper-to-gatekeeper relationship, create a new region for<br />
another gatekeeper.<br />
To add a gatekeeper region<br />
1 Select System Setup > Dial Plan > Gatekeeper Regions.<br />
2 From the Gatekeeper Regions list, click Add Region.<br />
3 In the Add Region dialog box, enter a Name and Description and other<br />
required information. See Table 24-6.<br />
212 <strong>Polycom</strong>, Inc.
Edit a Gatekeeper Region<br />
Delete a Gatekeeper Region<br />
Dial Plan Services<br />
4 Click Save.<br />
The new region is added to the system.<br />
Dial Plan Setup<br />
To edit a gatekeeper region<br />
1 Select System Setup > Dial Plan > Gatekeeper Regions.<br />
2 From the Gatekeeper Regions list, select the region of interest and click<br />
Edit Region.<br />
3 In the Edit Region dialog box, edit the information as required. See<br />
Table 24-6.<br />
4 Click Save.<br />
You can remove a gatekeeper region from the <strong>ReadiManager</strong> system.<br />
Note<br />
Routing between gatekeepers works only when both regions are defined in the<br />
<strong>ReadiManager</strong> system.<br />
To delete a region<br />
1 Select System Setup > Dial Plan > Gatekeeper Regions.<br />
2 From the Gatekeeper Regions list, select the region of interest and click<br />
Delete Region.<br />
3 Click Yes to confirm the deletion.<br />
Dial plan services can be used in video calls when a user dials the prefix<br />
associated with that service. For example, the user dials 9 to use simplified<br />
dialing or a prefix such as 61* to use a continuous presence service provided<br />
through an MCU.<br />
The <strong>ReadiManager</strong> system has four predefined dial plan services, which are<br />
described in the sections that follow.<br />
<strong>Polycom</strong>, Inc. 213
<strong>Polycom</strong> <strong>ReadiManager</strong> <strong>Operations</strong> <strong>Guide</strong><br />
Note<br />
Gateway and MCU services are defined in <strong>ReadiManager</strong> and the MCU platform.<br />
They must be exactly the same in both locations. If you enter this information<br />
manually, be sure to type it exactly as it is entered in the MGC or RMX 2000<br />
manager. You can simplify entry of services by making sure that the MCUs and<br />
gateways on your video conferencing network are set to register with the<br />
gatekeeper in <strong>ReadiManager</strong>. This setting assures the information appears<br />
automatically in the List of Services screen.<br />
Conference on Demand<br />
With Conference on Demand, users can start an unscheduled multipoint<br />
conference from the endpoint rather than requesting this service from an<br />
administrator. The initiating endpoint uses the capabilities available through<br />
the MCU. When Conference on Demand is enabled on the endpoint, the<br />
<strong>ReadiManager</strong> system sends the call to the MCU. For details, see Table 24-8.<br />
Table 24-8 Fields in the Conference on Demand Service dialog box<br />
Field Description<br />
Service Type Name of the service (read only)<br />
Enable Indicates whether this service is enabled<br />
Available for New Groups The service is available for new user groups<br />
Description Description (ASCII only a ) of the service (read only)<br />
Service Prefix The prefix (ASCII only a ) for this service: con<br />
MCU Properties<br />
Login ID User login (ASCII onlya ) for the MCU<br />
Note<br />
This user account must be authorized to create new<br />
conferences.<br />
Password Password (ASCII onlya ) for the MCU<br />
Note<br />
Each time you modify the password for the MGC, you<br />
must also modify it in this screen.<br />
H.323 Network Service Set on the MCU (ASCII only a )<br />
Default Conference Properties<br />
MGC: Video Session Indicates what users see. For Conference on<br />
Demand, select Continuous Presence.<br />
Notes<br />
• MGC only. For the RMX 2000, the profile<br />
determines this setting.<br />
• Select Transcoding to support IP and ISDN calls.<br />
214 <strong>Polycom</strong>, Inc.
Table 24-8 Fields in the Conference on Demand Service dialog box<br />
Field Description<br />
MGC: Bit rate (Kbps) Default bit rate for calls.<br />
Notes<br />
Dial Plan Setup<br />
• MGC only. The RMX 2000 bit rate is dictated by<br />
the RMX profile.<br />
• The initiator of a Conference on Demand call may<br />
use a higher or lower bit rate than is specified in<br />
this screen.<br />
RMX: Profile Name The name of the RMX profile that has the conference<br />
settings for the conference.<br />
a. For more information, see “Field Input Requirements” on page 7.<br />
Simplified Dialing<br />
Simplified dialing is a service that allows end-users to access gateway services<br />
by dialing 9, and then the phone number or other dialing string. Simplified<br />
dialing is enabled by default. For details, see Table 24-9.<br />
To use simplified dialing, the following settings are also required:<br />
• Sites must specify the country code, city and area code, and number of<br />
digits in the subscriber line.<br />
• The gateway must be registered with <strong>ReadiManager</strong> and display in the<br />
List of Devices screen.<br />
• Gateway services must be defined.<br />
• The LCR table must be defined.<br />
Table 24-9 Fields in the Simplified Dialing Service dialog box<br />
Field Description<br />
Service Type Name of the service (read only)<br />
Enable Indicates whether this service is enabled<br />
Available for New Groups The service is available for new user groups<br />
Description Description of the service<br />
Service Prefix The prefix for this service: 9.<br />
Gateway Service<br />
These services are provided by a gateway to endpoints. For example, gateways<br />
usually have distinct services for each speed they support (128 Kbps, 384 Kbps,<br />
512 Kbps, and so on) and a service for audio-only calls.<br />
Gateway services tell <strong>ReadiManager</strong> how to route the call during conversion<br />
between IP and ISDN.<br />
<strong>Polycom</strong>, Inc. 215
<strong>Polycom</strong> <strong>ReadiManager</strong> <strong>Operations</strong> <strong>Guide</strong><br />
You must define a gateway service for each bit rate available. These services<br />
should appear automatically in the list when the gateway registers with<br />
<strong>ReadiManager</strong>. If gateway services do not appear, you can enter them<br />
manually. If the List of Services screen does not include gateway services,<br />
alternate routing and least-cost routing are disabled. For details, see<br />
Table 24-10.<br />
Table 24-10 Fields in the Gateway Service dialog box<br />
Field Description<br />
Service Type Type of service.<br />
Enable Indicates whether this service is enabled.<br />
Available for New Groups The service is available to new user groups.<br />
Description Description of the service.<br />
Service Prefix The prefix for this service.<br />
Must be a registered E.164 alias for the corresponding<br />
gateway in the Devices screen for Directory Setup.<br />
For use in simplified dialing<br />
Device Capability Specifies the type of connection the device can<br />
handle. Select all that apply. Options are:<br />
• H.320. Supports video and voice using the ITU<br />
H.320 standard.<br />
• Voice. Supports voice over the PSTN network.<br />
• Other. Supports a protocol other than H.320 or<br />
voice, such as H.321 or video over ATM.<br />
Bit Rate (Kbps) The maximum rate at which the calls can connect.<br />
Insert between prefix and<br />
first number<br />
Insert between phone<br />
number<br />
216 <strong>Polycom</strong>, Inc.<br />
Note<br />
If you select Unknown, this service cannot support<br />
simplified dialing.<br />
Specifies the character to insert in the dial string<br />
between the prefix and the first number.<br />
For example, if you specify * as the character, the<br />
sequence the user enters would be:<br />
77*2125551212<br />
Specifies the character to insert in the dial string<br />
between phone numbers.<br />
For example, if you specify # as the character to<br />
separate numbers, the sequence the user enters<br />
would be:<br />
77*5551212#5651213
Table 24-10 Fields in the Gateway Service dialog box<br />
Field Description<br />
Append after full dial<br />
string<br />
Dial Plan Setup<br />
Specifies the character to append after the full dial<br />
string.<br />
To process the call, certain gateways require a symbol<br />
be appended after the final dialing number.<br />
For example, if you specify ** as the characters to<br />
append after the final dialing number, the sequence<br />
the user enters would be:<br />
77*5551212#5651213#2223232**<br />
Warning: <strong>ReadiManager</strong> does not recognize dial<br />
strings that require termination after the ISDN number<br />
and have an extension after the terminated ISDN.<br />
For example, <strong>ReadiManager</strong> does not recognize the<br />
following dial string:<br />
165024710000**3452<br />
MCU Service<br />
These services allow devices to use specific MCU features and settings when<br />
making a call. For example, an MCU can define a service for a multipoint video<br />
call with continuous presence at 384 Kbps and another service for video<br />
switching at 256 Kbps.<br />
MCU services and their associated prefixes are defined at the MCU. For MGC<br />
or RMX 2000 devices, the MCU services should appear automatically in the<br />
List of Services screen when the MCU registers with <strong>ReadiManager</strong>. Because<br />
third-party MCUs may not automatically register, you must enter them<br />
manually in <strong>ReadiManager</strong>. For details, see Table 24-11.<br />
Use MCU services to dial the IP gateway segment that translates between IP<br />
and ISDN, in conference calls with two or more participants, or continuous<br />
presence.<br />
Table 24-11 Fields in the MCU Service dialog box<br />
Field Name Description<br />
Service Type Type of service.<br />
Enable Indicates whether this service is enabled or not.<br />
Available for New Groups The service is available for new user groups.<br />
Description Description of the service. To identify it easily in the<br />
List of Services screen, include the prefix and the<br />
MCU feature (for example, 384 K video switching).<br />
Service Prefix The prefix for this service, which must be a E.164<br />
alias that is registered for the MCU on the Device<br />
screen.<br />
<strong>Polycom</strong>, Inc. 217
<strong>Polycom</strong> <strong>ReadiManager</strong> <strong>Operations</strong> <strong>Guide</strong><br />
View the Services List<br />
Add a Service<br />
This screen shows the services that have been defined in your dial plan. These<br />
services are available when you place unscheduled calls. For details, see<br />
Table 24-12.<br />
Note<br />
E.164 aliases appear in this list as follows:<br />
• For MGC and RMX 2000 devices, they appear as gateway services.<br />
• For a device’s H.323 services, they (including the alias prefix) appear as MCU<br />
services. Gateway service prefixes are the E.164 aliases of the MCU’s gateway<br />
session profiles.<br />
To view the Services list<br />
>> Select System Setup > Dial Plan > Services.<br />
The Services list appears.<br />
Table 24-12 Information in the Services List<br />
Column Description<br />
Prefix Prefix of the service.<br />
Type The type of service. Available types include System,<br />
Gateway, and MCU.<br />
Description Description of the service.<br />
Tip: When completed automatically, the description<br />
reflects the value entered in the MGC or RMX 2000<br />
manager.<br />
Enabled By default, services are enabled. To disable them, clear<br />
the Enabled check box.<br />
If a gateway or MCU service does not appear automatically when the device<br />
registers with <strong>ReadiManager</strong>, you can define the service manually so that it is<br />
available for use in unscheduled calls. In addition, you must add services for<br />
certain third-party MCUs.<br />
To add a service<br />
1 Select System Setup > Dial Plan > Services.<br />
2 From the Services list, click Add Service.<br />
218 <strong>Polycom</strong>, Inc.
Edit a Service<br />
Delete a Service<br />
Dial Plan Setup<br />
3 Complete the General Info, and if applicable Simplified Dialing or<br />
Conference on Demand, sections of the Add Service dialog box. See<br />
Table 24-8.<br />
4 Click OK.<br />
The new service is added to the system.<br />
You can make changes to a service.<br />
Note<br />
Be sure that the information you enter in <strong>ReadiManager</strong> matches the information<br />
entered in the MCU.<br />
To edit a service<br />
1 Select System Setup > Dial Plan > Services.<br />
2 From the Services list, select the service of interest and click Edit Service.<br />
3 As required, edit the General Info, and if applicable Simplified Dialing<br />
or Conference on Demand, sections of the Edit Service dialog box. See<br />
Table 24-8.<br />
4 Click OK.<br />
You can delete a gateway or MCU service from <strong>ReadiManager</strong>. You cannot<br />
delete the Conference on Demand or Simplified Dialing service.<br />
To delete a service<br />
1 Select System Setup > Dial Plan > Services.<br />
2 From the Services list, select the service of interest and click Delete<br />
Service.<br />
3 Click Yes to confirm the deletion.<br />
<strong>Polycom</strong>, Inc. 219
<strong>Polycom</strong> <strong>ReadiManager</strong> <strong>Operations</strong> <strong>Guide</strong><br />
Dial Rules<br />
Default Dial Rules<br />
Name<br />
Dialing rules describe how the gatekeeper in <strong>ReadiManager</strong> translates a dialed<br />
string to route a call. This dialed string might be an IP address, a string of<br />
numbers that begin with a prefix associated with a service, a string that begins<br />
with a country code and city code, or a string that matches a particular alias for<br />
a device. A dialed string may match multiple dialing rules.<br />
Dialing rules:<br />
• Identify the endpoint being called by resolving the address.<br />
• After resolving the address, determine what action to take in response to<br />
the request.<br />
You can establish different dialing rules and assign a priority to each one.<br />
When the gatekeeper in <strong>ReadiManager</strong> receives a call request and associated<br />
string to dial, it reviews the dialing rules in order of priority. The first matched<br />
dialing rule has the highest priority.<br />
<strong>ReadiManager</strong> provides three default dialing rules. For more information, see<br />
Table 24-13.<br />
Table 24-13 shows the three default dial rules shipped with <strong>ReadiManager</strong>.<br />
With these defaults, the endpoints may place all calls, except those made by an<br />
external DNS lookup.<br />
Note<br />
Do not delete the default dial rules, because <strong>ReadiManager</strong> cannot route calls as a<br />
result. If you do not use these rules, set them to Disabled by clearing the Enabled<br />
check box.<br />
Table 24-13 Default Dial Rules<br />
Dial Pattern<br />
Type<br />
Pattern<br />
Data Action Site<br />
Policy<br />
Group Priority Enabled<br />
Internal IP IP Address None Route out All All 10 Yes<br />
Alias Local Directory<br />
Services<br />
None Route All All 11 Yes<br />
DNS DNS Name None Block All All 14 Yes<br />
220 <strong>Polycom</strong>, Inc.
Parts of a Dial Rule<br />
Dial Plan Setup<br />
A dial rule consists of a pattern type paired with a routing action. When the<br />
dialed string uses a pattern that matches the pattern type, the associated rule<br />
is applied.<br />
About Pattern Types<br />
A pattern type tells <strong>ReadiManager</strong> how to find a match for the dial string.<br />
Table 24-14 shows the available pattern types.<br />
Table 24-14 Available Pattern Types<br />
Pattern Type Description<br />
Local Directory<br />
Services<br />
DNS Name Look up a DNS Name.<br />
Search the List of Devices and List of Services. Includes<br />
aliases, which are searched before the service prefix.<br />
IP Address Look for an IP addresses in the IPV4 format.<br />
Prefix Look for a prefix specified in the dial rule.<br />
Prefix Range Look for a prefix within the range of prefixes specified in<br />
the dial rule.<br />
About Routing Actions<br />
A routing action informs <strong>ReadiManager</strong> what to do according to the dial rule’s<br />
associated pattern type. Table 24-15 shows the available routing actions.<br />
Table 24-15 Available Routing Actions<br />
Routing<br />
Action<br />
Pattern<br />
Type Description<br />
Route All Allow the call to pass.<br />
Block All Block the call.<br />
Route within<br />
region<br />
Route out of<br />
region<br />
Route to a<br />
gateway with<br />
LCR<br />
IP Address Route to any IP address inside the region.<br />
IP Address Route to any IP address outside the region.<br />
Prefix and<br />
Prefix<br />
Range<br />
<strong>Polycom</strong>, Inc. 221<br />
Note<br />
The originating site’s Internet access rules still<br />
apply.<br />
Remove the prefix specified in the dial rule and<br />
route the remaining dial string to a gateway<br />
service, which has the specified LCR table.
<strong>Polycom</strong> <strong>ReadiManager</strong> <strong>Operations</strong> <strong>Guide</strong><br />
Route to a<br />
gateway<br />
service<br />
Examples of Custom Dial Rules<br />
Table 24-15 Available Routing Actions (continued)<br />
Routing<br />
Action<br />
Route to a list<br />
of gateway<br />
services<br />
Route to a<br />
trusted<br />
neighbor<br />
Pattern<br />
Type Description<br />
Prefix and<br />
Prefix<br />
Range<br />
Prefix and<br />
Prefix<br />
Range<br />
Prefix and<br />
Prefix<br />
Range<br />
Remove the prefix specified in the dial rule and<br />
route the remaining dial string to the specified<br />
gateway service.<br />
Modify the dial string specified in the dial rule and<br />
route the remaining dial string to the specified<br />
gateway service.<br />
Modify the dial string as specified in the dial rule<br />
and ask the specified neighboring gatekeeper to<br />
route the modified dial string. If the neighboring<br />
gatekeeper agrees, route the call.<br />
Note<br />
The neighboring gatekeeper must be configured<br />
as a region in <strong>ReadiManager</strong>.<br />
You use custom dial rules to perform these tasks:<br />
• Block calls. For example, you can block all calls to 900 numbers, which<br />
usually charge a per-minute fee. Create a dial rule with these settings:<br />
— Pattern type: Prefix<br />
— Prefix to match: 900<br />
— Routing action: Block<br />
• Route to a neighboring gatekeeper. If you have entered information<br />
about neighboring gatekeepers in the List of Regions screen, you can<br />
create a rule to route calls to another gatekeeper. For example:<br />
— Pattern type: Prefix Range<br />
— Prefixes to match: Specify the range.<br />
— Routing action: Select Route to a trusted neighbor and the region for<br />
the neighboring gatekeeper to which you want to route calls.<br />
• IP-specific routing. You can specify which calls may connect, according to<br />
the IP address. For example, you could allow calls from San Jose to<br />
Atlanta, but not from San Jose to Pleasanton.<br />
222 <strong>Polycom</strong>, Inc.
Table 24-16 Fields on the Dial Rule Editor: General Screen<br />
Field Description<br />
General Info<br />
Name Name (ASCII only a ) of the dial rule.<br />
Dial Plan Setup<br />
Description Description (ASCII only a ) of the dial rule, which can be<br />
up to 256 characters long.<br />
Priority Priority number of the dial rule, which determines the<br />
rule <strong>ReadiManager</strong> uses first.<br />
More than one dial rule may have the same priority. In<br />
that case, rules with the same priority may be applied in<br />
random order.<br />
Enabled Select the check box to enable the rule.<br />
Pattern Type Specifies the type of pattern to be matched. Available<br />
patterns include:<br />
• Local Directory Services<br />
• DNS Name<br />
• IP Address<br />
• Prefix<br />
• Prefix Range<br />
Applicable Site Site to which this pattern applies. You can select a<br />
specific site or all sites.<br />
Note<br />
Not available for Local Directory Services.<br />
Applicable Policy Group The policy group to which this pattern applies. You can<br />
select a specific policy group or all policy groups.<br />
Note<br />
Not available for Local Directory Services.<br />
Dial String Manipulation<br />
IP Address Pattern Data Specifies the criteria (ASCII only a ) to use to match the<br />
pattern type and additional changes to make when<br />
routing the call.<br />
Start Value The starting number to use as a prefix, which displays<br />
only for rules with the Prefix Range pattern type.<br />
End Value The ending number to use as a prefix, which displays<br />
only for rules with the Prefix Range pattern type.<br />
# Characters to remove Number of digits to remove (from the start or from the<br />
end) of the dialed string.<br />
Prefix to add Prefix to add to the dialed string.<br />
<strong>Polycom</strong>, Inc. 223
<strong>Polycom</strong> <strong>ReadiManager</strong> <strong>Operations</strong> <strong>Guide</strong><br />
View the Dial Rules List<br />
Table 24-16 Fields on the Dial Rule Editor: General Screen (continued)<br />
Field Description<br />
Action to perform<br />
Action Specifies what action to take for calls that match the<br />
pattern type and criteria.<br />
Action to perform when the pattern is matched. Options<br />
are:<br />
• Route<br />
• Block<br />
• Route within region<br />
• Route out of region<br />
• Route to a gateway with LCR applied<br />
• Route to a gateway service<br />
• Route to a list of gateway services<br />
• Route to a trusted neighbor<br />
Gateway Services<br />
Selected Gateway<br />
Services (prioritized)<br />
Trusted Neighbors<br />
To view the Dial Rules list<br />
When the action is Route to a gateway service, this field<br />
lists the selected gateway services.<br />
You can define multiple gateway services for a rule. The<br />
top-most is the default gateway service. Others are<br />
used in priority order when the primary gateway service<br />
is not available.<br />
Available Region When the action is Route to a trusted neighbor, select<br />
the region to which you want to route.<br />
a. For more information, see “Field Input Requirements” on page 7.<br />
>> Select System Setup > Dial Plan > Dial Rules.<br />
The Dial Rules list appears.<br />
224 <strong>Polycom</strong>, Inc.
Add a Dialing Rule<br />
Table 24-17 Information in the List of Dial Rules Screen<br />
Column Description<br />
Name The name of the dial rule<br />
Dial Plan Setup<br />
Pattern Type The pattern type in use for this rule. Options are:<br />
• Local Directory Services<br />
• DNS Name<br />
• IP Address<br />
• Prefix<br />
• Prefix Range<br />
For more information, see “Parts of a Dial Rule” on page 221.<br />
Pattern Data Additional criteria that must be met to apply this rule<br />
Routing Action The routing action used by this rule. Options are:<br />
• Route<br />
• Block<br />
• Route within region<br />
• Route out of region<br />
• Route to a GW with LCR applied<br />
• Route to a GW service<br />
• Route to a list of GW services<br />
• Route to a trusted neighbor<br />
Note<br />
Not all actions are available for all pattern types.<br />
Site The sites for which this rule is used. May be all sites or a<br />
specific site<br />
Policy Group The policy groups for which this rule is used. May be all policy<br />
groups or a specific policy group<br />
Priority The priority assigned this rule<br />
Enabled Indicates whether or not the dial rule is enabled<br />
To add a dialing rule<br />
1 Select System Setup > Dial Plan > Dial Rules.<br />
2 From the Dial Rules list, click Add Dialing Rule.<br />
3 Complete the General Info, Routing Action, Trusted Neighbors, and<br />
Gateway Services sections of the Add Dialing Rule dialog box. See<br />
Table 24-8.<br />
<strong>Polycom</strong>, Inc. 225
<strong>Polycom</strong> <strong>ReadiManager</strong> <strong>Operations</strong> <strong>Guide</strong><br />
Enable or Disable Dialing Rules<br />
Edit a Dial Rule<br />
Least-Cost Routing Tables<br />
4 Click OK.<br />
The new dialing rule is added to the system.<br />
You can enable or disable dial rules.<br />
Note<br />
Use caution when changing the default dial rules, which enable basic operations in<br />
<strong>ReadiManager</strong>.<br />
To enable or disable a dialing rule<br />
1 Select System Setup > Dial Plan > Dial Rules.<br />
2 From the Dial Rules list, select the dial rule of interest and click Edit<br />
Dialing Rule.<br />
3 On the Dial Rules - General Information screen, check or uncheck the<br />
Enabled check box.<br />
4 Click OK.<br />
To edit a dial rule<br />
1 Select System Setup > Dial Plan > Dial Rules.<br />
2 From the Dial Rules list, select the dial rule of interest and click Edit Dial<br />
Rule.<br />
3 In the Edit Dial Rule dialog box, make the required changes.<br />
4 When you are finished, click OK.<br />
Least-cost routing (LCR) allows <strong>ReadiManager</strong> to route ISDN or POTS calls<br />
made on paths that incur the lowest expense. You can route calls from one site<br />
through a gateway in another site by referencing LCR tables.<br />
Least-cost routing is useful when sites already have a high-bandwidth<br />
connection between them.<br />
Least-cost routing works with <strong>ReadiManager</strong>’s other routing features.<br />
226 <strong>Polycom</strong>, Inc.
How Least-Cost Routing Works<br />
Dial Plan Setup<br />
Setting up least-cost routing requires you to:<br />
• Determine the LCR information to enter in <strong>ReadiManager</strong>.<br />
• Create LCR tables.<br />
• In the device record for MCUs:<br />
— Define an H.320 service and select the LCR table to use.<br />
— Define a gateway service and select the H.320 service associated with<br />
the LCR table.<br />
Note<br />
Make sure the LCR tables you define match the network setup.<br />
You cannot use least-cost routing when:<br />
• The route cannot be identified.<br />
• The required resources are unavailable.<br />
• Bandwidth limitations exist on the WAN.<br />
Each LCR table defines dial strings, which include the country code, area code,<br />
prefix, and a weighted cost for commonly made calls. You usually create one<br />
LCR table per site.<br />
Table 24-18 shows an example of an LCR table.<br />
Table 24-18 Example of Least-Cost Routing Table<br />
Country Code Area Code Prefix Weighted Cost<br />
1 408 565 0<br />
1 408 0<br />
1 650 0<br />
1 415 5<br />
<strong>ReadiManager</strong> compares the dial string for a call to the dial strings in LCR<br />
tables. The dial string can match at the country code, area code, or prefix level.<br />
<strong>ReadiManager</strong> reads the “# of digits to strip” field to determine how many<br />
digits to remove.<br />
Note<br />
For areas of the United States that do not require you dial an access code before<br />
the area code, exclude this number when you define the number of digits to strip.<br />
<strong>Polycom</strong>, Inc. 227
<strong>Polycom</strong> <strong>ReadiManager</strong> <strong>Operations</strong> <strong>Guide</strong><br />
Example of Least-Cost Routing<br />
Before determining the final call routing, <strong>ReadiManager</strong> considers cost<br />
(through LCR tables), bandwidth resources (through site topology and device<br />
group policies), and gateway availability.<br />
Company ABC has three sites: Site A in San Jose, CA, Site B in Monterey, CA,<br />
and Site C in Washington, D.C. All sites have gateways.<br />
LCR Tables for Three Sites<br />
The LCR tables included area codes that are used frequently in each site and<br />
considered that calls are made frequently from Site C to Southern California.<br />
Table 24-19 lists area codes for the San Francisco Bay Area and Southern<br />
California. The prefix 755 for the 408 area code applies for all numbers in Site<br />
A.<br />
Table 24-19 LCR for Site A<br />
Area Code Prefix Weighted Cost<br />
408 755 0<br />
408 0<br />
650 0<br />
510 0<br />
925 0<br />
415 5<br />
831 5<br />
213 10<br />
310 10<br />
714 10<br />
Table 24-20 lists area codes for Washington, D.C., Eastern Maryland, and<br />
Northeastern Virginia.<br />
228 <strong>Polycom</strong>, Inc.<br />
20
Table 24-20 LCR for Site C<br />
Dial Plan Setup<br />
Table 24-21 lists area codes for San Jose, Monterey, and Southern California.<br />
Table 24-21 LCR for Site B<br />
Call Scenario One<br />
Area Code Prefix Weighted Cost<br />
202 238 0<br />
202 0<br />
240 0<br />
301 0<br />
741 0<br />
703 0<br />
410 5<br />
443 5<br />
540 5<br />
804 10<br />
Area Code Prefix Weighted Cost<br />
831 477 0<br />
831 0<br />
408 5<br />
Site C can call San Jose using ISDN through one of two routes:<br />
• Through the Site C gateway to the local phone system, making a long<br />
distance connection, at a higher cost per minute.<br />
• From Site C through the direct inter-site link to Site A and out its gateway,<br />
at a lower cost per minute.<br />
<strong>Polycom</strong>, Inc. 229<br />
20<br />
213 10<br />
310 10<br />
714 10<br />
20
<strong>Polycom</strong> <strong>ReadiManager</strong> <strong>Operations</strong> <strong>Guide</strong><br />
Determining Area Codes<br />
Determining Country Codes<br />
Call Scenario Two<br />
Determining the Weighted Cost<br />
Note<br />
If you dial an area code that is not in an LCR table, the call goes through the<br />
gateway from which the call originates.<br />
Calls are frequently made from Site C to Los Angeles. The area codes for some<br />
parts of Southern California are included in the LCR tables for Sites A and B,<br />
because it is less expensive to make an intrastate long distance call within<br />
California than an interstate long distance call from Washington, D.C. to Los<br />
Angeles.<br />
By including Southern California area codes in LCR tables for San Jose and<br />
Monterey, if the bandwidth for the San Jose gateway is saturated, the call from<br />
Site C can be routed through the Monterey gateway. The priority is to call from<br />
Site A or Site B, because the LCR tables share a relative cost to dial the area<br />
codes for Los Angeles.<br />
It is recommended you enter area codes for:<br />
• The area in which the site is located.<br />
• The area surrounding the site.<br />
• Frequently called numbers.<br />
Note<br />
You should also include special rate plans for intrastate calling.<br />
If you make international calls and you determine that calls to a certain<br />
country are less expensive from a particular gateway, enter the dial string for<br />
this country in the LCR table for the selected gateway.<br />
When you enter call strings in an LCR table, associate a weighted cost with<br />
each one. You can base the cost on a monetary value or ratio that compares<br />
costs between several locations. The weighted cost determines which call<br />
string is most cost-effective to use.<br />
230 <strong>Polycom</strong>, Inc.
You can calculate costs for the following types of calls:<br />
• Local<br />
• Local toll<br />
• Intrastate<br />
• Interstate<br />
• International long distance<br />
Table 24-22 Fields of the LCR Tables List<br />
Field Description<br />
View the Least Cost Routing Tables List<br />
Name Name (ASCII only a ) for the LCR table.<br />
Description (Optional) (ASCII only a )<br />
a. For more information, see “Field Input Requirements” on page 7.<br />
To display the list of least cost routing tables<br />
>> Select System Setup > Dial Plan > LCR Tables.<br />
The LCR Tables list appears.<br />
Dial Plan Setup<br />
Country Country code for the location to which this call is made.<br />
City Code City or area code for the location to which this call is made.<br />
Prefix The prefix is the first three numbers in a 7-digit dial string.<br />
# Digits to Strip The number of digits to strip before dialing.<br />
Cost Weighted cost for each call to the selected area or city<br />
code.<br />
Table 24-23 Information in the LCR Tables List<br />
Column Description<br />
Name Name of the LCR table.<br />
Description Description of the LCR table.<br />
<strong>Polycom</strong>, Inc. 231
<strong>Polycom</strong> <strong>ReadiManager</strong> <strong>Operations</strong> <strong>Guide</strong><br />
Add a New Least Cost Routing Table<br />
Edit a Least Cost Routing Table<br />
Delete a Least Cost Routing Table<br />
To add a new LCR table<br />
1 Select System Setup > Dial Plan > LCR Tables.<br />
2 From the LCR Tables list, click Add LCR.<br />
3 In the Add LCR Tables dialog box, enter the Name, Description, and<br />
New Route information required to create a new table. See Table 24-22.<br />
4 Click Add.<br />
5 Repeat step 3 and 4 for add additional routes to the table.<br />
6 Click OK.<br />
To edit an LCR table<br />
1 Select System Setup > Dial Plan > LCR Tables.<br />
2 From the LCR Tables list, select the table of interest and click Edit LCR.<br />
3 In the Edit LCR dialog box, edit the Name, Description, and New Route<br />
information as required. See Table 24-22.<br />
4 Click Save.<br />
The changes you made apply to all MCUs associated with a gateway<br />
service that uses this LCR table.<br />
To delete an LCR table<br />
1 Select System Setup > Dial Plan > LCR Tables.<br />
2 From the LCR Tables list, select the table of interest and click Delete<br />
LCR.<br />
3 Click Delete to confirm the deletion.<br />
232 <strong>Polycom</strong>, Inc.
Glossary<br />
A<br />
ACF (Admission Confirm)<br />
A message sent by the gatekeeper to the calling endpoint that the ARQ was<br />
accepted.<br />
Address Resolution<br />
A process that identifies the IP address of the called endpoint when the calling<br />
endpoint uses an H.323 alias to dial.<br />
Administrator<br />
A role that grants permissions to access all capabilities throughout<br />
<strong>ReadiManager</strong>, including access to the Administrator View, Operator View,<br />
and My Conferences View.<br />
Alias<br />
Character or numerical string used to identify an endpoint. Is resolvable to an<br />
IP address of a device. E.164 and H.323 ID are frequently used aliases.<br />
Alternate Gatekeeper<br />
A gatekeeper that devices can use when their primary gatekeeper is<br />
unreachable.<br />
Alternate Routing<br />
A method of routing a call through an alternate protocol (for example, H.320),<br />
when the call cannot proceed through the original route at an acceptable<br />
bandwidth.<br />
ARJ (Admission Reject)<br />
A message sent by the gatekeeper to the calling endpoint that the ARQ was<br />
rejected.<br />
ARQ (Admission Request)<br />
A message sent to the gatekeeper by the calling or receiving endpoint<br />
requesting that a call take place.<br />
<strong>Polycom</strong>, Inc. 233
<strong>ReadiManager</strong> <strong>Operations</strong> <strong>Guide</strong><br />
Bandwidth<br />
The amount of information that can be sent over a given transmission channel,<br />
usually expressed as bits per second.<br />
BCF (Bandwidth Confirm)<br />
A message sent by the gatekeeper to the calling endpoint that the bandwidth<br />
request (BRQ) was accepted.<br />
Bit Rate<br />
The number of bits occurring per unit time, usually expressed as bits per<br />
second.<br />
BRI (Basic Rate Interface)<br />
BRI is the standard copper line ISDN service, and usually consists of two 64<br />
Kbs channels and one 16 Kbs signalling channel.<br />
BRJ (Bandwidth Reject)<br />
A message sent by the gatekeeper to the calling endpoint that the bandwidth<br />
request (BRQ) was rejected.<br />
BRQ (Bandwidth Request)<br />
A message sent to the gatekeeper from the endpoint requesting a change to the<br />
allowed bandwidth when placing a call.<br />
Call Routing System<br />
Provides system services for Simplified Dialing and Conference on Demand<br />
through a specific prefix.<br />
Call Signaling Address<br />
The IP address and port used to communicate H.225 call control messages.<br />
Circuit-switched Networks<br />
ISDN, ATM, and leased lines.<br />
CLID (Calling Line Identifier)<br />
Also known as caller ID, in which the name and number of the calling party is<br />
sent to the receiving endpoint.<br />
Codec<br />
A device or software that converts analog pictures and voice into a<br />
compressed digital stream across the network between conferencing sites.<br />
234 <strong>Polycom</strong>, Inc.
Glossary<br />
Continuous Presence<br />
A video layout mode, during which several participants can be viewed<br />
simultaneously on the screen during a conference.<br />
If the number of participants is less than or equal to the number of participants<br />
displayed, each participant can see all the other participants. If the number of<br />
participants exceeds the number of screens in the selected continuous presence<br />
layout, automatic video switching occurs.<br />
DCF (Disengage Confirm)<br />
A message sent by the gatekeeper to the calling endpoint that the request for<br />
call disengagement was accepted.<br />
Dedicated Link<br />
A service that provides a logical connection between two networks separated<br />
geographically, in which the allotted bandwidth is not shared.<br />
Default Gatekeeper<br />
The gatekeeper with which video endpoints register if they are set to<br />
auto-register, instead of entering the IP for a specific gatekeeper.<br />
Device<br />
A device indicate equipment that is on your video conferencing network. In<br />
<strong>ReadiManager</strong>, devices include endpoints (sometimes called terminals),<br />
MCUs (multi-point control units), and gateways.<br />
DHCP (Dynamic Host Configuration Protocol)<br />
DHCP servers allow multiple devices to share a group of IP addresses,<br />
assigning one to a specific device, if needed.<br />
Dial Plan<br />
A collective term used to define all the settings related to video call routing,<br />
which includes the collection of sites, links, regions, dial rules, services, and<br />
least-cost routing tables.<br />
Dial Plan Service<br />
A service created through dial plan setup. Two default dial plan services are<br />
available: Conference on Demand and Simplified Dialing.<br />
Dialing Rule<br />
A dialing rule describes how <strong>ReadiManager</strong> locates a specific endpoint and<br />
routes a call. A dialing rule consists of pattern types and routing actions.<br />
Dial String<br />
The string of numbers used to dial an endpoint.<br />
<strong>Polycom</strong>, Inc. 235
<strong>ReadiManager</strong> <strong>Operations</strong> <strong>Guide</strong><br />
DID (Direct Inward Dial)<br />
Enables endpoints that do not have native ISDN to have a dedicated direct<br />
number.<br />
Direct Connection<br />
A physical connection between an MCU and an endpoint through a serial<br />
cable.<br />
Direct Links<br />
An inter-site link that goes directly between sites.<br />
DNS Name<br />
The name of a device on an IP network, as specified by a DNS (Domain Name<br />
System) server. Also called the host name.<br />
DRJ (Disengage Reject)<br />
A message sent by the gatekeeper to the calling endpoint that the request for<br />
call disengagement was rejected.<br />
DRQ (Disengage Request)<br />
A message sent by the gatekeeper to the calling endpoint that the request for<br />
call disengagement was accepted.<br />
E.164<br />
An H.323 alias that is resolvable by a gatekeeper. Functions as an extension.<br />
E.164 is the international public telecommunications numbering plan used for<br />
standard telephone numbers (that is, digits 0 through 9, * and #). In<br />
<strong>ReadiManager</strong>, E.164 provides the extension or a telephony-based alias to<br />
reach an H.323 device.<br />
E-mail Address<br />
An H.323 alias that is resolvable by a gatekeeper. Usually appears in the form<br />
of alias@organization.com.<br />
Embedded MCU<br />
A video endpoint that includes multi-point capability.<br />
Endpoint<br />
An H.323 entity that can call or be called. In <strong>ReadiManager</strong>, called a device.<br />
Equipment<br />
Called a device in <strong>ReadiManager</strong>.<br />
236 <strong>Polycom</strong>, Inc.
Glossary<br />
Gatekeeper<br />
An H.323 entity that provides address translation and controls access to the<br />
network for H.323 endpoints. May also provide services to endpoints.<br />
Gatekeeper Identifier<br />
The identifier of this gatekeeper on the network for communication between<br />
endpoints and <strong>ReadiManager</strong>.<br />
Gateway<br />
An H.323 entity that provides real-time, two-way communication between<br />
terminals on a packet-based network and a switched-circuit network.<br />
Gateways allows devices on networks that use different protocols (such as<br />
ISDN and IP) to communicate with each other.<br />
Gateway Services<br />
Gateway services tell <strong>ReadiManager</strong> how to route a call when converting<br />
between IP and ISDN by using a specified prefix.<br />
GCF (Gatekeeper Confirm)<br />
A message sent by the gatekeeper to the endpoint that the registration request<br />
was accepted.<br />
GRJ (Gatekeeper Reject)<br />
A message sent by the gatekeeper to the endpoint that the registration request<br />
was rejected.<br />
Group Policy<br />
A policy that dictates the bandwidth for outgoing calls and the alternate<br />
routing policy for devices that belong to a specific group.<br />
GRQ (Gatekeeper Request)<br />
A message sent to the gatekeeper by an endpoint requesting registration.<br />
H.225<br />
The signaling protocol for multimedia communications as defined in the<br />
ITU-T Recommendation. Consists of the RAS Channel (for<br />
gatekeeper-to-endpoint communications) and the Call Signaling Channel (to<br />
establish a call between two endpoints).<br />
H.245<br />
The control protocol for multimedia communications as defined in the ITU-T<br />
Recommendation. The control channel provides end-to-end control of a call<br />
between endpoints.<br />
<strong>Polycom</strong>, Inc. 237
<strong>ReadiManager</strong> <strong>Operations</strong> <strong>Guide</strong><br />
H.320 ITU-T<br />
Standard that defines the protocols used for multimedia communications on<br />
switched networks, such as ISDN.<br />
H.323 ITU-T<br />
Standard that defines the protocols used for multimedia communications on<br />
packet-based networks, such as IP.<br />
H.323 ID<br />
An H.323 alias composed of alphanumeric characters.<br />
Inter-site Link<br />
A logical connection from one LAN to another LAN within the WAN or from<br />
one physical site to another physical site that is outside the enterprise.<br />
IP Address<br />
A unique identifier for a computer on a TCP/IP network.<br />
IRQ (Information Request)<br />
A RAS message sent to the gatekeeper by the calling or receiving endpoint<br />
requesting information.<br />
IRR (Information Response)<br />
A RAS message sent by the gatekeeper to the calling or receiving endpoint as<br />
a response to the IRQ.<br />
ISDN (Integrated Services Digital Network)<br />
A switched network service that provides end-to-end digital connectivity to<br />
transmit voice, data, and video simultaneously over a single line.<br />
ISDN is the global standard for digital dial services. The network consists of a<br />
basic rate (two channels at 64 Kbit per second) and a primary rate (32<br />
channels).<br />
IVR (Interactive Voice Response) Service<br />
A voice-response system that replies to a call and prompts the caller to provide<br />
additional information, such as an extension to dial or an entry passcode.<br />
Jitter<br />
The uneven arrival of data, resulting from a one-way packet delay of more<br />
than 150 milliseconds.<br />
LAN (Local Area Network)<br />
A data communications network that connects two or more data<br />
communication devices over a transmission medium.<br />
238 <strong>Polycom</strong>, Inc.
Glossary<br />
LCF (Location Confirm)<br />
A message sent by the gatekeeper, notifying the endpoint or gatekeeper that<br />
the location confirmation was accepted.<br />
LCR (Least-Cost Routing)<br />
The routing of IP calls through a call processing server, using the most<br />
cost-effective path.<br />
Least-Cost Routing Tables<br />
LCR tables illustrate the relative cost of using a particular gateway service<br />
from a specified site to a set of destination countries and cities. These tables are<br />
used to determine the least expensive route for a call.<br />
LDAP (Lightweight Directory Access Protocol)<br />
Light-weight directory access protocol. An Internet protocol that e-mail and<br />
other programs use to look up information on a server.<br />
Line Hunting<br />
The ability of a gatekeeper to find an available gateway for outbound calls,<br />
according to the RAI information.<br />
Link<br />
See Inter-site Link.<br />
Logical Bandwidth Controls<br />
The maximum bandwidth that is allowed for video communications over any<br />
link or pipe. This number is entered in <strong>ReadiManager</strong> for each inter-site link.<br />
LRJ (Location Reject)<br />
A message sent by the gatekeeper to the endpoint or gatekeeper that the<br />
location confirmation was rejected.<br />
LRQ (Location Request)<br />
A message sent to the gatekeeper by an endpoint or another gatekeeper,<br />
requesting the location of an endpoint.<br />
LWRRQ (Lightweight Registration Request)<br />
A message sent to the gatekeeper by a registered endpoint, requesting to<br />
remain registered.<br />
MCU (Multipoint Control Unit)<br />
An H.323 endpoint that supports multipoint conferencing for three or more<br />
endpoints. Also called a device.<br />
<strong>Polycom</strong>, Inc. 239
<strong>ReadiManager</strong> <strong>Operations</strong> <strong>Guide</strong><br />
MCU Service<br />
MCU services tell <strong>ReadiManager</strong> how to route a call with a particular MCU<br />
feature by using a specific prefix.<br />
Multipoint Conference<br />
A conference that includes three or more terminals.<br />
Multisite Link<br />
An multisite link consists of two or more direct links.<br />
Neighboring Gatekeepers<br />
Gatekeepers that are configured in the neighboring gatekeeper table, enabling<br />
more efficient address resolution.<br />
Network Address<br />
A network number (such as 172.18.16.0) and a subnet mask (such as<br />
255.255.248.0). These numbers are often represented by the following notation<br />
(172.18.16.0/255.255.248.0).<br />
Operator<br />
A role that grants permissions to access capabilities in the <strong>ReadiManager</strong><br />
Operator View.<br />
Permissions<br />
Access rights to use various <strong>ReadiManager</strong> features. Permissions are granted<br />
through roles.<br />
Party Number<br />
A telephone number that may be from the originator or receiver.<br />
Point-to-Point Call<br />
A conference between two terminals.<br />
POTS (Plain Old Telephone System)<br />
The analog phone system (including telephones, modems, central offices<br />
switches, and so on) used around the world.<br />
Proxy<br />
A device that may be used to hide the true signaling address of an H.323<br />
device from devices in other zones, while still allowing inter-zone calling.<br />
240 <strong>Polycom</strong>, Inc.
Glossary<br />
QoS (Quality of Service)<br />
Characterized by data rate and bit error rate. Good QoS indicates a high data<br />
rate that is uncompromised by low bit error rate. On packet-switched<br />
networks, QoS is not guaranteed.<br />
RAI/RAC (Resource Availability Indicator/ Resource Availability Confirm)<br />
RAI/RAC provides a mechanism that enables a gatekeeper to understand<br />
whether endpoints have available resources to take additional calls.<br />
RAS (Registration Admission Status)<br />
A protocol for registration, admission, and status, as defined in the H.225<br />
Recommendation.<br />
RAS Address<br />
The IP address that includes the port for communicating registration,<br />
admission, and status messages.<br />
RAS Channel<br />
Channel that is used to show registration, admission, bandwidth change and<br />
status messages between two H.323 entities.<br />
RCF (Registration Confirm)<br />
A message sent by the gatekeeper to the endpoint that the registration request<br />
was accepted.<br />
Region<br />
A collection of sites managed by a single <strong>ReadiManager</strong> appliance and<br />
gatekeeper.<br />
Registrant<br />
An endpoint that is an entry in the gatekeeper registry.<br />
Routed Mode<br />
The routing of a call that forms a direct connection between two endpoints<br />
through the gatekeeper.<br />
RRJ (Registration Reject)<br />
A message sent by the gatekeeper to the endpoint rejecting the registration<br />
request.<br />
RRQ (Registration Request)<br />
A message sent to the gatekeeper from an endpoint requesting registration.<br />
<strong>Polycom</strong>, Inc. 241
<strong>ReadiManager</strong> <strong>Operations</strong> <strong>Guide</strong><br />
SBC (Session Border Control)<br />
A device that specifies call routing through the Internet for a site.<br />
Scheduler<br />
A role that assigns the permission to schedule conferences through<br />
<strong>ReadiManager</strong>. Roles are assigned to users.<br />
Service<br />
See Network Service and Dial Plan Service.<br />
Site<br />
A site is a physical location within an enterprise. A site contains one or more<br />
LAN networks. A site may have multiple gateways to connect the IP network<br />
to the PSTN network. A site may also be the location of a specific endpoint. In<br />
<strong>ReadiManager</strong>, a site is a physical area, such as a campus, in which many<br />
endpoints are located.<br />
Static Address<br />
An address that is manually entered into the address book. The address is<br />
considered static, because it is not updated when devices change.<br />
Subnet<br />
A part of a network that has been subdivided and controlled by a subnet mask.<br />
Network devices within a subnet have a similar IP addresses, defined with the<br />
base IP address and a bit mask.<br />
Subnet Mask<br />
The mask of an endpoint address that is matched to the network IP address.<br />
Switching (Video Switching)<br />
A video layout mode in which all participants see the same picture (video).<br />
The current speaker is displayed in full screen on all the participants’<br />
endpoints, and the switching between participants is voice-activated.<br />
Whenever a participant speaks, this person becomes the conference speaker<br />
and is viewed on all screens.<br />
System<br />
Called a device in <strong>ReadiManager</strong>.<br />
T.120<br />
ITU-approved standards for data conferencing that specify how documents<br />
should be moved, viewed, and changed in a conference.<br />
242 <strong>Polycom</strong>, Inc.
Glossary<br />
TCS4<br />
A method for dialing an endpoint using a gateway number and an extension.<br />
Terminal<br />
An H.323 endpoint that provides real-time, two-way communication with<br />
another H.323 endpoint. This communication format may be audio, video, or<br />
data.<br />
Transcoding<br />
A video session mode in which participants can use different line rates, video,<br />
audio, and data formats, while maintaining the highest video and audio<br />
capability each participant can achieve with an endpoint. The current speaker<br />
is displayed in full screen on all participants’ endpoints, and the switching<br />
between participants is voice-activated.<br />
Transport Address<br />
Consists of a network address and the TSAP Identifier of an addressable H.323<br />
entity.<br />
UCF (Unregister Confirm)<br />
A message sent by the gatekeeper to the requesting endpoint that the<br />
unregistration request was accepted.<br />
URJ (Unregister Reject)<br />
A message sent by the gatekeeper to the requesting endpoint that the<br />
unregistration request was rejected.<br />
URL (Universal Resource Locator)<br />
The address of a computer or a file that is accessible through HTTP.<br />
URQ (Unregistration Request)<br />
A message sent by the endpoint requesting removal from the gatekeeper<br />
registry.<br />
VoIP (Voice over IP)<br />
Audio communications that use the IP communication network as the<br />
transmission medium.<br />
Zone<br />
A collection of endpoints (gateways, MCUs, and terminals) that a single<br />
gatekeeper manages. At a minimum, a zone must consist of one terminal and<br />
one gatekeeper.<br />
<strong>Polycom</strong>, Inc. 243
<strong>ReadiManager</strong> <strong>Operations</strong> <strong>Guide</strong><br />
244 <strong>Polycom</strong>, Inc.
<strong>ReadiManager</strong> System Security and<br />
Port Usage<br />
B<br />
This section provides an overview of the port usage and security built into the<br />
<strong>ReadiManager</strong> SE200 system and includes a comprehensive list of services and<br />
clients on the system that are required for normal operation.<br />
Open Ports on the <strong>ReadiManager</strong> SE200 System<br />
The following table lists the open ports on the <strong>ReadiManager</strong> SE200 system<br />
and provides a description of their use.<br />
Port Description<br />
80 HTTP web server, through which the web application displays and where<br />
<strong>Polycom</strong> endpoints post status messages<br />
123 NTP listener<br />
135 Microsoft RPC listener<br />
137 NetBIOS name service listener<br />
139 NetBIOS SMB listener<br />
161 SNMP listener<br />
443 HTTPS web server listener<br />
700 Service Monitor for redundant <strong>ReadiManager</strong> servers<br />
1042 .NET listener used for the SQL Server<br />
1063 .NET listener<br />
1167 .NET listener<br />
1433 Internal MSDE server listener on this port, which enables views into the<br />
database from outside the SE200<br />
1720 The gatekeeper listener for RAS messages<br />
<strong>Polycom</strong>, Inc. 245
<strong>ReadiManager</strong> <strong>Operations</strong> <strong>Guide</strong><br />
2773 Codec Manager for remote control of iPower endpoints<br />
3601 Global Address Book listener with which endpoints register<br />
5005 .NET listener for the MGC Authentication Service and API Adapter<br />
8085 .NET listener for remote access<br />
Outbound Ports Used by the <strong>ReadiManager</strong> SE200 System<br />
The following table lists all outbound ports that the <strong>ReadiManager</strong> SE200<br />
system uses to communicate with other systems, including endpoints, bridges,<br />
database servers, and other network equipment.<br />
Port Description<br />
20<br />
21<br />
Used to FTP data to endpoints<br />
23 Used to access the Telnet interfaces on endpoints<br />
24 Used to access a secondary Telnet interface on endpoints<br />
25 Used to send e-mail messages to SMTP servers<br />
53 Used to access domain name servers (DNS)<br />
80 Used to access the Web application on endpoints and MGCs, version 7.x<br />
and higher<br />
389 Used to access LDAP services<br />
1205 Used to access MGCs for management and monitoring<br />
1719 Used by the gatekeeper for H.323 datagrams<br />
1720 Used by the gatekeeper for H.323 RAS messages<br />
3268 Used to access the Active Directory Global Catalog<br />
5001 Used to access MGCs for management and monitoring<br />
246 <strong>Polycom</strong>, Inc.
<strong>ReadiManager</strong> System Field Input<br />
Requirements<br />
C<br />
The text input fields in each <strong>ReadiManager</strong> system screen accept basic ASCII,<br />
extended-ASCII (eASCII), or Unicode input as indicated in the following table.<br />
Field Data Format Screen<br />
Filter Value: Owner Unicode Schedule | Monitor Conf. View > Secondary Filter<br />
Filter Value: Conference Name Unicode Schedule | Monitor Conf. View > Secondary Filter<br />
Conference Name Unicode Add/Edit Conference<br />
Last Name Unicode Add/Edit Conference > Add Participants<br />
First Name Unicode Add/Edit Conference > Add Participants<br />
Name Unicode Add/Edit Conference > Add Guest<br />
Email ASCII (1) Add/Edit Conference > Add Guest<br />
Number N/A Add/Edit Conference > Add Guest > Dial-Out + IP | ISDN<br />
Note<br />
Entry of text-based IP alias values is prohibited.<br />
To ASCII Add/Edit Conference > Email Notification<br />
CC ASCII Add/Edit Conference > Email Notification<br />
BCC ASCII Add/Edit Conference > Email Notification<br />
Additional Notes Unicode Add/Edit Conference > Email Notification<br />
Filter Value: Name ASCII Device > Admin/Monitor View<br />
Filter Value: Alias ASCII Device > Admin/Monitor View<br />
Filter Value: Site Unicode Device > Admin/Monitor View<br />
Admin ID ASCII Add/Edit Device > Find Device on Network<br />
Password ASCII (15) Add/Edit Device > Find Device on Network<br />
<strong>Polycom</strong>, Inc. 247
<strong>ReadiManager</strong> <strong>Operations</strong> <strong>Guide</strong><br />
Field Data Format Screen<br />
System Name ASCII (2) Add/Edit Device > Identification<br />
Description eASCII Add/Edit Device > Identification<br />
Serial Number ASCII Add/Edit Device > Identification<br />
Software Version ASCII Add/Edit Device > Identification<br />
HTTP URL ASCII Add/Edit Device > Identification<br />
HTTP Port Numeric Add/Edit Device > Identification<br />
DNS Name ASCII Add/Edit Device > Addresses<br />
Alias Value (E164) 0 through 9, *,<br />
and #<br />
Add/Edit Device > Addresses<br />
Alias Value (H323 ID) ASCII Add/Edit Device > Addresses<br />
Alias Value (URL) ASCII Add/Edit Device > Addresses<br />
Alias Value (Transport Address) ASCII Add/Edit Device > Addresses<br />
Alias Value (Party Number) Numeric Add/Edit Device > Addresses<br />
Alias Value (Unknown) ASCII Add/Edit Device > Addresses<br />
Service Name ASCII Add/Edit Device > MCU Services > Add > Gateway |<br />
H320 | H323<br />
Dialing Prefix Numeric Add/Edit Device > MCU Services > Add > Gateway |<br />
H323<br />
Channels Numeric Add/Edit Device > MCU Services > Add > H320<br />
Number Range 0 through 9 and<br />
‘-’ (dash)<br />
Service IP Address 0 through 9 and<br />
‘.’ (period)<br />
Add/Edit Device > MCU Services > Add > H320<br />
Add/Edit Device > MCU Services > Add > H323<br />
Alias E164 Add/Edit Device > MCU Services > Add > H323<br />
Message Text ASCII Device > Admin/Monitor View > Send Message | Clear<br />
Help<br />
Filter Value: Name ASCII Device > Softupdate View > Filter<br />
Filter Value: Alias ASCII Device > Softupdate View > Filter<br />
Filter Value: Site Unicode (9) Device > Softupdate View > Filter<br />
Name Unicode (5) Add/Edit Conference Template<br />
Description ASCII Add/Edit Conference Template<br />
RMX Profile Name Add/Edit Conference Template<br />
248 <strong>Polycom</strong>, Inc.
Field Data Format Screen<br />
Talk Hold Time Numeric x.x to<br />
y.y<br />
Add/Edit Conference Template<br />
From Address ASCII Conference Settings<br />
SMTP Server Conference Settings<br />
Filter Value: First Name Unicode Users > Attribute Filter<br />
Filter Value: Last Name Unicode Users > Attribute Filter<br />
Filter Value: User ID Unicode Users > Attribute Filter<br />
First Name Unicode (6) Add/Edit User<br />
Last Name Unicode Add/Edit User<br />
User ID Unicode Add/Edit User; AND<br />
Login Screen<br />
Password/Confirm Password Unicode (7) Add/Edit User; AND<br />
Login Screen<br />
Email Address Unicode (8) Add/Edit User<br />
<strong>ReadiManager</strong> System Field Input Requirements<br />
Search Value Unicode Add Room > search LDAP by First Name | Last Name |<br />
User ID<br />
Description ASCII Add/Edit Room > General Info<br />
Email Unicode (8) Add/Edit Room > General Info (display of LDAP email<br />
address or entry of a Local email address)<br />
Filter Value: Device Name ASCII Global Address Book > Attribute Filter<br />
Name ASCII (10) Add GAB User<br />
E-164 Alias 0 through 9, *,<br />
and #<br />
IP Address IP Address<br />
format<br />
Add GAB User > IP Video<br />
Add GAB User > IP Video<br />
City Code Numeric Add GAB User > ISDN Video<br />
Number A Numeric Add GAB User > ISDN Video<br />
Number B Numeric Add GAB User > ISDN Video<br />
Extension Numeric Add GAB User > ISDN Video<br />
Old Password ASCII (11) Set GAB Password<br />
New Password / Confirm ASCII Set GAB Password<br />
Filter Value: Name ASCII (2) Provision Device Profiles<br />
Filter Value: Created By Unicode (12) Provision Device Profiles<br />
<strong>Polycom</strong>, Inc. 249
<strong>ReadiManager</strong> <strong>Operations</strong> <strong>Guide</strong><br />
Field Data Format Screen<br />
Admin Password ASCII Add/Edit Provision Profile > General Settings > Security<br />
Meeting Password ASCII Add/Edit Provision Profile > General Settings > Security<br />
Country Code E164 Add/Edit Provision Profile >Video Network > IP Network<br />
> Gateway Number<br />
Area Code E164 Add/Edit Provision Profile >Video Network > IP Network<br />
> Gateway Number<br />
Gateway Number E164 Add/Edit Provision Profile >Video Network > IP Network<br />
> Gateway Number<br />
Outside Line Dialing Prefix E164 Add/Edit Provision Profile >Video Network > IP Network<br />
> ISDN BRI Protocol<br />
Camera 1 Name ASCII Add/Edit Provision Profile > Cameras<br />
Camera 2 Name ASCII Add/Edit Provision Profile > Cameras<br />
Camera 3 Name ASCII Add/Edit Provision Profile > Cameras<br />
Host Name ASCII Add/Edit Provision Profile > LAN Properties > LAN<br />
Properties 1<br />
Password ASCII Add/Edit Provision Profile > Global Services > Directory<br />
Servers<br />
Number of digits in Extension Numeric Add/Edit Provision Profile > Global Services > Dialing<br />
Rules 1<br />
International Dialing Prefix E164 Add/Edit Provision Profile > Global Services > Dialing<br />
Rules 1<br />
Public Network Dialing Prefix E164 Add/Edit Provision Profile > Global Services > Dialing<br />
Rules 1<br />
Public Network (same area code)<br />
Prefix<br />
E164 Add/Edit Provision Profile > Global Services > Dialing<br />
Rules 1<br />
Private Network Dialing Prefix E164 Add/Edit Provision Profile > Global Services > Dialing<br />
Rules 1<br />
If Area Code Equals E164 Add/Edit Provision Profile > Global Services > Dialing<br />
Rules 2<br />
Dial Prefix E164 Add/Edit Provision Profile > Global Services > Dialing<br />
Rules 2<br />
Contact Person ASCII Add/Edit Provision Profile > Global Services > My<br />
Information<br />
Contact Number E164 Add/Edit Provision Profile > Global Services > My<br />
Information<br />
Contact Email ASCII Add/Edit Provision Profile > Global Services > My<br />
Information<br />
250 <strong>Polycom</strong>, Inc.
Field Data Format Screen<br />
<strong>ReadiManager</strong> System Field Input Requirements<br />
Contact Fax E164 Add/Edit Provision Profile > Global Services > My<br />
Information<br />
Tech Support ASCII Add/Edit Provision Profile > Global Services > My<br />
Information<br />
City ASCII Add/Edit Provision Profile > Global Services > My<br />
Information<br />
State/Province ASCII Add/Edit Provision Profile > Global Services > My<br />
Information<br />
Country ASCII Add/Edit Provision Profile > Global Services > My<br />
Information<br />
Software Update Key File ASCII Software Update Profile > Upload Software Update<br />
Description ASCII Software Update Profile > Upload Software Update<br />
Filter Value: Name ASCII (2) Software Update Profiles > Get Serial Numbers<br />
Filter Value: Site Unicode Software Update Profiles > Get Serial Numbers<br />
Get Serial Numbers text box ASCII Software Update Profiles > Get Serial Numbers<br />
Filter Value: Name ASCII Device Policy Groups<br />
Filter Value: Description ASCII Device Policy Groups<br />
Name ASCII Device Policy Groups > Add/Edit Policy Group<br />
Description ASCII Device Policy Groups > Add/Edit Policy Group<br />
Filter Value: Name ASCII User Roles<br />
Filter Value: Description ASCII User Roles<br />
Name ASCII User Roles > Add/Edit Role<br />
Description ASCII User Roles > Add/Edit Role<br />
Filter Value: Group Name Unicode (13) User Roles for LDAP Groups<br />
Filter String ASCII Reports > Gatekeeper Message Log<br />
Filter Value: IP Address IP Address Reports > IP Call Detail Records<br />
Filter Value: System Name ASCII (2) Reports > ISDN Call Detail Records<br />
System Name ASCII (14) Server Settings > Network<br />
IP Address IP Address Server Settings > Network<br />
Subnet Mask Subnet Mask Server Settings > Network<br />
Default Gateway IP Address Server Settings > Network<br />
DNS Server IP Address Server Settings > Network<br />
<strong>Polycom</strong>, Inc. 251
<strong>ReadiManager</strong> <strong>Operations</strong> <strong>Guide</strong><br />
Field Data Format Screen<br />
IP Address or DNS Name ASCII Server Settings > System Time > External NTP Server<br />
Time Synchronization<br />
DB Server IP Address IP Address Server Settings > Database<br />
DB Server Port Numeric Server Settings > Database<br />
DB Instance Name ASCII Server Settings > Database<br />
LDAP Server IP Address or DNS<br />
Name<br />
ASCII Server Settings > LDAP<br />
LDAP User ID Unicode Server Settings > LDAP<br />
LDAP User Password Unicode (7) Server Settings > LDAP<br />
Activation Key ASCII Server Settings > Licenses<br />
Virtual IP IP Address Server Settings > Redundant Configuration<br />
Server IP IP Address Server Settings > Redundant Configuration<br />
Gatekeeper Identifier ASCII Gatekeeper Settings > Primary Gatekeeper<br />
Gatekeeper Description ASCII Gatekeeper Settings > Primary Gatekeeper<br />
Alternate Gatekeeper ID ASCII Gatekeeper Settings > Alternate Gatekeeper<br />
IP Address IP Address Gatekeeper Settings > Alternate Gatekeeper<br />
Port Numeric Gatekeeper Settings > Alternate Gatekeeper<br />
Priority Numeric Gatekeeper Settings > Alternate Gatekeeper<br />
Country Name (2 letter code) ASCII Security Settings > Generate Certificate Request<br />
State or Province Name ASCII Security Settings > Generate Certificate Request<br />
Locality Name ASCII Security Settings > Generate Certificate Request<br />
Organization Name ASCII Security Settings > Generate Certificate Request<br />
Organizational Unit Name ASCII Security Settings > Generate Certificate Request<br />
Common Name ASCII (14) Security Settings > Generate Certificate Request<br />
Email Address ASCII Security Settings > Generate Certificate Request<br />
Password / Verify Password ASCII (15) Security Settings > Device Management Settings<br />
Site Name Unicode (9) Dial Plan > Sites > Add/Edit Site<br />
Description ASCII Dial Plan > Sites > Add/Edit Site<br />
PBX Access Code E164 Dial Plan > Sites > Add/Edit Site<br />
Name ASCII Dial Plan > Site-Links > Add/Edit Site-Link<br />
Description ASCII Dial Plan > Site-Links > Add/Edit Site-Link<br />
252 <strong>Polycom</strong>, Inc.
Field Data Format Screen<br />
<strong>ReadiManager</strong> System Field Input Requirements<br />
Name ASCII Dial Plan > Gatekeeper Regions > Add/Edit Region<br />
Description ASCII Dial Plan > Gatekeeper Regions > Add/Edit Region<br />
Gatekeeper IP Address IP Address Dial Plan > Gatekeeper Regions > Add/Edit Region<br />
Gatekeeper Identifier ASCII Dial Plan > Gatekeeper Regions > Add/Edit Region<br />
Description ASCII Dial Plan > Services > Add/Edit Service > General Info<br />
Service Prefix ASCII Dial Plan > Services > Add/Edit Service > General Info<br />
Insert between Prefix & First<br />
number<br />
E164 Dial Plan > Services > Add/Edit Service > Simplified<br />
Dialing<br />
Insert between Phone number E164 Dial Plan > Services > Add/Edit Service > Simplified<br />
Dialing<br />
Append after full Dial string E164 Dial Plan > Services > Add/Edit Service > Simplified<br />
Dialing<br />
Login ID ASCII Dial Plan > Services > Add/Edit Service > Conference<br />
On Demand<br />
Password ASCII Dial Plan > Services > Add/Edit Service > Conference<br />
On Demand<br />
H.323 Network Service ASCII Dial Plan > Services > Add/Edit Service > Conference<br />
On Demand<br />
RMX Profile Name Unicode Dial Plan > Services > Add/Edit Service > Conference<br />
On Demand<br />
Name ASCII Dial Plan > Dial Rules > Add/Edit Rule > General<br />
Information<br />
Description ASCII Dial Plan > Dial Rules > Add/Edit Rule > General<br />
Information<br />
IP Address Pattern Data ASCII Dial Plan > Dial Rules > Add/Edit Rule > Routing Action<br />
Name ASCII Dial Plan > LCR Tables > Add/Edit LCR<br />
Description ASCII Dial Plan > LCR Tables > Add/Edit LCR<br />
Alert Note ASCII System Alerts > Edit<br />
<strong>Polycom</strong>, Inc. 253
<strong>ReadiManager</strong> <strong>Operations</strong> <strong>Guide</strong><br />
254 <strong>Polycom</strong>, Inc.
Index<br />
MCU and gateway dialing problems 168<br />
A<br />
Acknowledge Help command 31<br />
activation key, requesting 186<br />
activation keys, requesting 93<br />
active conference. See conference<br />
Add Conference command 18<br />
Add Device command 52<br />
Add Participant command 28<br />
Add Room command 28<br />
adding<br />
an alternate gatekeeper 194<br />
conference templates 150<br />
conferences 21<br />
custom logos to the user interface 190<br />
device policy groups 79<br />
dial rules 225<br />
gatekeeper regions 212<br />
least-cost-routing tables 232<br />
provioning profiles 86<br />
rooms 140<br />
services 218<br />
site links 209<br />
sites 206<br />
system licenses 185<br />
user roles 138<br />
users to the global address book 127<br />
users to the system 135<br />
adding manually<br />
endpoints 65<br />
MCUs 70<br />
address book. See global address book<br />
admin/monitor view commands<br />
Clear Help 53<br />
Delete Device 53<br />
Edit Device 53<br />
Manage Device 53<br />
Manage User 53<br />
Reboot Device 53<br />
Send Message 53<br />
View Device Details 53<br />
admin/monitor view of a device 51<br />
administering a redundant system 179<br />
Adobe Flash Player 3<br />
advanced conference settings 35<br />
editing 39<br />
alternate gatekeeper<br />
adding 194<br />
editing settings for 193, 195<br />
area codes, determining 230<br />
assigning<br />
a lecturer 24<br />
a video chairperson 24<br />
default user roles 139<br />
user roles and devices 136<br />
audio-only conference 22<br />
automatic layout 28<br />
automatic refresh of system dashboard 112<br />
auto-provisioning endpoints 201<br />
available commands, list of 17<br />
B<br />
backing up<br />
system databases 115, 117<br />
backup files<br />
copying 117<br />
bandwidth. See bit rate<br />
bit rate<br />
setting for guest participants 23<br />
setting for internal participants 37<br />
bridge (MCU)<br />
features field names 46<br />
features, list of 18<br />
forcing use of 36<br />
<strong>Polycom</strong>, Inc. 255<br />
Index<br />
C<br />
call detail records<br />
IP call detail records, viewing and exporting<br />
161<br />
ISDN call detail records, viewing and<br />
exporting 161<br />
overview of reports 159<br />
call routing<br />
setting up 14<br />
Cancel Provision command 54<br />
Cancel Update command 54<br />
canceling
<strong>ReadiManager</strong> <strong>Operations</strong> <strong>Guide</strong><br />
conferences 25<br />
provisioning 85<br />
software updates 96<br />
capabilities, system, list of 1<br />
CDR. See call detail records<br />
chairperson<br />
assigning 24<br />
enabling 36<br />
password for 36<br />
Change Video Mode command 28<br />
changing<br />
advanced conference settings 39<br />
alternate gatekeeper settings 195<br />
conference information 25<br />
conference templates 150<br />
device policy groups 80<br />
devices 73<br />
dial rules 226<br />
gatekeeper regions 213<br />
least-cost-routing tables 232<br />
participant dial options 26<br />
participant endpoint settings 26<br />
password for the global address book 129<br />
permissions for a user role 138<br />
primary gatekeeper settings 194<br />
provisioning profiles 87<br />
room dial options 27<br />
room endpoint settings 27<br />
rooms 142<br />
security settings for https 197<br />
services 219<br />
site links 210<br />
site settings 207<br />
system network settings 181<br />
system time settings 182<br />
user information 136<br />
user information in the global address book<br />
128<br />
checking the status of device provisioning 84<br />
Clear Help command 53<br />
Clear Status command 54<br />
clearing<br />
device help requests 74<br />
gatekeeper message log events 157<br />
status of device provisioning 85<br />
cloning provisioning profiles 87<br />
closing the <strong>ReadiManager</strong> system 19<br />
command categories<br />
admin/monitor view commands 53<br />
device commands 52<br />
provision view commands 54<br />
softupdate view commands 54<br />
commands<br />
Acknowledge Help 31<br />
Add Conference 18<br />
Add Device 52<br />
Add Participant 28<br />
Add Room 28<br />
Cancel Provision 54<br />
Cancel Update 54<br />
Change Video Mode 28<br />
Clear Help 53<br />
Clear Status 54<br />
conference 18<br />
Connect/Disconnect participant 31<br />
Delete Conference 19<br />
Delete Device 53<br />
Edit Conference 19<br />
Edit Device 53<br />
Extend Conference 28<br />
list of 17<br />
Manage Conference 19<br />
Manage Device 53<br />
Manage User 53<br />
Monitor Conf View 18<br />
Mute/Unmute Participant 31<br />
Provision 54<br />
Reboot Device 53<br />
Refresh Device List 52<br />
Refresh View 18<br />
Remove Participant 31<br />
Schedule Conf View 18<br />
Send Message 31, 53<br />
Software Update 54<br />
Terminate Conference 19<br />
Terminate conference 28<br />
View Device Details 53<br />
commands, dashboard<br />
Refresh 114<br />
Restart 114<br />
Shutdown 114<br />
System Log Files 114<br />
conference commands 18<br />
conference details<br />
conference details field names 42<br />
displaying 18<br />
conference features field names 44<br />
conference list field names 41<br />
conference on demand<br />
troubleshooting 169<br />
conference on demand service 214<br />
conference rooms<br />
adding 23<br />
setting dial options for 27<br />
setting endpoints for 27<br />
256 <strong>Polycom</strong>, Inc.
conference settings<br />
editing 39<br />
conference settings. See settings<br />
conference templates<br />
adding 150<br />
deleting 151<br />
editing 150<br />
overview of 144<br />
setting up 14<br />
viewing list of 150<br />
conferences<br />
assigning password for 35<br />
deleting 25<br />
displaying information about 112<br />
ending 28<br />
extending 28<br />
features, list of 18<br />
list of conferences 17<br />
managing 28<br />
overview of conference settings 143, 151<br />
scheduling 21<br />
sending email notification for 24<br />
setting to audio only 22<br />
setting to recurring 21<br />
terminating 28<br />
configuration, system<br />
displaying information about 113<br />
configuring<br />
a redundant system 178<br />
an external database 12<br />
an LDAP connection 12<br />
endpoints 201<br />
redundancy 9<br />
configuring devices 56<br />
Connect/Disconnect Participant command 31<br />
connected users<br />
displaying information about 113<br />
connecting to the serial console 116<br />
connection speed<br />
setting for guest participants 23<br />
setting for internal participants 37<br />
console, connecting to 116<br />
continuous presence mode 28, 37<br />
copying<br />
database backup files 117<br />
provisioning profiles 87<br />
country codes, determining 230<br />
creating<br />
conferences 21<br />
dial rules 225<br />
least-cost-routing tables 232<br />
custom<br />
<strong>Polycom</strong>, Inc. 257<br />
Index<br />
custom dialing rules, examples of 222<br />
custom logo, adding to the user interface 190<br />
Custom Date filter 17<br />
customizing the user interface 190<br />
D<br />
dashboard 111<br />
dashboard commands<br />
Refresh 114<br />
Restart 114<br />
Shutdown 114<br />
System Log Files 114<br />
data plus video stream 38<br />
database, external<br />
backing up 115<br />
integrating with the system 183<br />
restoring 120<br />
restoring during an upgrade 120<br />
database, external, configuring 12<br />
database, internal<br />
reverting to 184<br />
databases<br />
backing up 117<br />
copying backup files 117<br />
restoring, overview of 119<br />
databases, internal<br />
backing up 115<br />
restoring 119<br />
defaults<br />
for dial rules 220<br />
for dial-plan settings 176<br />
defining<br />
gatekeeper message log settings 157<br />
Delete Conference command 19<br />
Delete Device command 53<br />
deleting<br />
conference templates 151<br />
conferences 25<br />
device policy groups 80<br />
devices 73<br />
gatekeeper message log events 157<br />
gatekeeper regions 213<br />
least-cost-routing tables 232<br />
provisioning profiles 87<br />
rooms 142<br />
services 219<br />
site links 210<br />
sites 207<br />
user roles 139<br />
users 136<br />
users from the global address book 128
<strong>ReadiManager</strong> <strong>Operations</strong> <strong>Guide</strong><br />
deleting a conference 19<br />
details of conference, displaying 18<br />
determining<br />
area codes 230<br />
country codes 230<br />
weighted cost 230<br />
device commands<br />
Add Device 52<br />
Refresh Device List 52<br />
device details<br />
alias 61, 67, 100<br />
audio protocol 64, 102<br />
audio rate 64, 102<br />
available to schedule 62, 68, 98<br />
call signaling address 61, 100<br />
call type 63, 100<br />
capabilities enabled 62, 68, 99<br />
cause code 64, 101<br />
connection status 63, 100<br />
description 60, 66, 102<br />
encryption 63, 101<br />
errors 64, 102<br />
far site details 64, 102<br />
far site name 63, 101<br />
far site number 63, 101<br />
HTTP port 61, 67, 103<br />
HTTP URL 61, 67, 103<br />
IP address 60, 65, 98<br />
ISDN video number 61, 67, 98<br />
LAN host name 61, 100<br />
monitoring level 62, 68, 99<br />
name 59, 66, 97<br />
owner 60, 98<br />
policy group 63, 68, 99<br />
product ID 60, 102<br />
quality of service (QoS) 64, 102<br />
RAS address 62, 100<br />
serial number 60, 66, 98<br />
site 60, 66, 98<br />
software version 60, 66, 98<br />
supported protocols 62, 68, 99<br />
type 60, 65, 98<br />
video FEC errors 64, 101<br />
video format 63, 101<br />
video format rate 63, 101<br />
video protocol 63, 101<br />
video rate 63, 101<br />
video rate used 63, 101<br />
warnings 64, 102<br />
device details, viewing 59<br />
device lists<br />
list of devices 55<br />
list of provioning details 82<br />
list of serial numbers for 92<br />
device policy groups<br />
adding 79<br />
deleting 80<br />
editing 80<br />
overview of 77<br />
viewing list of 79<br />
device views<br />
admin/monitor view 51<br />
provision view 51<br />
softupdate view 51<br />
device views, overview of 51<br />
devices<br />
assigning to users 136<br />
canceling provisioning for 85<br />
checking provisioning status for 84<br />
clearing a help request for 74<br />
clearing provisioning status for 85<br />
configuring 56<br />
deleting 73<br />
device details field names 97<br />
displaying information about 112<br />
displaying information about management of<br />
112<br />
editing information about 73<br />
MCU device details field names 103<br />
policies and policy groups, overview of 77<br />
provisioning 84<br />
provisioning details field names 107<br />
provisioning profiles, overview of 86<br />
provisioning, overview of 81<br />
scheduling software updates for 95<br />
sending messages to 75<br />
setting passwords for 56<br />
softupdate details field names 108<br />
video feed for 74<br />
See also endpoints<br />
devices, managing for participants 31<br />
dial options<br />
editing 26<br />
setting 36<br />
setting for guest participants 23<br />
dial plan services<br />
conference on demand service 214<br />
gateway service 215<br />
MCU service 217<br />
overview of 213<br />
simplified dialing service 215<br />
dial plan settings<br />
default values for 176<br />
editing the sites list 203<br />
overview of 172<br />
dial rules<br />
258 <strong>Polycom</strong>, Inc.
adding 225<br />
default 220<br />
editing 226<br />
enabling/disabling 226<br />
examples of custom rules 222<br />
overview of 220<br />
pattern types 221<br />
routing actions 221<br />
rule components 221<br />
viewing list of 224<br />
dial type<br />
setting for guest participants 23<br />
dial-in option 36<br />
dial-out option 36<br />
Directory Overview screen 4<br />
directory services<br />
setting up 13<br />
disabling/enabling dial rules 226<br />
disconnecting/connecting a participant 31<br />
displaying<br />
conference templates list 150<br />
configuration information 113<br />
connected-users information 113<br />
device details 59<br />
device information 112<br />
device-management information 112<br />
gatekeeper message log 157<br />
global address book 127<br />
IP call detail records 161<br />
ISDN call detail records 161<br />
license information 113<br />
MCU information 112<br />
network-usage information 113<br />
rooms list 140<br />
services information 113<br />
site link statistics 159<br />
site statistics 158<br />
system log files 164<br />
system-usage information 113<br />
today’s conferences 112<br />
user roles list 138<br />
users list 134<br />
downloading software updates 93<br />
E<br />
Edit Conference command 19<br />
Edit Device command 53<br />
editing<br />
advanced conference settings 39<br />
alternate gatekeeper settings 195<br />
conference information 25<br />
conference templates 150<br />
<strong>Polycom</strong>, Inc. 259<br />
Index<br />
device policy groups 80<br />
devices 73<br />
dial rules 226<br />
gatekeeper regions 213<br />
least-cost-routing tables 232<br />
participant dial options 26<br />
participant endpoint settings 26<br />
password for the global address book 129<br />
permissions for a user role 138<br />
primary gatekeeper settings 194<br />
provioning profiles 87<br />
room dial options 27<br />
room endpoint settings 27<br />
rooms 142<br />
security settings for https 197<br />
services 219<br />
site links 210<br />
site settings 207<br />
system network settings 181<br />
system time settings 182<br />
user information 136<br />
user information in the global address book<br />
128<br />
email notifications 24<br />
enabling a chairperson 36<br />
enabling/disabling dial rules 226<br />
ending a conference 28<br />
endpoints<br />
adding manually 65<br />
auto-provisioning 201<br />
editing settings for 26<br />
sending messages to 31<br />
setting common passwords for 202<br />
setting passwords for 56<br />
third-party 57<br />
See also devices<br />
entering the system license number 186<br />
exporting<br />
gatekeeper message log 157<br />
IP call detail records 161<br />
ISDN call detail records 161<br />
system log files 164<br />
Extend Conference command 28<br />
external database<br />
integrating with the system 183<br />
external database, configuring 12<br />
external databases. See databases and database,<br />
external<br />
F<br />
failover, initiating in a redundant system 188<br />
features
<strong>ReadiManager</strong> <strong>Operations</strong> <strong>Guide</strong><br />
bridge (MCU) 18<br />
list of conference 18<br />
features, system, list of 1<br />
feed, viewing for a video device 74<br />
field names<br />
bridge (MCU) features 46<br />
conference details 42<br />
conference features 44<br />
conference list 41<br />
device details 97<br />
MCU device details 103<br />
participant details 47<br />
participant settings 48<br />
participants 47<br />
participants list 50<br />
provisioning details 107<br />
softupdate details 108<br />
fields<br />
input requirements for 7<br />
filtering<br />
overview of 7<br />
filters<br />
Custom Date 17<br />
Future Only 17<br />
Ongoing Plus 17<br />
Today Only 17<br />
Today Plus 18<br />
Yesterday Plus 18<br />
first-time setup, resetting during a recovery<br />
setup 121<br />
forcing MCU usage 36<br />
Future Only filter 17<br />
G<br />
gatekeeper message log<br />
clearing events from 157<br />
defining messages to be logged 157<br />
overview of 155<br />
pausing and restarting 158<br />
viewing and exporting 157<br />
gatekeeper regions<br />
adding 212<br />
deleting 213<br />
editing 213<br />
gatekeeper settings<br />
editing for alternate gatekeeper 195<br />
editing for primary gatekeeper 194<br />
for alternate gatekeeper, overview of 193<br />
for primary gatekeeper, overview of 191<br />
overview of 171<br />
gatekeepers<br />
adding alternate 194<br />
gatekeeper regions, overview of 211<br />
overview of 191<br />
viewing gatekeeper regions list 212<br />
gateway dialing, troubleshooting 168<br />
gateway service 215<br />
global address book<br />
adding users to 127<br />
deleting users from 128<br />
editing the password for 129<br />
editing user information in 128<br />
overview of 125<br />
viewing 127<br />
groups. See device policy groups<br />
guest participants<br />
adding 22<br />
setting bit rate for 23<br />
setting dial options for 23<br />
setting dial type for 23<br />
H<br />
help request, clearing for a device 74<br />
help, acknowledging 31<br />
https, implementing 197<br />
I<br />
implementing<br />
a redundant system 186<br />
https 197<br />
initiating failover in a redundant system 188<br />
input requirements for fields<br />
requirements<br />
for field inputs<br />
ASCII-only fields 7<br />
integrating<br />
an external database 183<br />
an LDAP server 184<br />
LDAP 177<br />
internal database, reverting to 184<br />
internal databases. See databases and databases,<br />
internal<br />
IP call detail records<br />
viewing and exporting 161<br />
ISDN call detail records<br />
viewing and exporting 161<br />
K<br />
key for software activation, requesting 186<br />
keys for software activation, requesting 93<br />
260 <strong>Polycom</strong>, Inc.
L<br />
LCR. See least-cost routing (LCR)<br />
LDAP 136, 139<br />
integrating an LDAP server 184<br />
integrating LDAP 177<br />
LDAP connection, configuring 12<br />
least-cost routing (LCR)<br />
determining area codes for 230<br />
determining country codes for 230<br />
determining weighted cost for 230<br />
least-cost-routing (LCR) tables<br />
adding 232<br />
deleting 232<br />
editing 232<br />
examples of 228<br />
overview of 226<br />
viewing list of 231<br />
lecturer, assigning 24<br />
licenses<br />
displaying information about 113<br />
licenses, system<br />
adding 185<br />
entering number for 186<br />
licensing the system 11<br />
link statistics for a site<br />
overview of 159<br />
viewing 159<br />
links for a site<br />
adding 209<br />
as part of the site topology 173<br />
deleting 210<br />
editing 210<br />
viewing list of 209<br />
lists<br />
filtering, overview of 7<br />
of bridge (MCU) features 18<br />
of commands 17<br />
of conference features 18<br />
of conference templates 150<br />
of conferences 17, 41<br />
of device policy groups 79<br />
of device serial numbers 92<br />
of devices 55<br />
of dial rules 224<br />
of gatekeeper regions 212<br />
of least-cost-routing tables 231<br />
of participant details 18<br />
of participants 50<br />
of provisioning details 82<br />
of rooms 140<br />
of services 218<br />
of site links 209<br />
of sites 203, 206<br />
of softupdate details 91<br />
of system features and capabilities 1<br />
of user roles 138<br />
of users 134<br />
logging into the <strong>ReadiManager</strong> system 3<br />
logging out of the <strong>ReadiManager</strong> system 19<br />
logo, adding to the user interface 190<br />
logs<br />
gatekeeper message log 155<br />
system log files 164<br />
M<br />
Manage Conference command 19<br />
Manage Device command 53<br />
Manage User command 53<br />
management settings, overview of 172<br />
managing<br />
active conferences 28<br />
participant devices 31<br />
manual additions<br />
endpoints 65<br />
MCUs 70<br />
MCU<br />
features field names 46<br />
forcing use of 36<br />
list of features 18<br />
MCU (Multipoint Control Unit)<br />
definition 239<br />
MCU device details<br />
channels 71, 103<br />
international prefix 71, 103<br />
LCR table 71, 103<br />
local area codes 71, 103<br />
local prefix 71, 103<br />
non-local prefix 71, 103<br />
number range 71, 103<br />
priority 71, 104<br />
service name 71, 103<br />
MCU dialing, troubleshooting 168<br />
MCU service 217<br />
MCUs<br />
adding manually 70<br />
displaying information about 112<br />
MCU device details field names 103<br />
menus<br />
System Management 114<br />
message, sending to a device 75<br />
messages, sending 31<br />
mode, T.120 38<br />
<strong>Polycom</strong>, Inc. 261<br />
Index
<strong>ReadiManager</strong> <strong>Operations</strong> <strong>Guide</strong><br />
modes, video<br />
automatic layout in 28<br />
changing 28<br />
continuous presence mode 28, 37<br />
setting 37<br />
switching mode 28, 37<br />
modifying<br />
advanced conference settings 39<br />
alternate gatekeeper settings 195<br />
conference information 25<br />
conference templates 150<br />
device policy groups 80<br />
devices 73<br />
dial rules 226<br />
gatekeeper regions 213<br />
least-cost-routing tables 232<br />
participant dial options 26<br />
participant endpoint settings 26<br />
password for the global address book 129<br />
permissions for a user role 138<br />
primary gatekeeper settings 194<br />
provisioning profiles 87<br />
room dial options 27<br />
room endpoint settings 27<br />
rooms 142<br />
security settings for https 197<br />
services 219<br />
site links 210<br />
site settings 207<br />
system network settings 181<br />
system time settings 182<br />
user information 136<br />
user information in the global address book<br />
128<br />
Monitor Conf View command 18<br />
Monitor Conferences screen 4<br />
monitoring conf view 18<br />
multipoint conference<br />
definition 240<br />
multisite links<br />
definition 240<br />
Muting/Unmuting Participant command 31<br />
N<br />
network settings, editing 181<br />
network usage<br />
displaying information about 113<br />
number for system license, entering 186<br />
O<br />
Ongoing Plus filter 17<br />
open ports<br />
list of 245<br />
P<br />
participant field names<br />
participant details field names 47<br />
participant settings field names 48<br />
participants list field names 50<br />
participants<br />
adding guest 22<br />
adding internal 28<br />
connecting/disconnecting 31<br />
list of, details 18<br />
managing devices for 31<br />
muting/unmuting 31<br />
removing 31<br />
setting endpoints for 26<br />
participants field names 47<br />
passwords<br />
editing the global address book password 129<br />
for chairperson 36<br />
for conference 35<br />
setting for endpoints 202<br />
pattern types for a dial plan 221<br />
pausing and restarting<br />
gatekeeper message log 158<br />
People + Content 38<br />
point-to-point calls<br />
troubleshooting 167<br />
policy groups<br />
adding 79<br />
deleting 80<br />
editing 80<br />
overview of 77<br />
ports used by the SE200<br />
list of 246<br />
primary gatekeepers<br />
editing settings for 194<br />
overview of 191<br />
Provision command 54<br />
provision view commands<br />
Cancel Provision 54<br />
Clear Status 54<br />
Provision 54<br />
provisioning<br />
canceling 85<br />
overview of 81<br />
provision view of a device 51<br />
provisioning details field names 107<br />
starting 84<br />
provisioning details<br />
failure reason 83, 108<br />
last attempt date/time 83, 107<br />
262 <strong>Polycom</strong>, Inc.
last profile applied 82, 107<br />
log message 83, 108<br />
pending profile 82, 107<br />
provisioning status 82, 107<br />
scheduled 82, 107<br />
provisioning profiles<br />
adding 86<br />
cloning 87<br />
deleting 87<br />
editing 87<br />
uploading for software updates 94<br />
viewing list of 82<br />
proxy, definition 240<br />
R<br />
Reboot Device command 53<br />
records<br />
IP call detail records 161<br />
ISDN call detail records 161<br />
recovery operations<br />
overview of 121<br />
recurring conferences 21<br />
redundancy, configuring 9<br />
redundant system<br />
administering 179<br />
configuring 178<br />
implementing 186<br />
initiating failover in 188<br />
Refresh command 114<br />
Refresh Device List command 52<br />
Refresh View command 18<br />
refresh, automatic, of system dashboard 112<br />
regions in the site topology 172<br />
regions, gatekeeper<br />
adding 212<br />
deleting 213<br />
editing 213<br />
viewing 212<br />
registration<br />
troubleshooting problems with 165<br />
Remove Participant command 31<br />
removing<br />
conference templates 151<br />
conferences 25<br />
device policy groups 80<br />
devices 73<br />
gatekeeper message log events 157<br />
gatekeeper regions 213<br />
least-cost-routing tables 232<br />
provioning profiles 87<br />
rooms 142<br />
services 219<br />
site links 210<br />
sites 207<br />
user from the global address book 128<br />
user roles 139<br />
users 136<br />
removing a conference 19<br />
reports<br />
call detail record reports 159<br />
request for help, clearing for a device 74<br />
requesting<br />
software activation key 186<br />
requesting update activation keys 93<br />
requirements, system, list of 2<br />
resetting first-time setup during a recovery<br />
operation 121<br />
resources<br />
See also rooms<br />
Restart command 114<br />
restarting<br />
the gatekeeper message log 158<br />
the system 122<br />
restoring<br />
databases, overview of 119<br />
external database 120<br />
external database during an upgrade 120<br />
internal databases 119<br />
reverting to an internal database 184<br />
roles, user<br />
adding 138<br />
assigning default roles 139<br />
deleting 139<br />
editing permissions for 138<br />
overview of 131, 137<br />
viewing list of 138<br />
rooms<br />
adding 23, 140<br />
adding internal 28<br />
deleting 142<br />
editing 142<br />
overview of 131, 139<br />
setting dial options for 27<br />
setting endpoints for 27<br />
viewing list of 140<br />
routing<br />
routing actions for a dial plan 221<br />
S<br />
Schedule Conf View command 18<br />
schedule conference view 17<br />
scheduling a conference 21<br />
<strong>Polycom</strong>, Inc. 263<br />
Index
<strong>ReadiManager</strong> <strong>Operations</strong> <strong>Guide</strong><br />
scheduling software updates 95<br />
scheduling system<br />
login 3<br />
requirements 3<br />
security settings<br />
editing for https 197<br />
overview of 172<br />
Send Message command 31, 53<br />
sending a message to a device 75<br />
serial console, connecting to 116<br />
serial numbers for devices to be updated 92<br />
servers<br />
initiating failover in a redundant system 188<br />
LDAP 184<br />
settings, overview of 171<br />
updating software for 202<br />
services<br />
adding 218<br />
deleting 219<br />
displaying information about 113<br />
editing 219<br />
viewing list of 218<br />
services, dial plan<br />
conference on demand service 214<br />
gateway service 215<br />
MCU service 217<br />
overview of 213<br />
simplified dialing service 215<br />
setting<br />
common passwords for endpoints 202<br />
default user roles 139<br />
setting up<br />
conference templates 14<br />
directory services 13<br />
video call routing 14<br />
settings<br />
advanced 35<br />
advanced conference settings 39<br />
alternate gatekeeper settings 193<br />
chairperson password 36<br />
conference password 35<br />
conference settings 151<br />
conference, overview of 143<br />
connection speed 37<br />
dial options 36<br />
dial plan settings 172, 176<br />
enable chairperson 36<br />
forced MCU usage 36<br />
gatekeeper settings 171<br />
management settings 172<br />
network settings 181<br />
People + Content 38<br />
primary gatekeeper settings 191<br />
security settings 172<br />
security settings for https 197<br />
server settings 171<br />
system time settings 182<br />
T.120 mode 38<br />
video mode 28, 37<br />
Shutdown command 114<br />
shutting down the system 122<br />
simplified dialing service 215<br />
site link statistics<br />
overview of 159<br />
viewing 159<br />
site links<br />
adding 209<br />
deleting 210<br />
editing 210<br />
overview of 208<br />
place of in the site topology 173<br />
viewing list of 209<br />
site settings, editing 207<br />
site statistics<br />
overview of 158<br />
viewing 158<br />
site topology<br />
overview of 172<br />
regions in 172<br />
site links in 173<br />
sites in 173<br />
subnets in 173<br />
sites<br />
adding 206<br />
deleting 207<br />
editing list of 203<br />
overview of 173<br />
viewing list of 206<br />
softupdate<br />
overview of 89<br />
softupdate details field names 108<br />
softupdate view of a device 51<br />
See also software updates<br />
softupdate details<br />
failure reason 91, 109<br />
last attempt date/time 91, 109<br />
log message 91, 109<br />
scheduled 91, 108<br />
softupdate status 91, 108<br />
softupdate view commands<br />
Cancel Update 54<br />
Clear Status 54<br />
Software Update 54<br />
software<br />
264 <strong>Polycom</strong>, Inc.
equesting activation key for 186<br />
updating for the server 202<br />
Software Update command 54<br />
software updates<br />
canceling 96<br />
downloading 93<br />
listing software for 91<br />
overview of 89<br />
scheduling 95<br />
uploading the profile 94<br />
See also softupdate<br />
SQL server database. See database, external<br />
starting<br />
the gatekeeper message log 158<br />
the system 122<br />
starting the <strong>ReadiManager</strong> system 3<br />
statistics<br />
site link statistics, overview of 159<br />
site statistics, overview of 158<br />
viewing site link statistics 159<br />
viewing site statistics 158<br />
status of device provisioning<br />
checking 84<br />
clearing 85<br />
stopping<br />
provisioning 85<br />
software updates 96<br />
subnets, place of in the site topology 173<br />
supported third-party endpoints 57<br />
switching mode 28, 37<br />
system configuration<br />
displaying information about 113<br />
system dashboard 111<br />
system features and capabilities, list of 1<br />
system integration with external database 183<br />
system licenses<br />
adding 185<br />
entering number for 186<br />
system log files<br />
overview of 164<br />
viewing and exporting 164<br />
System Log Files command 114<br />
system login 3<br />
system management menu 114<br />
system network settings, editing 181<br />
system requirements 3<br />
system requirements, list of 2<br />
system setup menu<br />
overview of 171<br />
system time settings, editing 182<br />
system usage<br />
displaying information about 113<br />
system views 4<br />
system, licensing 11<br />
T<br />
T.120 mode 38<br />
templates, conference<br />
adding 150<br />
deleting 151<br />
editing 150<br />
overview of 144<br />
setting up 14<br />
viewing list of 150<br />
Terminate Conference command 19, 28<br />
third-party endpoints 57<br />
time settings, editing 182<br />
Today Only filter 17<br />
Today Plus filter 18<br />
topology<br />
overview of 172<br />
regions in 172<br />
site links in 173<br />
sites in 173<br />
subnets in 173<br />
troubleshooting 168<br />
conference on demand problems 169<br />
point-to-point call problems 167<br />
registration problems 165<br />
U<br />
unmuting/muting a participant 31<br />
updates, software<br />
canceling 96<br />
downloading 93<br />
listing 91<br />
overview of 89<br />
requesting activation keys for 93<br />
scheduling 95<br />
See also softupdate<br />
updating server software 202<br />
upgrades<br />
restoring an external database during 120<br />
uploading the software update profile 94<br />
usage<br />
displaying information about system usage<br />
113<br />
displaying network-usage information 113<br />
user interface, adding a custom logo to 190<br />
user roles<br />
adding 138<br />
<strong>Polycom</strong>, Inc. 265<br />
Index
<strong>ReadiManager</strong> <strong>Operations</strong> <strong>Guide</strong><br />
assigning default roles 139<br />
deleting 139<br />
editing permissions for 138<br />
overview of 131<br />
users<br />
adding to the global address book 127<br />
adding to the system 135<br />
assigning roles and devices to 136<br />
deleting 136<br />
displaying information about connected users<br />
113<br />
editing information about 136<br />
editing information about in the global<br />
address book 128<br />
overview of 131<br />
roles for 137<br />
setting up 133<br />
viewing a list of 134<br />
viewing list of 134<br />
V<br />
video call routing<br />
setting up 14<br />
video chairperson, assigning 24<br />
video endpoints. See devices and endpoints<br />
video feed, viewing for a device 74<br />
video modes<br />
automatic layout in 28<br />
changing 28<br />
continuous presence mode 28, 37<br />
setting 37<br />
switching mode 28, 37<br />
video plus data stream 38<br />
View Device Details command 53<br />
viewing<br />
conference templates list 150<br />
configuration information 113<br />
connected-user information 113<br />
device details 59<br />
device information 112<br />
device list 55<br />
device policy group list 79<br />
device serial numbers list 92<br />
device-management information 112<br />
dial rules list 224<br />
gatekeeper message log 157<br />
gatekeeper regions list 212<br />
global address book 127<br />
IP call detail records 161<br />
ISDN call detail records 161<br />
least-cost-routing tables list 231<br />
license information 113<br />
MCU information 112<br />
network-usage information 113<br />
provisioning list and details 82<br />
rooms list 140<br />
services information 113<br />
services list 218<br />
site link statistics 159<br />
site links list 209<br />
site statistics 158<br />
sites list 206<br />
software update list and details 91<br />
status of device provisioning 84<br />
system log files 164<br />
system-usage information 113<br />
today’s conferences 112<br />
user roles list 138<br />
users list 134<br />
video feed for a device 74<br />
views<br />
device views 51<br />
monitor conf 18<br />
schedule conference view 17<br />
views of a device<br />
admin/monitor view 51<br />
provision view 51<br />
softupdate view 51<br />
W<br />
warnings 64, 102<br />
weighted cost, determining 230<br />
workspaces in <strong>ReadiManager</strong> 4<br />
Y<br />
Yesterday Plus filter 18<br />
266 <strong>Polycom</strong>, Inc.