Rmx 2000 installation & configuration guide - polycom support
Rmx 2000 installation & configuration guide - polycom support
Rmx 2000 installation & configuration guide - polycom support

Create successful ePaper yourself
Turn your PDF publications into a flip-book with our unique Google optimized e-Paper software.
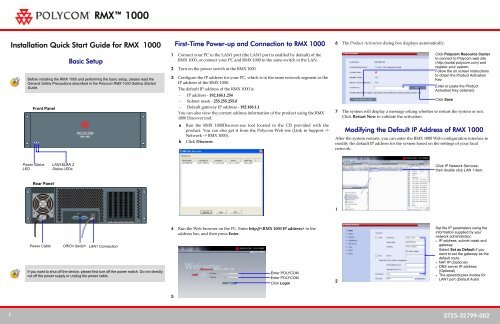
RMX 1000<br />
Installation Quick Start Guide for RMX 1000<br />
Basic Setup<br />
Before installing the RMX 1000 and performing the basic setup, please read the<br />
General Safety Precautions described in the Polycom RMX 1000 Getting Started<br />
Guide.<br />
Front Panel<br />
Power Status<br />
LED<br />
Rear Panel<br />
LAN1&LAN 2<br />
Status LEDs<br />
Power Cable Off/On Switch LAN1 Connection<br />
If you want to shut off the device, please first turn off the power switch. Do not directly<br />
cut off the power supply or unplug the power cable.<br />
First-Time Power-up and Connection to RMX 1000<br />
1 Connect your PC to the LAN1 port (the LAN1 port is enabled by default) of the<br />
RMX 1000, or connect your PC and RMX 1000 to the same switch in the LAN.<br />
2 Turn on the power switch at the RMX 1000.<br />
3 Configure the IP address for your PC, which is in the same network segment as the<br />
IP address of the RMX 1000.<br />
The default IP address of the RMX 1000 is:<br />
– IP address - 192.168.1.254<br />
– Subnet mask - 255.255.255.0<br />
– Default gateway IP address - 192.168.1.1<br />
You can also view the current address information of the product using the RMX<br />
1000 Discover tool:<br />
a Run the RMX 1000Discover.exe tool located in the CD provided with the<br />
product. You can also get it from the Polycom Web site (Link to Support -><br />
Network -> RMX 1000).<br />
b Click Discover.<br />
4 Run the Web browser on the PC. Enter http:// in the<br />
address bar, and then press Enter.<br />
5<br />
Enter POLYCOM<br />
Enter POLYCOM<br />
Click Login<br />
6 The Product Activation dialog box displays automatically.<br />
Click Polycom Resource Center<br />
to connect to Polycom web site<br />
(http://portal.<strong>polycom</strong>.com) and<br />
register your system.<br />
Follow the on screen instructions<br />
to obtain the Product Activation<br />
Key.<br />
7 The system will display a message asking whether to restart the system or not.<br />
Click Restart Now to validate the activation.<br />
Modifying the Default IP Address of RMX 1000<br />
After the system restarts, you can enter the RMX 1000 Web <strong>configuration</strong> interface to<br />
modify the default IP address for the system based on the settings of your local<br />
network.<br />
1 3725-32799-002<br />
1<br />
2<br />
Enter or paste the Product<br />
Activation Key obtained.<br />
Click Save<br />
Click IP Network Services,<br />
then double click LAN 1 item.<br />
Set the IP parameters using the<br />
information supplied by your<br />
network administrator:<br />
• IP address, subnet mask and<br />
gateway<br />
Select Set as Default if you<br />
want to set the gateway as the<br />
default route<br />
• NAT IP (Optional)<br />
• DNS server IP address<br />
(Optional)<br />
• The speed/duplex modes for<br />
LAN1 port (Default Auto)
RMX 1000<br />
Configuring Other Network Options (Optional)<br />
If necessary, you can configure other network parameters according to the following<br />
procedure:<br />
1 .<br />
2 Click the Routers tab.<br />
3<br />
4 If your IP network type is SIP only, go to step 8.<br />
5 To register the system to the gatekeeper, click the Gatekeeper tab.<br />
6<br />
7 If your IP network type is H.323 only, go to step 10.<br />
8 To configure the SIP server, click the SIP Server tab.<br />
Click IP Network Services,<br />
then double click LAN 1 item.<br />
9<br />
Starting a Conference via Remote Control<br />
The RMX 1000 conference platform offers several ways to start a conference.<br />
Participants can dial into a meeting room configured by the administrator or create<br />
their own conference ID on-the-fly and invite additional participants by adding their<br />
endpoint numbers to the dial string. The following sections describe how to start a<br />
simple conference using a dial-in string the user created to initiate a conference.<br />
H.323 Participants<br />
H.323 participants dial:<br />
[##Conference<br />
Password][##Chairperson Password]<br />
Here, the character in [ ] is optional.<br />
For example, if RMX 1000 prefix in gatekeeper is 925, to create a conference which ID is<br />
1001, dial 9251001. At the meantime if want to set a conference password 1111 and a<br />
chairperson password 2222, dial 9251001##1111##2222<br />
SIP Participants<br />
SIP participants dial:<br />
[$$Conference Password][$$Chairperson Password]@<br />
Here, the character in [ ] is optional.<br />
For example, if RMX 1000 static route domain name is <strong>polycom</strong>.com, to create a<br />
conference which ID is 1001, dial 1001@ <strong>polycom</strong>.com. At the meantime if want to set a<br />
conference password 1111 and a chairperson password 2222, dial<br />
1001$$1111$$2222@<strong>polycom</strong>.com<br />
Connecting to a Conference via Remote Control<br />
Set the transport layer protocol<br />
used for communicating with the<br />
SIP server. A user can directly dial in to the ongoing conference or meeting room using the remote<br />
Check the option to register to SIP<br />
Server<br />
Set the Primary/Alternate SIP<br />
server parameters. Primary<br />
/Alternate Server filed indicates<br />
whether or not the device is<br />
registered successfully.<br />
Enter the user name and password<br />
provided by the SIP server.<br />
Optional: Set the IP address and<br />
port number for the outbound<br />
proxy server.<br />
control. In this way, the user must obtain the conference ID and password (if the<br />
conference password or chairperson password is set) first.<br />
H.323 Participants<br />
H.323 participants dial:<br />
[##Conference Password or<br />
Chairperson Password].<br />
Here, the character in [ ] is optional.<br />
For example:<br />
RMX 1000 prefix in gatekeeper: 925<br />
10 Click OK.<br />
ID of the conference to be dialed in: 1001<br />
The system is now ready for use. For additional <strong>configuration</strong> instructions, please refer Then, the endpoint dials 9251001<br />
to the Polycom RMX 1000 System User Guide.<br />
If the conference to be dialed in is set with the conference password 1111 and<br />
Set the IP address for the sending<br />
chairperson password 2222<br />
router of packet transmission Then, the regular participant dials 9251001##1111<br />
Set the target network address for<br />
packet transmission<br />
The conference chairperson dials 9251001##2222<br />
SIP Participants<br />
Set the subnet mask for the target<br />
network SIP participants dial:<br />
Choose an IP network type for the<br />
RMX 1000 system to make a call<br />
Check the option to register to GK<br />
and set the following parameters<br />
Set the Primary / Alternate<br />
Gatekeeper parameters.<br />
Primary/Alternate Gatekeeper filed<br />
indicates whether or not the device<br />
is registered successfully<br />
Set the E.164 prefix / H.323 alias<br />
for the system<br />
[$$Conference Password or Chairperson Password]<br />
Here, the character in [ ] is optional.<br />
For example:<br />
RMX 1000 static route domain name: <strong>polycom</strong>.com<br />
ID of the conference to be dialed in: 1001<br />
Then, the endpoint dials 1001@ <strong>polycom</strong>.com<br />
If the conference to be dialed in is set with the conference password 1111 and<br />
chairperson password 2222<br />
Then, the regular user dials 1001$$1111@ <strong>polycom</strong>.com<br />
The conference chairperson dials 1001$$2222@ <strong>polycom</strong>.com.<br />
2 3725-32799-002