Sniffer® Portable Professional User's Guide - NetScout
Sniffer® Portable Professional User's Guide - NetScout Sniffer® Portable Professional User's Guide - NetScout
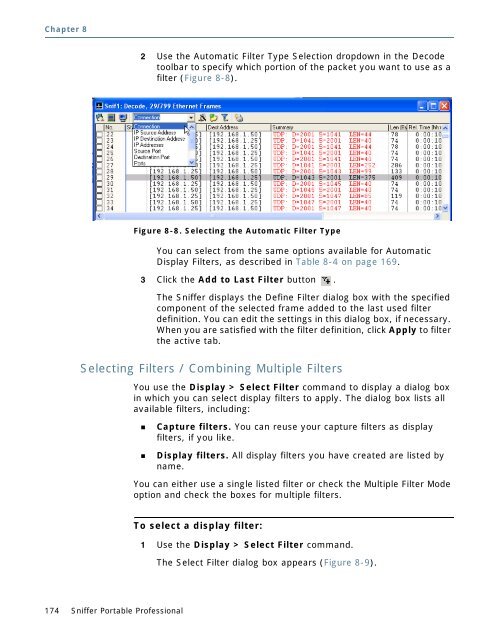
Chapter 8 174 Sniffer Portable Professional 2 Use the Automatic Filter Type Selection dropdown in the Decode toolbar to specify which portion of the packet you want to use as a filter (Figure 8-8). Figure 8-8. Selecting the Automatic Filter Type You can select from the same options available for Automatic Display Filters, as described in Table 8-4 on page 169. 3 Click the Add to Last Filter button . The Sniffer displays the Define Filter dialog box with the specified component of the selected frame added to the last used filter definition. You can edit the settings in this dialog box, if necessary. When you are satisfied with the filter definition, click Apply to filter the active tab. Selecting Filters / Combining Multiple Filters You use the Display > Select Filter command to display a dialog box in which you can select display filters to apply. The dialog box lists all available filters, including: Capture filters. You can reuse your capture filters as display filters, if you like. Display filters. All display filters you have created are listed by name. You can either use a single listed filter or check the Multiple Filter Mode option and check the boxes for multiple filters. To select a display filter: 1 Use the Display > Select Filter command. The Select Filter dialog box appears (Figure 8-9).
Figure 8-9. The Select Filter Dialog Box Displaying Captured Data 2 Do you want to use a single filter or combine multiple filters from the list? Multiple Filter Mode. If you want to combine multiple filters from the list, enable the Multiple Filter Mode option. Then, check the boxes corresponding to the filters you want to use. Multiple filter mode allows you to select two or more display filters to apply in the Sniffer window. Select options from the list of available filters to create a single filter using combinations of existing filters. If you select a parent category, all the filters within the category are selected automatically. When the parent category is unselected, all the filters within the category are deselected. NOTE: When the combination filter is applied, it acts as an “OR” between the selected filters. Because of this, Multiple Filter Mode may return unexpected results when using Exclude filters (filters set to remove matching traffic). See Multiple Filter Mode and Exclude Filters on page 176 for details. Single Filter Mode. If you are using only a single filter, leave Single Filter Mode enabled and check the box corresponding to the filter you want to use. User’s Guide 175
- Page 124 and 125: Chapter 6 Capture Buffer 124 Sniffe
- Page 126 and 127: Chapter 6 Tips: 126 Sniffer Portabl
- Page 128 and 129: Chapter 6 Capturing from Specific S
- Page 130 and 131: Chapter 6 130 Sniffer Portable Prof
- Page 132 and 133: Chapter 7 132 Sniffer Portable Prof
- Page 134 and 135: Chapter 7 Setting Expert Options 13
- Page 136 and 137: Chapter 7 136 Sniffer Portable Prof
- Page 138 and 139: Chapter 7 Expert Subnet Mask Settin
- Page 140 and 141: Chapter 7 140 Sniffer Portable Prof
- Page 142 and 143: Chapter 7 142 Sniffer Portable Prof
- Page 144 and 145: Chapter 7 Discovered access points
- Page 146 and 147: Chapter 7 146 Sniffer Portable Prof
- Page 148 and 149: Chapter 7 148 Sniffer Portable Prof
- Page 150 and 151: Chapter 7 Expert Oracle Options 150
- Page 152 and 153: Chapter 7 Limitations of the Expert
- Page 154 and 155: Chapter 7 Click to show the packet
- Page 156 and 157: Chapter 7 156 Sniffer Portable Prof
- Page 158 and 159: Chapter 8 Displaying Captured Packe
- Page 160 and 161: Chapter 8 Postcapture Views for Wir
- Page 162 and 163: Chapter 8 162 Sniffer Portable Prof
- Page 164 and 165: Chapter 8 164 Sniffer Portable Prof
- Page 166 and 167: Chapter 8 Table 8-3. Decode Tab Too
- Page 168 and 169: Chapter 8 168 Sniffer Portable Prof
- Page 170 and 171: Chapter 8 b 170 Sniffer Portable Pr
- Page 172 and 173: Chapter 8 a 172 Sniffer Portable Pr
- Page 176 and 177: Chapter 8 176 Sniffer Portable Prof
- Page 178 and 179: Chapter 8 178 Sniffer Portable Prof
- Page 180 and 181: Chapter 8 Display Setup > Summary D
- Page 182 and 183: Chapter 8 182 Sniffer Portable Prof
- Page 184 and 185: Chapter 8 184 Sniffer Portable Prof
- Page 186 and 187: Chapter 8 Searching for Frames in t
- Page 188 and 189: Chapter 8 Searching for Frames Matc
- Page 190 and 191: Chapter 8 Searching for Frames Matc
- Page 192 and 193: Chapter 8 Searching for Data Patter
- Page 194 and 195: Chapter 8 194 Sniffer Portable Prof
- Page 196 and 197: Chapter 8 Printing Decoded Packets
- Page 198 and 199: Chapter 8 Using Protocol Forcing Yo
- Page 200 and 201: Chapter 8 Sniffer Portable Professi
- Page 202 and 203: Chapter 8 Postcapture Matrix Tab 20
- Page 204 and 205: Chapter 8 More about the Matrix Tra
- Page 206 and 207: Chapter 8 Postcapture Host Table Ta
- Page 208 and 209: Chapter 8 Postcapture Protocol Dist
- Page 210 and 211: Chapter 8 Postcapture Statistics Ta
- Page 212 and 213: Chapter 8 212 Sniffer Portable Prof
- Page 214 and 215: Chapter 9 4 Click OK. 214 Sniffer P
- Page 216 and 217: Chapter 9 216 Sniffer Portable Prof
- Page 218 and 219: Chapter 9 218 Sniffer Portable Prof
- Page 220 and 221: Chapter 10 220 Sniffer Portable Pro
- Page 222 and 223: Chapter 10 Using a Defined Filter U
Chapter 8<br />
174 Sniffer <strong>Portable</strong> <strong>Professional</strong><br />
2 Use the Automatic Filter Type Selection dropdown in the Decode<br />
toolbar to specify which portion of the packet you want to use as a<br />
filter (Figure 8-8).<br />
Figure 8-8. Selecting the Automatic Filter Type<br />
You can select from the same options available for Automatic<br />
Display Filters, as described in Table 8-4 on page 169.<br />
3 Click the Add to Last Filter button .<br />
The Sniffer displays the Define Filter dialog box with the specified<br />
component of the selected frame added to the last used filter<br />
definition. You can edit the settings in this dialog box, if necessary.<br />
When you are satisfied with the filter definition, click Apply to filter<br />
the active tab.<br />
Selecting Filters / Combining Multiple Filters<br />
You use the Display > Select Filter command to display a dialog box<br />
in which you can select display filters to apply. The dialog box lists all<br />
available filters, including:<br />
Capture filters. You can reuse your capture filters as display<br />
filters, if you like.<br />
Display filters. All display filters you have created are listed by<br />
name.<br />
You can either use a single listed filter or check the Multiple Filter Mode<br />
option and check the boxes for multiple filters.<br />
To select a display filter:<br />
1 Use the Display > Select Filter command.<br />
The Select Filter dialog box appears (Figure 8-9).


