Installation Guide Mini Print Server MODEL PS101 - Netgear
Installation Guide Mini Print Server MODEL PS101 - Netgear
Installation Guide Mini Print Server MODEL PS101 - Netgear

You also want an ePaper? Increase the reach of your titles
YUMPU automatically turns print PDFs into web optimized ePapers that Google loves.
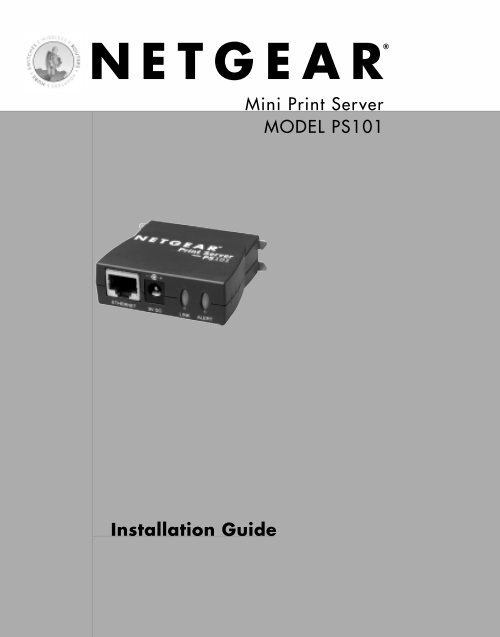
<strong>Installation</strong> <strong>Guide</strong><br />
<strong>Mini</strong> <strong>Print</strong> <strong>Server</strong><br />
<strong>MODEL</strong> <strong>PS101</strong>
Technical Support<br />
YOU MUST REGISTER TO OBTAIN TECHNICAL SUPPORT. PLEASE RETAIN<br />
PROOF OF PURCHASE AND THE WARRANTY INFORMATION.<br />
To register your product, get product support or obtain product information and product<br />
documentation, go to http://www.NETGEAR.com/register.<br />
You will find technical support information at http://www.NETGEAR.com through the<br />
Customer Support area. If you want to contact technical support by telephone, see the support<br />
information card for the correct telephone number for your country.<br />
Technical support is available 24 hours a day, 7 days a week.<br />
NETGEAR, INC.<br />
E-mail: support@NETGEAR.com<br />
www.NETGEAR.com<br />
©2002 by NETGEAR, Inc. All rights reserved.<br />
NETGEAR and AutoUplink are trademarks or registered trademarks of NETGEAR, Inc. in the United States and/or<br />
other countries. Other brand and product names are trademarks or registered trademarks of their respective holders.<br />
Information is subject to change without notice.
Introduction<br />
Thank you for purchasing a NETGEAR <strong>PS101</strong><br />
<strong>Mini</strong> <strong>Print</strong> <strong>Server</strong>. With this print server you can<br />
share your printer with all the computers in your<br />
home or office that run Microsoft® Windows®<br />
95 OSR2, 98, 2000, NT 4.x, Me, or XP<br />
operating system.<br />
This installation guide shows you how to connect<br />
the print server to your printer and configure it to<br />
use with your computers. Setup is easy – if you<br />
follow the instructions in this guide, the print server<br />
will soon be up and running for your computers.<br />
If you have problems, there is a troubleshooting section on page 9 to help you. You can get<br />
more detailed troubleshooting information from the Reference Manual on the CD or online at<br />
www.NETGEAR.com in our Support section.<br />
<strong>Installation</strong> Procedure Overview<br />
Estimated time: 30 minutes<br />
1. Unpack the box and verify the contents.<br />
2. Connect the print server to the printer and to the network.<br />
3. Configure the print server to be recognized on the network.<br />
4. Configure each computer to print through the print server.<br />
Note: You only need to go through procedures 1 through 3 once. Repeat procedure<br />
4 for each computer that will share the printer with the print server. It takes less<br />
than 5 minutes to configure and test each computer.<br />
On the <strong>PS101</strong> Resource CD, you will find a Reference Manual containing more detailed<br />
information about installation, troubleshooting and configuration.<br />
1
1<br />
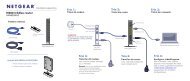
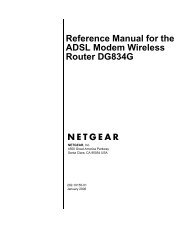
Unpack the Box and Verify the Contents<br />
When you open the box, verify that you received everything.<br />
The package includes:<br />
• <strong>PS101</strong> <strong>Mini</strong> <strong>Print</strong> <strong>Server</strong><br />
• AC power adapter<br />
• <strong>PS101</strong> Resource CD, including a full Reference <strong>Guide</strong> and print server software<br />
• <strong>PS101</strong> <strong>Installation</strong> <strong>Guide</strong> (this document)<br />
• Warranty and registration card<br />
• Support information card<br />
2<br />
<strong>PS101</strong> <strong>Mini</strong> <strong>Print</strong> <strong>Server</strong> Resource CD,<br />
installation guide, support information<br />
card & warranty/registration card<br />
<strong>PS101</strong> <strong>Mini</strong><br />
<strong>Print</strong> <strong>Server</strong><br />
Power adapter
2<br />
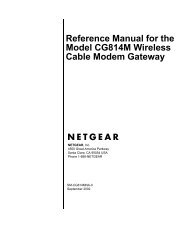
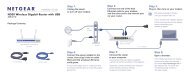
Connect the <strong>Print</strong> <strong>Server</strong><br />
The <strong>PS101</strong> <strong>Mini</strong> <strong>Print</strong> <strong>Server</strong> connects directly to the Centronics parallel port on your<br />
printer. After connecting it to your printer, you then connect the print server to a<br />
network device (like a hub, router, or switch).<br />
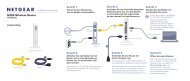
Centronics parallel port on the printer<br />
Not Compatible with<br />
<strong>Mini</strong> Centronics-C <strong>Print</strong>ers<br />
Before you share the printer with the NETGEAR <strong>PS101</strong> <strong>Mini</strong><br />
<strong>Print</strong> <strong>Server</strong>, you should have at least one computer connected<br />
to an Ethernet network and have one unused port on an<br />
Ethernet hub, switch, or router.<br />
Note: For printers with a <strong>Mini</strong>-<br />
Centronics C port, you will need to use<br />
one of the other NETGEAR <strong>Print</strong><br />
<strong>Server</strong>s such as the PS111W, PS110 or<br />
PS113 along with the correct cable.<br />
Note: The procedures described in this guide are for a<br />
TCP/IP-based network environment. For NetBEUI<br />
protocol printing, please see the Reference Manual.<br />
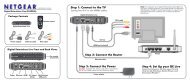
1. With the printer turned off, connect the print server to<br />
the Centronics connector on the printer.<br />
2. Insert one end of an Ethernet patch (or straight-through)<br />
cable into an open Ethernet port in the network device<br />
(hub, switch, or router) and insert the other end into the<br />
Ethernet port on the print server.<br />
ETHERNET 9V DC LINK ALERT<br />
<strong>Print</strong>er with <strong>PS101</strong> attached<br />
<strong>Netgear</strong> Router<br />
DSL modem<br />
<strong>Print</strong>er with <strong>PS101</strong><br />
attached<br />
ETHERNET 9V DC LINK ALERT<br />
Note: You may use a Category 3 (or higher)<br />
Ethernet cable.<br />
3. Turn the printer on.<br />
4. Connect the power adapter’s cord into the back<br />
of the print server and then plug the adapter into a<br />
power source (such as a wall socket or power strip).<br />
When power has been applied to the print server:<br />
The LINK light (green) should light up and may<br />
blink to show network activity.<br />
The ALERT light (yellow) should be off.<br />
Note: If any light does not operate as indicated,<br />
go to the Troubleshooting section on page 9.<br />
3
3<br />
Install <strong>Print</strong>er <strong>Server</strong> Software and<br />
Setup the <strong>Print</strong> <strong>Server</strong><br />
The <strong>PS101</strong> comes with several software components that allow you to set up the<br />
print server and use administrative tools. You should install all the software onto one Windows<br />
computer to act as the print server administrator. For the other computers, only install the<br />
NETGEAR Add <strong>Print</strong>er Wizard as described in procedure 4.<br />
To install the NETGEAR <strong>Print</strong> <strong>Server</strong> software:<br />
1. Insert the <strong>PS101</strong> <strong>Print</strong>er <strong>Server</strong> Resource CD in<br />
the CD-ROM drive. NETGEAR <strong>Print</strong> <strong>Server</strong><br />
Software <strong>Installation</strong> wizard starts up<br />
automatically. If it doesn’t, double-click My<br />
Computer, double-click your CD-ROM drive,<br />
and double-click Setup.exe.<br />
2. Follow the instructions in the installation wizard<br />
to install the software.<br />
3. For the administrative computer, install all components.<br />
Note: If this computer will just use the printer, only select the NETGEAR Add<br />
<strong>Print</strong>er Wizard. See procedure 4: Configure a Computer To Access the <strong>Print</strong> <strong>Server</strong><br />
for details.<br />
4. Click Finish.<br />
To set up the print server:<br />
1. Click Start. Point to Programs and click NETGEAR <strong>Print</strong> <strong>Server</strong>>NETGEAR <strong>Print</strong> <strong>Server</strong><br />
Setup Wizard.<br />
4<br />
2. Follow the instructions in the installation wizard to set up the print server.<br />
\If you have questions, click Help for information about a specific screen.
Note: The <strong>PS101</strong> <strong>Print</strong> <strong>Server</strong>, by default, automatically obtains an IP address from<br />
the network. However, NETGEAR recommends you use a fixed IP address to be<br />
able to use a Web browser to print a test page or to make configuration changes<br />
later. For a home or small office, use IP address information compatible with your<br />
router setup. The IP address for the print server needs to be unique in the network.<br />
If you don’t know what to use, you may click Suggest New Values to get a useable<br />
IP address. If you are using a NETGEAR router with default settings, the following<br />
settings should work:<br />
IP address: 192.168.0.150 (The first three numbers should match the<br />
numbers for the network device. Make sure the last 3 digits are unique<br />
on your network.)<br />
Subnet mask: 255.255.255.0<br />
Gateway IP address: 192.168.0.1 (the address of your router)<br />
3. When complete, click Finish.<br />
4. When asked if you want to set up a printer right away, click Yes and continue to<br />
procedure 4: Confirgure a Computer To Access the <strong>Print</strong> <strong>Server</strong>. You have already completed<br />
the software installation and are running the NETGEAR Add <strong>Print</strong>er Wizard.<br />
Advanced Settings<br />
Advanced users may want to change the default name of the <strong>Print</strong> <strong>Server</strong> or make other<br />
changes in the settings. There are 2 ways to administer your NETGEAR <strong>Print</strong> <strong>Server</strong>. The<br />
Reference Manual on the Resource CD has full instructions.<br />
a. Open a Web browser and go to the IP address for the print server. (For example, type<br />
http://192.168.0.150 and click Go.) or<br />
b. You can use the NETGEAR <strong>Print</strong> <strong>Server</strong> Administration program. Click Start. Point to<br />
Programs and click NETGEAR <strong>Print</strong> <strong>Server</strong>>NETGEAR <strong>Print</strong> <strong>Server</strong> Administration.<br />
5
4<br />
Configure a Computer To Access the<br />
<strong>Print</strong> <strong>Server</strong><br />
Before using the <strong>PS101</strong> on your network, each computer that needs to access the print server<br />
must have:<br />
• A connection to the network.<br />
• The printer added using the NETGEAR Add <strong>Print</strong>er Wizard.<br />
• Either the printer driver software already installed or, if this is a new printer, access to the<br />
printer driver software (either on a CD or downladed to a disk).<br />
To install the Add <strong>Print</strong>er Wizard (for a non-administrative<br />
computer):<br />
Note: You can skip ahead “To configure<br />
computers...” if you have already installed the<br />
NETGEAR software on this computer.<br />
1. Insert the <strong>PS101</strong> <strong>Print</strong>er <strong>Server</strong> Resource CD in<br />
the CD-ROM drive. NETGEAR <strong>Print</strong> <strong>Server</strong><br />
Software <strong>Installation</strong> wizard starts up<br />
automatically. If it doesn’t, double-click My<br />
Computer, double-click your CD-ROM drive,<br />
and double-click Setup.exe.<br />
2. Follow the instructions in the installation wizard to<br />
install the software.<br />
3. When asked, select only the NETGEAR Add <strong>Print</strong>er Wizard.<br />
6<br />
4. Click Finish.
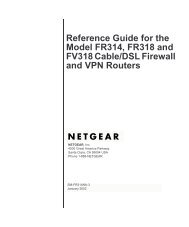
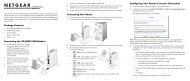
To configure computers running Windows NT, 2000, and XP:<br />
1. Click Start, point to Programs> NETGEAR <strong>Print</strong> <strong>Server</strong> and click NETGEAR Add <strong>Print</strong>er<br />
Wizard.<br />
2. Read, follow the instructions, and click OK in the Setup<br />
message window.<br />
3. In the list, select the print server port with the printer<br />
you want to add to this computer and click Add. When<br />
you see the AddPort screen, write down the port name<br />
(such as PSFF0091_P1).<br />
<strong>Print</strong>er port name:_____________________________.<br />
4. Scroll down in Add <strong>Print</strong>er Wizard screen. Select the <strong>Print</strong><br />
<strong>Server</strong> port with port name as written above.<br />
Click Next.<br />
Note: Do NOT select the default port “LPT1.”<br />
5. Select the printer manufacturer on the left and<br />
the model on the right<br />
or, if you need to install the printer driver, click<br />
Have Disk and follow the instructions.<br />
6. If you have installed the printer driver for this<br />
printer, you will be asked to keep the existing<br />
driver or replace it. Select either one and click<br />
Next. Follow the instruction on screen if any.<br />
7. Type a name for this printer and determine whether you want this as the default printer.<br />
Click Next.<br />
8. Select No when asked about sharing the printer and click Next.<br />
Note: The print server will perform this function.<br />
9. Select Yes when asked about printing a test page and click Next.<br />
10. Click Finish.<br />
If you cannot print the test page, go to Troubleshooting on page 9.<br />
If you successfully printed the test page, you can configure other computers to access this<br />
printer by repeating procedure 4 on each computer.<br />
7
To configure computers running Windows 95, 98, and Me:<br />
1. Click Start, point to Programs> NETGEAR <strong>Print</strong> <strong>Server</strong> and click NETGEAR Add <strong>Print</strong>er<br />
Wizard.<br />
2. Read, follow the instructions, and click OK in the Setup message window.<br />
3. Select the port with the printer you connect and click<br />
Add in the <strong>Print</strong>er Select screen. When the AddPort<br />
screen shows, write down the port name ( such as<br />
PSFF0091_P1).<br />
<strong>Print</strong>er port name: _____________________________.<br />
4. Select the printer manufacturer on the left and the model<br />
on the right or, if you need to install the printer driver,<br />
click Have Disk and follow the instructions.<br />
5. Click Next and select the print server in the<br />
Available ports list. This should match the port<br />
name from step 3. Then click Next.<br />
Note: Do NOT select the default port “LPT1.”<br />
6. Type a name for this printer and determine<br />
whether you want this as the default printer.<br />
7. Select Yes when asked about printing a test page.<br />
8. Click Finish.<br />
If you cannot print the test page, go to Troubleshooting on page 9.<br />
If you successfully printed the test page, you can configure other computers to access this<br />
printer by repeating procedure 4 on each computer.<br />
8
Troubleshooting<br />
The LINK light is not lit<br />
The print server has no power.<br />
• Make sure the power adapter is properly connected to the print server.<br />
• Make sure the power adapter is properly connected to a functioning power outlet. If it is<br />
in a power strip, make sure the power strip is turned on. If it is plugged directly into the<br />
wall, verify that it is not a switched outlet.<br />
• Make sure you are using the correct NETGEAR power adapter supplied with your<br />
print server.<br />
The printer is not on or there is a connection problem.<br />
• Make sure the printer is turned on.<br />
• Make sure the connector is securely plugged in at the print server and the printer.<br />
There is a network hardware connection problem.<br />
• Make sure the connectors are securely plugged in at the print server and the network<br />
device (hub, switch, or router).<br />
• Make sure the network device is turned on.<br />
• Be sure the correct cable is used. In most instances, use a Category 3 (or higher) Ethernet<br />
patch cable. If the network device has Auto Uplink (MDI/MDIX) ports, you may use a<br />
cross-over cable.<br />
The ALERT light is lit.<br />
• Turn the printer off and unplug the print server’s power adapter. Turn the printer on and<br />
then plug in the print server’s power adapter.<br />
• Contact NETGEAR if this doesn’t solve the problem.<br />
9
I can not print from my computer<br />
• You may not have selected the correct printer in the <strong>Print</strong> dialog box.<br />
• You may not have configured the computer to work with the print server. Go through<br />
procedure 4 on page 6 for each computer that will use the print server.<br />
• The computer may not be communicating to the print server. To test for printing directly<br />
from the print server:<br />
1. Open a browser and go to the IP address for the print server. (For example, type<br />
http://192.168.0.150 and click Go.)<br />
Note: If you do not know the IP address, you use the NETGEAR <strong>Print</strong> <strong>Server</strong><br />
Administration program. Click Start. Point to Programs and click NETGEAR <strong>Print</strong><br />
<strong>Server</strong>>NETGEAR <strong>Print</strong> <strong>Server</strong> Administration. The Reference Manual on the<br />
Resource CD has full instructions.<br />
2. Click <strong>Print</strong>er Ports on the left.<br />
3. Click <strong>Print</strong> Test Page.<br />
4. After the test page prints, click Logout.<br />
5. Click Yes (or OK) if asked about closing the browser window.<br />
Could print previously but can no longer print from<br />
my computer<br />
• If the print server is set up to ‘obtain IP address automatically’, the IP address may have<br />
changed. Restart your computer. You may also use the IP Setup program on the<br />
administrative computer to assign a fixed IP address to the print server. Click Start. Point<br />
to Programs and click NETGEAR <strong>Print</strong> <strong>Server</strong>>IPSetup.<br />
• The print server may be overheated. Unplug the power adapter and then plug it in again.<br />
Remove any paper or other material that may be restricting ventilation. Lower the<br />
temperature in the surrounding environment.<br />
10
Glossary of Terms<br />
Category 3 (CAT3): A twisted pair cable that meets specified requirements for 10 Mbps<br />
networking up to 328 ft. (100m).<br />
Category 5 (CAT5): A shielded twisted pair cable that meets requirements for 10 and 100 Mbps<br />
networking up to 328 ft. (100m).<br />
Local Area Network (LAN): A communications network within a limited area, such as one<br />
building.<br />
TCP/IP: Transfer Control Protocol (TCP) with Internet Protocol (IP). The main<br />
internetworking protocol used in the Internet.<br />
<strong>Mini</strong> <strong>Print</strong> <strong>Server</strong> System Requirements<br />
• Windows 95 OSR2, 98, Me, NT 4.x, 2000, XP<br />
• A printer with a Centronics parallel port<br />
• Network software<br />
11
<strong>Mini</strong> <strong>Print</strong> <strong>Server</strong> Specifications<br />
Network Protocols: IEEE 802.3i, 10BASE-T CSMA/CD Interface, NetBEUI and TCP/IP<br />
Electromagnetic Emissions: CE mark, commercial; FCC Part 15, Class A; EN 55 022<br />
(CISPR 22), Class A; VCCI Class A ITE; EN50082-1, C-Tick N10947<br />
Safety Agency Approvals: CE mark, commercial, UL listed, CSA certified, TUV licensed, T-Mark<br />
Dimensions Width 1.3 in. (6.2 cm)<br />
Height 0.8 in. (2.0 cm)<br />
Depth 2.3 in. (6.0 cm)<br />
Weight 0.4 lb. (0.1 kg)<br />
Status LEDs Link and Alert lights<br />
Power Adapter 9 V DC, 0.50A (customized power plug for individual countries)<br />
Environmental Specifications<br />
Operating temperature 32˚ to 104˚ F (0˚ to 40˚ C)<br />
Operating humidity 10 to 90%, noncondensing<br />
Warranty Limited 2-year warranty<br />
12
Statement of Conditions<br />
In the interest of improving internal design, operational function, and/or reliability, NETGEAR reserves the right to<br />
make changes to the products described in this document without notice. NETGEAR does not assume any liability<br />
that may occur due to the use or application of the product(s) or circuit layout(s) described herein.<br />
Certificate of the Manufacturer/Importer<br />
It is hereby certified that the Model <strong>PS101</strong> <strong>Mini</strong> <strong>Print</strong> <strong>Server</strong> has been suppressed in accordance with the conditions set<br />
out in the BMPT-AmtsblVfg 243/1991 and Vfg 46/1992.The operation of some equipment (for example, test<br />
transmitters) in accordance with the regulations may, however, be subject to certain restrictions. Please refer to the<br />
notes in the operating instructions. Federal Office for Telecommunications Approvals has been notified of the placing<br />
of this equipment on the market and has been granted the right to test the series for compliance with the regulations.<br />
VCCI Statement<br />
This equipment is in the Class A category (information equipment to be used in a residential area or an adjacent area<br />
thereto) and conforms to the standards set by the Voluntary Control Council for Interference by Data Processing<br />
Equipment and Electronic Office Machines aimed at preventing radio interference in such residential areas. When used<br />
near a radio or TV receiver, it may become the cause of radio interference. Read instructions for correct handling.<br />
Federal Communications Commission (FCC) Compliance Notice: Radio Frequency Notice<br />
This device complies with part 15 of the FCC Rules. Operation is subject to the following two conditions:<br />
1. This device may not cause harmful interference.<br />
2. This device must accept any interference received, including interference that may cause undesired operation.<br />
Note: This equipment has been tested and found to comply with the limits for a Class A digital<br />
device, pursuant to part 15 of the FCC Rules. These limits are designed to provide reasonable<br />
protection against harmful interference in a residential installation. This equipment generates,<br />
uses, and can radiate radio frequency energy and, if not installed and used in accordance with<br />
the instructions, may cause harmful interference to radio communications. However, there is<br />
no guarantee that interference will not occur in a particular installation. If this equipment does<br />
cause harmful interference to radio or television reception, which can be determined by<br />
turning the equipment off and on, the user is encouraged to try to correct the interference by<br />
one or more of the following measures: (1) Reorient or relocate the receiving antenna, (2)<br />
Increase the separation between the equipment and receiver, (3) Connect the equipment into<br />
an outlet on a circuit different from that to which the receiver is connected, (4) Consult the<br />
dealer or an experienced radio/TV technician for help.<br />
EN 55 022 Statement<br />
This is to certify that the Model <strong>PS101</strong> <strong>Mini</strong> <strong>Print</strong> <strong>Server</strong> is shielded against the generation of radio interference in<br />
accordance with the application of Council Directive 89/336/EEC, Article 4a. Conformity is declared by the<br />
application of EN 55 022 Class A (CISPR 22). Compliance is dependent upon the use of shielded data cables.<br />
Canadian Department of Communications Radio Interference Regulations<br />
This digital apparatus (Model <strong>PS101</strong> <strong>Mini</strong> <strong>Print</strong> <strong>Server</strong>) does not exceed the Class A limits for radio-noise emissions<br />
from digital apparatus as set out in the Radio Interference Regulations of the Canadian Department of<br />
Communications.<br />
Règlement sur le brouillage radioélectrique du ministère des Communications<br />
Cet appareil numérique (Model <strong>PS101</strong> <strong>Mini</strong> <strong>Print</strong> <strong>Server</strong>) respecte les limites de bruits radioélectriques visant les<br />
appareils numériques de classe A prescrites dans le Règlement sur le brouillage radioélectrique du ministère des<br />
Communications du Canada.<br />
April 2002 13