- Page 1 and 2:
DocumentCentre C400/320/240 Series
- Page 3 and 4:
Preface Thank you for purchasing th
- Page 5 and 6:
Chapter 3 Basic Printing 3.1 Flow o
- Page 7 and 8:
1.4 Configuring for Using Mailbox..
- Page 9 and 10:
Part 3 Appendix Appendix A Main Spe
- Page 11 and 12:
Using This Guide This section descr
- Page 13 and 14:
Conventions 1 In this guide, host m
- Page 15 and 16:
Switching Off Others ● When the p
- Page 17 and 18:
1Setting Printer Environment 1.1 Pr
- Page 19 and 20:
1.1.2 As Network Printer Windows ne
- Page 21 and 22:
Internet printing 1.1 Printer Envir
- Page 23 and 24:
Token Ring (option) 1.1 Printer Env
- Page 25 and 26:
1.2 Connecting Interface Cable ●
- Page 27 and 28:
1.3 Setting IP Address This section
- Page 29 and 30:
3 Select System Settings. System Se
- Page 31 and 32:
1.3 Setting IP Address 9 Enter the
- Page 33 and 34:
1.4 Setting Port If the System Admi
- Page 35 and 36:
9 Select Enable and then Save. 1. L
- Page 37 and 38:
PCL memory 1.5 Memory Allocation Th
- Page 39 and 40:
2Setting up Network 2.1 Windows Net
- Page 41 and 42:
2.1.2 Setting Procedure Procedure T
- Page 43 and 44:
2.2.2 Setting Procedure Procedure T
- Page 45 and 46:
2.3.2 Setting Procedure Procedure T
- Page 47 and 48:
2.4 NetWare The network system kit
- Page 49 and 50:
Basic Printing 3 36 3.1 Flow of Pri
- Page 51 and 52:
Basic Printing 3 38 3.2 About Paper
- Page 53 and 54:
Basic Printing 3 40 3.2 About Paper
- Page 55 and 56:
Basic Printing 3 42 3.2 About Paper
- Page 57 and 58:
Basic Printing 3 44 3.2 About Paper
- Page 59 and 60:
Basic Printing 3 46 3.3 This sectio
- Page 61 and 62:
Basic Printing 3 48 3.3 Printing Fe
- Page 63 and 64:
Basic Printing 3 50 3.4 Installing/
- Page 65 and 66:
Basic Printing 3 52 3.4 Installing/
- Page 67 and 68:
Basic Printing 3 54 3.4 Installing/
- Page 69 and 70:
Basic Printing 3 56 3.5 Switching P
- Page 71 and 72:
Basic Printing 3 58 3.6 Canceling P
- Page 73 and 74:
Basic Printing 3 60 3.6 Canceling P
- Page 75 and 76:
Basic Printing 3 62 3.6 Canceling P
- Page 77 and 78:
Special Printing 4 64 4.1 Printing
- Page 79 and 80:
Special Printing 4 66 4.2 Printing
- Page 81 and 82:
Special Printing 4 68 4.2 Printing
- Page 83 and 84:
Special Printing 4 70 4.3 Secure Pr
- Page 85 and 86:
Special Printing 4 72 4.3 Secure Pr
- Page 87 and 88:
Special Printing 4 74 4.3 Secure Pr
- Page 89 and 90:
Special Printing 4 76 4.3 Secure Pr
- Page 91 and 92:
Special Printing 4 78 4.4 Sample Pr
- Page 93 and 94:
Special Printing 4 80 4.4 Sample Pr
- Page 95 and 96:
Special Printing 4 82 4.4 Sample Pr
- Page 97 and 98:
Special Printing 4 84 4.5 Delayed P
- Page 99 and 100:
Special Printing 4 86 4.5 Delayed P
- Page 101 and 102:
Special Printing 4 88 4.5 Delayed P
- Page 103 and 104:
Special Printing 4 90 4.6 Expanding
- Page 105 and 106:
Special Printing 4 92 4.7 E-mail Pr
- Page 107 and 108:
Special Printing 4 94 4.7 E-mail Pr
- Page 109 and 110:
Special Printing 4 96 4.7 E-mail Pr
- Page 111 and 112:
Special Printing 4 98 4.8 Notify Jo
- Page 113 and 114:
Special Printing 4 100 4.8 Notify J
- Page 115 and 116:
Special Printing 4 102 4.10 File Up
- Page 117 and 118:
5Configuring From Computer (CentreW
- Page 119 and 120:
5.1.2 Structure Screen 5.1 About Ce
- Page 121 and 122:
5.1.4 Target OS and Browsers 5.1 Ab
- Page 123 and 124:
5.2.3 Proxy Server and Port Number
- Page 125 and 126:
5.4 Activating This section describ
- Page 127 and 128:
Part 2 Scanner
- Page 129 and 130:
Setting Scanner Environment 118 1 1
- Page 131 and 132: Setting Scanner Environment 120 1 1
- Page 133 and 134: Setting Scanner Environment 122 1 1
- Page 135 and 136: Setting Scanner Environment 1 124 1
- Page 137 and 138: Setting Scanner Environment 1 126 1
- Page 139 and 140: Setting Scanner Environment 1 128 1
- Page 141 and 142: Setting Scanner Environment 1 130 1
- Page 143 and 144: Setting Scanner Environment 1 132 1
- Page 145 and 146: Setting Scanner Environment 1 134 1
- Page 147 and 148: Setting Scanner Environment 1 136 1
- Page 149 and 150: Setting Scanner Environment 138 1 1
- Page 151 and 152: Setting Scanner Environment 1 140 1
- Page 153 and 154: Setting Scanner Environment 1 142 1
- Page 155 and 156: Documents for Scanning 144 2 2.1 Ab
- Page 157 and 158: 146 2.1 About Documents Documents f
- Page 159 and 160: Documents for Scanning 2 148 2.2 Lo
- Page 161 and 162: Documents for Scanning 2 150 2.2 Lo
- Page 163 and 164: 3Scanning With Mailbox 3.1 How to S
- Page 165 and 166: 3.1 How to Scan 4 Select the mailbo
- Page 167 and 168: Canceling scan jobs in this machine
- Page 169 and 170: 3.2 Canceling Scanning/Checking Job
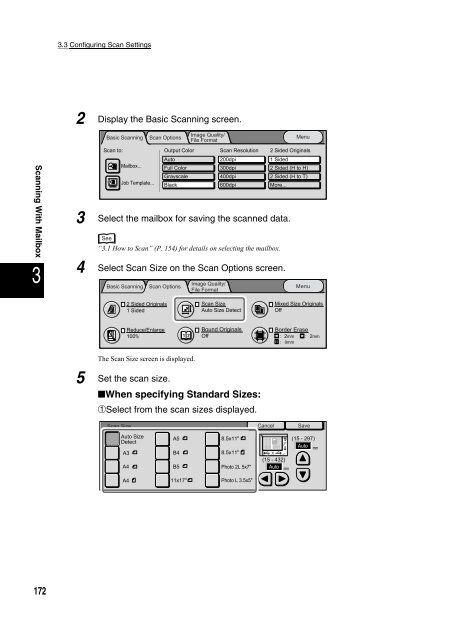
- Page 171 and 172: Procedure 1 Load the document to be
- Page 173 and 174: 3.3 Configuring Scan Settings 4 Sel
- Page 175 and 176: 3.3 Configuring Scan Settings ● S
- Page 177 and 178: Procedure 1 Load the document to be
- Page 179 and 180: Procedure 1 Load documents in the H
- Page 181: 3.3 Configuring Scan Settings 9 If
- Page 185 and 186: 4 Select Reduce/Enlarge on the Scan
- Page 187 and 188: 3.3.8 Bound Originals Procedure 3.3
- Page 189 and 190: 3.3 Configuring Scan Settings 5 Che
- Page 191 and 192: 1 Load the document to be scanned.
- Page 193 and 194: 3.3.10 Original Type Procedure 3.3
- Page 195 and 196: 3.3.11 Lighter/Darker/Contrast Proc
- Page 197 and 198: 3.3 Configuring Scan Settings 8 Pre
- Page 199 and 200: 3.3.13 Image Compression Procedure
- Page 201 and 202: 3.3.14 File Format You can set the
- Page 203 and 204: 3.3 Configuring Scan Settings 6 Aft
- Page 205 and 206: 3.4 Importing Scanned Data to Compu
- Page 207 and 208: 3.4 Importing Scanned Data to Compu
- Page 209 and 210: 3.4 Importing Scanned Data to Compu
- Page 211 and 212: 3.4 Importing Scanned Data to Compu
- Page 213 and 214: 3.5 Checking/Deleting Scanned Data
- Page 215 and 216: 3.5 Checking/Deleting Scanned Data
- Page 217 and 218: 3.5 Checking/Deleting Scanned Data
- Page 219 and 220: 3.6 Changing Network Scanner Utilit
- Page 221 and 222: 3.6 Changing Network Scanner Utilit
- Page 223 and 224: Import Settings Configures how to i
- Page 225 and 226: 4Scanning With Job Template 4.1 How
- Page 227 and 228: 2 Display the Basic Scanning screen
- Page 229 and 230: 5E-mail Scanning 5.1 Scanning Docum
- Page 231 and 232: 3 Under Save to, select E-mail. Bas
- Page 233 and 234:
5.1.3 Registering Dial Directory Re
- Page 235 and 236:
Changing/Deleting the registered co
- Page 237 and 238:
5.1 Scanning Document to Send as E-
- Page 239 and 240:
1Appendix A Main Specifications ...
- Page 241 and 242:
A.2 Printable Area The print area w
- Page 243 and 244:
Garamond Hlb Times Bd ITC A G Go Bk
- Page 245 and 246:
C Precautions/Limitations C.1 SMB T
- Page 247 and 248:
C.2 TCP/IP (LPD) The precautions/li
- Page 249 and 250:
C.3 NetWare The precautions/limitat
- Page 251 and 252:
Print control time C Precautions/Li
- Page 253 and 254:
Restriction on scanning capacity C
- Page 255 and 256:
D.2 Cannot Print D Troubleshooting
- Page 257 and 258:
E Troubleshooting When Using TCP/IP
- Page 259 and 260:
F Troubleshooting When Using NetWar
- Page 261 and 262:
The number of paper definition spec
- Page 263 and 264:
F.4 No Notification F Troubleshooti
- Page 265 and 266:
H Automatic Gradation Adjustment Wh
- Page 267 and 268:
Receive buffer Buffer is the locati
- Page 269 and 270:
I wish to print with the same image
- Page 271 and 272:
Index Numerics 100Base-TX..........
- Page 273 and 274:
Stroke fonts.......................
- Page 275:
DocumentCentre C400/320/240 Series