QuickSetupGuide English - Onkyo
QuickSetupGuide English - Onkyo
QuickSetupGuide English - Onkyo
Create successful ePaper yourself
Turn your PDF publications into a flip-book with our unique Google optimized e-Paper software.
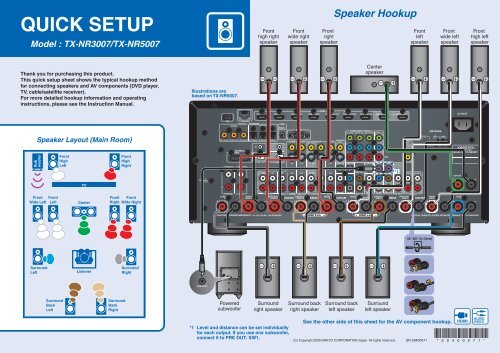
QUICK SETUP<br />
Model : TX-NR3007/TX-NR5007<br />
Thank you for purchasing this product.<br />
This quick setup sheet shows the typical hookup method<br />
for connecting speakers and AV components (DVD player,<br />
TV, cable/satellite receiver).<br />
For more detailed hookup information and operating<br />
instructions, please see the Instruction Manual.<br />
Sub<br />
woofer<br />
Speaker Layout (Main Room)<br />
Front<br />
Wide Left<br />
Surround<br />
Left<br />
Front<br />
Left<br />
Front<br />
High<br />
Left<br />
Surround<br />
Back<br />
Left<br />
TV<br />
Center<br />
Listener<br />
Front<br />
Right<br />
Surround<br />
Back<br />
Right<br />
Front<br />
High<br />
Right<br />
Front<br />
Wide Right<br />
Surround<br />
Right<br />
Illustrations are<br />
based on TX-NR5007.<br />
Powered<br />
subwoofer<br />
Front<br />
high right<br />
speaker<br />
Surround<br />
right speaker<br />
*1 Level and distance can be set individually<br />
for each output. If you use one subwoofer,<br />
connect it to PRE OUT: SW1.<br />
Front<br />
wide right<br />
speaker<br />
Surround back<br />
right speaker<br />
Front<br />
right<br />
speaker<br />
Speaker Hookup<br />
Surround back<br />
left speaker<br />
Center<br />
speaker<br />
Surround<br />
left speaker<br />
(C) Copyright 2009 ONKYO CORPORATION Japan. All rights reserved.<br />
*1<br />
Front<br />
left<br />
speaker<br />
1/2''-5/8'' (12-15mm)<br />
SN 29400071<br />
Front<br />
wide left<br />
speaker<br />
See the other side of this sheet for the AV component hookup.<br />
Front<br />
high left<br />
speaker<br />
* 2 9 4 0 0 0 7 1 *
AV Component Hookup<br />
With an HDMI cable you can send both audio and video with a single cable,<br />
making connecting simple and keeping wires neat.<br />
If you have an HDMI-compatible TV and players, you can connect them<br />
to the AV receiver with HDMI cables. Digital audio signals received<br />
at HDMI IN input are output to the speakers and headphones connected<br />
to the AV receiver.<br />
HDMI<br />
OUT<br />
Using the HDMI Inputs<br />
Illustrations are<br />
based on TX-NR5007.<br />
If there’s no picture on your TV, you’ll need to<br />
assign the HDMI inputs as necessary using the<br />
onscreen setup menus.<br />
If you connect your DVD/BD player to the AV<br />
receiver’s HDMI IN 1, and connect your cable<br />
or satellite receiver to HDMI IN 3, as shown,<br />
it’s not necessary to change the default<br />
assignments.<br />
HDMI<br />
OUT<br />
HDMI<br />
IN<br />
TV<br />
DVD/BD player<br />
Coaxial feed from<br />
TV antenna<br />
If you are not using<br />
cable/satellite box,<br />
please refer to the<br />
instruction manual.<br />
IF NO HDMI<br />
Cable/satellite Antenna input<br />
(e.g., RF IN)<br />
COAXIAL<br />
DIGITAL VIDEO<br />
OUT OUT<br />
DIGITAL<br />
OUT<br />
COAXIAL L<br />
R<br />
AUDIO<br />
OUT<br />
VIDEO<br />
OUT<br />
See the other side of this sheet for the speaker hookup.<br />
If your TV or player doesn’t support HDMI, use the analog or digital<br />
connections shown below.<br />
DVD player<br />
AUDIO<br />
OUT<br />
Using the Digital Inputs<br />
If there’s no sound, you’ll need to assign<br />
the digital inputs as necessary.<br />
If you connect your DVD player to the<br />
AV receiver’s DIGITAL COAXIAL IN 1,<br />
and connect your cable/satellite receiver<br />
to the DIGITAL COAXIAL IN 3, as shown,<br />
it’s not necessary to change the default<br />
assignments.<br />
If there’s no picture on your TV, set the<br />
“Monitor Out” setting to “Analog” by<br />
pressing the [MONITOR OUT] button first.<br />
L<br />
R<br />
Cable/<br />
satellite<br />
Antenna input<br />
(e.g..RF IN)<br />
Menu<br />
On the front panel On the front panel<br />
1. Input/Output Assign<br />
2. Speaker Setup<br />
3. Audio Adjust<br />
4. Source Setup<br />
5. Listening Mode Preset<br />
6. Miscellaneous<br />
7. Hardware Setup<br />
8. Remote Controller Setup<br />
9. Lock Setup<br />
1. Input/Output Assign<br />
1. Monitor Out<br />
2. HDMI Input<br />
3. Component Video Input<br />
4. Digital Audio Input<br />
1–2. HDMI Input<br />
DVD/BD<br />
VCR/DVR<br />
CBL/SAT<br />
GAME<br />
AUX1<br />
HDMI1<br />
HDMI2<br />
HDMI3<br />
HDMI4<br />
FRONT<br />
VIDEO 1<br />
IN<br />
TV<br />
Please ensure the monitor input<br />
(VIDEO 1, VIDEO 2, VIDEO 3, etc.)<br />
selected corresponds to actual<br />
connection used.<br />
Illustrations are<br />
based on TX-NR5007.<br />
Coaxial feed from<br />
TV antenna<br />
If you are not using<br />
cable/satellite box,<br />
please refer to the<br />
instruction manual.<br />
Menu<br />
1. Input/Output Assign<br />
2. Speaker Setup<br />
3. Audio Adjust<br />
4. Source Setup<br />
5. Listening Mode Preset<br />
6. Miscellaneous<br />
7. Hardware Setup<br />
8. Remote Controller Setup<br />
9. Lock Setup<br />
1. Input/Output Assign<br />
1. Monitor Out<br />
2. HDMI Input<br />
3. Component Video Input<br />
4. Digital Audio Input<br />
5. Analog Audio Input<br />
1–4. Digital Audio Input<br />
DVD/BD<br />
VCR/DVR<br />
CBL/SAT<br />
GAME<br />
AUX1<br />
COAX 1<br />
COAX 2<br />
COAX 3<br />
OPT 1<br />
FRONT


