Hi-Speed USB AnAlog TV/FM RAdio STick USeR MAnUAl - Manhattan
Hi-Speed USB AnAlog TV/FM RAdio STick USeR MAnUAl - Manhattan
Hi-Speed USB AnAlog TV/FM RAdio STick USeR MAnUAl - Manhattan

You also want an ePaper? Increase the reach of your titles
YUMPU automatically turns print PDFs into web optimized ePapers that Google loves.
<strong>Hi</strong>-<strong>Speed</strong> <strong>USB</strong><br />
<strong>AnAlog</strong> <strong>TV</strong>/<strong>FM</strong><br />
<strong>RAdio</strong> <strong>STick</strong><br />
<strong>USeR</strong><br />
<strong>MAnUAl</strong><br />
Model 161251<br />
MAN-161251-UM-0910-01
inTRodUcTion<br />
Thank you for purchasing the MANHATTAN ® <strong>Hi</strong>-<strong>Speed</strong> <strong>USB</strong> Analog <strong>TV</strong>/<strong>FM</strong> Radio<br />
Stick, Model 1612512.<br />
This device supports most worldwide analog television formats and <strong>FM</strong> radio to<br />
notebook and desktop computers, allowing you to transform your computer into<br />
a multimedia center. Advanced features like Multi-Channel Preview and digital<br />
Personal Video Recording capture and directly save programs to the hard drive<br />
for replay or transfer to Cd and other portable media devices. electronic Program<br />
Guide (ePG) lets you browse program summaries, conduct channel and program<br />
searches, schedule reminders and more. Using time-shifting capability, you can<br />
replay favorite scenes, skip annoying advertising and apply pause/rewind/fast<br />
forward control with live video and recorded programs.<br />
And a simple <strong>USB</strong> connection and Plug and Play capability make it easy to install<br />
and ready to use so you can enjoy favorite television and radio programs almost<br />
anywhere!<br />
By following the instructions in this user manual — or the simpler setup procedure<br />
in the printed quick install guide included with the product — you’ll soon be enjoying<br />
these additional features:<br />
• Compact design enables clear, crisp reception almost anywhere — no external<br />
power required<br />
• Automatic channel scanning; customizable favorites<br />
• Windows compatible<br />
• Lifetime Warranty (For a complete list of country-specific warranties, go to<br />
www.manhattan-products.com/warranty.)<br />
NOTE: Some screen images have been modified to fit the format of this manual;<br />
some screen images may vary in appearance depending on the operating system.<br />
Package Contents<br />
• <strong>Hi</strong>-<strong>Speed</strong> <strong>USB</strong> Analog <strong>TV</strong>/<strong>FM</strong> Radio Stick<br />
• <strong>USB</strong> extension cable<br />
• Remote control (CR 2025 battery included)<br />
• Quick install guide and software/driver CD<br />
System Requirements<br />
• Pentium 4 2.4 GHz, 256 MB RAM and 30 MB HDD space recommended<br />
• DirectX 9.0 or above<br />
• VGA graphics with overlay support<br />
• Windows XP SP2, Vista or 7<br />
2
HARdwARe inSTAllATion<br />
1. Connect the analog input jack to the analog source.<br />
Analog input<br />
2. With the protective cap removed from the<br />
Analog Stick, plug the <strong>USB</strong> connector<br />
into a <strong>USB</strong> port on the PC — directly<br />
or by using the included <strong>USB</strong> extension<br />
cable. Windows will identify the device<br />
and automatically launch the New<br />
Hardware Device wizard.<br />
<strong>USB</strong> connector<br />
Protective cap<br />
3. When prompted, click “Cancel” to complete the Hardware Installation procedure.<br />
3
SoFTwARe And dRiVeR inSTAllATion<br />
1. Insert the Software/Driver CD. Windows should run the setup program<br />
automatically; if it doesn’t, browse to the CD and select “<strong>USB</strong>_<strong>TV</strong>_Stick.exe.”<br />
2. Choose the setup language.<br />
3. When prompted to install Windows Media Format9, click “Yes.”<br />
4. Click “Next” to run the InstallShield wizard.<br />
5. Choose the installation path by selecting “Browse,” or click “Next” to use the<br />
recommended default path.<br />
6. Choose the components to install and click “Next.”<br />
7. If the device isn’t already plugged into the PC, plug it in now.<br />
8. Click “Install” to continue to install the drivers.<br />
9. At the next prompts, select “Continue Anyway.”<br />
4
10. Select “Finish” to complete the driver installation. Icons for MYGICA <strong>TV</strong><br />
and <strong>FM</strong> radio will display on the Windows desktop.<br />
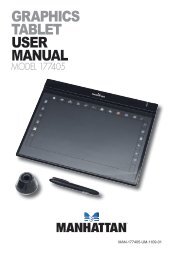
<strong>TV</strong> inTeRFAce<br />
Click on the <strong>TV</strong> icon on the desktop to display the on-screen controls described<br />
below. See the Remote Control section for a separate list of functions and their<br />
controls.<br />
1. Record<br />
2. Play<br />
3. Pause<br />
4. Stop<br />
5. Reverse<br />
6. Fast forward<br />
7. Hue<br />
8. Status window<br />
9. Minimize<br />
funCtion SetuP<br />
10. Full-screen window &<br />
video desktop switch<br />
11. Exit<br />
12. Channel up<br />
13. Channel down<br />
14. TAB/Back to<br />
previous channel<br />
15. 10 channels<br />
16. Numeric keys<br />
17. Time-shift<br />
18. Switch to/from stereo<br />
19. TeleText<br />
20. Shift video source<br />
21. Open recorded file<br />
22. Search (Auto-scan)<br />
23. Radio (switch to <strong>FM</strong>)<br />
24. 16-channel preview<br />
25. Setup menu<br />
26. Snap shot<br />
27. Schedule recording<br />
28. M ute<br />
29. Volume down<br />
30. Volume up<br />
Click on the Setup button (#25 above) to change settings for any of the functions.<br />
Channel edit<br />
Click on the Channel edit tab (see image below) to change the channel list so<br />
that favorites are easier to find and access. Before editing the list, select your<br />
country in the “Region” window.<br />
Click “Auto Scan” to automatically scan all the channels available in your area.<br />
NOTE: The volume is muted during a channel scan.<br />
To rename a channel:<br />
1. Click on a channel to highlight it.<br />
2. Right-click to enable the name change.<br />
3. Enter the new name in the “Name” window.<br />
4. Re-position the channel as desired using the “Up” and “Down” buttons.<br />
5
To fine tune a channel:<br />
1. Click on a channel to highlight it.<br />
2. Slide the Fine Tune control left or right to adjust. NOTE: Normally, the program<br />
automatically provides the best quality possible.<br />
To activate or skip a channel:<br />
1. Click on a channel to highlight it.<br />
2. Click the box in the “Index” column (as shown in the screen image above) to<br />
keep the channel on the active list; click a box with a check mark (thereby<br />
removing the check mark) to skip that channel in the list.<br />
To add a channel:<br />
1. Click the “Add” button.<br />
2. enter a name and frequency.<br />
3. Click “OK.”<br />
6<br />
Auto Scan
Color/image Control<br />
Click on the Video ProcAmp tab to adjust the settings for Brightness, Contrast, Hue,<br />
Saturation and Sharpness. Simply click on the slider control and move it left or<br />
right to suit your preferences. Click “Default” to return to the original settings.<br />
NOTE: If the <strong>TV</strong> screen goes blank or black during an adjustment, click “Default.”<br />
Recording options<br />
Click on the Record tab to select a recording format: DVD, VCD, SVCD, MPEG4,<br />
AVI, WMV, MP3 or WMA.<br />
7
NOTE: <strong>TV</strong> standards and their control vary by country/region.<br />
NTSC (National Television Systems Committee): America, Taiwan, Canada,<br />
Japan and Central and South America.<br />
PAl (Phase Alteration line): europe, China, Central Africa, Australia and South<br />
Africa. SeCAM: France, Africa and the Middle east.<br />
The recording size can be from 352 x 240 to 720 x 480 (NTSC) or 352 x 288 to<br />
720 x 576 (PAL). Keep in mind that larger audio and video bit rates use more disk<br />
space, but provide better audio and video quality. If space is limited, therefore,<br />
adjust the recording setting as needed to save longer programs with high-quality<br />
images.<br />
Path Setting<br />
Click on the Directory Setting tab to save still images or video files. Then, to<br />
check/confirm their path, click on the adjacent “Browse” button.<br />
Right-Click options<br />
other options and menu access routes are available by right-clicking, which displays<br />
a pop-up menu with the following selections.<br />
Always on top: Keeps the <strong>TV</strong> display on top of any others that are active.<br />
Display panel: displays or hides the software control panel.<br />
Full-screen mode: Enlarges the window to full-screen size. Double-clicking on the<br />
screen returns the image to window mode.<br />
8
Desktop mode: displays the <strong>TV</strong> image on the computer desktop.<br />
Video input: Presents three options: <strong>TV</strong> Tuner (default), Composite and S-video.<br />
Video standard: Changes the video format to PAl/NTSC/SeCAM. The default is<br />
PAL-BDGHI.<br />
Color adjust: Adjusts the color and brightness.<br />
Capture: Takes a single-frame snapshot. The default format saves the image as a<br />
.bmp file.<br />
Channel list: lets you edit the channels. For details, see Channel edit above.<br />
Directory setting: lets you select which directory to save recordings and images<br />
to. For details, see Path Setting above.<br />
About: Shows the program version and copyright information.<br />
Exit: Exits the program.<br />
ReCoRDinG & PLAYBACK<br />
This device supports MPeG-1 and MPeG-2 formats. To record while watching a<br />
<strong>TV</strong> program, click on the “Record” button (see Page 5). To stop recording, click<br />
on “Record” again. Name the file or default save. The status panel will show realtime<br />
recording information (and will shield some information).<br />
Recording file Space Requirements<br />
Space required for recording depends on the format, as shown below. NOTE:<br />
Recording a dVd requires much more space than a VCd does, but it doesn’t mean<br />
the dVd’s quality will be better. Recording a super video Cd (SVCd) provides the<br />
same quality as a dVd and is good enough for recording since the quality of a<br />
normal <strong>TV</strong> signal doesn’t have the same definition as DVD.<br />
Format Resolution Video bit rate Audio bit rate Disk space<br />
NTSC DVD 720 x 480 6 Mbps 224 Kbps 2.6 GB/hr<br />
NTSC SVCD 480 x 480 2.42 Mbps 224 Kbps 1 GB/hr<br />
NTSC VCD 320 x 240 1.15 Mbps 224 Kbps 600 MB/hr<br />
PAL DVD 720 x 576 6 Mbps 224 Kbps 2.6 GB/hr<br />
PAL SVCD 480 x 576 2.42 Mbps 224 Kbps 1 GB/hr<br />
PAL VCD 352 x 288 1.15 Mbps 224 Kbps 600 MB/hr<br />
AVI 352 x 288 224 Kbps<br />
MPEG-4 352 x 288 224 Kbps<br />
WMV 352 x 288 1.2 Mbps 224 Kbps About 650 MB/hr<br />
MP3 224 Kbps<br />
WMA 224 Kbps<br />
Schedule Recording<br />
You can also set the program to record in advance, specifying the channel to<br />
record; the time of day and the day of the week to begin recording; and the<br />
9
ecording duration period. Click “Schedule Recording” (see Page 5) to display the<br />
“Schedule” screen, which features the following options buttons.<br />
New: lets you add a new Schedule Recording task (details below).<br />
Modify: lets you make changes to a selected task.<br />
Delete: lets you delete the selected task.<br />
OK: Activates the status of all Schedule Recording tasks that’ve been entered.<br />
With the Add Task screen displayed, you have the following options.<br />
Task name: Asks that you enter an identifying name for the recording.<br />
Mode: Lets you select “Record” or “Watch Only.”<br />
Video input: Gives you the option of <strong>TV</strong> Tuner, Composite or S-Video.<br />
Channel: lets you select the channel you wish to watch or record.<br />
Duration time: Lets you enter the length of the task. (Minimum is 3 minutes;<br />
default is 30 minutes.)<br />
Click “Next” to display the Record Format screen. Choose DVD, VCD, SVCD,<br />
MPEG4, AVI, WMV, MP3 or WMA (see “Recording Options” on Page 7 for a similar<br />
screen display).<br />
10
Click “Next” to display the Time Setting screen, which presents these options.<br />
Only once: limits the task to a one-time recording.<br />
Every week: Repeatedly records each week as scheduled.<br />
Every day: Repeatedly records each day as scheduled.<br />
NOTE: Time of day is a 24-hour (vs. 12-hour) format.<br />
When finished, click “Next” to activate the Schedule Recording settings and display<br />
the After Task Completed screen. This presents three courses of action once the<br />
recording task is complete.<br />
Auto Shutdown: Turns off the power to the PC after recording.<br />
Exit Application: Exits the program, but doesn’t shut down the computer.<br />
Stay On: Keeps the software active and lets you continue watching <strong>TV</strong>.<br />
Click “Next” to display the Finish screen, then click “Finish.”<br />
NOTE: If the operating system displays<br />
the prompt shown at right, there is a<br />
conflict between two or more time<br />
settings. Click “OK,” then revise one or<br />
more of the time settings and follow the<br />
preceding prompts to the Finish screen.<br />
Video Playback<br />
To play a recorded file, click on the “Open recorded file” button (see Page 5) to<br />
access the file (in whichever folder it was saved to — see below). Double-click on<br />
the file, or highlight it and click “Open.” While the file plays, the control panel will<br />
display time information and the status of associated playback functions.<br />
11
Snapshot<br />
To capture a picture while watching <strong>TV</strong> (and save it as a .bmp file), click on the<br />
“Snapshot” button (see Page 5).<br />
Save the image when prompted,<br />
and double-click on the image to<br />
perform edits. If you don’t wish<br />
to save the image, click on “Delete.”<br />
tV Channel Preview<br />
Complete the channel scan before previewing. Most channel preview/selection<br />
functions are controlled with standard keys and buttons.<br />
To view the next or previous channel on the menu list while watching <strong>TV</strong>: Click<br />
on the Channel Up/Channel down buttons.<br />
To view a specific channel: Enter the channel number using the numeric keys.<br />
To return to the previous channel: Click on the “TAB” button.<br />
To preview 16 channels simultaneously: Click on the “16” button. To select one<br />
of these 16 channels for viewing, click on the channel image.<br />
time-Shifting<br />
Time-shift lets you skip commercials (not automatically, however), pause and replay<br />
while watching real-time <strong>TV</strong> — without interrupting any ongoing recording — by<br />
temporarily saving the “live” video to your hard disk for a specified period of time.<br />
In Time-shift, you are recording to and playing back from the same video file or<br />
buffer. You can play back from various locations in that buffer. As with video<br />
playback, you can pause, fast-forward and rewind. A major difference, however, is<br />
that the software is simultaneously recording real-time television while playing<br />
back from the buffer. NOTE: Time-shift can use a significant amount of disk space.<br />
There is greater CPU utilization during Time-shift because you are simultaneously<br />
recording and playing recorded videos. At full dVd quality, Time-shift can require<br />
up to a 1.7-GHz CPU.<br />
12
Click on the “Time-shift” button to active it (see Page 5). A time monitoring bar will<br />
appear, informing you how much of the Time-shift buffer is in use. You can also<br />
use your mouse to drag the Time Control Shuttle to jump to a specific time.<br />
To exit Time-shift, click on the “Stop” button (see Page 5).<br />
ReMoTe conTRol<br />
With the included CR2025 battery installed, press the<br />
Turn on/off button. (Replace battery as needed.)<br />
1. Mute<br />
2. Input source: <strong>TV</strong>,<br />
Composite, S-Video<br />
3. <strong>FM</strong>: Switch to <strong>FM</strong><br />
4. On/Off: <strong>FM</strong><br />
application software<br />
5. Single/double/<br />
triple digit<br />
<strong>FM</strong> inTeRFAce<br />
1. Click on the <strong>FM</strong> radio icon on the desktop to display<br />
the on-screen controls described below.<br />
1. Exit<br />
2. Minimize<br />
3. <strong>FM</strong> copyright<br />
4. Volume<br />
6. Snapshot: Take a<br />
picture of the on-<br />
screen image<br />
7. Full Screen/Restore:<br />
Switches between<br />
full & default screens<br />
8. Numeric keys<br />
9. Return to previous<br />
channel<br />
5. Record<br />
6. Mute<br />
7. Auto-scan<br />
channel<br />
10. Play, Record, Stop<br />
& Pause<br />
11. Volume Up/Down<br />
12. Channel Up/Down<br />
13. Reverse/Fast<br />
Forward<br />
8. Setup menu<br />
9. Shift to <strong>TV</strong><br />
10. Channel presets<br />
11. Back to preview<br />
channel<br />
12. Open file<br />
13. Play, Pause &<br />
Stop<br />
14. Channel display<br />
15. Next channel<br />
16. Previous<br />
channel<br />
13
SpeciFicATionS<br />
Standards and Certifications<br />
• CE<br />
• FCC<br />
• RoHS<br />
• WEEE<br />
• <strong>USB</strong> 2.0<br />
• Meets worldwide <strong>TV</strong> and PAL/SECAM/NTSC video standards<br />
input<br />
• Connection: <strong>TV</strong> cable with adapter<br />
• PAL/SECAM/NTSC video and <strong>FM</strong> radio standards<br />
• 125-channel support<br />
• S-video and AV-video image input<br />
• MPEG-1 or MPEG-2 capture format<br />
output<br />
• <strong>USB</strong> A-type male<br />
• MPEG-1/2/4, DVD, VCD, SVCD, AVI, WMV, MP3 and WMA (BMP for snapshot)<br />
• 10-bit GigaColor provides 8-, 9-, 10-bit colors<br />
• 30 fps @ 720 x 480 / 25 fps @ 720 x 576<br />
Physical<br />
• TM6010 chipset<br />
• Dimensions, overall: 8.5 x 2.9 x 1.5 cm (3.3 x 1.1 x 0.5 in.)<br />
• <strong>USB</strong> extension cable: 80 cm (31.5 in.)<br />
• Weight: 28 g (1 oz.)<br />
System Requirements<br />
• Pentium 4 2.4 GHz, 256 MB RAM and 30 MB HDD space recommended<br />
• DirectX 9.0 or above<br />
• VGA graphics with overlay support<br />
• Windows XP SP2/Vista/7<br />
Package Contents<br />
• <strong>Hi</strong>-<strong>Speed</strong> <strong>USB</strong> Analog <strong>TV</strong>/<strong>FM</strong> Radio Stick<br />
• <strong>USB</strong> extension cable<br />
• Remote control (CR 2025 battery included)<br />
• Quick install guide and software/driver CD<br />
14
feDeRAL CoMMuniCAtionS CoMMiSSion<br />
ReGuLAtoRY StAteMent<br />
fCC Class B<br />
This equipment has been tested and found to comply with the limits for a Class B<br />
digital device, pursuant to Part 15 of Federal Communications Commission (FCC)<br />
Rules. These limits are designed to provide reasonable protection against harmful<br />
interference in a residential installation. This equipment generates, uses and can<br />
radiate radio frequency energy, and if not installed and used in accordance with the<br />
instructions may cause harmful interference to radio communications. However,<br />
there is no guarantee that interference will not occur in a particular installation. If this<br />
equipment does cause harmful interference to radio or television reception, which<br />
can be determined by turning the equipment off and on, the user is encouraged to<br />
try to correct the interference by one or more of the following measures:<br />
• Reorient or relocate the receiving antenna.<br />
• Increase the separation between the equipment and the receiver.<br />
• Connect the equipment to an outlet on a circuit different from the receiver.<br />
• Consult the dealer or an experienced radio/<strong>TV</strong> technician for help.<br />
R&tte<br />
enGLiSh<br />
This device complies with the requirements of the R&TTe directive 1999/5/eC.<br />
DeutSCh<br />
dieses Gerät enspricht der direktive R&TTe direktive 1999/5/eC.<br />
eSPAñoL<br />
este dispositivo cumple con los requerimientos de la directiva R&TTe 1999/5/eC.<br />
fRAnçAiS<br />
Cet appareil satisfait aux exigences de la directive R&TTE 1999/5/CE.<br />
PoLSKi<br />
Urządzenie spełnia wymagania dyrektywy R&TTE 1999/5/EC.<br />
itALiAno<br />
Questo dispositivo è conforme alla Direttiva 1999/5/EC R&TTE.<br />
15
WASte eLeCtRiCAL & eLeCtRoniC eQuiPMent<br />
Disposal of electric and electronic equipment<br />
(applicable in the european union and other european countries with separate collection systems)<br />
ENGLISH<br />
This symbol on the product or its packaging indicates that this product shall not be<br />
treated as household waste. Instead, it should be taken to an applicable collection<br />
point for the recycling of electrical and electronic equipment. By ensuring<br />
this product is disposed of correctly, you will help prevent potential negative<br />
consequences to the environment and human health, which could otherwise<br />
becausedbyinappropriatewastehandlingofthisproduct.Ifyourequipment<br />
contains easily removable batteries or accumulators, dispose of these<br />
separately according to your local requirements. The recycling of materials will<br />
help to conserve natural resources. For more detailed information about recycling<br />
of this product, contact your local city office, your household waste disposal service or<br />
the shop where you purchased this product. In countries outside of the EU: If you wish<br />
to discard this product, contact your local authorities and ask for the correct manner<br />
of disposal.<br />
deUTSCH<br />
Dieses auf dem Produkt oder der Verpackung angebrachte Symbol zeigt an, dass<br />
dieses Produkt nicht mit dem Hausmüll entsorgt werden darf. In Übereinstimmung<br />
mit der Richtlinie 2002/96/eG des europäischen Parlaments und des Rates über<br />
Elektro- und Elektronik-Altgeräte (WEEE) darf dieses Elektrogerät nicht im normalen<br />
Hausmüll oder dem Gelben Sack entsorgt werden. Wenn Sie dieses Produkt entsorgen<br />
möchten, bringen Sie es bitte zur Verkaufsstelle zurück oder zum Recycling-<br />
Sammelpunkt Ihrer Gemeinde.<br />
eSPAñol<br />
este símbolo en el producto o su embalaje indica que el producto no debe tratarse<br />
como residuo doméstico. de conformidad con la directiva 2002/96/Ce de la Ue<br />
sobre residuos de aparatos eléctricos y electrónicos (RAee), este producto eléctrico<br />
no puede desecha se con el resto de residuos no clasificados. Deshágase de<br />
este producto devolviéndolo al punta de venta o a un punta de recogida municipal<br />
para su reciclaje.<br />
FRANçAIS<br />
Ce symbole sur Ie produit ou son emballage signifie que ce produit ne doitpas être<br />
traité comme un déchet ménager. Conformément à la directive 2002/96/eC sur les<br />
déchets d’équipements électriques et électroniques (deee), ce produit électrique ne<br />
doit en aucun cas être mis au rebut sous forme de déchet municipal non trié.Veuillez<br />
vous débarrasser de ce produit en Ie renvoyant à son point de vente ou au point de<br />
ramassage local dans votre municipalité, à des fins de recyclage.<br />
16
ITALIANO<br />
Questo simbolo sui prodotto o sulla relativa confezione indica che il prodotto non<br />
va trattato come un rifiuto domestico. In ottemperanza alla Direttiva UE 2002/96/EC<br />
sui rifiuti di apparecchiature elettriche ed elettroniche (RAEE), questa prodotto<br />
elettrico non deve essere smaltito come rifiuto municipale misto. Si prega di smaltire<br />
il prodotto riportandolo al punto vendita o al punto di raccolta municipale locale per<br />
un opportuno riciclaggio.<br />
POLSKI<br />
Jeśli na produkcie lub jego opakowaniu umieszczono ten symbol, wówczas w czasie<br />
utylizacji nie wolno wyrzucać tego produktu wraz z odpadami komunalnymi. Zgodnie z<br />
Dyrektywą Nr 2002/96/WE w sprawie zużytego sprzętu elektrycznego i elektronicznego<br />
(WEEE), niniejszego produktu elektrycznego nie wolno usuwać jako nie posortowanego<br />
odpadu komunalnego. Prosimy o usuniecie niniejszego produktu poprzez jego<br />
zwrot do punktu zakupu lub oddanie do miejscowego komunalnego punktu zbiórki<br />
odpadów przeznaczonych do recyklingu.<br />
17
18<br />
WARRAntY infoRMAtion<br />
ENGLISH: For warranty information, go to www.manhattan-products.com/warranty.<br />
deUTSCH: Garantieinformationen finden Sie unter www.manhattan-products.com/warranty.<br />
eSPAñol: Si desea obtener información sobre la garantía, visite www.manhattan-products.<br />
com/warranty.<br />
FRANçAIS: Pour consulter les informations sur la garantie, visitez www.manhattan-products.<br />
com/warranty.<br />
POLSKI: Informacje dotyczące gwarancji znajdują się na stronie www.manhattan-products.<br />
com/warranty.<br />
ITALIANO: Per informazioni sulla garanzia, accedere a www.manhattan-products.com/<br />
warranty.<br />
eN MéXICO: Poliza de Garantia MANHATTAN — Datos del importador y responsable<br />
ante el consumidor IC Intracom México, S.A. de C.V. •Av. Interceptor Poniente # 73, Col.<br />
Parque Industrial La Joya, Cuautitlan Izcalli, Estado de México, C.P. 54730, México. •<br />
Tel. (55)1500-4500<br />
la presente garantía cubre los siguientes productos contra cualquier defecto de<br />
fabricación en sus materiales y mano de obra.<br />
A. Garantizamos los productos de limpieza, aire comprimido y consumibles, por 60 dias<br />
a partir de la fecha de entrega, o por el tiempo en que se agote totalmente su<br />
contenido por su propia función de uso, lo que suceda primero.<br />
B. Garantizamos los productos con partes moviles por 3 años.<br />
C. Garantizamos los demas productos por 5 años (productos sin partes moviles),<br />
bajo las siguientes condiciones:<br />
1. Todos los productos a que se refiere esta garantía, ampara su cambio físico,<br />
sin ningún cargo para el consumidor.<br />
2. El comercializador no tiene talleres de servicio, debido a que los productos<br />
que se garantizan no cuentan con reparaciones, ni refacciones, ya que su<br />
garantía es de cambio físico.<br />
3. La garantía cubre exclusivamente aquellas partes, equipos o sub-ensambles<br />
que hayan sido instaladas defábrica y no incluye en ningún caso el equipo<br />
adicional o cualesquiera que hayan sido adicionados al mismo por el usuario<br />
o distribuidor.<br />
Para hacer efectiva esta garantía bastara con presentar el producto al distribuidor<br />
en el domicilio donde fue adquirido o en el domicilio de IC Intracom México, S.A. de<br />
C.V., junto con los accesorios contenidos en su empaque, acompañado de su<br />
póliza debidamente llenada y sellada por la casa vendedora (indispensable el sello<br />
y fecha de compra) donde lo adquirió, o bien, la factura o ticket de compra original<br />
donde se mencione claramente el modelo, numero de serie (cuando aplique) y<br />
fecha de adquisición. esta garantia no es val da en los siguientes casos: Si el<br />
producto se hubiese utilizado en condiciones distintas a las normales; si el producto<br />
no ha sido operado conforme a los instructivos de uso; ó si el producto ha sido<br />
alterado o tratado de ser reparado por el consumidor ó terceras personas.
MANHATTAN® offers a complete line of PC Components,<br />
Peripherals, Cables and Accessories. Ask your local computer dealer for more information<br />
or visit www.manhattan-products.com.<br />
All products mentioned are trademarks or registered trademarks of their respective owners.<br />
MANHATTAN® bietet ein vollständiges Sortiment an PC-Komponenten, Peripherie, Kabel und<br />
Zubehör. Weitere Informationen erhalten Sie von Ihrem Händler oder auf<br />
www.manhattan-products.com.<br />
Alle genannten Produkt- oder Firmennamen sind eingetragene Marken oder Marken der jeweiligen<br />
Firmen.<br />
MANHATTAN® ofrece una línea completa Componentes para PC, Periféricos, Cables y<br />
Accesorios. Consulte a su distribuidor local para más información ó visitenos<br />
www.manhattan-products.com.<br />
Todos los productos mencionados son marcas comerciales o marcas registradas de sus<br />
respectivos propietarios.<br />
MANHATTAN® offre un assortiment complet de composants de PC, des périphériques,<br />
des câbles et des accessoires<br />
www.manhattan-products.com.<br />
Tous les produits mentionnés sont des marques commerciales ou des marques déposées<br />
de leurs propriétaires respectifs.<br />
MANHATTAN® to kompletna linia Komponentów PC, Peryferiów, Kabli oraz Akcesoriów.<br />
Poproś lokalnego dealera o więcej informacji lub odwiedź stronę<br />
www.manhattan-products.com.pl.<br />
Wszystkie nazwy handlowe i towarów są nazwami i znakami towarowymi<br />
zastrzeżonymi odpowiednich firm odnośnych właścicieli.<br />
MANHATTAN® offre una linea completa di componenti per PC, periferiche, cavi e accessori.<br />
Chiedi maggiori informazioni al tuo rivenditore di computer o visita il sito<br />
www.manhattan-products.com.<br />
Tutti i prodotti sopracitati sono marchi di fabbrica o marchi registrati depositati dai proprietari.<br />
19
Copyright © MANHATTAN