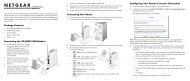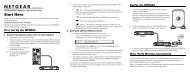
N300 Wireless Gigabit Router with USB Step 1: Step 2 ... - Netgear
N300 Wireless Gigabit Router with USB Step 1: Step 2 ... - Netgear
N300 Wireless Gigabit Router with USB Step 1: Step 2 ... - Netgear

You also want an ePaper? Increase the reach of your titles
YUMPU automatically turns print PDFs into web optimized ePapers that Google loves.
<strong>N300</strong> <strong>Wireless</strong> <strong>Gigabit</strong> <strong>Router</strong> <strong>with</strong> <strong>USB</strong><br />
JNR3210<br />
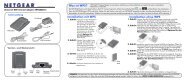
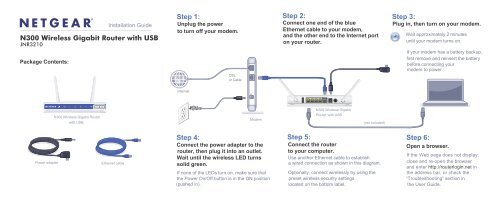
Package Contents:<br />
<strong>N300</strong> <strong>Wireless</strong> <strong>Gigabit</strong> <strong>Router</strong><br />
<strong>with</strong> <strong>USB</strong><br />
Power adapter Ethernet cable<br />
Installation Guide<br />
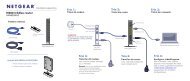
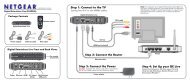
<strong>Step</strong> 1:<br />
Unplug the power<br />
to turn off your modem.<br />
Internet<br />
DSL<br />
or Cable<br />
Modem<br />
<strong>Step</strong> 4:<br />
Connect the power adapter to the<br />
router, then plug it into an outlet.<br />
Wait until the wireless LED turns<br />
solid green.<br />
If none of the LEDs turn on, make sure that<br />
the Power On/Off button is in the ON position<br />
(pushed in).<br />
<strong>Step</strong> 2:<br />
Connect one end of the blue<br />
Ethernet cable to your modem,<br />
and the other end to the Internet port<br />
on your router.<br />
<strong>Step</strong> 5:<br />
<strong>N300</strong> <strong>Wireless</strong> <strong>Gigabit</strong><br />
<strong>Router</strong> <strong>with</strong> <strong>USB</strong><br />
(not included)<br />
Connect the router<br />
to your computer.<br />
Use another Ethernet cable to establish<br />
a wired connection as shown in this diagram.<br />
Optionally, connect wirelessly by using the<br />
preset wireless security settings<br />
located on the bottom label.<br />
<strong>Step</strong> 3:<br />
Plug in, then turn on your modem.<br />
Wait approximately 2 minutes<br />
until your modem turns on.<br />
If your modem has a battery backup,<br />
first remove and reinsert the battery<br />
before connecting your<br />
modem to power.<br />
<strong>Step</strong> 6:<br />
Laptop or Desktop<br />
Computer<br />
Open a browser.<br />
If the Web page does not display,<br />
close and re-open the browser<br />
and enter http://routerlogin.net in<br />
the address bar, or check the<br />
“Troubleshooting” section in<br />
the User Guide.
Preset <strong>Wireless</strong> Security<br />
This product has a unique Wi-Fi network name (SSID) and network key (password).<br />
The default SSID and network key (password) are uniquely generated for every<br />
device (like a serial number), to protect and maximize your wireless security. This<br />
information is located on the label on the bottom of the product.<br />
NETGEAR recommends that you do not change the preset Wi-Fi network name<br />
(SSID) and network key (password). If you do change the settings, the information<br />
on the bottom of the product does not apply.<br />
Find the preset <strong>Wireless</strong> Settings on your router and record them here:<br />
Wi-Fi Network Name (SSID) _______________________________<br />
Network Key (Password) _________________________________<br />
If you change the preset wireless settings, record it here:<br />
<strong>Wireless</strong> Network Name (SSID) _______________________________<br />
Network Key (Password) _____________________________________<br />
If necessary to retrieve or update your password, type<br />
http://www.routerlogin.net in a Web browser and log in using the<br />
default user name (admin) and password (password).<br />
Select <strong>Wireless</strong> Settings to locate your wireless password.<br />
December 2011<br />
Connect <strong>Wireless</strong> Devices to Your <strong>Router</strong><br />
Choose either the manual or Wi-Fi Protected Setup (WPS) method to add wireless<br />
computers, and other devices to your wireless network.<br />
Manual Method<br />
1. Open the software utility that manages your wireless connections on the<br />
wireless device that you want to connect to your router (iPhone, laptop,<br />
computer, or gaming device). This utility scans for all wireless networks in your<br />
area.<br />
2. Look for the preset NETGEAR wireless network name (SSID), and select it.<br />
The preset Wi-Fi network name (SSID) is located on the product label on the<br />
bottom of the router.<br />
Note: If you changed the name of your network during the setup process, look<br />
for that network name.<br />
3. Enter the preset password (or your custom password if you changed it), and<br />
click Connect.<br />
4. Repeat steps 1–3 to add other wireless devices.<br />
WPS Method<br />
If your wireless device supports WPS (Wi-Fi Protected Setup)—NETGEAR calls<br />
this method Push 'N' Connect—you might be prompted to press the WPS button on<br />
the router instead of entering a password. If this happens:<br />
1. Press the WPS button on the router.<br />
2. Within 2 minutes, press the WPS button on the client device, or follow the<br />
WPS instructions that came <strong>with</strong> your wireless device to complete the WPS<br />
process. The device will then be connected to your router.<br />
3. Repeat this process to add other WPS wireless devices.<br />
Note: WPS does not support WEP security. If you try to connect a WEP client<br />
to your network using WPS, it will not work.<br />
ReadySHARE Printer and Music<br />
ReadySHARE Printer and Music lets you connect a <strong>USB</strong> printer or speaker to the<br />
router’s <strong>USB</strong> port, and access it wirelessly. To set up ReadySHARE Printer and<br />
Music:<br />
1. Connect the <strong>USB</strong> printer or speaker to the router’s <strong>USB</strong> port.<br />
2. Download and install the NETGEAR <strong>USB</strong> Control Center utility at http://<br />
www.netgear.com/landing/en-us/readyshare.aspx. You must install this utility<br />
before you can use the ReadySHARE Printer and Music feature.<br />
3. Follow the instructions in the utility to connect to the printer or speaker from<br />
your computer.<br />
For more information about ReadySHARE Printer and Music, see the JNR3210<br />
product information page at http://www.NETGEAR.com/success/jnr3210-en.aspx.<br />
After installing your device, register at http://www.NETGEAR.com/register so you<br />
can use our telephone support service. Also go to http://support.netgear.com for<br />
product updates, additional documentation, and support.<br />
For the free Live Parental Controls centralized Internet site filtering software for your<br />
router, download from: http://www.netgear.com/lpc.<br />
For additional features, including Traffic Metering, ReadySHARE, and Guest<br />
Access, log in to your router at: http://www.routerlogin.net.<br />
For complete DoC, go to the NETGEAR EU Declarations of Conformity website at<br />
http://support.netgear.com/app/answers/detail/a_id/11621/.<br />
For GNU General Public License (GPL) related information, go to<br />
http://support.netgear.com/app/answers/detail/a_id/2649.<br />
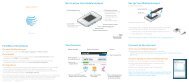
Internet<br />
STATUS GOOD<br />
Network Map<br />
Number of devices 16<br />
WiFi Connection<br />
STATUS Connected<br />
Parental Controls<br />
Click here<br />
<strong>Router</strong> Settings<br />
Click here<br />
ReadySHARE<br />
Click here<br />
Download the free Desktop<br />
NETGEAR Genie<br />
Automatically fix common network<br />
problems and easily manage your<br />
home network connections.<br />
http://www.NETGEAR.com/genie<br />
NETGEAR, the NETGEAR logo, and Connect <strong>with</strong> Innovation are trademarks and/or registered trademarks of<br />
NETGEAR, Inc. and/or its subsidiaries in the United States and/or other countries. Information is subject to<br />
change <strong>with</strong>out notice. Other brand and product names are trademarks or registered trademarks of their<br />
respective holders. © 2011 NETGEAR, Inc. All rights reserved.