Step 1: Connect to the TV Step 3: Connect the Power Step ... - Netgear
Step 1: Connect to the TV Step 3: Connect the Power Step ... - Netgear
Step 1: Connect to the TV Step 3: Connect the Power Step ... - Netgear

You also want an ePaper? Increase the reach of your titles
YUMPU automatically turns print PDFs into web optimized ePapers that Google loves.
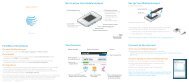
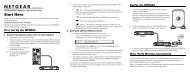
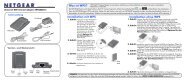
Digital Entertainer Live (EVA2000)<br />
Package Contents<br />
Digital Entertainer Live<br />
Installation Guide<br />
<strong>Power</strong> adapter E<strong>the</strong>rnet cable RCA cable<br />
<strong>Power</strong> E<strong>the</strong>rnet HDMI A/V output Multifunction<br />
(RCA) USB ports<br />
Remote control<br />
Digital Entertainer Live Front and Back Views<br />
Aim remote<br />
control here<br />
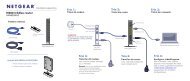
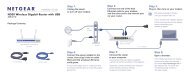
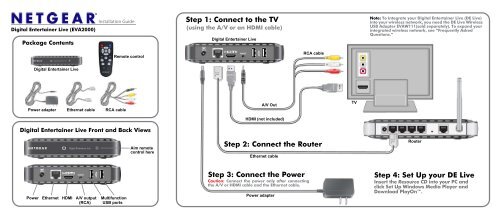
<strong>Step</strong> 1: <strong>Connect</strong> <strong>to</strong> <strong>the</strong> <strong>TV</strong><br />
(using <strong>the</strong> A/V or an HDMI cable)<br />
Digital Entertainer Live<br />
A/V Out<br />
HDMI (not included)<br />
E<strong>the</strong>rnet cable<br />
<strong>Step</strong> 3: <strong>Connect</strong> <strong>the</strong> <strong>Power</strong><br />
Caution: <strong>Connect</strong> <strong>the</strong> power only after connecting<br />
<strong>the</strong> A/V or HDMI cable and <strong>the</strong> E<strong>the</strong>rnet cable.<br />
<strong>Power</strong> adapter<br />
RCA cable<br />
<strong>Step</strong> 2: <strong>Connect</strong> <strong>the</strong> Router<br />
<strong>TV</strong><br />
Note: To integrate your Digital Entertainer Live (DE Live)<br />
in<strong>to</strong> your wireless network, you need <strong>the</strong> DE Live Wireless<br />
USB Adapter EVAW111(sold separately). To expand your<br />
integrated wireless network, see “Frequently Asked<br />
Questions.”<br />
Router<br />
<strong>Step</strong> 4: Set Up your DE Live<br />
Insert <strong>the</strong> Resource CD in<strong>to</strong> your PC and<br />
click Set Up Windows Media Player and<br />
Download PlayOn.
Volume Up<br />
<strong>Power</strong><br />
Select/Play<br />
Volume Down<br />
Back<br />
How <strong>to</strong> Use <strong>the</strong><br />
Remote Control<br />
Home<br />
Left Right<br />
Down<br />
Information<br />
Mute<br />
S<strong>to</strong>p<br />
Up<br />
Menu<br />
Page Up/<br />
Zoom In<br />
Page Down/<br />
Zoom Out<br />
Search<br />
Frequently Asked Questions<br />
1. I can’t see <strong>the</strong> Digital Entertainer Live startup screen or menu?<br />
Make sure that <strong>the</strong> <strong>TV</strong> input is set <strong>to</strong> <strong>the</strong> port where <strong>the</strong> Digital Entertainer Live cable<br />
is connected and make sure that all cable connections are firmly secured.<br />
Note: If using an RCA cable, make sure you insert <strong>the</strong> plug all <strong>the</strong> way—you<br />
should hear it “snap” in<strong>to</strong> place.<br />
2. How do I get <strong>the</strong> best signal from my remote?<br />
Aim <strong>the</strong> remote at <strong>the</strong> gray circle on <strong>the</strong> front of <strong>the</strong> Digital Entertainer Live.<br />
3. Can I reset <strong>the</strong> Digital Entertainer Live?<br />
To power cycle <strong>the</strong> Digital Entertainer Live, press <strong>the</strong> <strong>Power</strong> but<strong>to</strong>n on <strong>the</strong> remote for<br />
8 seconds while pointing directly at <strong>the</strong> unit. To res<strong>to</strong>re fac<strong>to</strong>ry defaults, go <strong>the</strong><br />
Settings menu and select Res<strong>to</strong>re Fac<strong>to</strong>ry Defaults.<br />
4. What network speeds do I need <strong>to</strong> use <strong>to</strong> connect <strong>the</strong> Digital Entertainer Live <strong>to</strong><br />
Internet content?<br />
The recommended network speed is 1.5 Mbps. The minimum is 800 Kbps.<br />
5. What are <strong>the</strong> multifunction USB ports used for?<br />
You can use <strong>the</strong>se ports <strong>to</strong> connect a:<br />
Digital Entertainer Live Wireless USB Adapter (EVAW111).<br />
Flash drive, or a USB external drive (hard drive), or a larger personal USB drive<br />
that is powered separately.<br />
Note: If you connect two USB drives, only <strong>the</strong> first device will function.<br />
The file formats supported by <strong>the</strong> USB ports are FAT16, FAT32, and NTFS.<br />
6. My personal USB drive is not accessible?<br />
Your USB drive might require external power. The Digital Entertainer Live USB ports<br />
provide only 5 volts and 500 mA.<br />
7. Can I integrate my Digital Entertainer Live in<strong>to</strong> my wireless network?<br />
Yes, you can connect <strong>to</strong> your wireless router in a number of ways:<br />
<strong>Connect</strong> wirelessly by installing <strong>the</strong> Digital Entertainer Live Wireless USB<br />
Adapter (EVAW111), or<br />
<strong>Connect</strong> <strong>to</strong> <strong>the</strong> router from a remote room by using your existing power outlets<br />
with <strong>the</strong> NETGEAR <strong>Power</strong>line Adapter kit (XAVB1001), or<br />
You can also use <strong>the</strong> existing cable outlet, if available, and <strong>the</strong> NETGEAR<br />
MoCA1001 MoCA Coax-E<strong>the</strong>rnet Adapter kit.<br />
See <strong>the</strong> in-product Cus<strong>to</strong>mer Support recommendations included with this<br />
package on <strong>the</strong> CD.<br />
Troubleshooting<br />
The remote control does not respond.<br />
Check <strong>to</strong> see if <strong>the</strong> battery is inserted correctly.<br />
No audio/visual output.<br />
Make sure that <strong>the</strong> A/V (RCA) cable is inserted fully. Remove <strong>the</strong> power cable<br />
and insert again.<br />
Using HDMI <strong>to</strong> DVI converter.<br />
HDMI <strong>to</strong> DVI converters are not supported.<br />
Technical Support<br />
Thank you for selecting NETGEAR products. For more information and <strong>to</strong> access <strong>the</strong><br />
online Digital Entertainer Live User Manual, see <strong>the</strong> Resource CD that<br />
came with your product.<br />
After installing your device, locate <strong>the</strong> serial number on <strong>the</strong> label of your product<br />
and use it <strong>to</strong> register your product at http://www.NETGEAR.com/register. Registration<br />
is required before you can use our telephone support service. Registration via our<br />
website is strongly recommended.<br />
Go <strong>to</strong> http://kbserver.netgear.com for product updates and Web support. For<br />
Warranty and Regional Cus<strong>to</strong>mer Support information, see <strong>the</strong> Resource CD.<br />
This symbol was placed in accordance with <strong>the</strong> European Union Directive 2002/96 on <strong>the</strong><br />
Waste Electrical and Electronic Equipment (<strong>the</strong> WEEE Directive). If disposed of within <strong>the</strong><br />
European Union, this product should be treated and recycled in accordance with <strong>the</strong> laws of<br />
your jurisdiction implementing <strong>the</strong> WEEE Directive.<br />
© 2009 by NETGEAR, Inc. All rights reserved. NETGEAR and <strong>the</strong> NETGEAR logo are registered<br />
trademarks of NETGEAR, Inc. in <strong>the</strong> United States and/or o<strong>the</strong>r countries. O<strong>the</strong>r brand and product<br />
names are trademarks or registered trademarks of <strong>the</strong>ir respective holders. Information is subject <strong>to</strong><br />
change without notice.<br />
July 2009