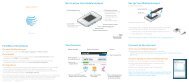
First, Set Up the WPN802 - Netgear
First, Set Up the WPN802 - Netgear
First, Set Up the WPN802 - Netgear

Create successful ePaper yourself
Turn your PDF publications into a flip-book with our unique Google optimized e-Paper software.
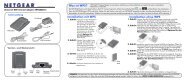
NETGEAR <strong>WPN802</strong> RangeMax Wireless Access Point<br />
Start Here<br />
Please refer to <strong>the</strong> Reference Manual on your Resource CD for instructions on advanced<br />
configuration options.<br />
Estimated Completion Time: 30 minutes.<br />
Tip: Before mounting <strong>the</strong> <strong>WPN802</strong> in a high location, first set up and test <strong>the</strong> <strong>WPN802</strong> to<br />
verify wireless network connectivity.<br />
<strong>First</strong>, <strong>Set</strong> <strong>Up</strong> <strong>the</strong> <strong>WPN802</strong><br />
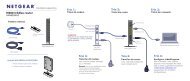
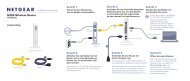
1. CONNECT THE WIRELESS ACCESS POINT TO YOUR COMPUTER<br />
a. Unpack <strong>the</strong> box and verify <strong>the</strong> contents.<br />
b. Prepare a computer with Internet access and an E<strong>the</strong>rnet adapter. If this computer<br />
is already part of your network, record its TCP/IP configuration settings. Configure<br />
<strong>the</strong> computer with a static IP address of 192.168.0.210 and 255.255.255.0 as<br />
<strong>the</strong> Subnet Mask.<br />
c. Connect an E<strong>the</strong>rnet cable from<br />
<strong>the</strong> <strong>WPN802</strong> to <strong>the</strong> PC.<br />
d. Securely insert <strong>the</strong> o<strong>the</strong>r end of<br />
<strong>the</strong> cable into <strong>the</strong> <strong>WPN802</strong><br />
E<strong>the</strong>rnet port.<br />
e. Turn on your computer, and connect <strong>the</strong> power adapter to <strong>the</strong> <strong>WPN802</strong>. Then<br />
check <strong>the</strong> lights on <strong>the</strong> front:<br />
• Power: The power light should be lit. If <strong>the</strong> power light is not lit,<br />
check <strong>the</strong> connections and check to see if <strong>the</strong> power outlet is controlled by a<br />
wall switch that is turned off.<br />
• Test: The test light blinks when <strong>the</strong> <strong>WPN802</strong> is first turned on.<br />
• WLAN: The wireless light should be lit.<br />
• E<strong>the</strong>rnet: The E<strong>the</strong>rnet (LAN) light should be lit (amber for a 10<br />
Mbps connection and green for a 100 Mbps connection). If not, make sure<br />
<strong>the</strong> E<strong>the</strong>rnet cable is securely attached at both ends.<br />
2. CONFIGURE LAN AND WIRELESS ACCESS<br />
a. Configure <strong>the</strong> <strong>WPN802</strong> E<strong>the</strong>rnet port for LAN access.<br />
• Connect to <strong>the</strong> <strong>WPN802</strong> by opening your browser and<br />
entering http://192.168.0.231 in <strong>the</strong> address field.<br />
• When prompted, enter admin for <strong>the</strong> user name and password for <strong>the</strong><br />
password, both in lower case letters.<br />
• Click <strong>the</strong> Basic <strong>Set</strong>tings link and configure <strong>the</strong> IP <strong>Set</strong>tings for your network.<br />
b. Configure <strong>the</strong> wireless interface for wireless access. See <strong>the</strong> online help or <strong>the</strong><br />
Reference Manual for full instructions.<br />
c. Test wireless connectivity using a computer with a wireless adapter configured<br />
according to <strong>the</strong> wireless settings you just set in <strong>the</strong> <strong>WPN802</strong> to establish a<br />
wireless connection to <strong>the</strong> <strong>WPN802</strong>.<br />
Now that you have finished <strong>the</strong> setup steps, you are ready to deploy <strong>the</strong> <strong>WPN802</strong> in<br />
your network. If needed, you can now reconfigure <strong>the</strong> PC you used in step 1 back to<br />
its original TCP/IP settings.<br />
Deploy <strong>the</strong> <strong>WPN802</strong><br />
1. Disconnect <strong>the</strong> <strong>WPN802</strong> from <strong>the</strong> computer and place it<br />
where you will deploy it.<br />
The best location is elevated, such as wall mounted or on<br />
<strong>the</strong> top of a cubicle, at <strong>the</strong> center of your wireless coverage<br />
area, and within line of sight of all <strong>the</strong> mobile devices. If <strong>the</strong><br />
<strong>WPN802</strong> is on a metal surface it must be positioned<br />
vertically.<br />
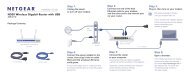
2. Connect an E<strong>the</strong>rnet cable from your <strong>WPN802</strong> Access<br />
Point to a LAN port on your router, switch, or hub.<br />
<strong>WPN802</strong><br />
Router<br />
3. Connect <strong>the</strong> power adapter to <strong>the</strong> wireless access point and plug <strong>the</strong> power adapter in<br />
to a power outlet. The Power, WLAN and E<strong>the</strong>rnet lights should light up.<br />
Now, Verify Wireless Connectivity<br />
<br />
Using a computer with an 802.11g or 802.11b wireless adapter, verify connectivity by<br />
using a browser such as Netscape® or Internet Explorer to connect to <strong>the</strong> Internet, or<br />
check for file and printer access on your network.<br />
Note: If you cannot connect, see to Troubleshooting Tips in this guide or <strong>the</strong> Reference<br />
Manual on <strong>the</strong> Resource CD for <strong>the</strong> Wireless Access Point.
Troubleshooting Tips<br />
Here are some tips for correcting simple problems you may have.<br />
No lights are lit on <strong>the</strong> access point.<br />
The access point has no power.<br />
• Make sure <strong>the</strong> power cord is connected to <strong>the</strong> access point and plugged in to a<br />
working power outlet or power strip.<br />
• Make sure you are using <strong>the</strong> correct NETGEAR power adapter supplied with your<br />
access point.<br />
The E<strong>the</strong>rnet light is not lit.<br />
There is a hardware connection problem.<br />
• Make sure <strong>the</strong> cable connectors are securely plugged in at <strong>the</strong> access point and <strong>the</strong><br />
network device (hub, switch, or router).<br />
• Make sure <strong>the</strong> connected device is turned on.<br />
The WLAN light is not lit.<br />
The access point’s antennas are not working.<br />
• If <strong>the</strong> Wireless LAN activity light stays off, disconnect <strong>the</strong> adapter from its power<br />
source and <strong>the</strong>n plug it in again.<br />
• Contact NETGEAR if <strong>the</strong> WLAN light remains off.<br />
I cannot configure <strong>the</strong> access point from a browser.<br />
Check <strong>the</strong>se items:<br />
• The <strong>WPN802</strong> is properly installed, LAN connections are OK, and it is powered on.<br />
Check that <strong>the</strong> LAN port LED is green to verify that <strong>the</strong> E<strong>the</strong>rnet connection is OK.<br />
• If you are using <strong>the</strong> NetBIOS name of <strong>the</strong> <strong>WPN802</strong> to connect, ensure that your PC<br />
and <strong>the</strong> <strong>WPN802</strong> are on <strong>the</strong> same network segment or that <strong>the</strong>re is a WINS server on<br />
your network.<br />
• If your PC uses a Fixed (Static) IP address, ensure that it is using an IP Address in <strong>the</strong><br />
range of <strong>the</strong> <strong>WPN802</strong>. The <strong>WPN802</strong> default IP Address is 192.168.0.231 and <strong>the</strong><br />
May 2005<br />
default Subnet Mask is 255.255.255.0. The <strong>WPN802</strong> default setting is for a static IP<br />
address. If <strong>the</strong> network where you are connecting it is using DHCP, configure it<br />
accordingly. See <strong>the</strong> Reference Manual on <strong>the</strong> Resource CD for <strong>the</strong> Wireless Access<br />
Point for more details.<br />
I cannot access <strong>the</strong> Internet or <strong>the</strong> LAN with a wireless capable<br />
computer.<br />
There is a configuration problem. Check <strong>the</strong>se items:<br />
• You may not have restarted <strong>the</strong> computer with <strong>the</strong> wireless adapter to have TCP/IP<br />
changes take effect. Restart <strong>the</strong> computer.<br />
• The computer with <strong>the</strong> wireless adapter may not have <strong>the</strong> correct TCP/IP settings to<br />
communicate with <strong>the</strong> network. Restart <strong>the</strong> computer and check that TCP/IP is set up<br />
properly for that network. The usual setting for Windows on <strong>the</strong> Network Properties<br />
is set to “Obtain an IP address automatically.”<br />
• The access point’s default values may not work with your network. Check <strong>the</strong> access<br />
point default configuration against <strong>the</strong> configuration of o<strong>the</strong>r devices in your network.<br />
• For full instructions on changing <strong>the</strong> access point’s default values, see <strong>the</strong> Reference<br />
Manual on <strong>the</strong> Resource CD for <strong>the</strong> Wireless Access Point.<br />
Technical Support<br />
Thank you for selecting NETGEAR products.<br />
To register your product, go to: http://www.NETGEAR.com/register<br />
Go to http://www.NETGEAR.com/support for support information.<br />
©2005 by NETGEAR, Inc. All rights reserved.<br />
NETGEAR is a registered trademark of NETGEAR, Inc. in <strong>the</strong> United States and/or o<strong>the</strong>r countries. O<strong>the</strong>r brand<br />
and product names are trademarks or registered trademarks of <strong>the</strong>ir respective holders. Information is subject to<br />
change without notice.