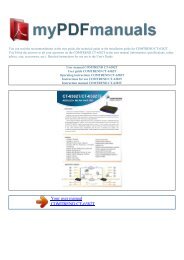
User manual SAITEK R440 FORCE FEEDBACK WHEEL - MY PDF ...
User manual SAITEK R440 FORCE FEEDBACK WHEEL - MY PDF ...
User manual SAITEK R440 FORCE FEEDBACK WHEEL - MY PDF ...

You also want an ePaper? Increase the reach of your titles
YUMPU automatically turns print PDFs into web optimized ePapers that Google loves.
You can read the recommendations in the user guide, the technical guide or the installation guide for <strong>SAITEK</strong> <strong>R440</strong> <strong>FORCE</strong><br />
<strong>FEEDBACK</strong> <strong>WHEEL</strong>. You'll find the answers to all your questions on the <strong>SAITEK</strong> <strong>R440</strong> <strong>FORCE</strong> <strong>FEEDBACK</strong> <strong>WHEEL</strong> in the<br />
user <strong>manual</strong> (information, specifications, safety advice, size, accessories, etc.). Detailed instructions for use are in the <strong>User</strong>'s Guide.<br />
<strong>User</strong> <strong>manual</strong> <strong>SAITEK</strong> <strong>R440</strong> <strong>FORCE</strong> <strong>FEEDBACK</strong> <strong>WHEEL</strong><br />
<strong>User</strong> guide <strong>SAITEK</strong> <strong>R440</strong> <strong>FORCE</strong> <strong>FEEDBACK</strong> <strong>WHEEL</strong><br />
Operating instructions <strong>SAITEK</strong> <strong>R440</strong> <strong>FORCE</strong> <strong>FEEDBACK</strong> <strong>WHEEL</strong><br />
Instructions for use <strong>SAITEK</strong> <strong>R440</strong> <strong>FORCE</strong> <strong>FEEDBACK</strong> <strong>WHEEL</strong><br />
Instruction <strong>manual</strong> <strong>SAITEK</strong> <strong>R440</strong> <strong>FORCE</strong> <strong>FEEDBACK</strong> <strong>WHEEL</strong><br />
Your user <strong>manual</strong><br />
<strong>SAITEK</strong> <strong>R440</strong> <strong>FORCE</strong> <strong>FEEDBACK</strong> <strong>WHEEL</strong>
Powered by TC<strong>PDF</strong> (www.tcpdf.org)<br />
Manual abstract:<br />
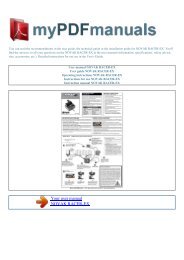
1 2 3 With your computer switched on, close down any programs that are currently running and insert the Saitek Smart Technology CD into your CD-ROM<br />
drive. (If the CD does not run automatically, select Start from the Windows® Taskbar, then Run and type D:\Setup. Exe and click OK - where D:\ is letter of<br />
your CD-ROM drive). After reading the Disclaimer, select the I accept the terms of the Disclaimer option and click Next to continue. at the Device Driver<br />
Installation screen , click on Next and follow the on-screen instructions. When prompted, plug your controller's USB connector into your computer, then click<br />
on Configure. When the Controller Properties screen appears, click Next to view the Test screen. Now try out all your controller's buttons and controls to<br />
show that it is working properly. When you have finished, click OK. Your Saitek controller is now ready for use with your favorite games.<br />
Upon completion of the installation, you have the option to Run Profile Editor, which will give you a view of the 3D programming environment. If you do not<br />
wish to see the Profile Editor at this point, just uncheck the box and click on Finish to complete the installation. Your Saitek controller is now ready for use<br />
with your favorite games. For a complete guide on how to program your Saitek controller, visit the Saitek website at www. 1 2 3 With your computer switched<br />
on, close down any programs that are currently running and insert the Saitek Smart Technology CD into your CD-ROM drive.<br />
(If the CD does not run automatically, select Start from the Windows® Taskbar, then Run and type D:\Setup. Note: For your controller to work, you must<br />
have a minimum of Microsoft® DirectX® 8. 1 installed on your computer. The installer will automatically recognize if this software needs to be added, and<br />
will allow you to install it directly from the Saitek Product Companion CD, if necessary. If you are asked to install Microsoft® DirectX® 8.<br />
1, click Install and follow the on-screen instructions, and then restart your computer when prompted. Make sure that you leave the Saitek CD in the drive<br />
when restarting. After this software has been installed, you will automatically be taken to the installation to continue with the next step. 5 6 7 8 9 Follow the<br />
on-screen instructions and select Yes , I want to restart my computer now when prompted. After the restart, at the Device Driver Installation screen, click on<br />
Next and follow the onscreen instructions. When prompted, plug your USB connector into your computer. When the Controller Properties screen appears,<br />
click Next to view the Test Screen. Now try out all your controller buttons and controls to show that it is working properly. When you have finished, click OK.<br />
Your Saitek controller is now ready for use with your favorite games.<br />
This installation will ONLY install the drivers for your Saitek controller. At this point you will be asked to insert your Windows® CD, however, DO NOT do<br />
this, just click on OK. At the next screen, type C:\windows\system into the prompt and click OK and follow the on-screen instructions. Upon completion of the<br />
installation, you have the option to Run Profile Editor, which will give you a view of the 3D programming environment. If you do not wish to see the Profile<br />
Editor at this point, just uncheck the box and click on Finish to complete the installation. Your Saitek controller is now ready for use with your favorite games.<br />
For a complete guide on how to program your Saitek controller, visit the Saitek website at www. If you chose the Quick Install (Drivers Only) you might want<br />
to install the Saitek Smart Technology programming software once you have mastered your new Saitek controller. To do this, simply reinstall your controller<br />
following the relevant Full Install (Drivers and Programming Software) above. SST delivers a powerful set of features, allowing you to program your device<br />
with the ultimate configuration for total interaction.<br />
Despite a level of sophistication previously unseen in the market, and because of the Saitek Smart Technology inside, the software remains simple and<br />
intuitive to use..<br />
Your user <strong>manual</strong><br />
<strong>SAITEK</strong> <strong>R440</strong> <strong>FORCE</strong> <strong>FEEDBACK</strong> <strong>WHEEL</strong>