You also want an ePaper? Increase the reach of your titles
YUMPU automatically turns print PDFs into web optimized ePapers that Google loves.
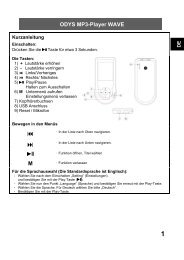
<strong>Language</strong> <strong>setup</strong><br />
<strong>ODYS</strong> <strong>MP3</strong> <strong>Player</strong> <strong>X36</strong><br />
Switching on:<br />
Shift the switch at the top of the device to the right.<br />
The x36 will start in the main<br />
menu.<br />
The sensor keypad:<br />
Active field for<br />
scrolling<br />
Left<br />
M Menu<br />
Up <br />
Down <br />
Right <br />
Moving in the main menu:<br />
Select the required option with the keys/ and confirm by pressing<br />
the M key.<br />
Moving in the sub menus<br />
Move your finger from the bottom to the top or from<br />
the top to the bottom over the line of the active<br />
keypad in order to move through the menu.<br />
By pressing the key you quit the currently active<br />
menu step by step until you reach the main menu.<br />
By pressing the menu key (M) the currently selected<br />
option will open up.<br />
For the language selection (The default language is English):<br />
1. Select settings and confirm by pressing the<br />
menu key (M).<br />
2. Move your finger from the bottom to the top or from the top to the<br />
bottom over the line of the activated keypad in order to move<br />
through the menu.<br />
Select the item “<strong>Language</strong>“<br />
and confirm by pressing the menu key (M).<br />
3. Select the language. For German please select “German“.<br />
Confirm by pressing the menu key (M).<br />
1<br />
EN
EN<br />
2<br />
Contents<br />
<strong>ODYS</strong> <strong>MP3</strong> <strong>Player</strong> <strong>X36</strong><br />
<strong>Language</strong> <strong>setup</strong>........................................................................ 1<br />
1 Scope of delivery ...................................................3<br />
2 Introduction............................................................4<br />
3 Commissioning ......................................................6<br />
3.1 Control elements ............................................................... 6<br />
3.2 Battery status .................................................................... 7<br />
3.3 Driver installation............................................................... 8<br />
3.4 Charging the battery via the USB connector...................... 8<br />
3.5 File transfer <strong>MP3</strong> <strong>Player</strong> - PC ............................................ 9<br />
3.6 Disable the <strong>MP3</strong> <strong>Player</strong> from the PC ............................... 10<br />
4 Operation.............................................................11<br />
4.1 Switching on and off ........................................................ 11<br />
4.2 Music mode..................................................................... 13<br />
4.3 Photo mode..................................................................... 20<br />
4.4 Video mode ..................................................................... 21<br />
4.5 FM radio mode ................................................................ 23<br />
4.6 Text mode ....................................................................... 25<br />
4.7 Voice recording and -playback (Voice mode) .................. 25<br />
4.8 Game mode..................................................................... 28<br />
4.9 Settings ........................................................................... 29<br />
4.10 File management (Explorer) ............................................ 33<br />
4.11 Video conversion tool ...................................................... 34<br />
4.12 Creating a slideshow ....................................................... 36<br />
5 Troubleshooting...................................................38<br />
6 Specifications ......................................................40<br />
7 Safety instructions ...............................................41<br />
8 Warranty conditions EN.......................................43
1 Scope of delivery<br />
<strong>ODYS</strong> <strong>MP3</strong> <strong>Player</strong> <strong>X36</strong><br />
Please check the contents of the box. Inform your dealer if the content is not<br />
complete:<br />
<strong>ODYS</strong> <strong>MP3</strong> <strong>Player</strong><br />
<strong>X36</strong><br />
Guarantee card<br />
USB cable<br />
CD-ROM<br />
(Driver +<br />
Application software)<br />
Ear-phone<br />
User guide<br />
3<br />
EN
EN<br />
4<br />
2 Introduction<br />
<strong>ODYS</strong> <strong>MP3</strong> <strong>Player</strong> <strong>X36</strong><br />
Thank you that you have decided to buy our product. Please thoroughly<br />
read the instruction in order to be able to use all functions of the product<br />
and to guarantee a long lifetime. Keep the instruction at a safe place to<br />
consult it later on.<br />
This product is a portable digital <strong>MP3</strong> <strong>Player</strong> with which you can replay<br />
your <strong>MP3</strong>- and WMA music tracks, record voice or save any files. With<br />
the modern color screen you can also view digital pictures and videos.<br />
Product features<br />
Attention<br />
Before using the <strong>MP3</strong> <strong>Player</strong> please read the general<br />
safety notes in chapter 7. Also in particular observe the<br />
notes for safe terminating the data exchange between the<br />
<strong>MP3</strong> <strong>Player</strong> and the PC in chapter 3.7.<br />
• 1.46 inch TFT color screen (176 x 132 pixel) 65.000 colors<br />
• Fast data transfer via USB 2.0<br />
• Supported formats: <strong>MP3</strong>, WMA, WAV, JPEG, BMP, MTV<br />
• Built in Lithium-Ionen battery<br />
• Adjustable energy saving functions, brightness and switch-off time<br />
• Hearing music when reading an E-Book or playing<br />
• Possible to use it as mobile data storage device<br />
• Supports firmware upgrade (function enhancements by using upgrade<br />
software from the Internet is possible)<br />
• Menu with clear symbols and characters for user friendly, intuitive<br />
operation<br />
• Different repetition and equalizer modes<br />
• Lyric function<br />
• Digital voice recording via the microphone and the voice playback<br />
• Multilingual menus selectable
Support<br />
URL: http://www.odys.de<br />
<strong>ODYS</strong> <strong>MP3</strong> <strong>Player</strong> <strong>X36</strong><br />
You will find the latest information about this <strong>MP3</strong> <strong>Player</strong>, about any other<br />
products of our company and about our company itself on our web site.<br />
Possible firmware updates for this <strong>MP3</strong> <strong>Player</strong> will also be offered on our web<br />
site. If you have any questions or problems please refer to the FAQ’s on our<br />
web site or consult our customer support support@odys.de.<br />
5<br />
EN
EN<br />
6<br />
3 Commissioning<br />
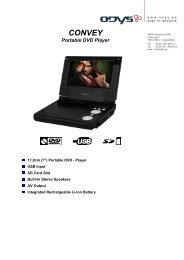
3.1 Control elements<br />
<strong>ODYS</strong> <strong>MP3</strong> <strong>Player</strong> <strong>X36</strong><br />
Before using the control elements of your <strong>MP3</strong> <strong>Player</strong> become<br />
acquainted to it.<br />
On/Off main switch Strap fixture<br />
/ Microphon<br />
back<br />
down / VOL −<br />
/ Play key<br />
USB connector<br />
Display<br />
Menu<br />
up / VOL +<br />
forward<br />
Socket for the<br />
ear-phone<br />
Key functions<br />
Menu key: Change over to the menu, select options/files<br />
Deactivate keylock<br />
: increase volume (VOL +), up<br />
, Play key: decrease volume (VOL -), down,<br />
Replay, pause<br />
: Fast forward, following file, selecting options<br />
: Highspeed rewind, previous file, quit menu<br />
On/Off main switch: On/Off switch (Resetting the player after malfunctions or<br />
operation errors)
<strong>ODYS</strong> <strong>MP3</strong> <strong>Player</strong> <strong>X36</strong><br />
Please note that the device has modern touch-sensitive keys<br />
which you only need to press slightly. If you press them too hard a<br />
proper key function will not be possible.<br />
Please also note that the device disposes of a sensor field<br />
which releases the function only by passing the finger over<br />
it.<br />
Description of the key operation<br />
You can operate the key in three ways: short pressing, long pressing and<br />
keeping pressed. In the further progress of the manual we always talk about<br />
short pressing if there is no further explanation.<br />
Short pressing: The effect occurs after a short pressure on the key.<br />
Long pressing: The effect occurs when you press the key and keep it pressed for<br />
1 … 2 seconds.<br />
Keeping pressed: The effect occurs when you press the key until you release it in<br />
certain intervals repeatedly, e.g. fast forward or highspeed rewind.<br />
3.2 Battery status<br />
The tension of the internal rechargeable battery amounts to 3.7 V. The state of<br />
charge of the battery is displayed with different symbols so that you can<br />
roughly estimate how long it will be possible to operate the player. During the<br />
period of usage this display will slowly decrease.<br />
full about half full almost empty empty<br />
The charge symbol “empty” will be displayed when the battery is almost empty.<br />
At this point in time you should charge the battery. The internal battery can be<br />
loaded via the USB interface of the PC/USB-Hub or using a separate USB<br />
power supply unit/battery recharger (refer to chapter 3.5).<br />
The separate USB power supply unit/battery recharger can be ordered on our<br />
web site www.odys.de.<br />
7<br />
EN
EN<br />
8<br />
<strong>ODYS</strong> <strong>MP3</strong> <strong>Player</strong> <strong>X36</strong><br />
Please fully charge the battery before the first use. The charging of<br />
an empty battery will take about 3 - 4 hours. For the first two<br />
charging cycles you should charge the battery during about<br />
8 hours.<br />
Please note that you cannot operate the player during charging.<br />
3.3 Driver installation<br />
• Switch on the main switch of the player (Position ON).<br />
• Connect the <strong>MP3</strong> <strong>Player</strong> to your PC by the USB cable which is included<br />
in the delivery.<br />
• The driver installation will be started. Under Windows ME, 2000 and XP<br />
the PC will recognize a new hardware device (Mass storage device) and<br />
will install the corresponding driver automatically.<br />
• If errors occur during the installation remove the USB cable, restart the<br />
operating system and connect the USB cable once again to your PC.<br />
Under Windows 98 and 98SE you first need to install the<br />
corresponding driver from the CD-ROM before connecting the<br />
<strong>MP3</strong> <strong>Player</strong>.<br />
3.4 Charging the battery via the USB connector<br />
You can charge the internal, rechargeable battery via the USB connector<br />
of your PC via a USB-Hub with proper power supply or with a separate<br />
USB power supply unit/battery charger. Before charging the accumulator<br />
of the player for the first time please use the existing accumulator energy.<br />
Then fully load the accumulator. Only this way the full accumulator<br />
capacity is being achieved.<br />
• Switch on the main switch of the player (Position ON).
<strong>ODYS</strong> <strong>MP3</strong> <strong>Player</strong> <strong>X36</strong><br />
• Connect the <strong>MP3</strong> <strong>Player</strong> by the included USB cable to the power supply.<br />
• The charging procedure will start automatically. Have the accumulators<br />
always completely charged (refer to the battery symbol in the screen).<br />
• During charging the keys of the player are inoperative.<br />
The battery lifetime of the player highly depends on the set<br />
volume. When the volume is high the battery runtime will be<br />
reduced accordingly. Depending on the replayed type of file<br />
and the number of key actuations the lifetime of the battery<br />
will also change.<br />
Use the energy saving functions to automatically switch off<br />
the screen and the player (Chapter 4.9).<br />
3.5 File transfer <strong>MP3</strong> <strong>Player</strong> - PC<br />
• Connect the <strong>MP3</strong> <strong>Player</strong> to your PC by the encluded USB cable.<br />
• Open the Windows-Explorer and double click on My Computer.<br />
• Select the folder or files which you want to transfer and drag them to the<br />
removable media icon of the <strong>MP3</strong> <strong>Player</strong> (Download to the root directory).<br />
You can also beforehand create different folders in order to classify your file<br />
types in the memory of the player and save the corresponding files there.<br />
• After finishing the transfer check if the files had been completely copied by<br />
clicking on the <strong>MP3</strong> <strong>Player</strong> icon.<br />
• In the same way you can also copy files from the <strong>MP3</strong> <strong>Player</strong> to the PC<br />
(Upload).<br />
9<br />
EN
EN<br />
10<br />
<strong>ODYS</strong> <strong>MP3</strong> <strong>Player</strong> <strong>X36</strong><br />
Please note that music tracks cannot be directly<br />
transferred from an Audio CD. Please first save the title in<br />
the <strong>MP3</strong> or WMA format.<br />
Make sure that the used WMA files are not copyright.<br />
Protected files cannot be replayed by this device.<br />
Do not remove the USB cable from the <strong>MP3</strong> <strong>Player</strong> during<br />
the file transfer or during formatting.<br />
Please note that the main directory of the player can<br />
maximum manage 150 entries (folders and files). If you<br />
would like to manage more files please create<br />
corresponding sub-folders. You can save any number of<br />
files in such sub-folders.<br />
Formatting the flash memory<br />
Using the PC operating system:<br />
Open the Windows-Explorer and click with the right mouse button on the<br />
removable media icon of the player. Then click on the option format in the<br />
context menu.<br />
3.6 Disable the <strong>MP3</strong> <strong>Player</strong> from the PC<br />
• Correctly disable the <strong>MP3</strong> <strong>Player</strong> from the operating system using the<br />
option “Securely remove hardware“ .<br />
• Click on the icon at the right bottom of the task bar and select in the<br />
following dialog window the entry “Remove USB removable media – drive<br />
(X:)“.<br />
• Then the message appears that you can now remove the hardware.<br />
Under Windows 98SE no icon will be displayed in the<br />
task bar. After finishing the file transfer simply remove the<br />
USB cable.
4 Operation<br />
4.1 Switching on and off<br />
Switching on<br />
<strong>ODYS</strong> <strong>MP3</strong> <strong>Player</strong> <strong>X36</strong><br />
• Switch on the main switch of the player (Position ON).<br />
• The screen now shows the main menu.<br />
• If the device does not switch on please load the battery via the USB<br />
connector.<br />
Mode change via the main menu<br />
• Via the main menu you can access the different operating modes and<br />
settings of the player: Music, Video, FM Radio, Photo, Text, Voice,<br />
Games, Settings and Explorer.<br />
• Select the required option using the keys / and confirm by pressing the<br />
menu key.<br />
• In order to change over to the main menu press the menu key again for<br />
about 1 sec.<br />
Please note that first all sub menus need to be closed before it is<br />
possible to call the main menu.<br />
In this case press the -key as often as necessary until the sub<br />
menu is closed.<br />
Switching off<br />
Switch off the player with the main switch on the top.<br />
11<br />
EN
EN<br />
12<br />
<strong>ODYS</strong> <strong>MP3</strong> <strong>Player</strong> <strong>X36</strong><br />
Keylock<br />
The keylock will automatically activaed after 15 seconds if you do not<br />
press any key. A lock icon will be displayed in the playback mode at the<br />
top margin of the screen and the backlight will switch off.<br />
• Keylock active: If a key is pressed when<br />
the keylock is active this symbol will<br />
appear.<br />
The backlight remains switched off.<br />
• Deactivating the keylock: Press the menu<br />
key until the lock icon opens up and the<br />
backlight switches on<br />
(about 3 seconds) in order to deactivate<br />
the keylock.<br />
LOCK<br />
LOCK<br />
Keylock deactivated<br />
Reset<br />
In case of malfunctions you can reset and restart the player by switching<br />
the main switch off and on again (ON/OFF).
4.2 Music mode<br />
<strong>ODYS</strong> <strong>MP3</strong> <strong>Player</strong> <strong>X36</strong><br />
Overview screen display<br />
The screen display shows several information about the current music track,<br />
the runtime and the system settings. Please find following a description of the<br />
symbols.<br />
EQ-Sound<br />
File name/ID3-Tag<br />
Replay mode<br />
Replay mode<br />
Track number<br />
Sample Rate<br />
Bitrate<br />
Track number in<br />
the current folder<br />
Volume<br />
Replay, forward/backward, pause, stop<br />
Battery status<br />
Replay time<br />
Replay speed<br />
Lyric display<br />
Replay time<br />
graphic<br />
• Plug the ear-phone into the socket for the ear-phone and switch the player<br />
on. Select the music mode in the main menu and confirm by pressing the<br />
menu key.<br />
• Press the -key in order to replay the displayed music track. The<br />
information regarding the music file (ID3-Tag) are now shown on the screen.<br />
• During the playback shortly press the -key in order to stop the playback<br />
(Pause). In order to continue the playback press again the -key (Resume<br />
function).<br />
13<br />
EN
EN<br />
14<br />
<strong>ODYS</strong> <strong>MP3</strong> <strong>Player</strong> <strong>X36</strong><br />
• Press and hold the keys / during the playback for fast forward or<br />
highspeed rewind within a music track.<br />
• If you shortly press the keys / during the playback the pause or in<br />
the stop status the display will skip to the following or previous music<br />
track.<br />
• Shortly press the menu key in order to change over to the sub menu and<br />
select one of the following options.<br />
Volume<br />
Decrease or increase the volume by moving<br />
your finger from the bottom to the top or from<br />
the top to the bottom over the line of the active<br />
keypad. The volume can be set in 33 levels<br />
(0 … 32).<br />
Lyric function<br />
Your player supports the synchronous display of the lyrics when playing<br />
mp3 files. The file name of the separate lyric file (*.lrc) has to comply with<br />
the file name of the mp3 file (*.mp3) and the lyric file has to be available in<br />
the same folder.
Sub menu during the playback<br />
<strong>ODYS</strong> <strong>MP3</strong> <strong>Player</strong> <strong>X36</strong><br />
• Shortly press the menu key in order to change over to the sub menu and<br />
select one of the following functions.<br />
Repeat mode<br />
• Shortly press the menu key in order to change over to the sub menu repeat<br />
mode.<br />
• Pass your finger over the active keypad in order to choose the required<br />
function (Once, Repeat One, Folder Once, Folder Repeat, All Once, All<br />
Repeat, Intro).<br />
• To confirm press the menu key once again.<br />
No Repeat:<br />
Repeats all files once.<br />
Repeat One:<br />
Repeats the current file several times.<br />
Repeat All:<br />
Repeats all files several times.<br />
Random All:<br />
Repeats all files in random order<br />
Folder Normal:<br />
Repeats all files of the current directory.<br />
Folder Repeat:<br />
Repeats all files of the current directory several times.<br />
Folder Random:<br />
Repeats all files of the current directory in random order.<br />
Equalizer settings, EQ<br />
• Shortly press the menu key in order to change over to the sub menu EQ.<br />
• Pass your finger over the active keypad in order to choose the required<br />
sound (Normal, 3D, Rock, Pop, Classic, Bass, Jazz, Custom EQ).<br />
• To confirm press the menu key once again.<br />
15<br />
EN
EN<br />
16<br />
A3D (3D sound emulation)<br />
<strong>ODYS</strong> <strong>MP3</strong> <strong>Player</strong> <strong>X36</strong><br />
• Shortly press the menu key in order to change over to the sub menu.<br />
• Pass your finger over the active keypad in order to switch the function<br />
on or off.<br />
• To confirm press the menu key once again.<br />
Play Rate<br />
• Shortly press the menu key in order to change over to the sub menu.<br />
• Pass your finger over the active keypad in order to select the play rate.<br />
When setting 1.00x the playback will be performed in original speed.<br />
• To confirm press the menu key once again.<br />
If this option is not set to 1.00x the playback might be<br />
skewed.<br />
File management<br />
Using this menu item you can specifically select files.<br />
• Shortly press the menu key in order to change over to the sub menu.<br />
• Pass your finger over the active keypad in order to select the option file.<br />
• To confirm press the menu key once again.<br />
• Pass your finger over the active keypad in order to select files or folders.<br />
• Press the key in order to enter a track to your favorite repeat list and<br />
confirm by pressing the menu key.<br />
• You can use the key to change over to the superior directory.
<strong>ODYS</strong> <strong>MP3</strong> <strong>Player</strong> <strong>X36</strong><br />
• Shortly press the menu key in order to repeat the selected file or to open a<br />
folder.<br />
Classified<br />
In chapter 4.10 it is described how to delete files from your<br />
player. You can also delete files or folders using the file<br />
manager of your PC when your <strong>MP3</strong> <strong>Player</strong> is connected to<br />
your PC via a USB connector.<br />
The device is able to read track information and to display the existing music<br />
sorted according to genre, artist, album and title.<br />
• Shortly press the menu key in order to change over to the sub menu.<br />
• Pass your finger over the active keypad in order to select classified.<br />
• To confirm press the menu key once again.<br />
If necessary the list needs to be updated. The dialog to<br />
update the list will be displayed if required after selecting the<br />
option “Classified“. If you want to update the list<br />
automatically by yourself, please select the corresponding<br />
entry in the system menu. (Chapter 4.9)<br />
• Pass your finger over the active keypad in order to select files or folders.<br />
• You can use the key to change over to the superior directory.<br />
• Shortly press the menu key in order to repeat a selected file or to open a<br />
folder.<br />
Please note that incorrect entries in the track information of a<br />
file may lead to wrong displays and to incorrect sorting on<br />
the device.<br />
17<br />
EN
EN<br />
18<br />
Play list<br />
<strong>ODYS</strong> <strong>MP3</strong> <strong>Player</strong> <strong>X36</strong><br />
This device supports the play lists in the m3u format. Create play lists on<br />
your PC and copy them afterwards with the corresponding <strong>MP3</strong> files to<br />
the device.<br />
Furthermore you can enter the music titles on the device in a favorite<br />
repeat list via “Browse files”(see above).<br />
Please note that the play list is located in the folder<br />
“PLAYLIST“ on the device together with the music files. The<br />
files can also be organized in sub-folders. However make<br />
sure that it is also indicated in the play list.<br />
At the best create a folder including all files which shall be<br />
repeated in the play list on the PC and copy this folder then<br />
to the device. The play list file itself has to be saved always<br />
directly in the PLAYLIST directory.<br />
• Shortly press the menu key in order to change over to the sub menu.<br />
• Pass your finger over the active keypad in order to select the option play<br />
list.<br />
• To confirm press the menu key once again.<br />
• Pass your finger over the active keypad in order to select the given play<br />
list and the music from this list.<br />
• You can use the key to change over to the superior folder level.<br />
• Shortly press the menu key in order to playback the selected file or in<br />
order to open a folder.<br />
Slideshow<br />
With the attached software “Slide Show Maker“ you can create a image slide<br />
show on your PC and transfer it to the device (refer to chapter 4.12).
<strong>ODYS</strong> <strong>MP3</strong> <strong>Player</strong> <strong>X36</strong><br />
• Shortly press the menu key in order to change over to the sub menu.<br />
• Pass your finger over the active keypad in order to select the option<br />
slideshow.<br />
• To confirm press the menu key.<br />
• Pass your finger over the active keypad and select in which interval you<br />
want the slides to be shown.<br />
When setting off the slideshow will not be shown.<br />
• To confirm press the menu key once again.<br />
• You can use the key to change over to the superior directory.<br />
Cue File List<br />
You can use so called CUE files in connection with APE music files. If CUE<br />
files are available you can manage them by means of the Cue File List.<br />
19<br />
EN
EN<br />
20<br />
4.3 Photo mode<br />
<strong>ODYS</strong> <strong>MP3</strong> <strong>Player</strong> <strong>X36</strong><br />
This function serves to display images in the common JPEG-and BMP<br />
formats.<br />
• Select the photo mode in the main menu using the keys / and<br />
confirm with the menu key.<br />
• Now the folders and image files of the players are displayed (Browser<br />
view). If no files are visible the player memory is empty.<br />
• With / you can navigate to the folder structure and select the<br />
required file. In order to open a file press<br />
the menu key. Press the key in order to<br />
quit the folder.<br />
Alternatively you can move your finger from<br />
the bottom to the top or from the top to the<br />
bottom over the line of the active keypad.<br />
• To confirm press the menu key once<br />
again in order to select and playback the<br />
required file.<br />
• Shortly press the keys / in order to<br />
display the following or previous image.<br />
• Shortly press the menu key in order to return to the browser view.<br />
• In order to change over to the main menu press the menu key for about<br />
1 sec.<br />
The image files to be displayed should ideally have a size of<br />
176 x 132 pixels. Other geometries and pixel numbers are<br />
also possible. The pictures will then not fill the whole screen.<br />
In chapter 4.10 you will find a description on how to delete<br />
files from your player.
4.4 Video mode<br />
<strong>ODYS</strong> <strong>MP3</strong> <strong>Player</strong> <strong>X36</strong><br />
This function serves to replay videos in the MTV format.<br />
• Select the video mode in the main<br />
menu by pressing the keys /<br />
and confirm by pressing the menu<br />
key.<br />
• You can now select and playback<br />
video files in the same way as you<br />
display images in the photo mode.<br />
• Increase or decrease the volume<br />
by passing your finger from the<br />
bottom to the top or from the top to the bottom over the line of the active<br />
keypad.<br />
• Shortly press the menu key during the playback in order to change over to<br />
the sub menu and select one of the following functions.<br />
Repeat mode<br />
• Shortly press the menu key during the playback in order to change over to<br />
the sub menu repeat mode.<br />
• Pass your finger over the active keypad in order to select the required<br />
function (Once, Repeat One, Folder Once, Folder Repeat, All Once, All<br />
Repeat, Intro).<br />
• To confirm press the menu key once again.<br />
No Repeat: Repeats all files once.<br />
Repeat One: Repeats the current file several times.<br />
Repeat All: Repeats all files several times.<br />
Random All: Repeats all files in a random order.<br />
Folder Normal: Repeats all files of the current directory.<br />
21<br />
EN
EN<br />
22<br />
<strong>ODYS</strong> <strong>MP3</strong> <strong>Player</strong> <strong>X36</strong><br />
Folder Repeat: Repeats all files of the current directory several times.<br />
Folder Random: Repeats all files of the current directory in random order<br />
Subtitle Color<br />
In this sub menu you can set the color of the system screen during the<br />
video playback.<br />
• During the playback shortly press the menu key in order to change over<br />
to the sub menu repeat mode.<br />
• Pass your finger over the active keypad and select “Subtitle Color“.<br />
• To confirm press the menu key.<br />
• Select the required color and press the menu key to confirm.<br />
• Press repeatedly on the menu key in order to return to the browser view.<br />
In order to return to the main menu press again the menu key for about 1<br />
sec.<br />
In order to set videos which your player can playback please<br />
use the video converting tool on the CD which is included in<br />
the delivery (refer to chapter 4.12).
4.5 FM radio mode<br />
<strong>ODYS</strong> <strong>MP3</strong> <strong>Player</strong> <strong>X36</strong><br />
• Select the FM radio mode by pressing<br />
the keys / in the main menu and<br />
confirm by pressing the menu key.<br />
• Decrease and increase the volume by<br />
passing your finger from the bottom to<br />
the top or from the top to the bottom<br />
over the line of the active keypad.<br />
• Pass from the normal mode to the preset mode by pressing the key.<br />
• The mode display is in the middle of the screen.<br />
Normal (Manual station search)<br />
Select the required frequency by pressing gradually the keys /. Press and<br />
hold the keys / for fast forward or backward within the UKW frequency<br />
band. In order to stop the search run press one of those keys once again.<br />
Preset (Selecting a saved radio station)<br />
If there are saved radio stations you can select one of those radio stations by<br />
pressing the key /. Otherwise you may save stations to one of the 20<br />
memory locations as follows:<br />
• Shortly press the menu key in order to change to the sub menu and select<br />
one of the following functions.<br />
Save Preset (Save radio station)<br />
This option is only activated in the normal mode.<br />
• Select save preset in order to save the current radio station.<br />
• Pass your finger over the active keypad in order to select a free memory<br />
location for this radio station and confirm by pressing the menu key.<br />
23<br />
EN
EN<br />
24<br />
<strong>ODYS</strong> <strong>MP3</strong> <strong>Player</strong> <strong>X36</strong><br />
• Select “Yes” or “No” by pressing the keys/ and confirm by<br />
pressing the menu key.<br />
Del (Deleting saved radio stations)<br />
This option is only activated in the preset mode.<br />
• Select Del in order to delete saved radio stations.<br />
• Pass your finger over the active keypad in order to select the<br />
number of the storage location which needs to be deleted and confirm<br />
by pressing the menu key.<br />
• Select “Yes” or “No” by pressing the keys / and confirm by<br />
pressing the menu key.<br />
Auto Scan (Automatic radio station finding)<br />
Select Auto Scan in order to perform an automatic radio station finding.<br />
The receivable radio stations will now automatically be found and saved.<br />
Finally you can select the preset radio stations one after another by<br />
pressing the keys /in the preset mode.<br />
Attention! Any radio stations which had been possibly<br />
saved beforehand will automatically be overwritten.<br />
Record (Radio recording)<br />
• Search for a radio station from which you would like to record.<br />
• Shortly press the menu key in order to change to the sub menu and<br />
select record.<br />
• The recording will immediately start.<br />
• Press the key in order to interrupt the recording. In order to continue the<br />
recording press the key once again.<br />
• Press the menu key in order to terminate the radio recording. Then the<br />
recording will be saved and the FM Radio menu will be displayed again.
<strong>ODYS</strong> <strong>MP3</strong> <strong>Player</strong> <strong>X36</strong><br />
The recorded files will be saved in the folder “FMIN.DIR“ in<br />
the WAV format. Do not save any <strong>MP3</strong>- or WMA files here.<br />
Playback of radio recordings<br />
• If the player is in another mode, change over to the voice playback mode via<br />
the main menu as described above.<br />
• The playback control is performed in the same way as for the music mode<br />
(Chapter 4.2).<br />
• In order to return to the main menu, press the menu key again for about 1<br />
sec.<br />
In chapter 4.10 it is described how to delete files from your<br />
player. You can also delete files or folders using the file<br />
manager of your PC when your <strong>MP3</strong> <strong>Player</strong> is connected to<br />
your PC via a USB connector.<br />
4.6 Text mode<br />
This function serves to display texts in the TXT format.<br />
• Select the text mode by pressing the keys / in the main menu and<br />
confirm by pressing the menu key.<br />
• Now you can select and display text files in the same way as pictures in the<br />
photo mode.<br />
• Pass your finger over the active keypad in order to scroll through the text.<br />
• Shortly press the key in order to return to the browser view. In order to<br />
return to the main menu press the menu key for about 1 sec.<br />
4.7 Voice recording and -playback (Voice mode)<br />
You can use your <strong>MP3</strong> <strong>Player</strong> also as digital dictaphone.<br />
This way you can record important ideas or thoughts when you are on your<br />
way.<br />
25<br />
EN
EN<br />
26<br />
<strong>ODYS</strong> <strong>MP3</strong> <strong>Player</strong> <strong>X36</strong><br />
Select the voice mode by pressing on the keys / in the main menu<br />
and confirm by pressing the menu key.<br />
Voice playback<br />
• If the player is in another mode change to the music mode via the main<br />
menu as described above.<br />
• The playback control is performed in the same way as for the music<br />
mode (Chapter 4.2).<br />
• In order to return to the main menu press the menu key for about 1sec.<br />
• Shortly press the menu key in order to change over to the sub menu and<br />
select here one of the following options.<br />
Repeat mode<br />
• Shortly press the menu key in order to change over to the sub menu<br />
repeat mode.<br />
• Pass your finger over the active keypad in order to select the required<br />
function (Once, Repeat One, Folder Once, Folder Repeat, All Once, All<br />
Repeat, Intro).<br />
• To confirm press the menu key once again.<br />
No Repeat: Repeats all files once.<br />
Repeat One: Repeats the current file several times.<br />
Repeat All: Repeats all files several times.<br />
Random All: Repeats all fiels in random order.<br />
Folder Normal: Repeats once all files of the current directory.<br />
Folder Repeat: Repeats all files of the current directory several times.<br />
Folder Random: Repeats all files of the current directory in random order.<br />
Equalizer settings, EQ<br />
• Shortly press the menu key in order to change over to the sub menu EQ.<br />
• Pass your finger over the active keypad in order to select the required<br />
sound (Normal, 3D, Rock, Pop, Classic, Bass, Jazz, Custom EQ).
<strong>ODYS</strong> <strong>MP3</strong> <strong>Player</strong> <strong>X36</strong><br />
• To confirm press the menu key once again.<br />
A3D (3D sound emulation)<br />
• Shortly press the menu key in order to change over to the sub menu.<br />
• Pass your finger over the active keypad in order to switch the function<br />
on or off.<br />
• To confirm press the menu key once again.<br />
Play rate<br />
• Shortly press the menu key in order to change over to the sub menu.<br />
• Pass your finger over the active keypad in order to select the play rate.<br />
When setting 1.00x the playback will be performed in original speed.<br />
• To confirm press the menu key once again.<br />
File<br />
If this option is not set to 1.00x the playback may be skewed.<br />
Using this menu item you can selectively select files.<br />
• Shortly press the menu key in order to change over to the sub menu.<br />
• Pass your finger over the active keypad in order to select the option file<br />
(file management).<br />
• To confirm press the menu key once again.<br />
• Pass your finger over the active keypad in order to select files or folders.<br />
27<br />
EN
EN<br />
28<br />
<strong>ODYS</strong> <strong>MP3</strong> <strong>Player</strong> <strong>X36</strong><br />
• You can press the key to change over to the superior folder level.<br />
• Shortly press the menu key in order to playback the selected file or<br />
to open a folder.<br />
Record<br />
• Shortly press the menu<br />
key in order to change<br />
over to the sub menu and<br />
select record.<br />
• The recording will start<br />
immediately.<br />
• Press the key in order to<br />
interrupt the recording. In<br />
order to continue the<br />
recording, press the key once again.<br />
• Press the menu key in order to terminate the radio recording. Then<br />
the recording will be saved and the voice playback menu (Voice) will<br />
be displayed again.<br />
The recorded files will be saved in the folder “MICIN.DIR“ in<br />
the WAV format. Do not save any <strong>MP3</strong>- or WMA files here.<br />
In chapter 4.10 it is described how to delete files from your<br />
player. You can also delete files or folders using the file<br />
manager of your PC when your <strong>MP3</strong> <strong>Player</strong> is connected to<br />
your PC via a USB connection.<br />
4.8 Game mode<br />
• Select the game mode by pressing the keys / in the main menu and<br />
confirm by pressing the menu key.
<strong>ODYS</strong> <strong>MP3</strong> <strong>Player</strong> <strong>X36</strong><br />
• In order to return to the main menu press the menu key for about<br />
1sec. and select “Exit”.<br />
4.9 Settings<br />
In the mode settings you can change important settings of your <strong>MP3</strong> <strong>Player</strong>.<br />
• Select the setting mode by pressing the keys / in the main menu and<br />
confirm by pressing the menu key. The settings menu includes the sub<br />
menus for the system settings Music, Radio, Record, Display, Auto Play<br />
Set, System, PowerOFF Time and Default Set. Select the corresponding<br />
sub menu by pressing the keys / and confirm by pressing the menu key.<br />
• In order to return to the main menu press the menu key once again for<br />
about 1 sec. You can also press the key to change over to the superior<br />
menu level.<br />
Power save mode<br />
In the power save mode the device will be automatically switched off in order<br />
to save energy when no key had been pressed during a determined period.<br />
You can also use the sleep timer function.<br />
Automatic switching off (Power)<br />
• Select one of the following values:<br />
15 min., 30 min., 60 min., 90 min.,120 Min. and close (Off).<br />
To confirm press the menu key.<br />
Always on<br />
• The device always remains switched on until the internal battery is empty.<br />
To confirm press the menu key.<br />
<strong>Language</strong> setting<br />
Set the required language using this menu item:<br />
Chinese (simple), Chinese (trad.), English, Korean, Japanese, Spanish,<br />
French, German, Italian, Portuguese, Greek<br />
29<br />
EN
EN<br />
30<br />
To confirm press the menu key.<br />
<strong>ODYS</strong> <strong>MP3</strong> <strong>Player</strong> <strong>X36</strong><br />
Display settings<br />
Set the interval during which the display will remain switched on after the<br />
last key stroke: 5 sec., 10 sec., 20 sec., 30 sec. and “Always On”. By<br />
selecting the settings “Always On” the display will remain switched on<br />
continuously.<br />
Brightness<br />
Select the required display brightness (4 levels).<br />
Display<br />
Select the interval during which the backlight will remain switched on after<br />
the last key stroke.<br />
• Select one of the following values:<br />
15 sec., 30 sec., 1 min. and close (Off).<br />
To confirm press the menu key.<br />
When setting “Close“ the light will remain switched on<br />
continuously.<br />
Record settings<br />
Quality of the recording (REC Quality)<br />
Set the required Bitrate for voice recording and for FM radio recording.<br />
Long Time: Records from the source at low quality (32 kbps).<br />
Normal Quality: Records from the source with average quality (48 kbps).<br />
High Quality: Records from the source at high quality (64 kbps).
VAD (Voice Activated)<br />
<strong>ODYS</strong> <strong>MP3</strong> <strong>Player</strong> <strong>X36</strong><br />
• Select if you want to perform the recording with voice command or<br />
without.<br />
To confirm press the menu key.<br />
The device will only record if the person does not speak up<br />
adequately. If you speak too low or not at all the recording<br />
will stop.<br />
AGC (Automatic Gain Control)<br />
• Select if the recording volume shall be automatically adapted.<br />
To confirm press the menu key.<br />
System settings<br />
Delete<br />
Select the files which shall be deleted.<br />
Please follow the instructions in chapter 4.10 file management<br />
Formatting<br />
Use this option in order to format the data storage of the device.<br />
• Select if the formatting shall be performed quickly or completely.<br />
To confirm press the menu key.<br />
Attention! After confirming the formatting procedure all data<br />
will be deleted from the device!<br />
31<br />
EN
EN<br />
32<br />
<strong>ODYS</strong> <strong>MP3</strong> <strong>Player</strong> <strong>X36</strong><br />
Please save important data on your PC beforehand.<br />
Reset to the factory defaults (Reset)<br />
Using this option you can reset the device to the factory defaults.<br />
• Select “Yes” or “No” by pressing the / keys and confirm by pressing<br />
the menu key.<br />
By pressing “Yes“ you will reset the device to the<br />
factory defaults – by pressing “No“ you will quit the<br />
dialog.<br />
Sys Info (System information)<br />
Here you inform yourself about the following system data:<br />
- current firmware version<br />
- manufacturing date<br />
- used and total memory capacity of the internal memory<br />
- used and total memory capacity of the external memory card<br />
Refresh<br />
Using this function you can force a new sorting of the saved data.<br />
• Select “Yes” or “No” by pressing the key / and confirm by pressing<br />
the menu key.
<strong>ODYS</strong> <strong>MP3</strong> <strong>Player</strong> <strong>X36</strong><br />
4.10 File management (Explorer)<br />
In the Explorer mode you can directly delete or playback files which are<br />
saved on your <strong>MP3</strong> <strong>Player</strong>.<br />
• Select the Explorer mode by pressing the keys / in the main menu<br />
and confirm by pressing the menu key.<br />
• Pass your finger over the active keypad in order to select the files to be<br />
deleted. In order to open a folder, press the menu key.<br />
• You can press the key to change over to the superior folder level.<br />
• Shortly press the menu key in order to delete the selected file.<br />
• Select Yes for deleting or quit the dialog by pressing No. Confirm by<br />
pressing the menu key.<br />
You can also delete files or folders using the file<br />
manager of your PC when your <strong>MP3</strong> <strong>Player</strong> is<br />
connected to your PC via a USB connector.<br />
33<br />
EN
EN<br />
34<br />
<strong>ODYS</strong> <strong>MP3</strong> <strong>Player</strong> <strong>X36</strong><br />
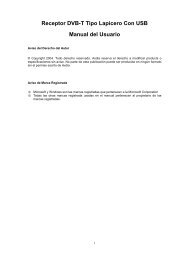
4.11 Video conversion tool<br />
Only use this video converter. Do not copy your standard<br />
video files on the player. Probably the player will not be able<br />
to replay such files.<br />
Execute the file “Video Convert.exe“ which is on the CD-ROM (double<br />
click). The following program window will open:<br />
1<br />
2<br />
3<br />
4<br />
1. Select the video which you want to convert.<br />
2. Select the location where you would like to save the video.<br />
3. Determine the period of time for the conversion (if required).<br />
4. Start the conversion and wait until the conversion is completed<br />
(100 %).
<strong>ODYS</strong> <strong>MP3</strong> <strong>Player</strong> <strong>X36</strong><br />
The following formats are supported by the conversion<br />
program:<br />
avi, wmv, mpg, mpeg, mov, qt, rm, rmvb, 3gb, mov, vob, asf.<br />
Attention! Due to the differences also within one file format it<br />
might occur in a few cases that the program might not be<br />
able to process some individual files.<br />
35<br />
EN
EN<br />
36<br />
<strong>ODYS</strong> <strong>MP3</strong> <strong>Player</strong> <strong>X36</strong><br />
4.12 Creating a slideshow<br />
Only use the enclosed software to create a slideshow. Any<br />
picture sequences which are created in another way might<br />
probably not be played back by this device.<br />
Execute the file “Slide Show Maker.exe“ which is on the CD-ROM (double<br />
click). The following program window will open:<br />
1. Load the pictures from your PC to the program.<br />
2. Select the transfer effect between the pictures under “Mode“.<br />
3. By pressing “Up“and “Down“ you can change the position of a<br />
picture within the order which is displayed on the left.<br />
4. Click on “Delete“ in order to remove pictures from the slideshow.<br />
5. Click on “Transform“ in order to create the slideshow and select<br />
the storage location for the slideshow.
<strong>ODYS</strong> <strong>MP3</strong> <strong>Player</strong> <strong>X36</strong><br />
6. At best, connect the player and save the slideshow directly on the<br />
device.<br />
7. Attention! Please save the created slideshows only in the folder<br />
SLS which is already located on the player. If this is not the case,<br />
create a folder named “SLS“ in the root directory of the device and<br />
copy the slideshow file to this folder.<br />
In this program deleted pictures will only be removed from<br />
the slideshow. They will not be deleted from your PC.<br />
37<br />
EN
EN<br />
38<br />
5 Troubleshooting<br />
<strong>ODYS</strong> <strong>MP3</strong> <strong>Player</strong> <strong>X36</strong><br />
Problem Cause and solutions<br />
No power Whether the battery is enough.<br />
Without sound inside<br />
earphone.<br />
The character on the<br />
display screen is in<br />
abnormal shape.<br />
Cannot download<br />
music normally.<br />
No USB connection<br />
is established to the<br />
PC.<br />
Please confirm whether turn on the player.<br />
Is the main switch turned on?<br />
Please confirm the volume is not in the status of Zero<br />
and the connection of earphone is ok.<br />
Please confirm the earphone is clean<br />
The broken <strong>MP3</strong> will produce noise with different<br />
grades even cannot play music. Please confirm the<br />
complete files.<br />
Try another pair of headphones.<br />
Please confirm the language that you selected is<br />
correct.<br />
Whether the installation of driver is OK<br />
Check whether damaged the connection of USB and<br />
the connection is OK. Check whether there’s any<br />
empty memory space.<br />
Be sure that button lock is deactivated.<br />
Check cable/plug connection to the PC, Windows<br />
system configuration and USB driver. Restart PC,<br />
remove and reconnect the USB cable, reinstall drivers<br />
If the malfunction continues, contact customer<br />
services.
The device has<br />
stopped working.<br />
The player shuts off<br />
after a short time or<br />
cannot be turned on.<br />
However, the USB<br />
connection works.<br />
<strong>ODYS</strong> <strong>MP3</strong> <strong>Player</strong> <strong>X36</strong><br />
Use the player’s reset function.<br />
Fully charge the battery (3 – 4 hours)<br />
If the player has not been used for an extended<br />
period of time, then the first two battery charging<br />
cycles should last 8 hours each.<br />
39<br />
EN
EN<br />
40<br />
6 Specifications<br />
Internal memory<br />
<strong>ODYS</strong> <strong>MP3</strong> <strong>Player</strong> <strong>X36</strong><br />
1 GB, 2 GB, 4GB<br />
Integrated Flash momory<br />
Formats <strong>MP3</strong>, WMA, WAV, JPEG, BMP, MTV<br />
Voice recording<br />
Battery Lithium-Ionen<br />
Battery life ca. 6 Stunden<br />
Power supply<br />
externally<br />
Record format WAV<br />
Aufzeichnungszeit ca. 32 Stunden (512 MB)<br />
USB<br />
Dimensions 89 mm x 41 mm x 6 mm<br />
Temperature<br />
range<br />
-5 bis 40 °C<br />
Display 1,46 “ TFT (176 x 132 Pixel) 65.000 Farben<br />
USB-Typ USB 2.0<br />
S/N ratio > 85 dB<br />
Headphone output 2 x 10 mW<br />
<strong>Language</strong>s<br />
English, Spanish, French, German, Italian, Polish, Dutch,<br />
Russia
7 Safety instructions<br />
<strong>ODYS</strong> <strong>MP3</strong> <strong>Player</strong> <strong>X36</strong><br />
Although this product is safe, please observe the following information and<br />
warnings.<br />
• Do not expose the device to direct sunlight, extreme heat<br />
or cold, damp or dusty conditions. Malfunctions and<br />
damage and can occur as a result..<br />
• Do not use the device in an extremely dry environment to<br />
avoid static electricity.<br />
• Do not shake the device or subject it to hard knocks. The<br />
device may be damaged if it falls. Do not place any heavy<br />
objects on top of the device.<br />
• Promptly load the device’s internal battery.<br />
• Do not use the <strong>MP3</strong> player while driving a vehicle.<br />
• Never press two buttons simultaneously and handle the<br />
display carefully.<br />
• Do not carry the <strong>MP3</strong> player with other metal objects<br />
(coins or keys) in your pocket.<br />
• Clean the device only using a soft, dry cloth and do not<br />
use any volatile substances, such as solvents, to avoid<br />
damaging the surface.<br />
• Do not open the casing of the device under any<br />
circumstances, and do not attempt to repair or modify the<br />
device.<br />
• Never disconnect the USB cable from your <strong>MP3</strong> player to<br />
the PC during a data transfer or formatting. Correctly<br />
disconnect the <strong>MP3</strong> player from the operating system.<br />
Information loss and malfunctions can occur.<br />
41<br />
EN
EN<br />
42<br />
Disposal<br />
<strong>ODYS</strong> <strong>MP3</strong> <strong>Player</strong> <strong>X36</strong><br />
Do not dispose of a defective <strong>MP3</strong> player in normal<br />
household waste disposal containers (internal battery).<br />
Take the defective device to your retailer or to an<br />
appropriate waste collection site. This will ensure that the<br />
device is disposed of in an environmentally-friendly way.
<strong>ODYS</strong> <strong>MP3</strong> <strong>Player</strong> <strong>X36</strong><br />
8 Warranty conditions EN<br />
The following conditions comprise the requirements and scope of our warranty conditions and do not<br />
affect our legal and contractual warranty obligations.<br />
We offer a warranty on our products in accordance with the following<br />
conditions:<br />
1. Odys products are covered by a 24 month warranty. We will resolve damages or defects on<br />
Odys products free of charge within 12 months of the purchase date under the following<br />
warranty conditions. For any damage or defect determined later than 12 months after the<br />
purchase date, proof of a manufacturing fault must be submitted for repair under warranty.<br />
The warranty does not cover batteries and other parts, which are considered consumables,<br />
parts that break easily such as glass or plastic or defects based on normal wear and tear.<br />
There is no warranty obligation in the event of marginal differences compared to the target<br />
appearance and workmanship provided these have a negligible effect on the product's<br />
fitness for use, in the event of damage caused by chemical or electrochemical effects, by<br />
water or generally from abnormal conditions.<br />
2. The warranty will be performed in such a way that we shall decide whether to repair the<br />
defective parts or to replace them with working parts free of charge. AXDIA reserves the<br />
right to exchange the product for a replacement product of equal value if the product that is<br />
sent in cannot be repaired within a reasonable time or at reasonable cost. The product can<br />
also be exchanged for a different model of the same value. Requests cannot be made for<br />
repairs to be carried out on site. Parts that have been replaced or exchanged become our<br />
property.<br />
3. The warranty claim does not apply if repairs or other work is carried out by unauthorized<br />
persons or if our products are equipped with additional parts or accessories that are not<br />
approved for our products.<br />
4. Warranties that have been activated do not cause the warranty period to be extended, nor<br />
do they trigger a new warranty period. The warranty period for any replacement parts<br />
installed ends with the warranty period for the entire product.<br />
5. Any other or further claims are excluded, especially those for replacement due to damage<br />
caused outside of the product, provided there is no obligatory legal liability. We therefore<br />
accept no liability for accidental, indirect or other consequential damage of any kind, which<br />
leads to usage restrictions, data loss, loss of earnings or interruption to business.<br />
Asserting a warranty claim<br />
1. To make use of the warranty service, you must contact the AXDIA Service Center by e-mail, fax or phone (see<br />
below for contact details). You can also use the service form on our website or on the back of the warranty<br />
conditions.<br />
2. AXDIA Service Center will try to diagnose and solve your problem. If it is determined that a warranty claim exists,<br />
you will be given an RMA number (Return Material Authorization) and you will be asked to send the product to<br />
AXDIA.<br />
43<br />
EN
EN<br />
44<br />
<strong>ODYS</strong> <strong>MP3</strong> <strong>Player</strong> <strong>X36</strong><br />
IMPORTANT: AXDIA will only accept parcels that have an RMA number.<br />
Please observe the following when sending the product:<br />
1. Send the product suitably packaged with carriage and insurance paid. Do not enclose any<br />
accessories with the products (no cables, CD's, memory cards, manuals, etc.), unless the<br />
AXDIA Service Centre specifies otherwise.<br />
2. Mark the RMA number on the outside of the package in such a way that it is visible and<br />
clearly legible.<br />
3. You must enclose a copy of the sales slip as proof of purchase.<br />
4. Once AXDIA has received the product, it will meet its warranty obligations in accordance<br />
with the warranty conditions and will return the product to the sender with carriage and<br />
insurance paid.<br />
Service outside of warranty<br />
AXDIA can refuse any service claim made that is not covered by the warranty. If AXDIA agrees to<br />
provide a service outside the warranty, the customer will be invoiced for all repair and transport costs.<br />
AXDIA will not accept any packages that have not first been approved by AXDIA by means of an RMA<br />
(Return Material Authorization).