


You also want an ePaper? Increase the reach of your titles
YUMPU automatically turns print PDFs into web optimized ePapers that Google loves.
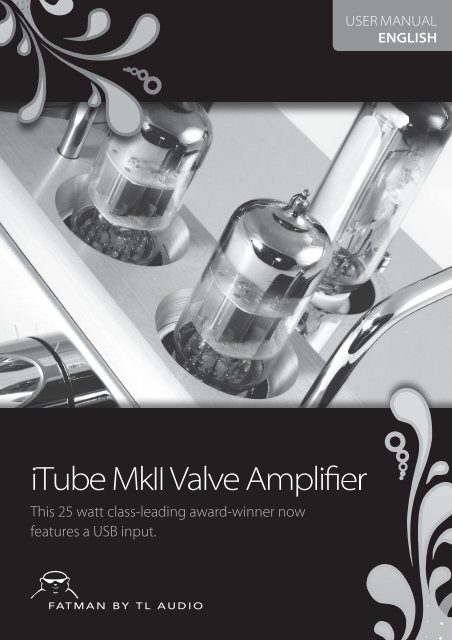
<strong>iTube</strong> <strong>MkII</strong> <strong>Valve</strong> Amplifi er<br />
This 25 watt class-leading award-winner now<br />
features a USB input.<br />
<strong>Fat</strong><strong>man</strong> by tL audio<br />
USER MANUAL<br />
ENGLISH
Contents<br />
2<br />
<strong>iTube</strong> <strong>MkII</strong> <strong>Valve</strong> <strong>Amplifier</strong><br />
In the box .................................................................3<br />
Safety instructions.................................................4<br />
<strong>Amplifier</strong> <strong>co</strong>nnections .........................................5<br />
Speaker <strong>co</strong>nnections ...........................................6<br />
Connecting the <strong>Valve</strong>Dock ................................7<br />
Front and back <strong>co</strong>ntrols ......................................8<br />
Remote <strong>co</strong>ntrol ......................................................9<br />
Dr Feelgood - symptoms and cures ............ 10<br />
Specifications ...................................................... 12<br />
Service.................................................................... 12<br />
<strong>Fat</strong><strong>man</strong> by tL audio<br />
From us, to you…<br />
We’d like to <strong>co</strong>ngratulate you on your excellent taste in choosing the <strong>Fat</strong><strong>man</strong> <strong>iTube</strong><br />
<strong>MkII</strong> by TL Audio. We’ve put <strong>man</strong>y, <strong>man</strong>y years of audio engineering experience<br />
and a whole lot of love into bringing you a marvel of modern engineering that will<br />
enhance your listening experience, and in its own small way, your life.<br />
To make sure you get the best perfor<strong>man</strong>ce from your system please read this<br />
owner’s <strong>man</strong>ual thoroughly and use your <strong>iTube</strong> <strong>MkII</strong> only in ac<strong>co</strong>rdance with its<br />
instructions. Treat it well, and it should reward you with <strong>man</strong>y years of loyal service<br />
and excellent sound quality.
In the box<br />
Here’s what you’ll find inside<br />
• <strong>iTube</strong> <strong>MkII</strong> Vacuum Tube <strong>Amplifier</strong><br />
• <strong>iTube</strong> <strong>MkII</strong> iPod <strong>Valve</strong>Dock<br />
• High quality, directional Speaker Cables<br />
• Audio Cable - Connects the <strong>iTube</strong> <strong>MkII</strong> amplifier to the iPod <strong>Valve</strong>Dock<br />
• Aux Audio Cable - <strong>co</strong>nnects another source like a phone, MP3 player, CD player or <strong>co</strong>mputer.<br />
• Video Cable - <strong>co</strong>nnects your <strong>iTube</strong> <strong>MkII</strong> to your television<br />
• Remote Control - Use the <strong>Fat</strong><strong>man</strong> Remote Control to play, pause, forward, rewind, shuffle and more<br />
USER MANUAL<br />
ENGLISH<br />
bEauty • tRutH • muSiC • LiStEn <strong>Fat</strong><strong>man</strong> by tL audio | 3
<strong>iTube</strong> <strong>MkII</strong> <strong>Valve</strong> <strong>Amplifier</strong><br />
Safety Instructions<br />
They’re Important, So Please Read Carefully!<br />
Please DO...<br />
• Keep these instructions in a safe place for future<br />
reference - you may need ‘em.<br />
• The <strong>iTube</strong> <strong>MkII</strong> works best on a clean, dry and flat<br />
surface. Try it, you’ll see.<br />
• The <strong>iTube</strong> <strong>MkII</strong> needs room to breathe, so make<br />
sure its new home has adequate ventilation. Don’t<br />
put it on beds, sofas, rugs, enclosed bookcases /<br />
cabinets or anywhere else where its ventilation<br />
may be obstructed and it can overheat.<br />
• Make sure that your <strong>iTube</strong> <strong>MkII</strong> is <strong>co</strong>nnected to the<br />
<strong>co</strong>rrect power supply as indicated on the unit.<br />
• Unplug your <strong>iTube</strong> <strong>MkII</strong> when it’s not in use for a<br />
long period (we’re talking days, not hours).<br />
• Always make sure power cables are placed safely<br />
and not obstructing a walkway.<br />
• If you move your <strong>iTube</strong> <strong>MkII</strong> from a <strong>co</strong>ol to a warm<br />
place, <strong>co</strong>ndensation may form on the surface of<br />
the vacuum tube. It’s nothing to worry about, but<br />
allow 1 hour before you switch it on again. This will<br />
avoid leakage or a blow-out of the vacuum tube<br />
due to too much sudden heat.<br />
• You really should get your <strong>iTube</strong> <strong>MkII</strong> serviced by<br />
an authorised service engineer if:<br />
1. The power supply or <strong>co</strong>rd is damaged<br />
2. It drops or is struck by a falling object<br />
3. It’s exposed to rain or moisture<br />
4. Liquid is spilt on it<br />
5. It’s not operating normally or shows a sudden<br />
change in perfor<strong>man</strong>ce<br />
4<br />
Please DON’T...<br />
• Don’t put your <strong>iTube</strong> <strong>MkII</strong> anywhere near water – it<br />
hates it. So avoid placing it near bathtubs, sinks,<br />
washing machines, swimming pools, saunas,<br />
jacuzzis, kettles, precariously balanced pints of beer<br />
etc.<br />
• Expose it to direct sunlight or to extremes of<br />
temperature or humidity.<br />
• Don’t leave it near direct heat sources such as<br />
radiators, stoves, gas fires, naked flames or candles.<br />
• Never drop the unit. It’s delicate, so don’t apply<br />
excessive force to the <strong>co</strong>ntrols or place heavy<br />
objects on top of it either.<br />
• Don’t let too much dust gather on your <strong>iTube</strong><br />
– give it a regular wipe with a soft dry cloth. If<br />
necessary, use a slightly damp cloth but DO NOT<br />
use solvents.<br />
• The <strong>iTube</strong> <strong>MkII</strong> has valves, and they can get hot.<br />
Don’t touch the tubes and keep away from babies<br />
and children.<br />
• Don’t try to remove the <strong>co</strong>ver or the back - there<br />
are no user-serviceable parts, and you don’t want<br />
to risk an electric shock.<br />
NOTE: Any unauthorised changes or modifications<br />
to this equipment render the <strong>man</strong>ufacturer’s warranty<br />
null and void.
<strong>Amplifier</strong> Connections<br />
• Before <strong>co</strong>nnecting anything to or from your <strong>iTube</strong><br />
<strong>MkII</strong>, switch OFF the power to the <strong>iTube</strong> <strong>MkII</strong> and<br />
to the <strong>co</strong>mponents you want to <strong>co</strong>nnect.<br />
• Make sure that all <strong>co</strong>nnections between the <strong>iTube</strong><br />
and other <strong>co</strong>mponents are made <strong>co</strong>rrectly, so<br />
L(left) goes to L, R(Right) to R, + to + and - to -.<br />
Don’t forget to refer to the owner’s <strong>man</strong>ual of each<br />
<strong>co</strong>mponent that you want to <strong>co</strong>nnect.<br />
• Always turn OFF the power switches when you’re<br />
<strong>co</strong>nnecting or dis<strong>co</strong>nnecting from the mains.<br />
• Dis<strong>co</strong>nnect the power supply from the mains if<br />
you’re not planning to use your <strong>iTube</strong> <strong>MkII</strong> for a<br />
while eg holidays.<br />
USER MANUAL<br />
ENGLISH<br />
• Any speakers you <strong>co</strong>nnect should have an<br />
impedance of 4-8 ohms – if it’s not written on the<br />
back of the speaker, check with the <strong>man</strong>ufacturer.<br />
bEauty • tRutH • muSiC • LiStEn <strong>Fat</strong><strong>man</strong> by tL audio | 5
6<br />
<strong>iTube</strong> <strong>MkII</strong> <strong>Valve</strong> Amplifi er<br />
Speaker Connections<br />
• Connect to your speakers using high quality, bare<br />
(stripped) speaker wire. If your speaker wires are<br />
not <strong>co</strong>nnected properly you may hear no sound at<br />
all, or if the wires are mixed up, it will sound weird<br />
with a disturbing loss of bass.<br />
• When using bare speaker wires, fit at least 1.6mm<br />
of insulation inside the speaker terminals<br />
so that there’s no bare wire showing.<br />
• Make sure the wire holders are firmly screwed in to<br />
stop the wires from be<strong>co</strong>ming loose. If wires touch, the<br />
speakers or the unit <strong>co</strong>uld be damaged. That’s bad.
Connecting the <strong>Valve</strong>Dock<br />
Video Output<br />
Connect the video cable (yellow) from the video<br />
output <strong>co</strong>nnector (yellow) of the <strong>iTube</strong> to the video<br />
input (you guessed it, probably yellow) of your TV.<br />
Audio Output<br />
Connect the audio cable from the twin audio outputs<br />
of your CD player or other source to the audio inputs<br />
of the <strong>iTube</strong>.<br />
S-Video Output<br />
Use an S-Video cable (not included, sorry) to <strong>co</strong>nnect<br />
the S-Video output of your <strong>iTube</strong> to the S-Video input<br />
of your TV.<br />
Video Out<br />
S-Video<br />
Line Outputs<br />
Red is right channel, White is left channel<br />
Power<br />
USER MANUAL<br />
ENGLISH<br />
Power input<br />
Connect the supplied power cable between your<br />
<strong>iTube</strong> and the mains supply.<br />
Remote power<br />
Use the on switch on the remote <strong>co</strong>ntrol to turn<br />
on your <strong>iTube</strong> <strong>MkII</strong>.<br />
Backrest<br />
LED<br />
Power Indicator<br />
bEauty • tRutH • muSiC • LiStEn <strong>Fat</strong><strong>man</strong> by tL audio | 7
The Front<br />
8<br />
<strong>iTube</strong> <strong>MkII</strong> <strong>Valve</strong> <strong>Amplifier</strong><br />
• Power switch<br />
Press to on for power - the<br />
indicator will light up while<br />
the power is on. Later on, try<br />
pressing it off to give it a rest.<br />
• Source<br />
For switching between<br />
different sound sources –<br />
iPod dock, CD player, pre-amp,<br />
external DAC, whatever.<br />
• Volume <strong>co</strong>ntrol<br />
Full <strong>co</strong>ntrol - you can turn it<br />
up… or you can turn it down.<br />
Note: Before you switch on, set the volume <strong>co</strong>ntrol to the lowest<br />
setting to avoid damage to the speakers. Just in case you don’t, the<br />
speaker-protection circuit will mute the volume for a few se<strong>co</strong>nds<br />
after the power is switched on.<br />
The Back<br />
5 MINUTE RULE!<br />
Your <strong>iTube</strong> <strong>MkII</strong><br />
should only<br />
be re-started 5<br />
minutes after<br />
switching off to<br />
avoid damaging<br />
the tubes.<br />
USB<br />
Input<br />
Power Switch<br />
Line Inputs<br />
Red is right channel, White is left channel<br />
Speaker<br />
Outputs<br />
Source Volume<br />
Voltage<br />
switch<br />
AC Power<br />
Input
The Remote Control<br />
• iPod <strong>co</strong>ntrol<br />
Some iPod functions can be <strong>co</strong>ntrolled using the <strong>iTube</strong> <strong>MkII</strong>’s remote.<br />
Play/pause song Press play/pause<br />
Turn off iPod Press and hold ‘Play’<br />
Skip to next song Press ‘Next/fast forward’<br />
Start a song again Press ‘Previous/rewind’ once<br />
Play previous song Press ‘Previous/rewind’ twice<br />
Fast forward song Press and hold ‘Next/fast forward’<br />
Rewind a song Press and hold ‘Previous/rewind’<br />
Mute<br />
Backlight<br />
USER MANUAL<br />
ENGLISH<br />
Power On/Off<br />
Bass Treble Volume Shuffle Previous<br />
Next<br />
Menu Up<br />
bEauty • tRutH • muSiC • LiStEn <strong>Fat</strong><strong>man</strong> by tL audio | 9<br />
Menu<br />
Menu Down<br />
Select<br />
Play/Pause<br />
Repeat<br />
Stop
10<br />
<strong>iTube</strong> <strong>MkII</strong> <strong>Valve</strong> Amplifi er<br />
Dr Feelgood<br />
Your <strong>iTube</strong> <strong>MkII</strong> should give you years of trouble-free<br />
audio fitness, but if it isn’t performing as it should, it<br />
<strong>co</strong>uld be due to one of these simple problems. If you’re<br />
still having trouble, please <strong>co</strong>ntact your authorised<br />
dealer or service centre.<br />
SYMPTOM DIAGNOSIS CURE<br />
Won’t turn on when the<br />
POWER switch is pressed<br />
Power adaptor isn’t <strong>co</strong>nnected properly Mains supply is off Make sure the power cable is firmly plugged in and mains<br />
is switched on<br />
No sound The volume <strong>co</strong>ntrol is turned all the way to the left<br />
The <strong>co</strong>nnection wires are not <strong>co</strong>nnected securely to the<br />
INPUT terminals.<br />
Speakers are not <strong>co</strong>nnected properly<br />
No sound from left or right<br />
speaker<br />
The a<strong>co</strong>ustic image is unstable<br />
(sounds unnatural or<br />
weirdly bass light)<br />
iPod volume doesn’t effect<br />
audio volume<br />
One or both speakers are not properly <strong>co</strong>nnected<br />
<strong>iTube</strong> Dock input isn’t properly <strong>co</strong>nnected<br />
The positive and negative polarities of the unit and speakers<br />
aren’t matched<br />
Turn the <strong>co</strong>ntrol to the right to crank up the volume<br />
Make sure the <strong>co</strong>rds are fully inserted at both ends<br />
Check that the speaker cables are <strong>co</strong>nnected <strong>co</strong>rrectly (pg4)<br />
Check both speaker cables and ensure they’re <strong>co</strong>nnected<br />
securely<br />
Check the <strong>co</strong>nnections between your source and amplifier<br />
are <strong>co</strong>rrectly and firmly <strong>co</strong>nnected<br />
Remove the speaker cables and re-<strong>co</strong>nnect them <strong>co</strong>rrectly<br />
(pg4)<br />
iPod is already at maximum output Use your <strong>iTube</strong> <strong>MkII</strong>’s amplifier volume <strong>co</strong>ntrol when your<br />
iPod is docked
SYMPTOM DIAGNOSIS CURE<br />
USER MANUAL<br />
ENGLISH<br />
Crackling sound from Bad <strong>co</strong>nnection Check docking station <strong>co</strong>nnection (or the 3.5mm cable <strong>co</strong>n<strong>co</strong>nspeakers A problem with your audio source<br />
nection if using). Make sure it’s using ‘line out’ ‘audio out’ or<br />
‘headphone out’ from your source, NOT ‘speaker out’<br />
Test the 3.5mm cable with another audio source eg CD<br />
player, MP3 player<br />
Sound is distorted Volume level on <strong>iTube</strong> is too high<br />
Sound source is distorted<br />
Turn it down a bit (well, if it makes it sound better…)<br />
WAV and MIDI files are often poor quality and distortion<br />
sounds worse through a quality system – try a different<br />
audio source eg CD<br />
Radio interference You may be too close to a radio tower Try moving the speakers to different positions<br />
Remote <strong>co</strong>ntrol doesn’t<br />
work<br />
Low battery<br />
Remote’s not in range or pointing the wrong way<br />
TV cannot display Bad <strong>co</strong>nnection<br />
iPod video set up is in<strong>co</strong>rrect<br />
Replace battery<br />
Point the remote at the dock from no more than 20ft<br />
distance<br />
Check dock <strong>co</strong>nnection.<br />
Check iPod video set up<br />
bEauty • tRutH • muSiC • LiStEn <strong>Fat</strong><strong>man</strong> by tL audio | 11
<strong>iTube</strong> <strong>MkII</strong> <strong>Valve</strong> <strong>Amplifier</strong><br />
Specification<br />
Max output power: 25Wx2<br />
Frequency response: 20Hz-20KHz (±1.5dB)<br />
Distortion: ≤0.5%<br />
Signal to noise ratio: ≥86dB<br />
Input sensitivity: 200mV<br />
Input impedance: 100KΩ<br />
Output impedance: 4Ω /8Ω<br />
<strong>iTube</strong> <strong>MkII</strong> Size (WxHxD): 260mm x 145mm x 130mm<br />
<strong>Valve</strong>Dock (WxHxD): 155mm x 130mm x 123mm<br />
Weight: 4.3kg<br />
Tubes: 6N1 x 2, 6E2 x 1<br />
Type of amp: Hybrid<br />
Inputs: RCA pair x 1, USB x 1<br />
Service<br />
Please <strong>co</strong>ntact your local authorised dealer or reseller.<br />
<strong>Fat</strong><strong>man</strong> by tL audio<br />
info@fat-<strong>man</strong>.<strong>co</strong>.<strong>uk</strong> www.fat-<strong>man</strong>.<strong>co</strong>.<strong>uk</strong><br />
12In<br />
ac<strong>co</strong>rdance with our policy of <strong>co</strong>ntinuous development, we reserve the right to change specifications without notice. Photographs are<br />
for illustration only and actual product may vary. E&OE.<br />
iPod / iPhone not included. iPod is a trademark of Apple Inc., registered in the U.S. and other <strong>co</strong>untries. iPhone is a trademark of Apple Inc.<br />
Compatible with iPhone (2G, 3G, 3GS), iPod Nano (3rd, 4th, 5th Gen), iPod Touch, iPod Classic

