User's Manual - VTech
User's Manual - VTech
User's Manual - VTech

You also want an ePaper? Increase the reach of your titles
YUMPU automatically turns print PDFs into web optimized ePapers that Google loves.
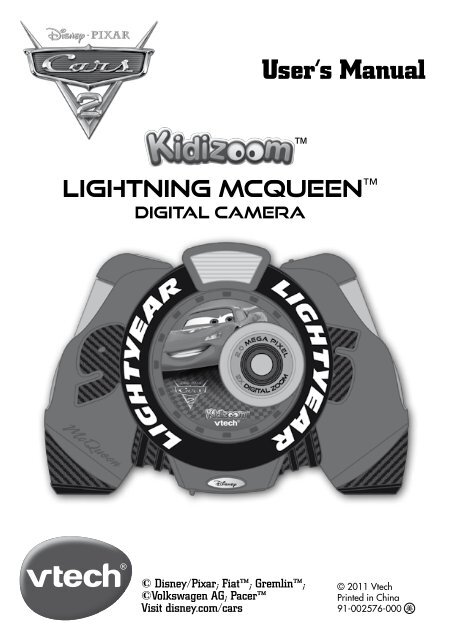
User’s <strong>Manual</strong><br />
Lightning McQueen <br />
DigitaL caMera<br />
© Disney/Pixar; Fiat; Gremlin;<br />
©Volkswagen AG; Pacer<br />
Visit disney.com/cars<br />
© 2011 Vtech<br />
Printed in China<br />
91-002576-000
To learn more about <strong>VTech</strong> ® toys, visit www.vtechuk.com
INTRODUCTION<br />
Thank you for purchasing the <strong>VTech</strong> ® Lightning McQueen Digital Camera!<br />
Take photos with Lightning McQueen and his friends or add a Cars touch to your movie<br />
clips with this sleek, easy to use and durable digital camera! The Lightning McQueen<br />
Digital Camera includes 256MB of built-in memory and supports both normal SD and<br />
SDHC cards (not included) with a capacity of 32MB to 16GB, so even more photos and<br />
movies can be stored! The Lightning McQueen Digital Camera can be connected to<br />
a TV so you can view your creative work on a big screen! There is also a USB port and<br />
supplied cable that allows you to connect the Lightning McQueen Digital Camera<br />
to your home PC and import your files. You can add more effects to your photos using the<br />
downloadable Photo Editor software.<br />
PRODUCT FeaTURes<br />
PRODUCT LayOUT aND KeybOaRD<br />
A/V Port<br />
Camera Mode<br />
Button<br />
1.8” Color<br />
Screen<br />
Up/Down<br />
Wheel<br />
On/Off Button<br />
Trash Button<br />
USB Port<br />
ON/OFF button<br />
Press this button to turn the camera ON or OFF.<br />
Camera Mode button<br />
Press this button to choose Camera Mode.<br />
Photo editor Mode button<br />
Press this button to access the Photo Editor Mode.<br />
Movie Mode button<br />
Press this button to choose Movie Mode.<br />
Shutter/OK<br />
Button<br />
Movie Mode<br />
Button<br />
Photo Editor<br />
Mode Button<br />
Zoom Wheel<br />
Play Button<br />
Flash Button<br />
Speaker<br />
SD Card Slot<br />
INTRODUCTION/PRODUCT FeaTURes<br />
3
INCLUDeD IN ThIs PaCKage/ PRODUCT sPeCIFICaTIONs<br />
4<br />
Tools & settings Mode<br />
Hold down the Camera Mode Button and Photo Editor Mode Button together for<br />
approximately 2 seconds to access the Tools and Settings Mode.<br />
Play button<br />
Press this button to view saved photos in Camera Mode, play a slideshow, or view saved<br />
videos in Movie Mode.<br />
Trash button<br />
Press this button to delete the selected file.<br />
shutter/OK button<br />
Press this button to take a photo, start/stop recording a movie, or to confirm a choice<br />
or action.<br />
Up/Down Wheel<br />
Scroll the wheel up/down to make a selection.<br />
Zoom Wheel<br />
Scroll the wheel to zoom in and out while previewing pictures or movies.<br />
Flash button<br />
Press this button to choose between Flash On, Flash Off, and Auto Flash. The Auto Flash<br />
mode will use flash when it detects that it is necessary. When the flash is ready to use, a<br />
lightning bolt icon will appear in the upper left corner of the screen in Camera Mode.<br />
a/V Port<br />
Plug the included A/V cable into the A/V port on the camera to connect to your TV.<br />
Usb Port<br />
Plug the included USB cable into the USB port on the camera to connect to your PC.<br />
INCLUDeD IN ThIs PaCKage<br />
• 1 <strong>VTech</strong> ® Lightning McQueen Digital Camera<br />
• 1 A/V cable<br />
• 1 USB cable<br />
• 1 user’s manual<br />
• 1 wrist strap<br />
WaRNINg: all packing materials such as tape, plastic sheets, wire ties and<br />
tags are not part of this toy, and should be discarded for your child’s safety.<br />
PRODUCT sPeCIFICaTIONs<br />
Display: 1.8” color LCD screen<br />
Photo Resolution : 1600 x 1200 (JPEG format)<br />
Video Resolution : 320 x 240 (Motion JPEG format)<br />
Focus Range : 1.5 feet - ∞<br />
Flash Range : 1.5 - 8 feet
atteries : 4 “AA” (LR6) alkaline batteries or<br />
4 “AA” NiMH rechargeable batteries<br />
Memory : 256MB Built-in memory (approximately 196MB free memory<br />
for photo/video storage)<br />
Internal photo storage capacity: Store up to 500 photos<br />
Internal video storage capacity: Store up to 10 minutes of video, max. 5 minutes<br />
per file.<br />
Lightning McQueen Digital Camera supports both normal SD and SDHC cards with<br />
a memory size of 32MB to 16GB. It doesn’t support SD cards less than 32MB. SD cards of<br />
1GB or above are recommended. (Note: SD cards are not included.)<br />
See below for approximate photo storage capacity with different sized SD cards:<br />
1GB 2000+ photos<br />
2GB 4000+ photos<br />
4GB 8000+ photos<br />
8GB 16000+ photos<br />
16GB 32000+ photos<br />
supported File Formats:<br />
Photo: Standard Baseline JPEG.<br />
Video: Motion JPEG (recorded with the Lightning McQueen Digital Camera).<br />
supported Connectivity:<br />
A/V cable for TV connection (included)<br />
USB cable for PC connection (included)<br />
Operating Temperature : 0 to 40 o C (32 to 104 o F)<br />
geTTINg sTaRTeD<br />
baTTeRy INsTaLLaTION<br />
Note: Adult assembly is required for battery installation.<br />
• Make sure the camera is turned OFF.<br />
• Locate the battery covers on the bottom of the camera. Open the battery covers by<br />
separately pressing each trigger inwards.<br />
• Install 4 new “AA” batteries (2 on each side) as illustrated. (The use of new, alkaline<br />
batteries is recommended for maximum performance.)<br />
• Replace each battery cover (they will both fit either side) with the arrow on the trigger<br />
pointing inwards and push down until they click into position.<br />
geTTINg sTaRTeD<br />
5
aTTeRy NOTICe/sD CaRD INseRTION<br />
6<br />
baTTeRy NOTICe<br />
• The use of new alkaline batteries is recommended for maximum performance.<br />
• Non-rechargeable batteries are not to be recharged.<br />
• Rechargeable batteries are to be removed from the toy before being charged (if<br />
removable).<br />
• Rechargeable batteries are only to be charged under adult supervision (if<br />
removable).<br />
• Do not mix old and new batteries.<br />
• Do not mix batteries of different types: alkaline, standard (carbon-zinc) or rechargeable<br />
(nickel-cadmium).<br />
• Only batteries of the same or equivalent type as recommended are to be used.<br />
• Batteries are to be inserted with the correct polarity.<br />
• Exhausted batteries are to be removed from the toy.<br />
• The supply terminals are not to be short-circuited.<br />
• The toy is not to be connected to more than the recommended number of power<br />
supplies.<br />
• Do not dispose of batteries in fire.<br />
sD CaRD INseRTION<br />
• Make sure the camera is turned OFF.<br />
• Locate the SD card slot at the bottom of the camera.<br />
• Pull up the rubber cover.<br />
• Insert the SD card (not included) as illustrated below.<br />
TO begIN UsINg The LIghTNINg<br />
MCQUeeN DIgITaL CaMeRa<br />
• Press the ON/OFF Button to turn on the camera.<br />
• If it’s the first time you have powered on the Lightning McQueen Digital Camera,<br />
you will need to select the language you want to use. Scroll the Up/Down Wheel and<br />
press the Shutter/OK button to select the language. If you want to select a different<br />
language later, please go to Tools and Settings Mode, select the language menu, and
then choose the language you want. After turning on, the Lightning McQueen<br />
Digital Camera will go directly to the Camera Mode.<br />
• To go to Movie Mode, press the Movie Mode button. To access the Tools and Settings<br />
Mode, hold down the Camera Mode button and Photo Editor Mode button together for<br />
approximately 2 seconds.<br />
• To connect to a TV or PC, follow the instructions in the ‘Connecting to a TV’ or<br />
‘Connecting to a PC’ illustrations.<br />
• Press the ON/OFF Button again to turn the unit off.<br />
baTTeRy sTaTUs<br />
When the batteries are running low, the low battery symbol will be displayed .<br />
aUTOMaTIC shUT-OFF<br />
To preserve battery life, the Lightning McQueen Digital Camera will automatically<br />
turn off after several minutes without input. The camera can be turned on again by<br />
pressing the ON/OFF Button.<br />
CONNeCTINg TO a TV<br />
NOTe: Before connecting your Lightning McQueen Digital Camera<br />
to a TV, check to make sure that the camera is working properly.<br />
Connect your Lightning McQueen Digital Camera to a TV or monitor<br />
using the supplied A/V cable. Insert the A/V cable into the A/V port on<br />
your Lightning McQueen Digital Camera. Insert the colored plugs on the A/V<br />
cable into the matching color video and audio input ports on your TV set.<br />
CONNeCTINg TO a PC<br />
You can connect the Lightning McQueen Digital Camera to a computer using<br />
the included USB cable. Once connected, you can upload and download files to the<br />
Lightning McQueen Digital Camera by accessing your camera as a removable<br />
storage device.<br />
CONNeCTINg TO a TV/CONNeCTINg TO a PC<br />
7
aCTIVITIes<br />
8<br />
• Locate the USB port on the back of your camera.<br />
• Pull up the rubber cover.<br />
• Insert the USB cable (smaller end) into the USB port on the camera.<br />
• Insert the larger end of the USB cable into a USB port on the computer. A USB port is<br />
usually marked with this symbol .<br />
MINIMUM sysTeM ReQUIReMeNTs FOR PC CONNeCTION:<br />
Microsoft ® Windows ® XP, Windows Vista ® or Windows ® 7 Operating System<br />
Mac OS X version 10.5 or 10.6<br />
Note: Once the camera is connected to the PC, the Lightning McQueen Digital<br />
Camera will automatically turn on and enter the USB mode to connect to the computer.<br />
Do not disconnect the camera while files are uploading or downloading.<br />
To avoid any potential damage to your Lightning McQueen Digital Camera:<br />
• When the unit is not connected to a USB cable, please ensure the rubber cover is fully<br />
covering the USB port.<br />
• When the unit is not connected to a TV, please ensure the rubber cover is fully<br />
covering the A/V Port.<br />
• Please ensure the rubber cover is fully covering the SD card slot.<br />
aCTIVITIes<br />
1. CaMeRa MODe<br />
a. Taking Pictures<br />
• In Camera Mode, you can look at the LCD screen to see the photo subject.<br />
• While holding the camera steady, press the Shutter/OK button on the top of the<br />
camera to take a picture.<br />
• You can also choose to add different photo frames to your<br />
photos, or stamps of your Cars friends. Scroll the Up/Down<br />
Wheel to choose an option. After choosing an option, take a<br />
photo as usual and that frame or stamp will be added to the<br />
photo. If you don’t want to add a border or stamp, press the<br />
Trash button to remove it.
• You can scroll the Zoom Wheel up or down to increase or reduce the level of digital<br />
zoom.<br />
• When the Lightning McQueen Digital Camera is first turned ON, it will be set to<br />
auto flash mode. To change your flash settings, press the Flash button to switch<br />
between auto flash , flash on or flash off .<br />
Warning: To avoid eye damage, turn off the flash when you’re taking a close-up picture<br />
of a person or animal.<br />
Note: If the batteries are too weak, the auto flash feature may not be available. This icon<br />
will appear: .<br />
Flash mode Optimum distance for using<br />
Auto flash<br />
Flash on<br />
2.5 – 3.5 feet<br />
3.5 – 8 feet<br />
b. Viewing Photos<br />
• To view the photos you’ve taken, press the Play button to enter the Photo Album.<br />
Scroll the Up/Down Wheel to view the next or previous picture stored in the album.<br />
To return to Camera Mode, press the Shutter/OK button , or the Camera Mode<br />
button.<br />
C. slideshow<br />
• While in the Photo Album, press the Play button again and it will start to display<br />
the photos in a slideshow. To return to Camera Mode, press the Shutter/OK button<br />
or Camera Mode button .<br />
D. Delete a Photo<br />
• While in the Photo Album or Slideshow, press the Trash button to delete the photo<br />
that is currently shown on the screen.<br />
Note: Photos taken with the Lightning McQueen Digital Camera will be saved in<br />
the PHOTO folder. If you want to view your own photos, please save them to the folder<br />
DOWNLOAD\PHOTO in the built-in memory or on an SD card (not included) if one is<br />
inserted into the camera. The Lightning McQueen Digital Camera only supports<br />
Standard Baseline JPEG.<br />
2. MOVIe MODe<br />
• In Movie Mode, you can create digital videos with the<br />
Lightning McQueen Digital Camera. Press the Shutter/<br />
OK button on the top of the camera to start or to stop<br />
movie recording.<br />
• You can scroll the Zoom Wheel to increase or reduce the level<br />
of digital zoom.<br />
aCTIVITIes<br />
9
aCTIVITIes<br />
10<br />
• To add a frame to the movie before starting to record, scroll the Up/Down Wheel to<br />
choose a frame for the video. Then, press the Shutter/OK button to start recording<br />
a movie. The frame can’t be changed during the recording.<br />
• To watch the movies you’ve recorded, press the Play button to enter the Movie<br />
Album, then scroll the Up/Down Wheel to choose the movie that you want to watch,<br />
and press the Play button to start the movie. While watching movies, you can<br />
scroll the Zoom Wheel to adjust the volume.<br />
• While in the Movie Album, press the Trash button to delete the movie that is<br />
currently shown on the screen.<br />
• To exit the Movie Album and return to Movie Mode, press the Shutter/OK button<br />
once, or press the Movie Mode button.<br />
Note: Movies taken with the Lightning McQueen Digital Camera will be saved<br />
in the VIDEO folder of the internal memory or on the SD card (not included) if one is<br />
inserted into the camera. If you want to play the movies backed up earlier from the<br />
Lightning McQueen Digital Camera, please download the movies to the folder<br />
in DOWNLOAD\VIDEO of the built-in memory or on an SD card (not included) if one is<br />
inserted.<br />
3. PhOTO eDITOR MODe<br />
• In the Photo Editor Mode, scroll the Up/Down Wheel to choose a photo and press the<br />
Shutter/OK button to start editing the selected photo. Scroll the Up/Down Wheel<br />
again to choose one border or stamp and then press the Shutter/OK button . The<br />
selected border or stamp will become part of the photo.<br />
• Then, you can scroll the Up/Down Wheel to choose another photo to edit.<br />
4. TOOLs & seTTINgs MODe<br />
Scroll the Up/Down Wheel to select one of the following options to change in the<br />
Lightning McQueen Digital Camera settings.<br />
a. Memory Manager<br />
You can see the memory status of the camera’s internal<br />
memory and SD card (not included) if one is inserted into<br />
the Lightning McQueen Digital Camera. Scroll the<br />
Up/Down Wheel to select either the internal memory in<br />
the Lightning McQueen Digital Camera or the SD<br />
card. Press the Shutter/OK button to set the selected<br />
memory as default to save the photos and videos taken with<br />
the Lightning McQueen Digital Camera. To format and<br />
erase all the data in the selected memory, press the Trash<br />
button .<br />
b. Volume<br />
Scroll one of the wheels up to increase the volume and down<br />
to decrease the volume. Press the Shutter/OK button to<br />
confirm the volume setting.
C. shutter sound<br />
Set the shutter sound to a normal camera sound, or the default<br />
sound of car horn. Scroll the Up/Down Wheel to choose a<br />
sound and press the Shutter/OK button to confirm.<br />
D. Flickering<br />
Set the refresh rate to 50Hz for EU countries and 60 Hz for<br />
USA and Canada. Scroll the Up/Down Wheel to choose a<br />
setting and press the Shutter/OK button to confirm. When<br />
the flickering is correctly set, it will help avoid any flicker on<br />
the photos taken under fluorescent lighting. If you travel to<br />
other countries, please check the local voltage rating and set<br />
the camera to the correct setting for best results.<br />
e. Language setting<br />
Scroll one of the wheels up or down to select the language<br />
and press the Shutter/OK button to confirm the language<br />
setting.<br />
5. LIghTNINg MCQUeeN PhOTO eDITOR<br />
To edit your photos with a computer, there is a <strong>VTech</strong> ® Lightning McQueen Photo<br />
Editor software package available for both PC and Mac systems. Visit the following<br />
website to download the software:<br />
www.vtechkids.com/download<br />
After you download and install this Photo Editor software on your computer, you can<br />
add additional fun photo frames and stamps to your photos, as well as distortion and<br />
animation effects. Please see the Help section of the <strong>VTech</strong> ® Lightning McQueen Photo<br />
Editor software for more details and user instructions.<br />
Note: If it’s your first time launching the Photo Editor program, you will be asked to<br />
connect your <strong>VTech</strong> ® Lightning McQueen Digital Camera to your computer<br />
for program activation. The Photo Editor program will not run until the activation is<br />
completed.<br />
COMPUTeR sysTeM ReQUIReMeNTs<br />
For PC Users:<br />
• Pentium ® 4 CPU, 1 GHz or above<br />
• 256 MB RAM (512 MB recommended)<br />
• Graphic card with 1280x1024 at 16 or 32 bit color<br />
• Monitor Resolution: 1280x1024<br />
• 300MB Hard disk space<br />
• Windows ® compatible sound card and speakers<br />
• Microsoft ® Windows ® XP, Windows Vista ® or Windows ® 7 Operating System<br />
For Macintosh Users:<br />
• Macintosh Computer with an Intel (1GHz or faster) processor<br />
aCTIVITIes<br />
11
CaRe & MaINTeNaNCe/ TROUbLeshOOTINg<br />
12<br />
• 256 MB RAM (512 MB recommended)<br />
• 300MB Hard disk space<br />
• Mac OS X version 10.5 or 10.6<br />
Internet Connection is required for software download.<br />
Microsoft®, Windows® and Windows Vista® are either registered trademarks or trademarks of Microsoft<br />
Corporation in the United States and/or other countries. Intel®, Pentium® are trademarks of Intel Corporation in the<br />
United States and other countries. Macintosh, Mac and Mac OS are trademarks of Apple Inc., registered in the United<br />
States and other countries. All other trademarks are the property of their respective owners.<br />
sOFTWaRe ResTRICTIONs<br />
If the Software provides you with the ability to download, print and/or save images<br />
containing Disney’s copyrighted characters and/or artwork, this License only permits<br />
you to do so for your PERSONAL, NON-COMMERCIAL, and NON-GOVERNMENTAL<br />
use (e.g., you may not sell or publicly display such images), provided that you preserve<br />
all copyright notices that are included with the images as generated by the Software.<br />
You may not use images generated by the Software in any advertising or promotional<br />
materials, whether for profit or not for profit. You may share images generated by the<br />
Software with others (as long as such use is consistent with the restrictions described<br />
above), but you may not publicly distribute any such images via the Internet or otherwise<br />
or post such images to any website or to any other publicly accessible electronic forum.<br />
If any such image (a) is solely created by you, and (b) does not contain, reference<br />
or incorporate, and is not in any way based upon, any Disney copyrighted character,<br />
artwork or other material, the restrictions in this paragraph shall not apply. Use of images<br />
generated by the Software for any purpose not specifically permitted by this License is<br />
a violation of Disney’s copyrights, trademarks and/or other proprietary rights and is a<br />
breach of this License, entitling Disney to immediately terminate this License.<br />
CaRe & MaINTeNaNCe<br />
1. Keep the camera clean by wiping it with a slightly damp cloth.<br />
2. Keep the camera out of direct sunlight and away from any direct heat source.<br />
3. Remove the batteries when the camera is not in use for an extended period of time.<br />
4. Do not drop the camera on a hard surface and do not expose it to or immerse it in water.<br />
TROUbLeshOOTINg<br />
Go through this section if you experience difficulty in operating the Lightning McQueen<br />
Digital Camera.<br />
Problem Solution<br />
Program stops working 1. Interrupt the power supply by removing the batteries.<br />
2. Let the camera sit for a few minutes without batteries,<br />
then replace the batteries.<br />
3. Turn the unit on. The unit should now be ready to play<br />
again.<br />
4. If the unit still does not work, replace the batteries with<br />
an entire set of new batteries.
Image taken is not clear Check the camera lens protection window is clean.<br />
Display on the<br />
Lightning McQueen<br />
Digital Camera LCD<br />
does not turn on<br />
There is no picture on<br />
the TV screen<br />
1. Make sure there are 4 “AA” batteries in the camera.<br />
Hold the ON/OFF button for 2 seconds to turn it on.<br />
2. Make sure the camera is not connected to a TV with the<br />
A/V cable.<br />
3. Make sure the camera is not in power saving mode.<br />
Press the ON/OFF button for 2 seconds to turn it on.<br />
1. Make sure that there are batteries in the camera and<br />
that the TV is plugged into a power outlet.<br />
2. Make sure that the camera is turned on and the TV is<br />
turned on.<br />
3. Check the connections on the A/V cable between<br />
the camera and the TV and review the appropriate<br />
connection procedure in this manual.<br />
4. Make sure that all cable plugs are securely inserted into<br />
the appropriate ports.<br />
5. Make sure that the TV is tuned to the appropriate input<br />
channel.<br />
No sound on TV 1. Check if the TV volume is turned off or muted.<br />
2. Try to increase the volume.<br />
3. Check the audio and video connections between the<br />
camera and the TV.<br />
4. Make sure that the TV is tuned to the appropriate input<br />
channel.<br />
Picture is rolling or bars Try to adjust the vertical or horizontal hold controls (if<br />
and lines are visible on available) on your TV.<br />
TV screen<br />
Cannot connect to PC Check the connections on the USB cable between the<br />
camera and the PC and review the appropriate connection<br />
procedure in this manual.<br />
Cannot save files 1. Check the memory status of both the built-in Lightning<br />
McQueen Digital Camera memory and the SD<br />
card (not included), if one is inserted into the camera.<br />
2. Check your memory default setting (see procedure in<br />
Memory Manager section). If it is set to use an SD card<br />
(not included), check to make sure that the SD card is<br />
not write-protected.<br />
TROUbLeshOOTINg<br />
13
DIsCLaIMeR aND LIMITaTION OF LIabILITy<br />
14<br />
SD Card can’t be<br />
detected<br />
Can’t view the<br />
downloaded JPEG file<br />
1. Check if the SD card is correctly inserted.<br />
2. Check if the SD card is less than 32MB in capacity.<br />
The Lightning McQueen Digital Camera doesn’t<br />
support SD cards of less than 32MB.<br />
3. Check to see if it is the correct type of card. The<br />
Lightning McQueen Digital Camera doesn’t<br />
support MMC or other formats.<br />
Please check if the downloaded JPEG is Standard Baseline<br />
JPEG format. Other formats such as Progressive or CMYK<br />
JPEG are not supported.<br />
If you have a problem that cannot be solved by using this manual, we encourage you<br />
to visit us online or contact our Customer Services Department with any problems and/<br />
or suggestions that you might have. Our support representative will be happy to assist<br />
you.<br />
Before requesting support, please be ready to provide or include the information below:<br />
• The name of your product or model number (the model number is typically located on<br />
the back or bottom of your product).<br />
• The specific problem you are experiencing.<br />
• The actions you took right before the problem occurred.<br />
Internet: www.vtechkids.com, or www.vtechcanada.com<br />
Phone: 1-800-521-2010 in the U.S., or 1-877-352-8697 in Canada.<br />
DIsCLaIMeR aND LIMITaTION OF<br />
LIabILITy<br />
<strong>VTech</strong> ® Electronics North America, L.L.C. and its suppliers assume no responsibility<br />
for any damage or loss resulting from the use of this handbook. <strong>VTech</strong> ® Electronics<br />
North America, L.L.C. and its suppliers assume no responsibility for any loss or claims<br />
by third parties that may arise through the use of this product. <strong>VTech</strong> ® Electronics North<br />
America, L.L.C. and its suppliers assume no responsibility for any damage or loss caused<br />
by deletion of data as a result of malfunction, dead battery, or repairs.<br />
Company: <strong>VTech</strong> ® Electronics North America, L.L.C.<br />
address: 1155 West Dundee Road, Suite 130, Arlington Heights, IL, 60004 USA<br />
Phone: 1-800-521-2010 in the U.S., or 1-877-352-8697 in Canada.<br />
IMPORTaNT NOTe:<br />
Creating and developing Preschool Learning products is accompanied by a<br />
responsibility that we at <strong>VTech</strong> ® take very seriously. We make every effort to ensure<br />
the accuracy of the information which forms the value of our products. However, errors<br />
sometimes can occur. It is important for you to know that we stand behind our products and<br />
encourage you to call our Consumer Services Department at 1-800-521-2010 in the U.S.,<br />
or 1-877-352-8697 in Canada with any problems and/or suggestions that you might have.<br />
A service representative will be happy to help you.
Note:<br />
This equipment has been tested and found to comply with the limits for a Class B digital<br />
device, pursuant to Part 15 of the FCC Rules. These limits are designed to provide<br />
reasonable protection against harmful interference in a residential installation. This<br />
equipment generates, uses and can radiate radio frequency energy and, if not installed<br />
and used in accordance with the instructions, may cause harmful interference to radio<br />
communications. However, there is no guarantee that interference will not occur in a<br />
particular installation. If this equipment does cause harmful interference to radio or<br />
television reception, which can be determined by turning the equipment off and on, the<br />
user is encouraged to try to correct the interference by one or more of the following<br />
measures:<br />
• Reorient or relocate the receiving antenna.<br />
• Increase the separation between the equipment and receiver.<br />
• Connect the equipment into an outlet on a circuit different from that to which the<br />
receiver is connected.<br />
• Consult the dealer or an experienced radio/TV technician for help.<br />
Caution: Changes or modifications not expressly approved by the party responsible for<br />
compliance could void the user’s authority to operate the equipment.<br />
THIS DEVICE COMPLIES WITH PART 15 OF THE FCC RULES. OPERATION IS<br />
SUBJECT TO THE FOLLOWING TWO CONDITIONS: (1) THIS DEVICE MAY NOT<br />
CAUSE HARMFUL INTERFERENCE, AND (2) THIS DEVICE MUST ACCEPT ANY<br />
INTERFERENCE RECEIVED, INCLUDING INTERFERENCE THAT MAY CAUSE<br />
UNDESIRED OPERATION.<br />
THIS CLASS B DIGITAL APPARATUS COMPLIES WITH CANADIAN ICES-003.<br />
CET APPAREIL NUMÉRIQUE DE LA CLASSE B EST CONFORME À LA NORME<br />
NMB-003 DU CANADA.<br />
DIsCLaIMeR aND LIMITaTION OF LIabILITy<br />
15
Step 1<br />
Wrist Strap Attachment<br />
Instructions<br />
Locate the thread loop on the end of the<br />
strap. Insert it into the groove behind the<br />
bar and then push it through<br />
Step 2<br />
Feed the end of the strap up through the<br />
loop and pull it all the way through<br />
Step 3<br />
Make sure the loop is securely tightened<br />
around the bar