Hallo Maxi, jetzt aber!!!, meine Art zwei Socken auf einer ...
Hallo Maxi, jetzt aber!!!, meine Art zwei Socken auf einer ...
Hallo Maxi, jetzt aber!!!, meine Art zwei Socken auf einer ...

You also want an ePaper? Increase the reach of your titles
YUMPU automatically turns print PDFs into web optimized ePapers that Google loves.
<strong>Hallo</strong> <strong>Maxi</strong>,<br />
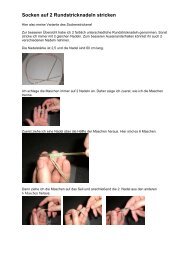
<strong>jetzt</strong> <strong>aber</strong>!!!, <strong>meine</strong> <strong>Art</strong> <strong>zwei</strong> <strong>Socken</strong> <strong>auf</strong> <strong>einer</strong> Rundstricknadel anzuschlagen!<br />
Sorry, <strong>aber</strong> an <strong>meine</strong>r Digi tut’s der Blitz wie er will und die Schärfe ist auch mal so oder so!<br />
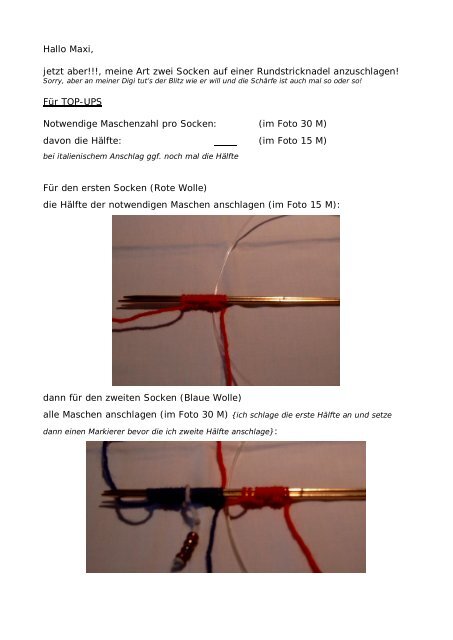
Für TOP-UPS<br />
Notwendige Maschenzahl pro <strong>Socken</strong>: (im Foto 30 M)<br />
davon die Hälfte: (im Foto 15 M)<br />
bei italienischem Anschlag ggf. noch mal die Hälfte<br />
Für den ersten <strong>Socken</strong> (Rote Wolle)<br />
die Hälfte der notwendigen Maschen anschlagen (im Foto 15 M):<br />
dann für den <strong>zwei</strong>ten <strong>Socken</strong> (Blaue Wolle)<br />
alle Maschen anschlagen (im Foto 30 M) {ich schlage die erste Hälfte an und setze<br />
dann einen Markierer bevor die ich <strong>zwei</strong>te Hälfte anschlage}:
So <strong>jetzt</strong> eine Nadel raus<br />
und wie beim Einzelsocken die Schl<strong>auf</strong>e bilden {dafür der Markierer}<br />
Und dann die fehlende <strong>zwei</strong>te Hälfte für den ersten <strong>Socken</strong> <strong>auf</strong>nehmen
Alle Maschen <strong>auf</strong> die Nadelspitzen schieben und ausrichten (d.h. kontrollieren<br />
das die <strong>auf</strong>genommenen Maschen nicht um die Nadeln verdreht sind), die<br />
Runde schließen {ich mach einen Knoten mit Strickfaden und Anfangsfaden}<br />
Die erste Hälfte beider <strong>Socken</strong> stricken
Wie von <strong>einer</strong> Socke gewohnt, die Nadeln ausrichten<br />
Arbeitsnadel lang ziehen und Arbeit wenden (Reihenfolge nach belieben)<br />
DIE FÄDEN SIND JETZT VERKREUZT!!!<br />
Die <strong>zwei</strong>te Hälfte beider <strong>Socken</strong> stricken, die Fäden sind immer noch verkreuzt!
Wieder wie von <strong>einer</strong> Socke gewohnt,<br />
Nadeln ausrichten,<br />
Arbeitsnadel lang ziehen<br />
und Arbeit wenden (ACHTUNG: so wenden, dass die Fäden nicht mehr<br />
verkreuzt, sondern wieder parallel l<strong>auf</strong>en)<br />
Das weitere Vorgehen ist wie bei <strong>einer</strong> Socke,<br />
DU musst halt nur das Verkreuzen der Fäden in Auge behalten,<br />
sonst hast Du nach einigen Runden einen elenden Tuck.<br />
UPS, ich hoffe, dass ich <strong>jetzt</strong> verständlicher war als die anderen Anleitungen!!<br />
Für Toe-Ups nehme ich nach der angehängten Anleitung <strong>auf</strong>, strick dann<br />
allerdings die ersten ein oder <strong>zwei</strong> Runden mit doppeltem Faden. Auch dabei<br />
ist der ganze Trick dann <strong>auf</strong> das Verkreuzen der Fäden zu achten!<br />
LG Chess<br />
P.S. Tippfehler darfst Du behalten!
Knitty: Magic cast-on for toe-up socks<br />
Cool stuff! Techniques with Theresa Thinking beyond... Knit like a man Frankenknits<br />
History 101 Silk Confessions Cleaning Beads Repairs 101 Magic cast-on<br />
Knittyspin Got spin? Dishwasher dyeing Madge, [a Knittyspin pattern]<br />
By Judy Becker<br />
There are advantages to knitting socks toe-up. For example, the sock can be tried on as you go, so<br />
the fit is perfect. If you are not sure you have enough yarn, you can knit both socks at the same<br />
time and stop when your yarn runs out.<br />
There are various ways to start a toe-up sock: Figure-8 cast-on, provisional cast-on, long-tail caston<br />
combined with grafting, etc. I used to use the figure-8 cast-on, but it leaves loose stitches that<br />
have to be tightened back in after a few rounds. Even with lots of practice, I usually had to make<br />
two or three tries at it. Although invisible from the outside of the toe, on the inside the figure-8<br />
cast-on leaves a blank space between the purl bumps of the first round.<br />
I thought that the world needed a better way, a more humane way to start toe-up socks, so I<br />
developed Judy's Magic Cast-On. It's an easy to learn, fast method that starts at the very end of the<br />
toe and works the first time, every time. It's completely invisible from both sides, and it can be<br />
used with almost any toe-up sock pattern.<br />
Note: These instructions assume that you have some familiarity with knitting socks toe-up. The<br />
pictures show the Magic Cast-On using two circular needles. Instructions for knitting two socks at<br />
the same time and for using the cast-on with DPNs are at the bottom.<br />
1. Make a slip knot and place the loop around one of the needles. The anchor loop will count as the<br />
first stitch.<br />
2. Hold the two needles together, with the needle that the yarn is attached to toward the top. We'll<br />
call this needle #2 and the other needle will be needle #1.<br />
3. In your other hand, hold the yarn so that the tail goes over your index finger and the working<br />
yarn (the yarn that leads to the ball) goes over your thumb. This is opposite from how the yarn is<br />
usually held for a long-tail cast-on.<br />
http://www.knitty.com/ISSUEspring06/FEATmagiccaston.html<br />
Seite 1<br />
25.05.2007 08:39:25
Knitty: Magic cast-on for toe-up socks<br />
4.<br />
http://www.knitty.com/ISSUEspring06/FEATmagiccaston.html<br />
a. Bring the tip of needle #1 over the strand of yarn on your finger,<br />
b. around and under the yarn and back up, making a loop around needle #1<br />
c. Pull the loop snug, but not tight, around the needle.<br />
Youhavecastonestitchontoneedle#1.<br />
5. Bring needle #2 over the yarn tail on your thumb, around and under the yarn and back up,<br />
making a loop around needle #2. Pull the loop snug around the needle.<br />
Youhavecastonestitchontoneedle#2.<br />
There are now two stitches on needle #2 Ñ the stitch you just cast on plus the anchor loop.<br />
The top yarn strand always wraps around needle #1 (the bottom needle), and the bottom yarn<br />
strand always wraps around needle #2 (the top needle). Just remember: Top around bottom, bottom<br />
around top.<br />
6. Repeat step 4 to cast a second stitch on to needle #1. (bottom around top)<br />
7. Repeat step 5 to cast a third stitch on to needle #2. (top around bottom)<br />
8. Continue repeating steps 4 and 5, alternating between needle #1 and needle #2, until you have<br />
cast on the desired number of stitches and ending with step 4. You will have the same number of<br />
stitches on each needle.<br />
Seite 2<br />
25.05.2007 08:39:25
Knitty: Magic cast-on for toe-up socks<br />
In this picture, a total of 20 stitches, or 10 stitches on each needle, have been cast on. The outside<br />
of the sock toe looks like two rows of offset loops. If you turn the needles over, you will see that<br />
the wrong side of the work (the inside of your sock) features a row of twists that look like purl<br />
bumps between the two needles.<br />
Turn back to the right side to begin knitting.<br />
9. Round 1: Drop the yarn tail and let it dangle. Turn the needles so that needle #1 is on the top.<br />
Pull needle #2 to the right until the stitches lie on the cable. Pick up the working yarn. Be sure that<br />
the yarn tail lies between the working yarn and the needle. In the picture, you can see how the tail<br />
passes under the working strand (purple arrow).<br />
Knit the row of stitches from needle #1. The first stitch will probably become loose while you are<br />
knitting it. Pull gently on the tail to snug it back up.<br />
You will see a row of stitches appear between the two needles.<br />
10. Turn the work so that the working yarn is on the right and needle #2 is on the top. Pull needle<br />
#1 to the right so that the stitches you just knit lie along the cable. Pull needle #2 to the left so<br />
that its point is towards the right and the stitches are ready to knit from it. Knit the stitches from<br />
needle #2.<br />
http://www.knitty.com/ISSUEspring06/FEATmagiccaston.html<br />
Seite 3<br />
25.05.2007 08:39:25
Knitty: Magic cast-on for toe-up socks<br />
Be careful! The cast-on loops on needle #2 are twisted. On the first round only, be sure to knit<br />
them through the back of the loops in order to untwist them. After this round the stitches will be<br />
"normal."<br />
You have completed one round and are back where you started.<br />
Note: Do the stitches between the needles appear too loose or "sloppy?" Make sure when you cast<br />
on that you have tightened each loop up individually as you placed it around the needle. Try to keep<br />
the loops at your regular gauge. If you find that your cast-on stitches are too tight, you can try<br />
casting on to a pair of larger needles.<br />
There are two rows of stitches between the needles now. The absolute center of your sock toe lies<br />
between the two rows of stitches.<br />
We now return you to your regularly scheduled toe-up sock pattern. Work the toe increases as<br />
specified by your pattern. If your pattern specifies a different type of toe, the following instructions<br />
are for a typical toe-up sock that starts at the very end:<br />
Round 2: on first needle, * K1, M1, K each stitch to within one stitch of the end of the row, M1, K1,<br />
turn to second needle. Repeat from *<br />
Round 3: K all stitches on both needles (no decreases).<br />
Repeat these two rounds, increasing 4 stitches every other round, until the total number of stitches<br />
has been reached.<br />
In this picture, 10 rounds have been worked and there are 20 stitches on each needle (40 stitches<br />
total.<br />
In this the toe has been spread out and the very end of the toe where the cast-on was made is right<br />
in the center. The left image is the outside of the sock and the right image is the inside.<br />
You can see that the stitches flow over the center of the toe with no visible break or seam. The caston<br />
is invisible on both sides.<br />
The tail can be woven in and trimmed at any time after you've worked at least one non-increase<br />
round. I usually let it dangle until I've finished the toe increases. Since the tail hangs at the<br />
beginning of the first round, it makes a handy way of telling which side of the sock each round<br />
starts on.<br />
http://www.knitty.com/ISSUEspring06/FEATmagiccaston.html<br />
Seite 4<br />
25.05.2007 08:39:25
Knitty: Magic cast-on for toe-up socks<br />
To use the Magic Cast-On for two-at-once socks, drop both the tail and the working strands when<br />
you have cast on the total number of stitches for the first sock. Push the stitches back along the<br />
needles so there is room at the tips for another set of stitches. Starting from a new ball of yarn,<br />
cast a second set of stitches on to the same needles.<br />
Work step #9 on sock #1. Drop the yarn and pick up sock #2's yarn. Repeat step #9 for sock #2.<br />
Work step #10 on sock #2. Drop the yarn and pick up sock #1's yarn. Repeat step #10 for sock #1.<br />
(Don't forget to work the stitches through the back of the loop on this round only.)<br />
Continue with the subsequent steps, always being careful to work each sock with its own ball of<br />
yarn.<br />
If you are knitting with DPNs, Cast on to two needles.<br />
Work step #9 by knitting 1/4 of the stitches using one needle and the remaining 1/4 of the stitches<br />
using a second needle. The stitches may be tight and rather awkward to work. This will improve<br />
after the first round.<br />
http://www.knitty.com/ISSUEspring06/FEATmagiccaston.html<br />
Seite 5<br />
25.05.2007 08:39:25
Knitty: Magic cast-on for toe-up socks<br />
Work step #10 by knitting 1/4 of the stitches using a third needle, and the remaining 1/4 of the<br />
stitches using a fourth needle. (Don't forget to work the stitches through the back of the loop on this<br />
round only.)<br />
On subsequent rounds, work the increases 1 stitch from the beginning of needles #1 and #3, and<br />
one stitch from the end of needles #2 and #4.<br />
So, is this good for anything but socks?<br />
Absolutely! It can be used for almost any pattern that requires casting on and working in a small<br />
closed circle. For example:<br />
Ð When casting on a center-out pinwheel, cast on 5 total stitches, three on the bottom needle and<br />
two on the top. Work round one and at round 2, begin the pattern's standard yo increases.<br />
Ð To knit the bottom of an oblong bag or purse, cast on enough stitches to equal the length of the<br />
bag minus the width (i.e., if the bag will be 10" long and 3" wide, cast on 7" worth of stitches). Work<br />
rounds 1, then increase 4 stitches every round until the bottom of the bag is the right size.<br />
And when anyone asks you how you accomplished that wonderful, invisible cast-on, you can say,<br />
"It's magic!"<br />
ABOUT THE AUTHOR<br />
© 2006 Judy Becker. Contact Judy<br />
http://www.knitty.com/ISSUEspring06/FEATmagiccaston.html<br />
Judy Becker knits and blogs near Portland, Oregon, where she lives<br />
with her teenaged son, a large stash of sock yarn, and three fiberobsessed<br />
cats.<br />
Seite 6<br />
25.05.2007 08:39:25