Using the Sagem fingerprint reader with Net2 - Paxton Access
Using the Sagem fingerprint reader with Net2 - Paxton Access
Using the Sagem fingerprint reader with Net2 - Paxton Access

Create successful ePaper yourself
Turn your PDF publications into a flip-book with our unique Google optimized e-Paper software.
27/04/2010<br />
AN1110 - <strong>Using</strong> <strong>the</strong> <strong>Sagem</strong> <strong>fingerprint</strong> <strong>reader</strong> <strong>with</strong> <strong>Net2</strong><br />
How does it work?<br />
This innovative system stores <strong>fingerprint</strong> information on <strong>the</strong> user’s own Mifare card.<br />
The data is encoded by means of a <strong>Sagem</strong> <strong>fingerprint</strong> <strong>reader</strong> and card encoder using<br />
<strong>Net2</strong> software connected to <strong>the</strong> PC via USB ports.<br />
<strong>Sagem</strong> <strong>reader</strong>/verifier units are used at each door to confirm that <strong>the</strong> <strong>fingerprint</strong> data<br />
matches <strong>the</strong> user before passing <strong>the</strong> card number to <strong>the</strong> <strong>Net2</strong> ACU.<br />
The advantages of this system are:<br />
- No dedicated data line is required to update <strong>the</strong> <strong>fingerprint</strong> data in each <strong>reader</strong>.<br />
- No dedicated application program is required to register each user.<br />
- No large database of <strong>fingerprint</strong> data is required at <strong>the</strong> PC.<br />
- No data protection issues arise as <strong>the</strong> user carries his own <strong>fingerprint</strong> data, it is not<br />
stored by <strong>the</strong> company.<br />
Setting up <strong>the</strong> PC hardware<br />
Connect <strong>the</strong> <strong>Sagem</strong> <strong>fingerprint</strong> <strong>reader</strong> and <strong>the</strong> card encoder into USB ports at <strong>the</strong> PC.<br />
Run <strong>the</strong> <strong>Net2</strong> software installation. (v4.18 or later). The PC will now detect <strong>the</strong><br />
hardware and <strong>the</strong> units will self configure.<br />
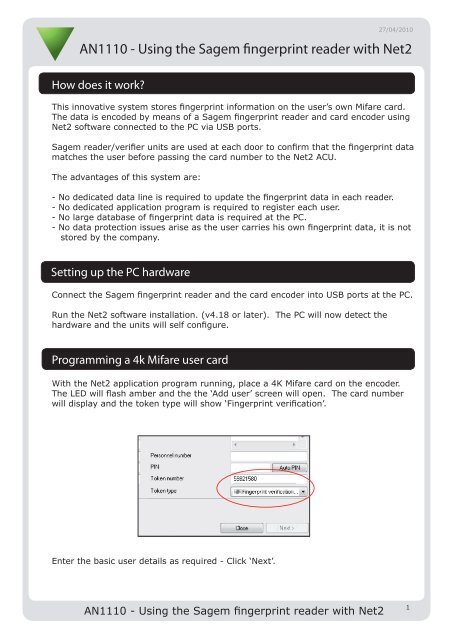
Programming a 4k Mifare user card<br />
With <strong>the</strong> <strong>Net2</strong> application program running, place a 4K Mifare card on <strong>the</strong> encoder.<br />
The LED will flash amber and <strong>the</strong> <strong>the</strong> ‘Add user’ screen will open. The card number<br />
will display and <strong>the</strong> token type will show ‘Fingerprint verification’.<br />
Enter <strong>the</strong> basic user details as required - Click ‘Next’.<br />
AN1110 - <strong>Using</strong> <strong>the</strong> <strong>Sagem</strong> <strong>fingerprint</strong> <strong>reader</strong> <strong>with</strong> <strong>Net2</strong><br />
1
The system now enters <strong>the</strong> scanning routine. - Click ‘Yes’<br />
You can abort <strong>the</strong> process and return to <strong>the</strong> ‘Add user’ screen by clicking ‘No’.<br />
Cards may be encoded for users that do not<br />
require <strong>fingerprint</strong> information. When setting<br />
up <strong>the</strong> ‘Add User’ data, set <strong>the</strong> token type to<br />
‘Visitor’ before clicking ‘Next’. The program will<br />
now go straight to <strong>the</strong> ‘Writing card’ process.<br />
The system requires three scans to build up a profile of <strong>the</strong> <strong>fingerprint</strong> information.<br />
Leave <strong>the</strong> card on <strong>the</strong> encoder throughout <strong>the</strong> process. The LED will show amber<br />
while a card remains in range.<br />
The scanner window will illuminate during <strong>the</strong> scanning process.<br />
Place a left finger on <strong>the</strong> scanner. Once <strong>the</strong> finger has been scanned <strong>the</strong> window LED<br />
will go out. Remove your finger from <strong>the</strong> scanner.<br />
AN1110 - <strong>Using</strong> <strong>the</strong> <strong>Sagem</strong> <strong>fingerprint</strong> <strong>reader</strong> <strong>with</strong> <strong>Net2</strong><br />
2
The system will check <strong>the</strong> <strong>fingerprint</strong> data and will confirm <strong>the</strong> entry <strong>with</strong> a tick.<br />
Repeat this process for <strong>the</strong> second and third scans of <strong>the</strong> same finger of <strong>the</strong> left hand.<br />
Once <strong>the</strong> data for <strong>the</strong> left finger has been captured and verified, <strong>the</strong> program will<br />
request a finger from <strong>the</strong> right hand. Click ‘Next’ to continue.<br />
Three scans are now required of a finger from <strong>the</strong> right hand.<br />
Once <strong>the</strong> <strong>fingerprint</strong> data for <strong>the</strong> right hand has been captured, it is again checked<br />
for quality.<br />
The system will <strong>the</strong>n write this data to <strong>the</strong> card.<br />
AN1110 - <strong>Using</strong> <strong>the</strong> <strong>Sagem</strong> <strong>fingerprint</strong> <strong>reader</strong> <strong>with</strong> <strong>Net2</strong><br />
3
Leave <strong>the</strong> card on <strong>the</strong> encoder until <strong>the</strong> final screen displays and <strong>the</strong>n remove <strong>the</strong> card.<br />
Click ‘Finish’.<br />
Removing <strong>the</strong> card should return <strong>the</strong> encoder LED to green.<br />
If <strong>the</strong> LED flashes red, <strong>the</strong> encoder should be allowed to reset itself to a green LED<br />
before continuing. This may take several minutes.<br />
A user record is created that will display <strong>the</strong> card details under a <strong>fingerprint</strong> icon.<br />
If a user record is already displayed when a card is placed on <strong>the</strong> <strong>reader</strong>, you will be<br />
invited to add this card to that same record. If you click ‘yes’ <strong>the</strong> scanning process<br />
will begin as before.<br />
AN1110 - <strong>Using</strong> <strong>the</strong> <strong>Sagem</strong> <strong>fingerprint</strong> <strong>reader</strong> <strong>with</strong> <strong>Net2</strong><br />
4
<strong>Sagem</strong> Door <strong>reader</strong>/verifier<br />
Wiring <strong>the</strong> <strong>reader</strong><br />
Software settings<br />
<strong>Using</strong> <strong>the</strong> <strong>reader</strong><br />
Cable Pinout ACU terminal<br />
Pwr +12 +12V<br />
- Red LED<br />
- Amber LED<br />
LED 1 Green LED<br />
TR+ / D0 Data<br />
TR - / D1 Clock<br />
- NOT USED<br />
Pwr Gnd + COM Gnd 0V<br />
Ensure any unused wires are safely terminated.<br />
Hardware configuration information is loaded on a USB stick supplied <strong>with</strong> <strong>the</strong> <strong>reader</strong>. With <strong>the</strong><br />
unit powered off, remove <strong>the</strong> outer case and plug <strong>the</strong> USB stick into its socket. Power up <strong>the</strong><br />
unit and it will load <strong>the</strong> configuration file. When completed, <strong>the</strong> unit will beep. Power down <strong>the</strong><br />
<strong>reader</strong> and remove <strong>the</strong> USB stick. Replace <strong>the</strong> cover and power up <strong>the</strong> unit.<br />
An administration card is also supplied which contains <strong>the</strong> user card configuration. Present this<br />
card once to <strong>the</strong> <strong>reader</strong> and it will beep. The <strong>reader</strong> has now been activated for <strong>Net2</strong> cards.<br />
The <strong>reader</strong> LEDs must be set in <strong>Net2</strong> to default OFF. Open <strong>the</strong> <strong>Net2</strong> server configuration utility<br />
and on <strong>the</strong> ‘General’ tab, check ‘Hide <strong>reader</strong> LED’s’.<br />
This is a global setting and so <strong>the</strong> LEDs on all o<strong>the</strong>r <strong>Paxton</strong> <strong>reader</strong>s wired to <strong>the</strong> system will<br />
default to off.<br />
LED indications for valid and invalid access will remain unchanged.<br />
The <strong>reader</strong> is configured to provide a Clock and Data output. Set <strong>the</strong> <strong>reader</strong> type in <strong>Net2</strong><br />
accordingly.<br />
1. The LED flashes while waiting for a user card.<br />
2. Present a user card to <strong>the</strong> <strong>reader</strong>.<br />
3. The <strong>reader</strong> reads <strong>the</strong> Mifare card and <strong>the</strong>n illuminates <strong>the</strong> scanner window. Once <strong>the</strong><br />
users <strong>fingerprint</strong> has been scanned, <strong>the</strong> <strong>reader</strong> compares this data <strong>with</strong> that stored<br />
on <strong>the</strong> card and if a good match is made, <strong>the</strong> card number is sent to <strong>Net2</strong>.<br />
4. The <strong>reader</strong> waits for confirmation from <strong>the</strong> ACU that this access request is valid.<br />
This is done by <strong>the</strong> ACU activating <strong>the</strong> green LED line. The <strong>reader</strong> responds by<br />
flashing its own green LED for a few seconds.<br />
If <strong>the</strong> <strong>fingerprint</strong> does not match <strong>the</strong> card data or <strong>the</strong> ACU does not respond via <strong>the</strong><br />
green LED wire, <strong>the</strong> <strong>reader</strong> will <strong>the</strong>n flash <strong>the</strong> red LED for a few seconds.<br />
AN1110 - <strong>Using</strong> <strong>the</strong> <strong>Sagem</strong> <strong>fingerprint</strong> <strong>reader</strong> <strong>with</strong> <strong>Net2</strong><br />
5