your guide to the lantus® solostar® insulin pen - Healthy Outcomes
your guide to the lantus® solostar® insulin pen - Healthy Outcomes your guide to the lantus® solostar® insulin pen - Healthy Outcomes
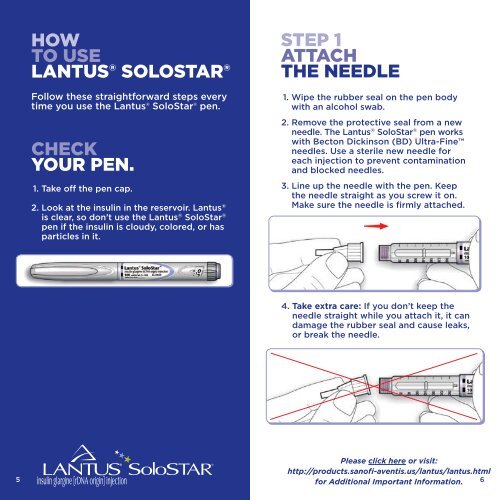
5 HOW TO USE LANTUS ® SOLOSTAR ® follow these straightforward steps every time you use the lantus ® solostar ® pen. CHECK YOUR PEN. 1. take off the pen cap. 2. look at the insulin in the reservoir. lantus ® is clear, so don’t use the lantus ® solostar ® pen if the insulin is cloudy, colored, or has particles in it. STEP 1 ATTACH THE NEEDLE 1. Wipe the rubber seal on the pen body with an alcohol swab. 2. remove the protective seal from a new needle. the lantus ® solostar ® pen works with Becton dickinson (Bd) ultra-fine needles. use a sterile new needle for each injection to prevent contamination and blocked needles. 3. line up the needle with the pen. keep the needle straight as you screw it on. Make sure the needle is firmly attached. 4. Take extra care: if you don’t keep the needle straight while you attach it, it can damage the rubber seal and cause leaks, or break the needle. Please click here or visit: http://products.sanofi-aventis.us/lantus/lantus.html for Additional Important Information. 6
7 STEP 2 DO A SAFETY TEST Always perform the safety test before every injection. This removes air bubbles and ensures the pen and needle are working properly. 1. select a dose of 2 units by turning the dosage knob. 2. take off the outer needle cap. keep this for removing the used needle after your injection. 3. take off the inner needle cap and throw it away. Keep Discard 4. hold the pen with the needle pointing upward. 5. tap the insulin reservoir to make any air bubbles rise up toward the needle. 6. Press the injection button all the way in. check to see if insulin comes out of the needle tip. if insulin does not come out, repeat the test until it does. If no insulin comes out after doing the test three times, replace the needle with a new one and try again. Please click here or visit: http://products.sanofi-aventis.us/lantus/lantus.html for Additional Important Information. 8
- Page 1 and 2: Please click here or visit: http://
- Page 3: 3 GETTING TO KNOW LANTUS ® SOLOSTA
- Page 7 and 8: 11 STEP 4 INJECT YOUR DOSE use the
5<br />
HOW<br />
TO USE<br />
LANTUS ® SOLOSTAR ®<br />
follow <strong>the</strong>se straightforward steps every<br />
time you use <strong>the</strong> lantus ® solostar ® <strong>pen</strong>.<br />
CHECK<br />
YOUR PEN.<br />
1. take off <strong>the</strong> <strong>pen</strong> cap.<br />
2. look at <strong>the</strong> <strong>insulin</strong> in <strong>the</strong> reservoir. lantus ®<br />
is clear, so don’t use <strong>the</strong> lantus ® solostar ®<br />
<strong>pen</strong> if <strong>the</strong> <strong>insulin</strong> is cloudy, colored, or has<br />
particles in it.<br />
STEP 1<br />
ATTACH<br />
THE NEEDLE<br />
1. Wipe <strong>the</strong> rubber seal on <strong>the</strong> <strong>pen</strong> body<br />
with an alcohol swab.<br />
2. remove <strong>the</strong> protective seal from a new<br />
needle. <strong>the</strong> lantus ® solostar ® <strong>pen</strong> works<br />
with Bec<strong>to</strong>n dickinson (Bd) ultra-fine<br />
needles. use a sterile new needle for<br />
each injection <strong>to</strong> prevent contamination<br />
and blocked needles.<br />
3. line up <strong>the</strong> needle with <strong>the</strong> <strong>pen</strong>. keep<br />
<strong>the</strong> needle straight as you screw it on.<br />
Make sure <strong>the</strong> needle is firmly attached.<br />
4. Take extra care: if you don’t keep <strong>the</strong><br />
needle straight while you attach it, it can<br />
damage <strong>the</strong> rubber seal and cause leaks,<br />
or break <strong>the</strong> needle.<br />
Please click here or visit:<br />
http://products.sanofi-aventis.us/lantus/lantus.html<br />
for Additional Important Information. 6


