

Odin Client 9.1.0.5 Batch Setup Installation Procedure - India Capital ...
Odin Client 9.1.0.5 Batch Setup Installation Procedure - India Capital ...
Odin Client 9.1.0.5 Batch Setup Installation Procedure - India Capital ...

You also want an ePaper? Increase the reach of your titles
YUMPU automatically turns print PDFs into web optimized ePapers that Google loves.
<strong>Odin</strong> <strong>Client</strong> <strong>9.1.0.5</strong> <strong>Batch</strong> <strong>Setup</strong> <strong>Installation</strong> <strong>Procedure</strong><br />
1) Go to Cd-Rom: <strong>Odin</strong> <strong>9.1.0.5</strong> <strong>Batch</strong> setup folder<br />
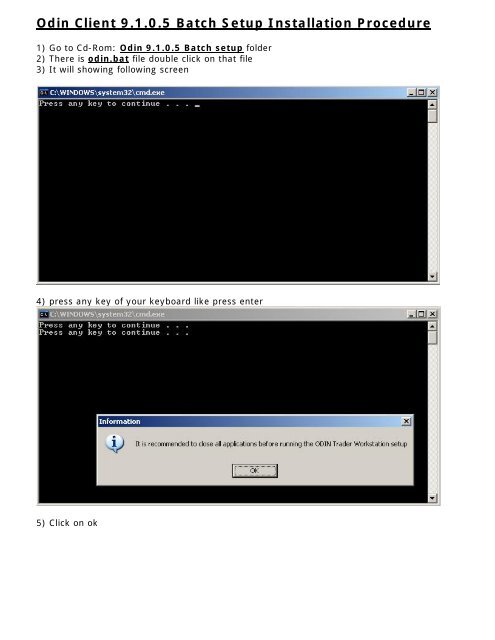
2) There is odin.bat file double click on that file<br />
3) It will showing following screen<br />
4) press any key of your keyboard like press enter<br />
5) Click on ok
7) Click Next<br />
8) Click on yes
9) In company box type: “<strong>India</strong>capital”<br />
In serial box type: “91638-10001”<br />
10) Click on Next
11) Click on Next<br />
13) Click on Next
14) Click on Next<br />
15) Using MinAdmin select option No<br />
Click on Next
16) Type in Remote box type “192.168.0.252”<br />
17) Click on Next
18) Click on Next<br />
19) Click on Next
20) Close the window<br />
21) Select option No, I will restart my computer later<br />
Click on Finish.<br />
22) After that following screen is come
23) Then press any key to continue<br />
24) Click on ok
25) Then press any key to continue<br />
26) Click on ok
27) Press enter key<br />
28) Select option Install Drivers (If SQL Drivers are not installed)
29) Type in IP Address box “192.168.0.252”<br />
30) Type in IP Address box “192.168.0.252”
31) Click on ok<br />
32) Press enter key
33) Click to option continue<br />
34) Click complete
35) Click ok<br />
36) Press enter
37) Click on Next<br />
38) Click on Next
39) Click on Next<br />
40) Click on Next
41) Click Install<br />
42) Click on Finish
43) Press enter<br />
44) Click on Next
45) Click on Next<br />
46) Click on Next
47) Click on Next<br />
48) Click Install
49) Click on Finish<br />
50) Press enter key setup will go on<br />
After press enter, enter for copying for files and dos windows screen automatically disappear.<br />
<strong>Odin</strong> <strong>Client</strong> <strong>9.1.0.5</strong> <strong>Installation</strong> Finished.
