COMM-TEC ProPLAY Audio - Ela-Data GmbH
COMM-TEC ProPLAY Audio - Ela-Data GmbH
COMM-TEC ProPLAY Audio - Ela-Data GmbH

Create successful ePaper yourself
Turn your PDF publications into a flip-book with our unique Google optimized e-Paper software.
<strong>COMM</strong>-<strong>TEC</strong> <strong>ProPLAY</strong> <strong>Audio</strong><br />
Digital <strong>Audio</strong> Player<br />
User Manual<br />
Version 1.1<br />
1 of 10
1. Table Of Content<br />
1. Table Of Content.....................................................................................................2<br />
2. General Notes .........................................................................................................3<br />
3. Product Description..............................................................................................3<br />
3.1 Product Dimensions .........................................................................................3<br />
3.2 System Features ..............................................................................................4<br />
3.3 Connector Assignment DB-15 pin male...........................................................5<br />
4. User Instruction ....................................................................................................6<br />
4.1 Quick Start Instruction......................................................................................6<br />
4.2 Notes for Correct Use ......................................................................................6<br />
4.3 System Setup...................................................................................................7<br />
4.4 Operating Instructions ......................................................................................8<br />
5. Technical Specifications.....................................................................................10<br />
Author: Alex Tempel, CTCS<br />
Date: 5. Juli 2005<br />
2 of 10
2. General Notes<br />
The <strong>COMM</strong>-<strong>TEC</strong> <strong>ProPLAY</strong> <strong>Audio</strong> is a remote controllable Digital <strong>Audio</strong> Player<br />
designed to use with simple speakers or a separate amplifier. The data will be<br />
played back from a Sandisk Compact Flash Card, which is not in the scope of<br />
delivery.<br />
Please check the scope of supply, after you have received the shipment. Following<br />
has to be included:<br />
• <strong>ProPLAY</strong> <strong>Audio</strong><br />
• 12V power supply<br />
• IEC power cord with EU plug<br />
• DB-15pin male plug<br />
• User manual<br />
If you realize a hidden transport damage, please contact your insurance company or<br />
supplier immediately.<br />
3. Product Description<br />
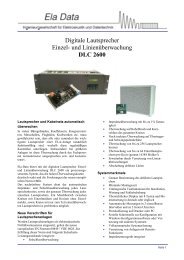
3.1 Product Dimensions<br />
Side View (in mm)<br />
3 of 10
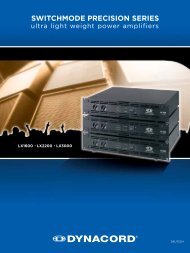
Top View (in mm)<br />
3.2 System Features<br />
4 of 10
Description Type / Use<br />
Compact Flash Card Slot 25x2 pin Hirose CF-II Socket<br />
(accepts CF Card types 1 & 2)<br />
USB Mini USB Port<br />
Power LED On (green) / Off (clear)<br />
Status LED Enabled (green) / disabled (clear)<br />
Discrete control / Speaker output DB-15 pin female connector<br />
<strong>Audio</strong> output – stereo right RCA jack – Right (red)<br />
<strong>Audio</strong> output – stereo left RCA jack – Left (white)<br />
12V DC Power input jack DC power jack. Center pin positive,<br />
2.5mm diam.<br />
Power on/off Rocker switch<br />
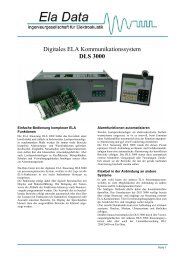
3.3 Connector Assignment DB-15 pin male<br />
Pin Nr. Description<br />
1 Button 1<br />
2 Button 2<br />
3 Button 3<br />
4 Button 4<br />
5 Button 5<br />
6 Button 6<br />
7 Button 7<br />
8 Button 8<br />
9 Button Ground<br />
10 Speaker Ground<br />
11 Speaker Output (L)<br />
12 Speaker Ground<br />
13 Speaker Output (R)<br />
5 of 10<br />
front view of the plug
4. User Instruction<br />
4.1 Quick Start Instruction<br />
Never connect or disconnect parts of the system when the system is powered up as<br />
this may cause serious damage.<br />
Connection and usage are straightforward. However, care needs to be taken with<br />
the following:<br />
• Ensuring parts have been correctly connected – both power & signal<br />
considerations.<br />
• Checking that all switches are set correctly.<br />
• The input signal is compatible.<br />
• Legal & safety requirements have been met.<br />
Now connect the system as follows:<br />
• Connect amplifier signal connections.<br />
• Connect the power supply (DC 12V @ 1.2A minimum. - ensure correct + & -<br />
orientation) to the <strong>ProPLAY</strong> <strong>Audio</strong>.<br />
• Power on the amplifier.<br />
• Power on the <strong>ProPLAY</strong> <strong>Audio</strong> unit.<br />
4.2 Notes for Correct Use<br />
The <strong>ProPLAY</strong> <strong>Audio</strong> is designed for use with speakers or stereo amplifiers. Here are<br />
some notes for correct use:<br />
• Preparation - Before you proceed, please familiarize yourself with the various<br />
connectors, jacks, switches and function buttons of the <strong>ProPLAY</strong> <strong>Audio</strong> unit (see<br />
item 3.2 - System Features diagrams).<br />
• The unit - Handle the unit with care; any knocking may cause components to<br />
come loose and disconnect. Operate in a cool and dry place.<br />
• Power Input: 12V DC1.2A (minimum) is required; this should be a regulated<br />
supply. It is recommended to use the power supply, which is delivered with the<br />
<strong>ProPLAY</strong> <strong>Audio</strong> unit.<br />
• <strong>Audio</strong> Output: <strong>Audio</strong> - Stereo output. Volume is controlled by the switch mount<br />
buttons or preset with the <strong>ProPLAY</strong> Studio software.<br />
• Discrete Control: An external port for remote button control. Maximum up to 8<br />
buttons can be accessed.<br />
• Disccrete Control Cable: The cables to any remote button control should be of<br />
suitable quality and length so that impedance does not affect performance.<br />
Generally lengths up to 1 metre (3 feet) should be acceptable.<br />
• Power LED: The power LED indicator shows power is being supplied to the<br />
player – LED light activated by the power on/off switch.<br />
• Status LED: The LED indicates the status of CompactFlash card.<br />
6 of 10
• USB Port: A port to upload or download content to or from the CompactFlash<br />
Card. The port has to be used while the <strong>ProPLAY</strong> <strong>Audio</strong> is switched off or<br />
disconnected from the power supply.<br />
• Service & Warranty: Warranty is invalidated if the unit is dismantled in any way.<br />
The unit is not user serviceable or repairable.<br />
CAUTION: Do not attempt to remove any part of the casing or internal parts.<br />
4.3 System Setup<br />
• Installation / Mounting<br />
The <strong>ProPLAY</strong> <strong>Audio</strong> can be installed in different ways, by using the mounting<br />
wholes, which are available at three sides of the unit. For applications with<br />
limited installation space, the mounting ears at the left and right side can be<br />
removed. To remove them, bend them up and down.<br />
• Power Up<br />
The Autoplay and Sleep playback mode are selected when writing the MP3 files<br />
on to the CompactFlash Card by using <strong>ProPLAY</strong> Studio software.<br />
Auto-Play start up mode<br />
• Plug in the external power supply<br />
• Insert CompactFlash Card containing <strong>ProPLAY</strong> Studio exported “.pll /<br />
.prj” and other digital files. (e.g. .mpg, .mp3) All filename should be in 8+3<br />
format (i.e. xxxxxxxx.xxx) and avoid using any illegal characters like “~”,<br />
“_”, “-“, etc<br />
• Switch the power 'on/off' switch to 'on'.<br />
• The first track of the collection of MPEG files will be auto-played.<br />
Sleep mode<br />
• Plug in the external power supply<br />
• Insert CompactFlash Card containing <strong>ProPLAY</strong> Studio exported “.pll /<br />
.prj” and other digital files. (e.g. .mpg, .mp3) All filename should be in 8+3<br />
format (i.e. xxxxxxxx.xxx) and avoid using any illegal characters like “~”,<br />
“_”, “-“, etc<br />
• Switch the power 'on/off' switch to 'on'.<br />
• Press the 'play' button'.<br />
• The first track of the collection of MPEG files will be played.<br />
Special specific track playback activated by assigned button can also be<br />
performed in sleep mode using <strong>ProPLAY</strong> Studio software.<br />
Auto-Loop Playback<br />
After Track 1 is set to play, it will play to the end, then Track 2 will start playing from<br />
beginning to end, then Track 3 etc. When the <strong>ProPLAY</strong> plays to the end of the last<br />
track, it will automatically jump back to the beginning of Track 1, repeating tracks 1,2<br />
then 3 etc. The <strong>ProPLAY</strong> will play in auto-loop play mode, so long as none of the<br />
7 of 10
function buttons are pressed. Loop playback is the standard playback setting of the<br />
<strong>ProPLAY</strong> (in simple play and playlist mode) but the track playback sequence can be<br />
changed as required using <strong>ProPLAY</strong> Studio software.<br />
4.4 Operating Instructions<br />
There are two operating modes in <strong>ProPLAY</strong>– “playlist mode” and “simple play mode”<br />
.<br />
• Playlist mode<br />
When operating in playlist mode, both project file (*.prj) and playlist file (*.pll)<br />
must be present on the Compact Flash card. These are used to control the<br />
sequence for all audio tracks.<br />
The project and playlist file are created using <strong>ProPLAY</strong> Studio software. Using<br />
this software, you can set simple sequences or complex sequences including<br />
“jump track“ or “next track” actions. <strong>ProPLAY</strong> Studio can also program buttons<br />
with different function like “play”, “stop”, “pause”, “mute”, “previous”, “next” and<br />
“volume”.<br />
Note: Make sure all capital letters in filename defined in playlist are consistence<br />
with the filename on CompactFlash card. All filename should be in 8+3 format<br />
(i.e. xxxxxxxx.xxx) and avoid using any illegal characters like “~”, “_”, “-“, etc<br />
• Simple play mode<br />
In simple play mode, the user just copies all audio files (.mp3) onto the<br />
Compact Flash card. The <strong>ProPLAY</strong> <strong>Audio</strong> will play these files in alphabetical<br />
sequence.<br />
Operating Functions<br />
The following key buttons are default in “Simple Play mode”.<br />
PLAY (Button 1)<br />
• Resumes playback of audios from track 1 after STOP has been pressed.<br />
• Resumes playback of the track from the point that it has been set to PAUSE.<br />
• Playback is reset back to the beginning of the specific track which is being<br />
played at the time the PLAY button is pressed.<br />
STOP (Button 2)<br />
• When STOP is pressed the audio stops playing.<br />
PAUSE (Button 3)<br />
• When PAUSE is pressed the audio stops playing.<br />
• Press Pause again or PLAY to resume normal playback from the position where<br />
it was paused.<br />
REPEAT (Button 4)<br />
• When REPEAT is pressed the current track loop back on itself continuously.<br />
8 of 10
• To disable the repeat mode press REPEAT, PLAY, PREVIOUS TRACK or<br />
NEXT TRACK . When the track plays to the end it will playback the next track<br />
(and etc.) as normal.<br />
NEXT TRACK (Button 5)<br />
• The NEXT TRACK function can be activated only when a track is already<br />
playing. When NEXT TRACK is pressed the current audio stops playing and<br />
jumps directly to the start of the next track.<br />
VOLUME DECREASE (Button 6)<br />
• Decreases audio output volume setting for both, speaker an line out.<br />
VOLUME INCREASE (Button 7)<br />
• Increases audio output volume setting for both, speaker an line out.<br />
MUTE (Button 8)<br />
• When MUTE is pressed, all the tracks will be still played but without sound.<br />
• Press MUTE again to resume the normal sound in all tracks.<br />
All above buttons can be re-defined by <strong>ProPLAY</strong> Studio software if operating in<br />
playlist mode.<br />
9 of 10
5. Technical Specifications<br />
Playable formats: MP3 <strong>Audio</strong><br />
32 kbit/s to 320 kbit/s<br />
Storage medium: CompactFlash Memory Cards : Type 1 & Type 2<br />
Output Systems: Speakers and/or amplifier<br />
<strong>Audio</strong> Outputs: Stereo output,<br />
connector – RCA jack, 3.2 V p-p max. 5K ohm<br />
Signal-to-Noise: 96 dB<br />
Speaker Output: 2W at 4 Ohm<br />
Select Switches: Power ON/OFF switch<br />
Indicators: Power LED, Status LED<br />
Start-up Modes: Autoplay (at power-on)<br />
Sleep mode (after power-on)<br />
Power Input: 12V DC, 500mA typical<br />
Power Consumption: 6 W<br />
Environment: 0 °C to 50 °C , free air circulation<br />
Relative Humidity 5-95% relative humidity, non-condensing<br />
Dimensions: 209 (187) x 26 x 105mm (W x H x D)<br />
Weight : net weight: 400g<br />
USB Port: USB 2.0<br />
connector – Mini USB<br />
Discrete Control 8 External Buttons Connection (DB-15 pin)<br />
Storage Accessories: CompactFlash Card – various memory capacities<br />
available<br />
16,32,48,64,96,128,192,256,512MB,1,2,4,8GB<br />
10 of 10