Instructions for Use 3 mm - Varicor
Instructions for Use 3 mm - Varicor
Instructions for Use 3 mm - Varicor

You also want an ePaper? Increase the reach of your titles
YUMPU automatically turns print PDFs into web optimized ePapers that Google loves.
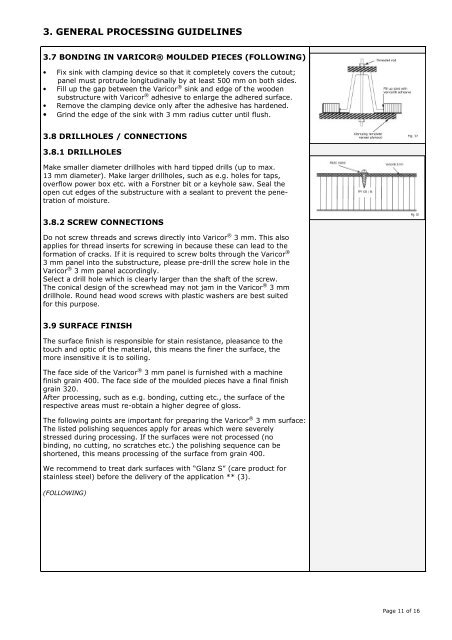
3. GENERAL PROCESSING GUIDELINES<br />
3.7 BONDING IN VARICOR® MOULDED PIECES (FOLLOWING)<br />
• Fix sink with clamping device so that it completely covers the cutout;<br />
panel must protrude longitudinally by at least 500 <strong>mm</strong> on both sides.<br />
• Fill up the gap between the <strong>Varicor</strong> ® sink and edge of the wooden<br />
substructure with <strong>Varicor</strong> ® adhesive to enlarge the adhered surface.<br />
• Remove the clamping device only after the adhesive has hardened.<br />
• Grind the edge of the sink with 3 <strong>mm</strong> radius cutter until flush.<br />
3.8 DRILLHOLES / CONNECTIONS<br />
3.8.1 DRILLHOLES<br />
Make smaller diameter drillholes with hard tipped drills (up to max.<br />
13 <strong>mm</strong> diameter). Make larger drillholes, such as e.g. holes <strong>for</strong> taps,<br />
overflow power box etc. with a Forstner bit or a keyhole saw. Seal the<br />
open cut edges of the substructure with a sealant to prevent the penetration<br />
of moisture.<br />
3.8.2 SCREW CONNECTIONS<br />
Do not screw threads and screws directly into <strong>Varicor</strong> ® 3 <strong>mm</strong>. This also<br />
applies <strong>for</strong> thread inserts <strong>for</strong> screwing in because these can lead to the<br />
<strong>for</strong>mation of cracks. If it is required to screw bolts through the <strong>Varicor</strong> ®<br />
3 <strong>mm</strong> panel into the substructure, please pre-drill the screw hole in the<br />
<strong>Varicor</strong> ® 3 <strong>mm</strong> panel accordingly.<br />
Select a drill hole which is clearly larger than the shaft of the screw.<br />
The conical design of the screwhead may not jam in the <strong>Varicor</strong> ® 3 <strong>mm</strong><br />
drillhole. Round head wood screws with plastic washers are best suited<br />
<strong>for</strong> this purpose.<br />
3.9 SURFACE FINISH<br />
The surface finish is responsible <strong>for</strong> stain resistance, pleasance to the<br />
touch and optic of the material, this means the finer the surface, the<br />
more insensitive it is to soiling.<br />
The face side of the <strong>Varicor</strong> ® 3 <strong>mm</strong> panel is furnished with a machine<br />
finish grain 400. The face side of the moulded pieces have a final finish<br />
grain 320.<br />
After processing, such as e.g. bonding, cutting etc., the surface of the<br />
respective areas must re-obtain a higher degree of gloss.<br />
The following points are important <strong>for</strong> preparing the <strong>Varicor</strong> ® 3 <strong>mm</strong> surface:<br />
The listed polishing sequences apply <strong>for</strong> areas which were severely<br />
stressed during processing. If the surfaces were not processed (no<br />
binding, no cutting, no scratches etc.) the polishing sequence can be<br />
shortened, this means processing of the surface from grain 400.<br />
We reco<strong>mm</strong>end to treat dark surfaces with “Glanz S” (care product <strong>for</strong><br />
stainless steel) be<strong>for</strong>e the delivery of the application ** (3).<br />
(FOLLOWING)<br />
Page 11 of 16