Instructions for Use 3 mm - Varicor
Instructions for Use 3 mm - Varicor
Instructions for Use 3 mm - Varicor
Create successful ePaper yourself
Turn your PDF publications into a flip-book with our unique Google optimized e-Paper software.
3. GENERAL PROCESSING GUIDELINES<br />
3.6.1 HOT TOP CUTOUT<br />
The following points must be observed <strong>for</strong> the installation of heat sources<br />
(hot top, grill, integrated deep-fryer etc):<br />
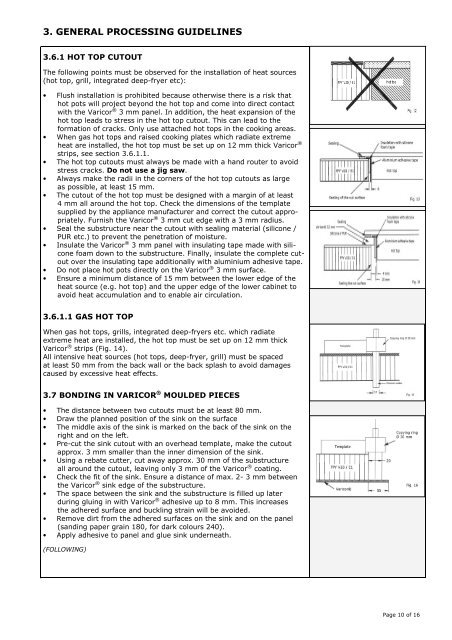
• Flush installation is prohibited because otherwise there is a risk that<br />
hot pots will project beyond the hot top and come into direct contact<br />
with the <strong>Varicor</strong> ® 3 <strong>mm</strong> panel. In addition, the heat expansion of the<br />
hot top leads to stress in the hot top cutout. This can lead to the<br />
<strong>for</strong>mation of cracks. Only use attached hot tops in the cooking areas.<br />
• When gas hot tops and raised cooking plates which radiate extreme<br />
heat are installed, the hot top must be set up on 12 <strong>mm</strong> thick <strong>Varicor</strong> ®<br />
strips, see section 3.6.1.1.<br />
• The hot top cutouts must always be made with a hand router to avoid<br />
stress cracks. Do not use a jig saw.<br />
• Always make the radii in the corners of the hot top cutouts as large<br />
as possible, at least 15 <strong>mm</strong>.<br />
• The cutout of the hot top must be designed with a margin of at least<br />
4 <strong>mm</strong> all around the hot top. Check the dimensions of the template<br />
supplied by the appliance manufacturer and correct the cutout appro-<br />
priately. Furnish the <strong>Varicor</strong> ® 3 <strong>mm</strong> cut edge with a 3 <strong>mm</strong> radius.<br />
• Seal the substructure near the cutout with sealing material (silicone /<br />
PUR etc.) to prevent the penetration of moisture.<br />
• Insulate the <strong>Varicor</strong> ® 3 <strong>mm</strong> panel with insulating tape made with sili-<br />
cone foam down to the substructure. Finally, insulate the complete cut-<br />
out over the insulating tape additionally with aluminium adhesive tape.<br />
• Do not place hot pots directly on the <strong>Varicor</strong> ® 3 <strong>mm</strong> surface.<br />
• Ensure a minimum distance of 15 <strong>mm</strong> between the lower edge of the<br />
heat source (e.g. hot top) and the upper edge of the lower cabinet to<br />
avoid heat accumulation and to enable air circulation.<br />
3.6.1.1 GAS HOT TOP<br />
When gas hot tops, grills, integrated deep-fryers etc. which radiate<br />
extreme heat are installed, the hot top must be set up on 12 <strong>mm</strong> thick<br />
<strong>Varicor</strong> ® strips (Fig. 14).<br />
All intensive heat sources (hot tops, deep-fryer, grill) must be spaced<br />
at least 50 <strong>mm</strong> from the back wall or the back splash to avoid damages<br />
caused by excessive heat effects.<br />
3.7 BONDING IN VARICOR ® MOULDED PIECES<br />
• The distance between two cutouts must be at least 80 <strong>mm</strong>.<br />
• Draw the planned position of the sink on the surface<br />
• The middle axis of the sink is marked on the back of the sink on the<br />
right and on the left.<br />
• Pre-cut the sink cutout with an overhead template, make the cutout<br />
approx. 3 <strong>mm</strong> smaller than the inner dimension of the sink.<br />
• Using a rebate cutter, cut away approx. 30 <strong>mm</strong> of the substructure<br />
all around the cutout, leaving only 3 <strong>mm</strong> of the <strong>Varicor</strong> ® coating.<br />
• Check the fit of the sink. Ensure a distance of max. 2- 3 <strong>mm</strong> between<br />
the <strong>Varicor</strong> ® sink edge of the substructure.<br />
• The space between the sink and the substructure is filled up later<br />
during gluing in with <strong>Varicor</strong> ® adhesive up to 8 <strong>mm</strong>. This increases<br />
the adhered surface and buckling strain will be avoided.<br />
• Remove dirt from the adhered surfaces on the sink and on the panel<br />
(sanding paper grain 180, <strong>for</strong> dark colours 240).<br />
• Apply adhesive to panel and glue sink underneath.<br />
(FOLLOWING)<br />
Page 10 of 16


