Insertion of (RPA) - Intensive Care & Coordination Monitoring Unit
Insertion of (RPA) - Intensive Care & Coordination Monitoring Unit
Insertion of (RPA) - Intensive Care & Coordination Monitoring Unit

Create successful ePaper yourself
Turn your PDF publications into a flip-book with our unique Google optimized e-Paper software.
INTENSIVE CARE SERVICE<br />
NURSING POLICY & PROCEDURES<br />
NAME OF POLICY: TRACHEOSTOMY MANAGEMENT:<br />
Assist with <strong>Insertion</strong><br />
GOAL: TO SAFELY CHANGE A TRACHEOSTOMY TUBE AND<br />
PROVIDE PATENCY OF CARE WHILE INSITU<br />
Introduction:<br />
A tracheostomy may be performed as a surgical procedure under general anaesthetic in the<br />
operating theatre or as a percutaneous procedure within the intensive care setting.<br />
A tracheostomy tube provides the best route for long-term airway maintenance and avoids the<br />
oral, nasal, pharyngeal and laryngeal complications <strong>of</strong> endotracheal intubation.<br />
The tube is shorter thus the resistance to airflow is less, and breathing is easier. This may<br />
facilitate ventilator weaning. Other advantages are increased patient acceptance and comfort,<br />
reduction in sedation and the possibility <strong>of</strong> the patient being able to eat and talk. Tracheostomy is<br />
usually considered if artificial airway is required longer than 10-14 days. Other indications are:<br />
� Upper airway obstruction or malformation<br />
� Repeated intubations, presence <strong>of</strong> complications <strong>of</strong> endotracheal intubation, glottic<br />
incompetence, sleep apnoea and chronic inability to clear secretions<br />
Equipment for insertion <strong>of</strong> percutaneous tracheostomy<br />
� Consent and information provided to patient and significant others if applicable<br />
� Sterile dressing pack, gown/gloves/trolley<br />
� Disposable dressing pack<br />
� Percutaneous tracheostomy “Rhinodilator” set<br />
� Tracheostomy <strong>of</strong> appropriate size (fenestrated/unfenestrated)<br />
� Sterile water<br />
� 1% Lignocaine with adrenaline<br />
� KY jelly<br />
� Tracheal dilators (remain at bedside)<br />
� Syringe<br />
� Stethoscope<br />
� Inline tracheostomy suction catheter (appropriate size)<br />
Pre-Procedure:<br />
� Check Coagulation and platelet pr<strong>of</strong>ile<br />
� Check tracheostomy tube is patent, inflate the cuff and submerge under water, check for<br />
leaks, deflate and cover with KY jelly (usually done by Medical Officer)<br />
� Ensure C02 monitoring is insitu (See End Tidal CO2 protocol)<br />
� Ensure all emergency equipment is ready and in working order<br />
� Ensure patient is monitored<br />
� Ensure adequate sedation as ordered<br />
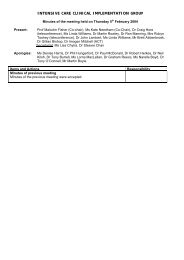
� Position patient appropriately usually after sedation ( See picture below)<br />
� Pre-oxygenate with 100% for 3-5 minutes<br />
© ROYAL PRINCE ALFRED HOSPITAL INTENSIVE CARE SERVICE
Patient’s position for insertion <strong>of</strong> tracheotomy Anatomy <strong>of</strong> the neck<br />
Procedure<br />
Assist with the procedure but always remain vigilant regarding the patient’s vitals<br />
� Prepare to inflate cuff when asked (check pressure post insertion)<br />
� Observe rise and fall <strong>of</strong> chest<br />
� Auscultate chest for air entry<br />
� Secure tracheostomy appropriately with tapes or s<strong>of</strong>t collar<br />
� Connect patient to ventilator with appropriate mode and alarm settings.<br />
� Suction as required<br />
Post-Procedure<br />
� Xray to confirm placement<br />
� ABG approximately 30minutes (not always necessary)<br />
� Ensure key-hole dressing is applied<br />
� Re-position patient to semi-fowlers<br />
� Check cuff pressure (18-22mmHg)<br />
� Ensure tracheostomy <strong>of</strong> the same size and one smaller with tracheal dilators are at the<br />
bedside in the event <strong>of</strong> an emergency<br />
� Observe for early sign <strong>of</strong>:<br />
� Hemorrhage<br />
� Wound infection<br />
� Pneumothorax<br />
� Pneumomediastinum<br />
If a surgical tracheostomy is performed leave the dressing intact for 24hrs to prevent potential<br />
bleeding and displacement. A surgical tracheostomy is usually indicated when:<br />
� Anatomical landmarks are unidentifiable and/or grossly abnormal<br />
� Difficult Intubation<br />
© ROYAL PRINCE ALFRED HOSPITAL INTENSIVE CARE SERVICE
Change <strong>of</strong> tracheostomy<br />
When a tube is changed, the patient’s artificial airway is temporarily removed. This should be a<br />
planned procedure, carried out by two competent staff. The procedure can be potentially<br />
traumatic for the patient, who should be prepared for it.<br />
A skilled practitioner should perform the first change on day 7. This is because the stoma and<br />
track to the skin form the patient’s trachea may not be well formed. In addition, if the<br />
tracheostomy has been performed percutaneously the stoma is likely to be tight. Two<br />
experienced RN’s may undertake this in conjunction with the Senior Registrar being within<br />
close proximity for prompt airway intervention if required.<br />
Equipment<br />
� Ensure all emergency equipment is working and ready<br />
� Dressing pack/trolley<br />
� Suitable size tracheostomy (see types <strong>of</strong> tubes below)<br />
� Sterile water<br />
� 20ml syringe<br />
� Sterile gloves<br />
� Keyhole dressing<br />
� Closed suction catheter (appropriate diameter) or single use “Y” catheters<br />
� KY jelly<br />
� “Guide wire” kit if available<br />
Procedure<br />
� Inform patient and significant others if applicable<br />
� Ensure enteral feeds are ceased 6hrs prior to procedure and aspirate NG tube<br />
� Position patient approximately 30 degree, head moderately extended<br />
� May enlist physiotherapy treatment prior to procedure but allow at least 20 minutes<br />
thereafter to prevent potential respiratory embarrassment.<br />
Prepare tracheostomy tube<br />
� Inflate cuff and submerge in sterile water to check for leaks, deflate cuff<br />
� Lubricate cuff with KY jelly (use <strong>of</strong> obturator is operators preference)<br />
Prepare Patient<br />
� Repeat and inform the patient <strong>of</strong> the procedure<br />
� Suction lower airway once<br />
� Perform cuff release on second suction. Briefly deflate and then reinflate cuff as<br />
requested.<br />
Removal & <strong>Insertion</strong> <strong>of</strong> tracheostomy<br />
� Remove old tracheostomy dressing<br />
� Pre-oxygenate with 100% for 3-5 minutes<br />
© ROYAL PRINCE ALFRED HOSPITAL INTENSIVE CARE SERVICE
Method 1<br />
� Deflate old tracheostomy and remove the tube<br />
� Rapidly insert new tube angled at 90 degrees to the trachea, rotate to a downward<br />
position. (may feel some resistance, especially if it is a percutaneous stoma)<br />
� Inflate the cuff (18-22mmHg)<br />
� Remove obturator and insert inner unfenestrated cannula<br />
� Attach to ventilator, check mode and alarm parameters<br />
� Auscultate chest for air entry and observe chest movement<br />
� Secure tracheostomy and dress appropriately<br />
� Follow up chest Xray if applicable<br />
Method 2 (obturator not required)<br />
� A single Y-suction catheter is required for this method or a guidewire kit if available<br />
� After suctioning leave the “Y” suction catheter in situ and cut <strong>of</strong>f the end as this will keep<br />
the pathway (a guidewire is used in the same way)<br />
� Deflate cuff and remove old tracheostomy over the catheter or guidewire<br />
� Guide the new tracheostomy tube over the catheter or guidewire until correct position is<br />
attained, remove catheter or guidewire and inflate the cuff<br />
� Follow all other procedures as for Method 1<br />
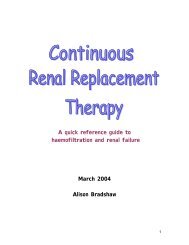
Blueline Ultra fenestrated tube with obturator and guidewire insitu<br />
© ROYAL PRINCE ALFRED HOSPITAL INTENSIVE CARE SERVICE
<strong>Care</strong> <strong>of</strong> the Tracheostomy<br />
� Monitor cuff pressure every 8hrs, maintain between 18-22mmHg, greater pressure may<br />
decrease blood flow to capillaries in the tracheal wall. Lesser pressure increases the risk <strong>of</strong><br />
aspiration.<br />
� Suction with “tracheostomy” closed suction system insitu PRN<br />
� When performing suctioning with a fenestrated tracheostomy ensure the unfenestrated<br />
inner cannular is insitu prior to suctioning, if balloon is down, reinflate.<br />
� Humidification is required as the tracheostomy tube by passes the natural humidifying<br />
passages. When changing to a humidified circuit the ventilator tubing requires checking<br />
for air leaks.<br />
� When using “Swedish nose” the inner coil acts as the humidifier (change regularly)<br />
� Change stoma dressing and tapes ensuring integrity <strong>of</strong> skin remains intact. Use sterile<br />
water to clean stoma area. Observe for signs <strong>of</strong> complications mentioned above.<br />
� To prevent undue weight and movement <strong>of</strong> the ventilator tubing, support as necessary<br />
� Inner cannular should be changed every shift and PRN, soak in sodium chloride<br />
solution<br />
TYPES OF TRACHEOSTOMIES<br />
“Portex Blue Line Ultra” A thermosensitive tube moulds to the patient’s trachea and it has a<br />
s<strong>of</strong>t seal cuff to minimise patient trauma. It comes cuffed and uncuffed with or without<br />
fenestration. The sizes are 6-10mm. Corks and speaking valves plus separate fenestrated and<br />
unfenestrated inner cannula are available. These tubes can be left insitu up to 3 months.<br />
Fenestrated tracheostomy tube has one large or several small elliptical holes located on its<br />
outer curve. These tubes are <strong>of</strong>ten used to wean patients from mechanical ventilation. An<br />
unfenestrated inner cannula must be insitu, when the patient is being mechanically<br />
ventilated. This closes <strong>of</strong>f the fenestrae so the tube serves as a regular tracheostomy tube.<br />
Ensure the cuff is inflated.<br />
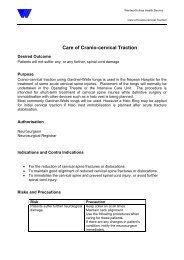
Blueline Ultra unfenestrated tube with cuff Blueline Ultra fenestrated tube with<br />
and inner unfenestrated cannular cuff, obturator insitu<br />
When weaning from a tracheostomy the patient should be spontansouly breathing through the<br />
tracheotomy. The inner cannula is changed to a fenestrated cannula with the cuff remaining<br />
inflated, to prevent aspiration. The patient will be able to spontaneously breath through the<br />
fenestrae. The cuff may be deflated as ordered by the Intensivist, allowing the patient to<br />
spontaneously breath around the tube. A Swedish nose provides oxygen and humidification.<br />
© ROYAL PRINCE ALFRED HOSPITAL INTENSIVE CARE SERVICE
Separate inner fenestrated cannular<br />
Corking or plugging the tube lets the patient directly exhale air through the upper trachea and<br />
past the vocal cords <strong>of</strong> the larynx; the cuff must be deflated for phonation to take place. If the<br />
tube is plugged while the cuff is inflated or the inner cannula is in place, the patient won’t be<br />
able to breathe except through the fenestrae, which can result in respiratory distress<br />
“Shiley” tracheostomies are a low pressure cuffed with fenestration. They are available in four<br />
sizes 4,6,8 &10. They are not equivalent to Portex size.<br />
The Shiley contains the obturator to facilitate insertion and two translucent inner cannulas<br />
with twist-lock connectors, one fenestrated to assist with weaning and phonation; the other<br />
unfenestrated (inner cannula to the hard outer fenestrated tube) provides for mechanical<br />
ventilation; when this tube is insitu it should never be corked. The Shiley outer tube may stay in<br />
situ for up to 3 months. The Shiley swivel neck allows conformity to individual neck anatomies.<br />
The “red” cork and “green” twist-lock cannular are not pictured below.<br />
© ROYAL PRINCE ALFRED HOSPITAL INTENSIVE CARE SERVICE
“Portex Tracheostomy with adjustable flange” These are specifically designed for patients<br />
who have deep set tracheas, such as those that are obese or have distorted anatomy within the<br />
neck due to inflammation and oedema. The adjustable flange means that the tracheostomy tube<br />
can be manipulated to the desired length. Used inplace <strong>of</strong> the Rusch tracheostomy tube<br />
“Portex Minitrach” Is used for the prevention <strong>of</strong> sputum retention. This tube is very small in<br />
diameter and is performed through the cricothyroidectomy membrane.<br />
“Quicktrach” Is usually used in an emergency situation where an emergency cricothyrotomy is<br />
required for life threatening airway obstruction and the delivery <strong>of</strong> oxygen. The “quicktrach”<br />
pack contains a metal tipped needle and syringe for immediate cannulation <strong>of</strong> the cricothyroid<br />
membrane. Not suitable for patients who require long term ventilation<br />
REFERENCES:<br />
Quintel, M. & Roth, H. (1999). Tracheostomy in the critically ill: clinical impact <strong>of</strong> new procedures.<br />
<strong>Intensive</strong> <strong>Care</strong> Medicine. 25:326-328.<br />
Thelan, L. A. et al (1998) Critical <strong>Care</strong> Nursing: Diagnosis and Management. Mosby St Louis<br />
Occupational Health and Safety: Universal precautions taken in the preparation, administration <strong>of</strong> drug and<br />
disposal <strong>of</strong> equipment and sharps.<br />
Cross Referenced: <strong>RPA</strong>H Occ. Health & Safety Manual and Infection Control Manual<br />
NSW Infection Control Policy 98/99<br />
Revised by: Frankie Hopkins (ACNC) and Suzy Dimovski (CNS) February 2002<br />
Authorised and assisted by: Dr. Clive Woolfe February 2002<br />
Revision February 2004<br />
© ROYAL PRINCE ALFRED HOSPITAL INTENSIVE CARE SERVICE