

UC-260 Wireless Acoustic Indicator - Jablotron
UC-260 Wireless Acoustic Indicator - Jablotron
UC-260 Wireless Acoustic Indicator - Jablotron

Create successful ePaper yourself
Turn your PDF publications into a flip-book with our unique Google optimized e-Paper software.
<strong>UC</strong>-<strong>260</strong> <strong>Wireless</strong> <strong>Acoustic</strong> <strong>Indicator</strong><br />
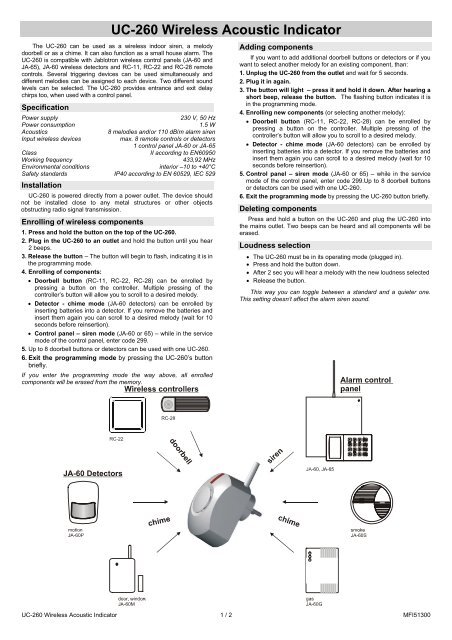
The <strong>UC</strong>-<strong>260</strong> can be used as a wireless indoor siren, a melody<br />
doorbell or as a chime. It can also function as a small house alarm. The<br />
<strong>UC</strong>-<strong>260</strong> is compatible with <strong>Jablotron</strong> wireless control panels (JA-60 and<br />
JA-65), JA-60 wireless detectors and RC-11, RC-22 and RC-28 remote<br />
controls. Several triggering devices can be used simultaneously and<br />
different melodies can be assigned to each device. Two different sound<br />
levels can be selected. The <strong>UC</strong>-<strong>260</strong> provides entrance and exit delay<br />
chirps too, when used with a control panel.<br />
Specification<br />
Power supply 230 V, 50 Hz<br />
Power consumption 1.5 W<br />
<strong>Acoustic</strong>s 8 melodies and/or 110 dB/m alarm siren<br />
Input wireless devices max. 8 remote controls or detectors<br />
1 control panel JA-60 or JA-65<br />
Class II according to EN60950<br />
Working frequency 433,92 MHz<br />
Environmental conditions interior –10 to +40°C<br />
Safety standards IP40 according to EN 60529, IEC 529<br />
Installation<br />
<strong>UC</strong>-<strong>260</strong> is powered directly from a power outlet. The device should<br />
not be installed close to any metal structures or other objects<br />
obstructing radio signal transmission.<br />
Enrolling of wireless components<br />
1. Press and hold the button on the top of the <strong>UC</strong>-<strong>260</strong>.<br />
2. Plug in the <strong>UC</strong>-<strong>260</strong> to an outlet and hold the button until you hear<br />
2 beeps.<br />
3. Release the button – The button will begin to flash, indicating it is in<br />
the programming mode.<br />
4. Enrolling of components:<br />
• Doorbell button (RC-11, RC-22, RC-28) can be enrolled by<br />
pressing a button on the controller. Multiple pressing of the<br />
controller’s button will allow you to scroll to a desired melody.<br />
• Detector - chime mode (JA-60 detectors) can be enrolled by<br />
inserting batteries into a detector. If you remove the batteries and<br />
insert them again you can scroll to a desired melody (wait for 10<br />
seconds before reinsertion).<br />
• Control panel – siren mode (JA-60 or 65) – while in the service<br />
mode of the control panel, enter code 299.<br />
5. Up to 8 doorbell buttons or detectors can be used with one <strong>UC</strong>-<strong>260</strong>.<br />
6. Exit the programming mode by pressing the <strong>UC</strong>-<strong>260</strong>’s button<br />
briefly.<br />
If you enter the programming mode the way above, all enrolled<br />
components will be erased from the memory.<br />
Adding components<br />
If you want to add additional doorbell buttons or detectors or if you<br />
want to select another melody for an existing component, than:<br />
1. Unplug the <strong>UC</strong>-<strong>260</strong> from the outlet and wait for 5 seconds.<br />
2. Plug it in again.<br />
3. The button will light – press it and hold it down. After hearing a<br />
short beep, release the button. The flashing button indicates it is<br />
in the programming mode.<br />
4. Enrolling new components (or selecting another melody):<br />
• Doorbell button (RC-11, RC-22, RC-28) can be enrolled by<br />
pressing a button on the controller. Multiple pressing of the<br />
controller’s button will allow you to scroll to a desired melody.<br />
• Detector - chime mode (JA-60 detectors) can be enrolled by<br />
inserting batteries into a detector. If you remove the batteries and<br />
insert them again you can scroll to a desired melody (wait for 10<br />
seconds before reinsertion).<br />
5. Control panel – siren mode (JA-60 or 65) – while in the service<br />
mode of the control panel, enter code 299.Up to 8 doorbell buttons<br />
or detectors can be used with one <strong>UC</strong>-<strong>260</strong>.<br />
6. Exit the programming mode by pressing the <strong>UC</strong>-<strong>260</strong> button briefly.<br />
Deleting components<br />
Press and hold a button on the <strong>UC</strong>-<strong>260</strong> and plug the <strong>UC</strong>-<strong>260</strong> into<br />
the mains outlet. Two beeps can be heard and all components will be<br />
erased.<br />
Loudness selection<br />
• The <strong>UC</strong>-<strong>260</strong> must be in its operating mode (plugged in).<br />
• Press and hold the button down.<br />
• After 2 sec you will hear a melody with the new loudness selected<br />
• Release the button.<br />
This way you can toggle between a standard and a quieter one.<br />
This setting doesn’t affect the alarm siren sound.<br />
<strong>UC</strong>-<strong>260</strong> <strong>Wireless</strong> <strong>Acoustic</strong> <strong>Indicator</strong> 1 / 2 MFI51300
Doorbell mode<br />
After pressing a doorbell button, the <strong>UC</strong>-<strong>260</strong> will play a selected<br />
melody. Different melodies can be chosen for each button, if desired.<br />
If you want to change a melody, enter the programming mode (See<br />
Adding components) and press the button until a desired melody is<br />
selected.<br />
Detector chime mode<br />
If an enrolled detector is triggered, the <strong>UC</strong>-<strong>260</strong> will play a chosen<br />
melody. The melody can be changed if desired (See Adding<br />
components).<br />
A detector enrolled to the <strong>UC</strong>-<strong>260</strong> can be enrolled to a JA-60 or<br />
JA-65 security control panel too. For example, this way a wireless door<br />
detector can activate a chime with the <strong>UC</strong>-<strong>260</strong> and at the same time it<br />
can trigger an alarm system.<br />
Note: JA-60P motion detector uses a special sleeping mode<br />
feature (can be set to 5 min. or 1 min.). Therefore it cannot detect<br />
more frequent movements in a covered area.<br />
Alarm mode<br />
The <strong>UC</strong>-<strong>260</strong> can be used as a simple stand-alone wireless<br />
alarm. This mode can be combined with the doorbell mode too.<br />
In order to set the alarm mode enter the programming mode<br />
first. Then press and hold both buttons of RC-11 for 3 sec. This<br />
RC-11 will be than used for arming and disarming the alarm. You<br />
can add more remote controls later. Up to 8 detectors, remote<br />
controls or doorbell buttons can be used in an alarm mode.<br />
Controlling the alarm<br />
If you press the A button of the remote control, you will arm the<br />
alarm. For delayed JA-60 detectors, a 15 seconds exit delay will be<br />
allowed. Beeping can optionally indicate an exit delay.<br />
If you press the B button of the remote control, you will disarm<br />
the system.<br />
If you activate a detector set to a delayed mode when the alarm<br />
is armed, you will hear entrance delay beeping (15 sec.) first.<br />
If the alarm is not disarmed with in this period the siren will go off<br />
for 3 minutes. You can stop the siren by pressing the B button of the<br />
remote control.<br />
<strong>Wireless</strong> siren mode<br />
If a control panel is enrolled to a <strong>UC</strong>-<strong>260</strong>, the <strong>UC</strong>-<strong>260</strong>’s light<br />
indicator copies the status of the PgY control panel output. If an alarm<br />
is triggered, the siren of the <strong>UC</strong>-<strong>260</strong> sounds. Also an exit and entrance<br />
delay can be indicated. The exit and entrance delay can be set in two<br />
ways:<br />
1. When a control panel is enrolled and one beep is heard, than both exit<br />
and entrance delays will be performed regardless of the control panel’s<br />
setting.<br />
2. When two beeps are heard, the <strong>UC</strong>-<strong>260</strong> copies the control panel’s<br />
setting of the exit and entrance delays.<br />
You can toggle between these two settings each time you enroll the<br />
control panel to the <strong>UC</strong>-<strong>260</strong> (entering 299 code while in the service<br />
mode).<br />
Exit and Entrance delay setting<br />
Description above corresponds to a factory setting of the <strong>UC</strong>-<strong>260</strong>.<br />
It can be changed using an enrolled RC-11 remote control while the<br />
<strong>UC</strong>-<strong>260</strong> is in its programming mode.<br />
• Press A button – alarm will indicate exit delay but not entrance<br />
delay, detectors trigger a siren when the alarm is armed. (Factory<br />
setting)<br />
• Press B button – alarm will not indicate exit and entrance delay;<br />
detectors trigger a siren when the alarm is armed.<br />
• Press both buttons – alarm will indicate exit and entrance delay,<br />
detectors trigger a siren when the alarm is armed and the first<br />
enrolled detector (enrolled before RC-11) activates a chime<br />
function.<br />
Note: Alarm mode cannot be selected if a JA-60 or JA-65 control<br />
panel has been enrolled.<br />
• If you need to replace batteries in a detector, it is necessary to<br />
unplug the <strong>UC</strong>-<strong>260</strong> first! Otherwise opening a cover of a detector<br />
will trigger a tamper alarm.<br />
<strong>UC</strong>-<strong>260</strong> <strong>Wireless</strong> <strong>Acoustic</strong> <strong>Indicator</strong> 2 / 2 MFI51300
