Getting Hands-On with Soft Circuits - MIT Media Lab
Getting Hands-On with Soft Circuits - MIT Media Lab
Getting Hands-On with Soft Circuits - MIT Media Lab

Create successful ePaper yourself
Turn your PDF publications into a flip-book with our unique Google optimized e-Paper software.
3. Spend.a.few.minutes.introducing.the.<br />
microcontroller.as.a.miniature.computer.<br />
that.can.be.programmed.to.control.<br />
certain.behaviors.<strong>with</strong>in.a.circuit ..The.<br />
microcontrollers.in.this.activity.have.been.<br />
pre-programmed.to.control.the.behavior.of.<br />
an.LED .<br />
4. Instruct.students.to.curl.the.legs.of.their.<br />
LEDs.using.needle.nose.pliers.so.that.the.<br />
LEDs.can.be.sewn.to.fabric.(see.page.5.for.a.<br />
photo.of.this) .<br />
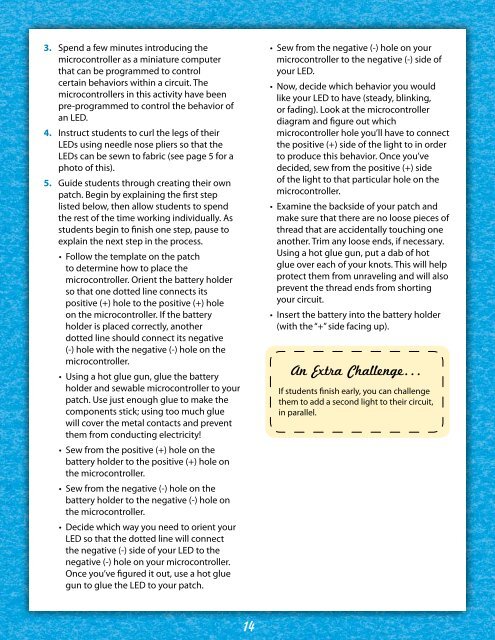
5. Guide.students.through.creating.their.own.<br />
patch ..Begin.by.explaining.the.first.step.<br />
listed.below,.then.allow.students.to.spend.<br />
the.rest.of.the.time.working.individually ..As.<br />
students.begin.to.finish.one.step,.pause.to.<br />
explain.the.next.step.in.the.process .<br />
•..Follow.the.template.on.the.patch.<br />
to.determine.how.to.place.the.<br />
microcontroller ..Orient.the.battery.holder.<br />
so.that.one.dotted.line.connects.its.<br />
positive.(+).hole.to.the.positive.(+).hole.<br />
on.the.microcontroller ..If.the.battery.<br />
holder.is.placed.correctly,.another.<br />
dotted.line.should.connect.its.negative.<br />
(-).hole.<strong>with</strong>.the.negative.(-).hole.on.the.<br />
microcontroller .<br />
•..Using.a.hot.glue.gun,.glue.the.battery.<br />
holder.and.sewable.microcontroller.to.your.<br />
patch ..Use.just.enough.glue.to.make.the.<br />
components.stick;.using.too.much.glue.<br />
will.cover.the.metal.contacts.and.prevent.<br />
them.from.conducting.electricity!..<br />
•..Sew.from.the.positive.(+).hole.on.the.<br />
battery.holder.to.the.positive.(+).hole.on.<br />
the.microcontroller ..<br />
•..Sew.from.the.negative.(-).hole.on.the.<br />
battery.holder.to.the.negative.(-).hole.on.<br />
the.microcontroller ..<br />
•..Decide.which.way.you.need.to.orient.your.<br />
LED.so.that.the.dotted.line.will.connect.<br />
the.negative.(-).side.of.your.LED.to.the.<br />
negative.(-).hole.on.your.microcontroller ..<br />
<strong>On</strong>ce.you’ve.figured.it.out,.use.a.hot.glue.<br />
gun.to.glue.the.LED.to.your.patch .<br />
14<br />
•..Sew.from.the.negative.(-).hole.on.your.<br />
microcontroller.to.the.negative.(-).side.of.<br />
your.LED ..<br />
•..Now,.decide.which.behavior.you.would.<br />
like.your.LED.to.have.(steady,.blinking,.<br />
or.fading) ..Look.at.the.microcontroller.<br />
diagram.and.figure.out.which.<br />
microcontroller.hole.you’ll.have.to.connect.<br />
the.positive.(+).side.of.the.light.to.in.order.<br />
to.produce.this.behavior ..<strong>On</strong>ce.you’ve.<br />
decided,.sew.from.the.positive.(+).side.<br />
of.the.light.to.that.particular.hole.on.the.<br />
microcontroller ..<br />
•..Examine.the.backside.of.your.patch.and.<br />
make.sure.that.there.are.no.loose.pieces.of.<br />
thread.that.are.accidentally.touching.one.<br />
another ..Trim.any.loose.ends,.if.necessary ..<br />
Using.a.hot.glue.gun,.put.a.dab.of.hot.<br />
glue.over.each.of.your.knots ..This.will.help.<br />
protect.them.from.unraveling.and.will.also.<br />
prevent.the.thread.ends.from.shorting.<br />
your.circuit .<br />
•..Insert.the.battery.into.the.battery.holder.<br />
(<strong>with</strong>.the.“+”.side.facing.up) .<br />
An Extra Challenge...<br />
If.students.finish.early,.you.can.challenge.<br />
them.to.add.a.second.light.to.their.circuit,.<br />
in.parallel .