download/files/LCQ Deca_Duo Hardware Troubleshooting_8601.pdf
download/files/LCQ Deca_Duo Hardware Troubleshooting_8601.pdf
download/files/LCQ Deca_Duo Hardware Troubleshooting_8601.pdf

You also want an ePaper? Increase the reach of your titles
YUMPU automatically turns print PDFs into web optimized ePapers that Google loves.
<strong>LCQ</strong> <strong>Deca</strong>/<strong>Duo</strong> <strong>Hardware</strong><br />
<strong>Troubleshooting</strong><br />
Ed Gonzalez<br />
Product Support
Presentation Topics<br />
◗ Overview of the <strong>LCQ</strong> Ion Optic System<br />
◗ Tour of the <strong>LCQ</strong> Ion Optic System<br />
– Making Ions<br />
– Transferring Ions<br />
– Filtering Ions (Quadrupole Ion Trap)<br />
– Detecting Ions<br />
◗ <strong>LCQ</strong> Maintenance<br />
◗ <strong>LCQ</strong> Diagnostic Overview<br />
◗ Front Panel LEDs Indications
Mass Spectrometer<br />
Simplified Schematic<br />
Sample<br />
In<br />
Make<br />
Ions<br />
Transfer<br />
Ions<br />
Filter<br />
Ions<br />
Ion Optics System<br />
Detect<br />
Ions<br />
Data<br />
Out
200,000<br />
15,000<br />
1,000<br />
Molecular<br />
Weight<br />
Choice in Making Ions<br />
GC<br />
Non Polar<br />
Polarity vs. Molecular Weight<br />
APCI<br />
PBI<br />
ESI<br />
TSP<br />
FAB<br />
Polar
Simplified <strong>LCQ</strong> Schematic<br />
Sheath Liquid<br />
Auxiliary Gas<br />
Sheath Gas<br />
ESI Needle Assembly<br />
Heated Capillary<br />
Tube Lens Octapole Endcap<br />
Mechanical<br />
Pump<br />
Skimmer<br />
APCI Probe<br />
Assembly<br />
Turbo<br />
Pump<br />
Transfer Ions<br />
Turbo<br />
Pump<br />
Ring<br />
Electrode<br />
Electron<br />
Multiplier<br />
+15 kV<br />
Conversion<br />
Dynode<br />
Make Ions Desolvate Ions<br />
Filter Ions<br />
Detect<br />
Ions
<strong>LCQ</strong> Probes used in Making Ions<br />
◗ API-1 / ESI Probe (<strong>LCQ</strong> Classic)<br />
◗ API-2 / ESI Probe (<strong>LCQ</strong> <strong>Deca</strong> / <strong>LCQ</strong> <strong>Duo</strong>)<br />
◗ API-2 / Off Axis ESI Probe (Classic/<strong>Deca</strong>/<strong>Duo</strong>)<br />
◗ APCI Probe (Same for API-1 and API-2)
ESI Ionization Process<br />
ESI Ionization Process<br />
Simplified Schematic
±5kV ±5kV<br />
ESI Spray Cross Section<br />
Nozzle<br />
Gas Sheath<br />
Needle<br />
Liquid Sheath<br />
Ion Plume
Aerosol Formation<br />
Relative velocity between the sheath gas flow and the liquid flow<br />
causes a shearing effect on the emanating large droplet, and<br />
results in rapid droplet size reduction (spray)<br />
Sheath Gas<br />
Sample Tube<br />
Field lines<br />
Applied high voltage activates the<br />
coulombic explosion process<br />
Heated<br />
Capillary
API-1 API 1 / ESI Probe Assembly<br />
(<strong>LCQ</strong> Classic)
Cal Mix Tune Parameters<br />
API-1 on <strong>LCQ</strong> Classic<br />
◗ Infusion Flow Rate (µL/min.): 3-5<br />
◗ Spray Voltage (kV): 4-6<br />
◗ Spray Current (µA): 0.1-0.75<br />
◗ Sheath Gas Flow Rate (arb): 30-60<br />
◗ Aux. Gas Flow Rate (arb): 0<br />
◗ Capillary Temperature: 200-250°C<br />
◗ Probe Position : Pulled all the way back
<strong>LCQ</strong> <strong>Deca</strong> Tune Plus Window<br />
<strong>LCQ</strong> <strong>Deca</strong> Tune Plus Window<br />
ESI Source dialog and Status Panel
<strong>Troubleshooting</strong> the API1 Probe<br />
◗ Spray Current too high: High Voltage (HV) shorting effects:<br />
Leaks within ESI Probe<br />
Problematic mixture of solvents/sample/etc.<br />
◗ Erratic Spray Voltage: Shorted HV cable<br />
Spay current at maximum<br />
Bad HV supply<br />
◗ Erratic spray: Sample tube<br />
ESI needle<br />
Sheath gas flow<br />
◗ Contamination: Wipe spray shield around heated capillary<br />
Wipe out ESI probe flange<br />
Flush the ESI probe<br />
Clean ESI probe interior parts<br />
◗ Overall solution for 90% of source related Problems:<br />
� good maintenance<br />
(especially with the sample tube)<br />
� use of divert valve
API-1 API 1 / ESI Probe Cross Section
Sample Tube Elongation<br />
ESI Needle<br />
Sheath Liquid<br />
ESI Needle<br />
ESI Needle<br />
ESI Needle<br />
ESI Needle<br />
Polyimide<br />
Polyimide<br />
Sheath Liquid<br />
Sheath Liquid<br />
ESI Needle<br />
ESI Needle<br />
ESI Needle<br />
Polyimide<br />
Polyimide<br />
Sheath Liquid<br />
Fused Silica<br />
Fused Silica<br />
Fused Silica<br />
Fused Silica<br />
Sample<br />
Sample<br />
Elongation of polyimide<br />
occurs when specific<br />
solvents are adsorbed into<br />
the sample tube.<br />
The sample tube must be cut<br />
to ensure good spray.<br />
The sample tube must be cut<br />
square to ensure good spray.<br />
Best results can be achieved<br />
by making the sample tube<br />
flush with the ESI Needle.
Sample Tube Elongation Resolution<br />
ESI Needle<br />
Sheath Liquid<br />
ESI Needle<br />
Polyimide<br />
ESI Needle<br />
Polyimide<br />
Sheath Liquid<br />
ESI Needle<br />
ESI Needle<br />
Sheath Liquid<br />
ESI Needle<br />
Polyimide<br />
Polyimide<br />
Sheath Liquid<br />
ESI Needle<br />
Fused Silica<br />
Fused Silica<br />
Fused Silica<br />
Fused Silica<br />
Sample<br />
Sample<br />
The polyimide can be flamed<br />
to avoid elongation; however,<br />
make sure the end of the<br />
fused silica is cut square.<br />
Again, make sure the end of<br />
the fused silica is cut square.<br />
In this case, the fused silica<br />
is cut on an angle. This will<br />
produce poor spray.
Divert Valve Configuration<br />
TRANSFER LINE FROM<br />
DIVERT/INJECT VALVE<br />
TRANSFER LINE<br />
FROM LC PUMP<br />
SYRINGE<br />
PORT<br />
WASTE<br />
LINE<br />
3<br />
Front Panel Injections<br />
L oa d<br />
Detect or<br />
4<br />
2<br />
5<br />
DIVERT/<br />
INJECT<br />
VALVE<br />
6<br />
I nj ect<br />
Waste<br />
1<br />
TRANSFER LINE<br />
FITTING<br />
SAMPLE<br />
LOOP<br />
A U X I L I A R Y<br />
G A S<br />
S H E A T H<br />
G A S<br />
S A M P L E<br />
S H E A T H<br />
L I Q U I D<br />
H I G H<br />
V O LT A G E<br />
ESI SOURCE<br />
GROUNDED<br />
FITTING<br />
HOLDER<br />
SAMPLE TUBE
Divert Valve Configuration<br />
TRANSFER LINE FROM<br />
DIVERT/INJECT VALVE<br />
TRANSFER LINE<br />
FROM LC PUMP<br />
FROM LC<br />
PUMP<br />
TO ION<br />
SOURCE<br />
Normal Applications<br />
Load<br />
Detector<br />
3<br />
WASTE<br />
LINE<br />
3<br />
4<br />
2<br />
5<br />
6<br />
DIVERT/<br />
INJECT<br />
VALVE<br />
4<br />
2<br />
5<br />
TRANSFER LINE<br />
FITTING<br />
Inject<br />
Waste<br />
1<br />
6<br />
1<br />
SHEATH<br />
GAS<br />
AUXILIARY SAMPLE<br />
GAS<br />
SHEATH<br />
LIQUID<br />
GROUNDED<br />
FITTING<br />
HOLDER SAMPLE TUBE<br />
HIGH<br />
VOLTAGE<br />
ESI SOURCE<br />
FROM LC<br />
PUMP<br />
TO ION<br />
SOURCE<br />
3<br />
6<br />
WASTE 4<br />
WASTE<br />
TO MS TO WASTE<br />
2<br />
5<br />
1
Xcalibur Instrument Setup<br />
Divert Valve Dialog
API-2 API 2 / ESI Probe Assembly<br />
(<strong>LCQ</strong> <strong>Deca</strong> / <strong>LCQ</strong> <strong>Duo</strong>)
API-2 / ESI Probe Positions<br />
4 3 2 1<br />
Probe<br />
Positions
LC Flow Rate<br />
Infusion or LC at flow rates of<br />
API-2 API 2 / ESI Probe<br />
Exploded Pictorial
Cal Mix Tune Parameters<br />
API-2 on <strong>LCQ</strong> <strong>Deca</strong> / <strong>LCQ</strong> <strong>Duo</strong><br />
◗ Infusion Flow Rate (µL/min.): 3-5<br />
◗ Spray Voltage (kV): 4-6<br />
◗ Spray Current (µA): 0.1-0.75<br />
◗ Sheath Gas Flow Rate (arb): 20-40<br />
◗ Aux. Gas Flow Rate (arb): 0<br />
◗ Capillary Temperature: 200-250°C<br />
◗ Probe Position : 2
<strong>LCQ</strong> <strong>Deca</strong> Tune Plus Window<br />
<strong>LCQ</strong> <strong>Deca</strong> Tune Plus Window<br />
(ESI Source dialog and Status Panel)
<strong>Troubleshooting</strong> the API2 Probe<br />
◗ Contamination: Wipe spray shield around heated capillary<br />
Wipe out ESI probe flange<br />
Flush the ESI probe<br />
◗ Erratic spray: Sample tube<br />
Sheath gas flow<br />
◗ Spray Current too high: Problematic mixture of solvents/sample/etc.<br />
◗ Erratic Spray Voltage: Spray current at maximum<br />
◗ Overall solution for 90% of source related Problems:<br />
� Good maintenance<br />
(especially with the sample tube)<br />
� Use of divert valve
API-2 API 2 / ESI Probe Assembly<br />
Cross Section
API-2 API 2 / Off Axis ESI Probe<br />
(<strong>LCQ</strong> <strong>Deca</strong> / <strong>LCQ</strong> <strong>Duo</strong> / <strong>LCQ</strong> Classic)
API-2 API 2 / Off Axis ESI<br />
Tangential Movement<br />
Probe Geometry<br />
ESI probe on a 25 degree slide<br />
Ion flow<br />
Heated<br />
Capillary<br />
matrix flow
API-2 API 2 / Off Axis ESI Guidelines<br />
LC Flow Rates<br />
Infusion or LC at flow<br />
rates of 200 µL/min<br />
Slide<br />
Plate<br />
Position<br />
Operational Parameters<br />
Probe<br />
Position<br />
(1 to 7)<br />
Heated<br />
Capillary<br />
Temperature<br />
Top 4 Typical setting:<br />
250 °C<br />
Top 4 Typical setting:<br />
350 °C<br />
Top 5 Typical setting:<br />
350 °C<br />
Sheath<br />
Gas<br />
Required<br />
Typical setting:<br />
10 to 30 units<br />
Required<br />
Typical setting:<br />
80+ units<br />
Required<br />
Typical setting:<br />
80+ units<br />
Auxiliary<br />
Gas<br />
Not required<br />
Typical<br />
setting:<br />
0 units<br />
Required<br />
Typical<br />
setting:<br />
10 to 20 units<br />
Required<br />
Typical<br />
setting:<br />
10 to 20 units
APCI Ionization Process
<strong>LCQ</strong> Classic APCI Probe
<strong>LCQ</strong> <strong>Deca</strong> / <strong>LCQ</strong> <strong>Duo</strong> APCI Probe
Typical APCI Tune Parameters<br />
Conditions: Reserpine at 1ml/min<br />
◗ Vaporizer Temp (°C): 400-550 (600 max.)<br />
◗ Discharge Current (µA): 5 (10µA max.)<br />
◗ Discharge Voltage (kV): 4-6kV (read back)<br />
◗ Sheath Gas Flow Rate (arb): 50-80<br />
◗ Aux. Gas Flow Rate (arb): 0-20<br />
◗ Capillary Temp (°C): 125-250<br />
◗ Capillary Voltage (V): 10-40<br />
◗ Tube Lens Offset (V): 30-60<br />
◗ Flow Rate capability: 50µL/min. - 2mL/min.
<strong>LCQ</strong> <strong>Deca</strong> Tune Plus Window<br />
<strong>LCQ</strong> <strong>Deca</strong> Tune Plus Window<br />
APCI Source dialog and Status Panel
<strong>Troubleshooting</strong> the APCI Probe<br />
◗ Spray voltage erratic: Spray current should not exceed 20µA<br />
Once 20µA level is reached, the spray<br />
voltage will be lowered to compensate<br />
for the 20µA threshold<br />
◗ Spray current too high: Problematic mixture of solvents/sample/etc.<br />
◗ Contamination: Bake out the probe for 10-60 minutes at 50ºC<br />
above desired Vaporizer Temperature<br />
◗ Lack of sensitivity: Make sure the corona needle is seated<br />
and is not deformed
API-1 API 1 / API-2 API 2 APCI Probe<br />
Cross Section
Ion Transfer / Desolvation Process<br />
Overview<br />
ESI Nozzle<br />
(± ± 8 kV)<br />
Solvent/Buffer<br />
+<br />
+<br />
+<br />
+<br />
+<br />
+<br />
+<br />
Heated Capillary<br />
+ +<br />
+<br />
Ion<br />
Stream
<strong>LCQ</strong> API Stack Gas Flow<br />
1 Torr<br />
×<br />
×<br />
Tube lens<br />
Peek Holder<br />
skimmer<br />
10 -3 Torr
<strong>LCQ</strong> API Stack Assembly<br />
Cross Section<br />
Kalrez OO-Ring<br />
OO-Ring<br />
Ring<br />
Capillary must be flush with the<br />
Tube lens and Skimmer Mount.<br />
Peek Bushing<br />
Capillary Sleeve<br />
Manifold<br />
Manifold<br />
Heated Capillary Specifications:<br />
Heater Resistance: 14Ω<br />
Platinum Sensor: 110Ω
Cal Mix Tune Parameters<br />
<strong>LCQ</strong> API Stack<br />
◗ Capillary Temp (°C)*: 200-250<br />
◗ Capillary Voltage (V): 10-40<br />
◗ Tube Lens Offset (V): 30-60<br />
* Heated Capillary I.D.:<br />
<strong>LCQ</strong> Classic / <strong>LCQ</strong> <strong>Duo</strong>: 400µm<br />
<strong>LCQ</strong> <strong>Deca</strong>: 500µm
<strong>LCQ</strong> <strong>Deca</strong> Tune Plus Window<br />
<strong>LCQ</strong> <strong>Deca</strong> Tune Plus Window<br />
Vacuum dialog and Status Panel
<strong>Troubleshooting</strong> the API Stack<br />
◗ Loss of Sensitivity: Clean skimmer and tube lens<br />
◗ Low Convectron Gauge Pressure: Heated capillary plugged<br />
◗ Cal Mix Contamination: Clean API probe and heated capillary area<br />
◗ Spiky noise: Bent capillary tip or dirty heated capillary<br />
◗ Constant Background: Possible heated capillary contamination<br />
◗ Overall solution for 90% of API Stack related Problems:<br />
� Good maintenance:<br />
Caution:<br />
Clean/Rinse the heated capillary region<br />
and spray shield daily.<br />
� Use of the divert valve<br />
� Use of Spray Cap and Orthogonal<br />
Sampling Adapter<br />
Periodically empty the waste bottle to avoid potential back streaming of waste<br />
solvent into the source region.
Orthogonal Spray Adapter<br />
Configuration<br />
ESI Probe<br />
Buffer deposition<br />
‘Orthogonal’ ion flow<br />
Focusing ring Liquid drains<br />
Heated capillary
Orthogonal Spray Adapter Guidelines<br />
Operational Parameters<br />
LC Flow Rate<br />
Infusion or LC at flow<br />
rates of
ESI Probe<br />
Reduces Cal Mix contamination<br />
Spray Cap<br />
Configuration<br />
Spray Cap<br />
Capillary Sleeve<br />
Heated capillary<br />
Spray Shield<br />
O-Ring Ring<br />
Peek<br />
Bushing<br />
Spray Shield
Spiky Noise Characteristics<br />
Single Noise Spike<br />
S#: 4 RT: 0.27 AV: 1 T: + p Full ms NL: 2185325<br />
Abundance<br />
ve<br />
elati<br />
R<br />
100<br />
90<br />
80<br />
70<br />
60<br />
50<br />
40<br />
30<br />
20<br />
10<br />
0<br />
330.5<br />
326.6 328.6 330.9<br />
334.3<br />
327.6 328.0 329.0<br />
331.8<br />
334.6<br />
326 327 328 329 330 331 332 333 334 335<br />
m/z<br />
335.6
Spiky Noise Characteristics<br />
S#: 4 RT: 0.27 AV: 1 T: + p Full ms NL: 7692800<br />
100<br />
90<br />
80<br />
70<br />
60<br />
Abundance 50<br />
e<br />
elativ<br />
elativ<br />
R 40<br />
30<br />
20<br />
10<br />
0<br />
308.5<br />
330.5<br />
Particle Noise Spectrum of Cal mix<br />
Spiky Noise at 10 uscans<br />
524.4<br />
536.3<br />
195.2<br />
262.7<br />
413.3<br />
553.7<br />
690.9<br />
812.2<br />
959.6<br />
872.7 1022.3<br />
1122.1<br />
1222.1<br />
1322.1<br />
1421.9<br />
1522.0<br />
1621.8<br />
1721.9<br />
200 400 600 800 1000<br />
m/z<br />
1200 1400 1600 1800<br />
1821.8
Heated Capillary Cross Section<br />
Bent Capillary Tip<br />
Heated<br />
Capillary<br />
Bent Capillary Tip<br />
+<br />
+<br />
+<br />
+<br />
+<br />
+<br />
+<br />
+<br />
+ +<br />
+<br />
+<br />
+ +<br />
+ +<br />
+<br />
+<br />
+<br />
Tube<br />
Lens<br />
Fixed<br />
distance<br />
Skimmer<br />
With time, compound will<br />
neutralize out on the skimmer.<br />
This will spot will eventually<br />
need to be cleaned; otherwise,<br />
field affects can reduce<br />
sensitivity.<br />
Avoid bending the tip of the heated<br />
capillary. The tip of the capillary<br />
must remain off axis to the<br />
skimmer; otherwise, spiky noise or<br />
reduced sensitivity can occur.<br />
The distance between the end of<br />
the capillary and the skimmer<br />
opening must remain fixed.
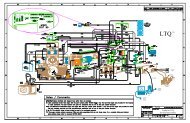
Ion Transfer Overview<br />
<strong>Deca</strong> Ion Optic System<br />
Ions will be trapped<br />
in stable trajectories<br />
Ion Stream<br />
from skimmer<br />
Transfer<br />
Array<br />
Fundamental RF<br />
on Ring<br />
Ion Trap
Octapole 1 Offset: <strong>LCQ</strong> / <strong>LCQ</strong> <strong>Duo</strong><br />
Quadrupole 1 Offset: <strong>LCQ</strong> <strong>Deca</strong><br />
Ion Optics<br />
Gating Ions into the Ion Trap<br />
Multipole RF<br />
Octapole 2 2 Offset:<br />
Offset:<br />
<strong>LCQ</strong> / <strong>LCQ</strong> <strong>Duo</strong> / <strong>LCQ</strong> <strong>Deca</strong>
<strong>LCQ</strong> <strong>Deca</strong> Tune Plus Window<br />
<strong>LCQ</strong> <strong>Deca</strong> Tune Plus Window<br />
Ion Optics dialog and Status Panel
Cal Mix Tune Parameters<br />
<strong>LCQ</strong> Ion Optics<br />
Octapole 1 Offset (V) for Classic/<strong>Duo</strong>: -1 to -5<br />
Octapole 1 Offset (V) for <strong>Deca</strong>: -4 to -9<br />
Lens Voltage (v): -16 to -50<br />
Octapole 2 Offset (V) for Classic / <strong>Duo</strong>: -5.5 to -10<br />
Octapole 2 Offset (V) for <strong>Deca</strong>: -7 to -15<br />
Octapole RF Amplitude (V p-p): 400<br />
Entrance Lens (V) for the <strong>Deca</strong> only: -35 to -60 V<br />
<strong>Troubleshooting</strong>:<br />
Loss of Sensitivity: * Clean octapoles(multipoles) and lens<br />
Octapole Diagnostic errors: * Tune multipole RF prior to running diagnostics.<br />
* Multipole RF tune now performed in calibration<br />
for all <strong>LCQ</strong>s run with Xcalibur.
760 torr<br />
<strong>LCQ</strong> Classic Optics<br />
Typical Operating Pressures<br />
1.0 torr 1.7x10 -3 torr<br />
30 m 3 /hr<br />
100 L/sec<br />
2.0 x10 -5 torr (1.0x10 -5 torr He)<br />
3.5x10 -3 torr He<br />
220 L/sec
<strong>LCQ</strong> <strong>Duo</strong> Optics<br />
Typical Operating Pressures/Comparison to <strong>LCQ</strong> Classic<br />
1.0 torr 1.7x10⁻³ 760 torr torr 2.0 x10⁻⁵ torr (1.0x10⁻⁵ torr He)<br />
30 m 3 /hr<br />
100 L/sec<br />
3.5x10 -3 torr He<br />
220 L/sec
<strong>LCQ</strong> <strong>Deca</strong> Optics<br />
Typical Operating Pressures/Comparison to <strong>LCQ</strong> Classic<br />
1.3 torr 1.7x10⁻³ 760 torr torr 2.0 x10⁻⁵ torr (1.0x10⁻⁵ torr He)<br />
60 m 3 /hr<br />
100 L/sec<br />
3.5x10 -3 torr He<br />
220 L/sec
Potential<br />
Potential Energy Diagram<br />
<strong>LCQ</strong> and <strong>LCQ</strong> <strong>Duo</strong><br />
0<br />
4000<br />
20<br />
Source CID<br />
= 20%<br />
50<br />
0<br />
-3<br />
-23<br />
-20<br />
-40<br />
-7<br />
-27<br />
-10<br />
-30<br />
-15000
Potential<br />
Potential Energy Diagram<br />
<strong>LCQ</strong> <strong>Deca</strong><br />
0<br />
4000<br />
50<br />
20<br />
0<br />
-5<br />
-20<br />
-7 -10<br />
-50<br />
-15000
RF Tune Diagnostic Dialog<br />
RF Tune Diagnostic Dialog<br />
<strong>LCQ</strong> <strong>Deca</strong>
Tune Multipole RF<br />
Tune Multipole RF<br />
<strong>LCQ</strong> <strong>Deca</strong>
Multipole RF Tune<br />
in Calibration Process<br />
Multipole RF Tune<br />
verification performed<br />
prior to calibration.
<strong>LCQ</strong> <strong>Deca</strong> Ion Optics<br />
Specifics Features<br />
Square Square Quadrupole<br />
Quadrupole<br />
New New Endcap Endcap Electrodes<br />
Electrodes<br />
New New Entrance Entrance Lens<br />
Lens<br />
New New Inter-Octapole Inter-Octapole Inter Octapole Lens<br />
Lens
Split Multipole<br />
<strong>Deca</strong> / <strong>Duo</strong> Configurations<br />
Split Square Quadrupole<br />
<strong>LCQ</strong> <strong>Deca</strong><br />
Deflection - set to +132<br />
Transmit - both set to Offset Value<br />
Split Octopole<br />
<strong>LCQ</strong> <strong>Duo</strong><br />
Deflection - set to -132
Relative Abundance<br />
Relative Abundance<br />
100<br />
90<br />
80<br />
70<br />
60<br />
50<br />
40<br />
30<br />
20<br />
10<br />
100<br />
90<br />
80<br />
70<br />
60<br />
50<br />
40<br />
30<br />
20<br />
10<br />
0<br />
0<br />
Effect of Split Multipole<br />
No Split<br />
Multipole<br />
200 300 400 500 600 700 800 900<br />
m/z<br />
With Split<br />
Multipole<br />
MRFA<br />
m/z 524<br />
(with isotopes)<br />
MRFA<br />
m/z 524<br />
(with isotopes)<br />
200 300 400 500 600 700 800 900
-DC<br />
<strong>LCQ</strong> <strong>Deca</strong> Noise Reduction<br />
Split DC on Scan out<br />
No Split<br />
+DC<br />
DECA<br />
<strong>LCQ</strong><br />
Pulsed lens
Overview of Ion Separation<br />
Quadrupole Ion Trap<br />
Ion Stream<br />
from Transfer Array<br />
Ion Trap<br />
Fundamental (Ring Electrode) and Resonance Ejection (End Caps) RF potential<br />
are ramped to sequentially eject ions from the Ion Trap
Mass Selective Instability<br />
Simplified Overview<br />
0.2<br />
0.1<br />
0<br />
-0.1<br />
-0.2<br />
-0.3<br />
-0.4<br />
-0.5<br />
-0.6<br />
-0.7<br />
a z<br />
0.2<br />
β z<br />
0.3<br />
0.4 0.5 0.6 0.7 0.81.0<br />
0<br />
0.1<br />
0.2<br />
0.2 0.4 0.6 0.8 1.0 1.2 1.4 1.6<br />
0.3<br />
0.4<br />
0.5<br />
β<br />
0.6 r<br />
0.7<br />
0.8<br />
0.9<br />
1.0<br />
q z-edge = 0.908<br />
q z = k v<br />
(m/z)<br />
q z
Ion Trap Mass Analyzer<br />
Ion Trap Mass Analyzer<br />
Filter Ions
Quadrupole Ion Trap<br />
Operational Parameters<br />
◗ Main RF: 16.2 kV p-p max.<br />
(760kHz)<br />
◗ Resonance Ejection RF: 80 V p-p max.<br />
(frequency Varies)<br />
◗ Waveform RF: 160 V p-p max.<br />
(Arbitrary)<br />
◗ Trap Offset: 10 V fixed<br />
◗ Exit Lens: at Ground potential<br />
◗ Helium gas consumption: 1 cc/min. under<br />
vacuum
<strong>LCQ</strong> <strong>Deca</strong> Tune Plus Window<br />
<strong>LCQ</strong> <strong>Deca</strong> Tune Plus Window<br />
Injection Control dialog and Status Panel
<strong>Troubleshooting</strong> the Ion Trap<br />
◗ Loss of Sensitivity: Clean End caps and ring electrode<br />
◗ High Mass Noise: Clean spacer rings and endcaps.<br />
◗ Lack of sensitivity/resolution/mass stability:<br />
Lack of helium or Air leak<br />
Notes:<br />
Full scan target: -Set to 5X10e7 for best sensitivity<br />
in the positive ion mode.<br />
-For best mass stability results, set to 2X10e7.<br />
-Set (2-3) times less in the negative ion mode.<br />
A typical value of 1X10e7 should be used.<br />
Positive/Negative switching: -Xcalibur allows for separate tune <strong>files</strong>.<br />
Pos/Neg scan segments can be used.<br />
ZoomScan target: -Set to (1-3)X10e6 for compounds with<br />
multiple charge.<br />
-Singly charged compounds will exhibit a<br />
slightly higher target.<br />
-For calibration with Cal Mix, set to 1X10e7.
Tune RF Frequency<br />
<strong>LCQ</strong> <strong>Deca</strong><br />
Measure RF<br />
Frequency<br />
Detected RF<br />
RF Frequency<br />
Well<br />
Standing Wave<br />
Ratio<br />
Switch Status
Tune RF Modulation<br />
<strong>LCQ</strong> <strong>Deca</strong><br />
Standing<br />
Wave<br />
Ratio<br />
Switch Status<br />
Detected RF<br />
Highest Mass<br />
RF Modulation<br />
Upper<br />
and<br />
Lower<br />
Ranges<br />
RF Modulation
S#: 34 RT: 1.11 AV: 1 T: + p ms NL: 10610<br />
Abundance<br />
ve<br />
elati<br />
R<br />
100<br />
90<br />
80<br />
70<br />
60<br />
50<br />
40<br />
30<br />
20<br />
10<br />
0<br />
High Mass Noise<br />
901.9<br />
951.5<br />
1196.3<br />
1229.1<br />
1336.0<br />
1504.0<br />
200 400 600 800 1000 1200 1400 1600<br />
m/z<br />
1641.4<br />
1628.6<br />
High Mass noise due to a RF electrical discharge from inside the manifold.<br />
17
Affects of Helium on Spectra<br />
Helium Helium flowing flowing into into trap<br />
trap<br />
S#:1 RT:0.00 AV:1 SM:7G NL:2.50E7<br />
T: + p Full ms<br />
Relative Abundance<br />
100<br />
80<br />
60<br />
40<br />
20<br />
0<br />
524.3<br />
525.3<br />
514 516 518 520 522<br />
m/z<br />
524 526 528<br />
Helium Helium shut shut off off and and not not flowing flowing into into trap<br />
trap<br />
S#:1 RT:0.02 AV:1 SM:7G NL:9.70E6<br />
T: + p Full ms<br />
Relative Abundance<br />
100<br />
80<br />
60<br />
40<br />
20<br />
0<br />
520.7<br />
521.8<br />
521.2<br />
522.6 523.0 523.0<br />
523.9<br />
514 516 518 520 522<br />
m/z<br />
524 526 528<br />
S#:23-32 RT:0.71-1.00 AV:10 SM:7G NL:5.61E7<br />
T: + p Full ms<br />
Relative Abundance<br />
100<br />
80<br />
60<br />
40<br />
20<br />
0<br />
195.15<br />
524.26<br />
1322.06<br />
1222.14<br />
1522.04<br />
1621.97<br />
1721.89<br />
1821.95<br />
1122.21 1921.88<br />
1022.09<br />
500 1000<br />
m/z<br />
1500 2000<br />
S#:23-32 RT:0.39-0.54 AV:10 SM:7G NL:2.80E7<br />
T: + p Full ms<br />
Relative Abundance<br />
100<br />
80<br />
60<br />
40<br />
20<br />
0<br />
192.17<br />
1320.95<br />
1620.79<br />
1520.26<br />
1720.44<br />
1220.75<br />
523.01 1919.96<br />
1120.90<br />
500 1000<br />
m/z<br />
1500 2000
Ion Detection
2-Particles<br />
enter the<br />
multiplier<br />
Electron Multiplier<br />
Detection System<br />
Cathode<br />
Applied High<br />
Voltage<br />
Anode cup<br />
~<br />
Two particles formed when an ion<br />
ejected from the Ion Trap hits the<br />
dynode. Dynode particles enter the<br />
multiplier.<br />
Each particle hits the surface of the<br />
multiplier resulting in the ejection of<br />
two more particles.<br />
The cascading effect of this process<br />
will produce a charge on the anode<br />
cup.<br />
This charge represents the signal<br />
produced by the ion.<br />
Signal to Data system.
<strong>LCQ</strong> <strong>Deca</strong> Tune Plus Window<br />
<strong>LCQ</strong> <strong>Deca</strong> Tune Plus Window<br />
Ion Detection System dialog and Status Panel
Detection System Parameters<br />
◗ Dynode Voltage: 15kV (fixed)<br />
◗ Electron Multiplier: 2500 Volts max.<br />
Note:<br />
– Multiplier voltage is a calibrated parameter.<br />
– For best results, the multiplier should not be set manually.<br />
<strong>Troubleshooting</strong>:<br />
No peaks on Classic: Check multiplier voltage<br />
Switch dynode polarity<br />
Check for ions<br />
No peaks on <strong>Deca</strong>/<strong>Duo</strong>: Check Multiplier and Dynode Voltages.<br />
Noisy spectra with heated capillary capped off:<br />
Potential Dynode noise<br />
Clean Dynode Cup
Dynode Noise<br />
◗ Dynode noise occurs over time.<br />
◗ A noisy baseline with the heated<br />
capillary capped off is the<br />
symptom.<br />
◗ This is due to an accumulation of<br />
material that can build up in the<br />
dynode cup over time.<br />
◗ The cup should be cleaned when<br />
this occurs.
Voltage<br />
Life Time of the<br />
Electron Multiplier<br />
Time<br />
The voltage needed to produce gain on the multiplier should show a linear increase with time.
<strong>LCQ</strong> Recommended Maintenance Schedule<br />
Daily:<br />
Morning Recommendations:<br />
◗ Check the convectron and ion gauge pressures. Make sure the<br />
vacuum system is operational.<br />
◗ Check the fused silica sample tube. Make sure the fused silica has<br />
not elongated.<br />
◗ Remove the septum cap.<br />
◗ Check the convectron and ion gauges pressure again. Make sure<br />
the vacuum pressures are still OK.<br />
◗ Start your analysis.
<strong>LCQ</strong> Recommended Maintenance Schedule<br />
Daily:<br />
Evening Recommendations:<br />
◗ Put the system in the stand-by mode.<br />
◗ Turn off the Ion Gauge and rinse the Heated Capillary with methanol<br />
or an appropriate solvent. When finished, turn Ion Gauge back on.<br />
◗ Cap off the heated capillary with the septum cap.<br />
◗ Secure the API probe to the API stack.<br />
◗ Make sure the solvent waste bottle is empty.<br />
◗ Open the mechanical pump ballast for roughly 0.5 hour.<br />
◗ While the pump is ballasting, maintain (move, delete, and/or copy)<br />
<strong>files</strong> at the <strong>LCQ</strong> computer.<br />
◗ If bottled nitrogen gas is being used, check the nitrogen gas.<br />
◗ After 0.5 hour, close the ballast valve.
<strong>LCQ</strong> Recommended Maintenance Schedule<br />
Weekly:<br />
For normal operation:<br />
◗ Check the mech. pump oil level.<br />
◗ Fill the mech. pump as needed.<br />
◗ If through put is high (running 24 hours a day), schedule<br />
one day a week to:<br />
- Change the mech. pump oil.<br />
- Clean the skimmer and tube lens.
<strong>LCQ</strong> Recommended Maintenance Schedule<br />
Monthly:<br />
Every Month:<br />
◗ Check the helium gas tank pressure. Replace as needed.<br />
◗ Check the nitrogen gas tank (Dewer) pressure. Replace as needed.<br />
◗ Nitrogen gas consumption:<br />
– Typical: 3-6 L/min<br />
– Worse case scenario associated with choice of Nitrogen Generator:<br />
15L/min (28SCFH at 100psi and 99% purity) for <strong>LCQ</strong> Classic<br />
30L/min (56SCFH at 100psi and 99% purity) for <strong>Duo</strong> / <strong>Deca</strong><br />
◗ Check the <strong>LCQ</strong> calibration.<br />
◗ Check the air filter. Clean if necessary.<br />
◗ Possibly, change the mech. pump oil.
<strong>LCQ</strong> Recommended Maintenance Schedule<br />
Every 3 months:<br />
Change the mech. pump oil.<br />
6 months to a year:<br />
Change the turbo pump oil.<br />
Notes<br />
- The API stack and analyzer should be clean as needed.<br />
- If the sensitivity starts to drop off and can not be<br />
restored, clean the API stack (and analyzer) as needed.
Overview of Diagnostics<br />
◗ Tests and Tools provided:<br />
– Static Tests<br />
– Dynamic Tests<br />
– Diagnostic Tools<br />
– Research Tools<br />
◗ Limitations:<br />
– Provides status of electronics components<br />
– Does not provide readbacks from the actual source element<br />
Can not detect a broken or loose connection.<br />
◗ Prior to running the dynamic diagnostics:<br />
– Tune all RF components (Octapole/Multipole and Main RF).<br />
– Make sure the system in the ON mode.<br />
– Make sure the API Probe is bolted to the API stack. This allows the<br />
high voltage to be activated.
Run All Diagnostics<br />
Run All Diagnostics<br />
Dynamic and Static Tests
Static Results from Status Test<br />
+15 V - Pass<br />
+150 V - Pass<br />
+205 V - Pass<br />
+24 V - Pass<br />
+28 V - Pass<br />
+35 V - Pass<br />
+36 V - Pass<br />
+5 V - Pass<br />
-15 V - Pass<br />
-150 V - Pass<br />
-205 V - Pass<br />
-28 V - Pass<br />
8 kV PS voltage - Pass<br />
Ambient temp. - Pass<br />
Analyzer temp. - Pass<br />
Aux gas flow - Pass<br />
Capillary temp. - Pass<br />
Capillary voltage - Pass<br />
Convectron - Pass<br />
Detected RF - Pass<br />
Dynode voltage - Pass<br />
Entrance lens - Pass<br />
Intermultipole lens - Pass<br />
Ion gauge - Pass<br />
Main RF DAC - Pass<br />
Multiplier setting - Pass<br />
Multiplier voltage - Pass<br />
Multipole 1 offset - Pass<br />
Multipole 2 offset - Pass<br />
Multipole RF mod. - Pass<br />
Multipole det. RF - Pass<br />
Multipole RF amp. out - Pass<br />
RF amp. output - Pass<br />
RF det. temp. - Pass<br />
RF gen. temp. - Pass<br />
RF modulation - Pass<br />
Sheath gas flow - Pass<br />
Trap DC Offset - Pass<br />
Tube/gate lens - Pass
Dynamic Results<br />
RF Test<br />
Starting All Diagnostics Scan Tests<br />
16:18:30: Start scan readback test on device Auxiliary amplitude (V) -- 0 to 83.2<br />
16:18:35: Scan readback test ended<br />
16:18:37: Result: PASSED<br />
16:18:37: Start scan readback test on device Main RF DAC (16-bit) -- 0 to 65535<br />
16:18:42: Scan readback test ended<br />
16:18:44: Result: PASSED<br />
16:18:44: Start scan readback test on device Vernier det. RF amp. (V) -- 0 to 65535<br />
16:18:48: Scan readback test ended<br />
16:18:50: Result: PASSED<br />
16:18:50: Start scan readback test on device Vernier RF DAC (16-bit) -- 0 to 65535<br />
16:18:55: Scan readback test ended<br />
16:18:57: Result: PASSED<br />
16:18:57: Start scan readback test on device Multipole RF DAC (V) -- 0 to 1000<br />
16:19:02: Scan readback test ended<br />
16:19:04: Result: PASSED
Dynamic Test<br />
Dynamic Test<br />
Graphical Output
Starting All Diagnostics Scan Tests<br />
Dynamic Results<br />
Lenses Test<br />
16:19:04: Start scan readback test on device Multipole 1 offset (V) -- -132 to 132<br />
16:19:09: Scan readback test ended<br />
16:19:11: Result: PASSED<br />
16:19:11: Start scan readback test on device Multipole 2 offset (V) -- -132 to 132<br />
16:19:16: Scan readback test ended<br />
16:19:17: Result: PASSED<br />
16:19:17: Start scan readback test on device Multipole lens (V) -- -132 to 132<br />
16:19:22: Scan readback test ended<br />
16:19:24: Result: PASSED<br />
16:19:24: Start scan readback test on device Multipole det. RF amp. (Vp-p) -- 0 to 1000<br />
16:19:29: Scan readback test ended<br />
16:19:31: Result: PASSED
Dynamic Results<br />
Ion Detection Test<br />
Starting All Diagnostics Scan Tests<br />
16:19:31: Start scan readback test on device Trap Offset (V) -- -132 to 132<br />
16:19:36: Scan readback test ended<br />
16:19:38: Result: PASSED<br />
16:19:38: Start scan readback test on device Tube gate (V) -- -200 to 198.01<br />
16:19:43: Scan readback test ended<br />
16:19:45: Result: PASSED<br />
16:19:45: Start scan readback test on device Multiplier (V) -- 0 to -2200<br />
16:19:58: Scan readback test ended<br />
16:20:00: Result: PASSED
Dynamic Results<br />
API Source Test<br />
Starting All Diagnostics Scan Tests<br />
16:20:00: Start scan readback test on device Auxiliary gas flow (arb) -- 0 to 60<br />
16:21:35: Scan readback test ended<br />
16:21:37: Result: PASSED<br />
16:21:37: Start scan readback test on device Sheath gas flow (arb) -- 20 to 100<br />
16:23:20: Scan readback test ended<br />
16:23:22: Result: PASSED<br />
16:23:22: Start scan readback test on device Capillary Voltage (V) -- -132 to 132<br />
16:23:27: Scan readback test ended<br />
16:23:28: Result: PASSED<br />
16:23:28: Final result: PASSED
Power Supplies<br />
Power Supplies<br />
Static Diagnostic
API and Temperature<br />
API and Temperature<br />
Static Diagnostic
Lenses<br />
Static Diagnostic
RF<br />
RF-1<br />
Static Diagnostic
RF<br />
RF-2<br />
Static Diagnostic
Calibration<br />
Diagnostic Tool
Toggles/Detector<br />
Diagnostic Tool
Instrument Settings<br />
Instrument Settings<br />
Diagnostic Tool
Graphs<br />
Plotting Conversion Dynode Voltage
Graphs<br />
Plot Tube Lens Calibration
Triggers<br />
Research Tool
Front Panel LEDs<br />
Classic/<strong>Deca</strong>
Front Panel LEDs<br />
Front Panel LEDs<br />
Definition of Classic/<strong>Deca</strong><br />
�Power: Indication of the digital power<br />
– Should be green unless the power to the <strong>LCQ</strong> is off or there has been a failure.<br />
�Vacuum: Indicates that the vacuum is OK.<br />
– (Convectron gauge, ion gauge, and external switch are all in the correct state.)<br />
– Should be green. If any one of the inter-locks is not logically correct, the LED will be off.<br />
�Communication: Indicates communication between the on-board AT CPU and the NT<br />
computer.<br />
– Will be green if the two computers are communicating.<br />
– Will be yellow if the on-board AT is active but not communicating with the NT computer.<br />
– Will be off if the <strong>LCQ</strong> is off or if a failure has occurred.<br />
�System: Indicates the status of the <strong>LCQ</strong>.<br />
– Will be green if the <strong>LCQ</strong> is in the On mode. High voltage is applied.<br />
– Will be yellow if the <strong>LCQ</strong> is in the standby mode. High voltages are off.<br />
– Will be off if the <strong>LCQ</strong> is in the Off mode. Most of the power supplies are off.<br />
�Scan: Indicates that the <strong>LCQ</strong> is in the On mode and Scanning.<br />
– Will be blue and flashing when the <strong>LCQ</strong> is collecting data.<br />
– Will be off if the <strong>LCQ</strong> is either in the On or Standby mode. Also will be off if the <strong>LCQ</strong> is<br />
off.
Front Panel LEDs<br />
<strong>LCQ</strong> <strong>Duo</strong>
<strong>LCQ</strong> <strong>Duo</strong> Front Panel LEDs<br />
Definition<br />
�Power: Indication of the digital power<br />
– Should be green unless the power to the <strong>LCQ</strong> is off or there has been a failure.<br />
– Will flash yellow indicating a Warning condition for the on-board CPU temperature .<br />
– Will be solid yellow indicating a Fatal condition. The MS will be held in a Reset mode until<br />
the temperature problem has been resolved.<br />
�Vacuum: Indicates that the vacuum is OK.<br />
– (Convectron gauge, ion gauge, and external switch are all in the correct state.)<br />
– Should be green. If any one of the inter-locks is not logically correct, the LED will be off.<br />
�Communication: Indicates communication between the <strong>LCQ</strong> AT<br />
CPU and the NT computer.<br />
– Will be green if the two computers are communicating.<br />
– Will be yellow if the on-board AT is active but not communicating with the NT computer.<br />
– Will be off if the <strong>LCQ</strong> is off or if a failure has occurred.
<strong>LCQ</strong> <strong>Duo</strong> Front Panel LEDs<br />
Definition<br />
� System: Indicates the status of the <strong>LCQ</strong>.<br />
− Will be green if the <strong>LCQ</strong> is in the On mode. High voltage is applied.<br />
− Will be yellow if the <strong>LCQ</strong> is in the standby mode. High voltages are off.<br />
− Will be off if the <strong>LCQ</strong> is in the Off mode. Most of the power supplies are off.<br />
� Scan: Indicates that the <strong>LCQ</strong> is in the On mode and Scanning.<br />
− Will be blue and flashing when the <strong>LCQ</strong> is collecting data.<br />
− Will be off if the <strong>LCQ</strong> is either in the On or Standby mode. Also will be off<br />
if the <strong>LCQ</strong> is off.<br />
� Syringe Pump: Indicates the status of the syringe pump.<br />
− Will be green if the syringe pump on.<br />
− Will be yellow when the pump has reached it end of travel.