Install Guide - Bose FreeSpace DS 16S, DS16SE, and DS100Se ...
Install Guide - Bose FreeSpace DS 16S, DS16SE, and DS100Se ...
Install Guide - Bose FreeSpace DS 16S, DS16SE, and DS100Se ...

You also want an ePaper? Increase the reach of your titles
YUMPU automatically turns print PDFs into web optimized ePapers that Google loves.
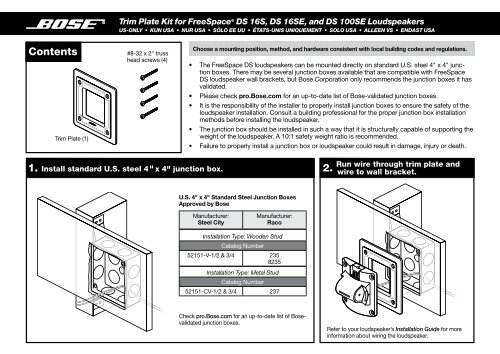
Contents<br />
Trim Plate (1)<br />
Trim Plate Kit for <strong>FreeSpace</strong> ® <strong>DS</strong> <strong>16S</strong>, <strong>DS</strong> <strong>16S</strong>E, <strong>and</strong> <strong>DS</strong> 100SE Loudspeakers<br />
US-ONLY • KUN USA • NUR USA • SÓLO EE UU • ÉTATS-UNIS UNIQUEMENT • SOLO USA • ALLEEN VS • ENDAST USA<br />
#8-32 x 2" truss<br />
head screws (4)<br />
1. <strong>Install</strong> st<strong>and</strong>ard U.S. steel 4" x 4" junction box.<br />
Choose a mounting position, method, <strong>and</strong> hardware consistent with local building codes <strong>and</strong> regulations.<br />
• The <strong>FreeSpace</strong> <strong>DS</strong> loudspeakers can be mounted directly on st<strong>and</strong>ard U.S. steel 4" x 4" junction<br />
boxes. There may be several junction boxes available that are compatible with <strong>FreeSpace</strong><br />
<strong>DS</strong> loudspeaker wall brackets, but <strong>Bose</strong> Corporation only recommends the junction boxes it has<br />
validated.<br />
• Please check pro.<strong>Bose</strong>.com for an up-to-date list of <strong>Bose</strong>-validated junction boxes.<br />
• It is the responsibility of the installer to properly install junction boxes to ensure the safety of the<br />
loudspeaker installation. Consult a building professional for the proper junction box installation<br />
methods before installing the loudspeaker.<br />
• The junction box should be installed in such a way that it is structurally capable of supporting the<br />
weight of the loudspeaker. A 10:1 safety weight ratio is recommended.<br />
• Failure to properly<br />
install a junction box or loudspeaker could result in damage, injury or death.<br />
U.S. 4" x 4" St<strong>and</strong>ard Steel Junction Boxes<br />
Approved by <strong>Bose</strong><br />
Manufacturer:<br />
Steel City<br />
Manufacturer:<br />
Raco<br />
<strong>Install</strong>ation Type: Wooden Stud<br />
Catalog Number<br />
52151-V-1/2 & 3/4 235<br />
8235<br />
<strong>Install</strong>ation Type: Metal Stud<br />
Catalog Number<br />
52151-CV-1/2 & 3/4 237<br />
Check pro.<strong>Bose</strong>.com for an up-to-date list of <strong>Bose</strong>validated<br />
junction boxes.<br />
2.<br />
Run wire through trim plate <strong>and</strong><br />
wire to wall bracket.<br />
Refer to your loudspeaker’s <strong>Install</strong>ation <strong>Guide</strong> for more<br />
information about wiring the loudspeaker.
3. Attach loudspeaker wall bracket to trim plate.<br />
Use (2) #8-32 x 2" truss head screws provided.<br />
Note: Trim plate has two threaded inserts which should be oriented at the corners<br />
opposite of the junction box tabs.<br />
Do not overtighten.<br />
If using a power drill, set to a low torque setting.<br />
4. Secure wall bracket <strong>and</strong> trim plate to junction box.<br />
Use (2) #8-32 x 2" truss head screws provided.<br />
5. Mount loudspeaker to wall bracket.<br />
Do not overtighten.<br />
If using a power<br />
drill, set to a low<br />
torque setting.<br />
Refer to your<br />
loudspeaker’s<br />
<strong>Install</strong>ation <strong>Guide</strong><br />
for more information<br />
about mounting the<br />
loudspeaker to the<br />
wall bracket<br />
©2008 <strong>Bose</strong> Corporation, The Mountain, Framingham, MA 01701-9168 USA AM316792 Rev.02