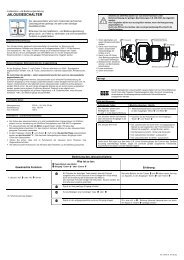
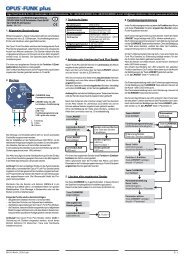
gN Aktor REG 12 V Lichtszenen / Universal Dimmen - OPUS Schalter
gN Aktor REG 12 V Lichtszenen / Universal Dimmen - OPUS Schalter
gN Aktor REG 12 V Lichtszenen / Universal Dimmen - OPUS Schalter

Sie wollen auch ein ePaper? Erhöhen Sie die Reichweite Ihrer Titel.
YUMPU macht aus Druck-PDFs automatisch weboptimierte ePaper, die Google liebt.
D<br />
561.176<br />
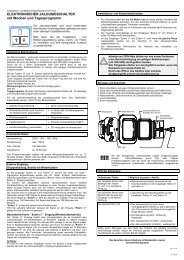
RS485-Bus-Dimmaktor<br />
<strong>Lichtszenen</strong>steuergerät<br />
GN-A-R<strong>12</strong>V-LZ/UD mit<br />
<strong>Universal</strong>-Dimmschalter<br />
Dimmaktor 1 Kanal, Power MOSFET bis<br />
500W, ESL bis 100W. Stand-by-Verlust nur<br />
0,3 Watt.<br />
Speicherung von bis zu 40 <strong>Lichtszenen</strong> für<br />
eine Gruppe dimmbarer Energiesparlampen<br />
ESL, Glühlampen und Halogenlampen.<br />
Reiheneinbaugerät für Montage auf<br />
Tragschiene DIN-EN 60715 TH35.<br />
1 Teilungseinheit = 18mm breit, 58mm tief.<br />
<strong>Universal</strong>-Dimmschalter für R-, L- und C-Lasten<br />
bis 500W, abhängig von den Lüftungsverhältnissen,<br />
dimmbare Energiesparlampen<br />
ESL bis 100W. Automatische Erkennung der<br />
Lastart R+L oder R+C.<br />
Schaltung im Nulldurchgang mit Soft-Ein und<br />
Soft-Aus zur Lampenschonung.<br />
Bei einem Stromausfall werden die Schaltstellung<br />
und die Helligkeitsstufe gespeichert<br />
und wird gegebenenfalls bei Wiederkehr der<br />
Versorgungsspannung eingeschaltet.<br />
Automatische elektronische Überlastsicherung<br />
und Übertemperatur-Abschaltung.<br />
Anschluss an den greenNet-RS485-Bus,<br />
Anschlussklemmen RSA und RSB. Bis insgesamt<br />
<strong>12</strong>8 Kanäle können so hinzugefügt werden.<br />
Funktion des GN-A-R<strong>12</strong>V-LZ/UD<br />
Alle GN-A-R<strong>12</strong>V-LZ eines Raumes können zu<br />
<strong>Lichtszenen</strong> zusammengeschaltet werden,<br />
wobei die Helligkeit jeder Leuchtengruppe<br />
manuell eingestellt und die ganze Lichtszene<br />
danach gemeinsam eingelernt wird. Bis zu<br />
40 <strong>Lichtszenen</strong> können so festgelegt werden.<br />
Bis zu 10 <strong>Lichtszenen</strong> werden mit nur einem<br />
Taster sequenziell abgerufen, bis zu 30 weitere<br />
<strong>Lichtszenen</strong> werden mit einzeln zugeordneten<br />
Tastern direkt abgerufen.<br />
Jeder GN-A-R<strong>12</strong>V-LZ oder auch Gruppen von<br />
GN-A-R<strong>12</strong>V-LZ können zusätzlich individuell<br />
geschaltet und gedimmt werden. Insgesamt<br />
stehen je GN-A-R<strong>12</strong>V-LZ bis zu 35 <strong>Lichtszenen</strong>taster<br />
und Individualtaster zur<br />
Verfügung. Der Abruf einer Lichtszene<br />
übersteuert eine individuelle Einstellung.<br />
Die gleiche Funktion wie ein <strong>Lichtszenen</strong>taster<br />
hat ein entsprechend eingelerntes Funk-<br />
S d d l GN GW R8 230V T 2 d<br />
hat ein entsprechend eingelerntes Funk-<br />
Sendemodul GN-GW-R8-230V-T-2 oder<br />
GN-GW-U8-230V-T-2. Ereignisabhängig oder<br />
zeitabhängig gesteuert, können damit gezielt<br />
<strong>Lichtszenen</strong> abgerufen werden.<br />
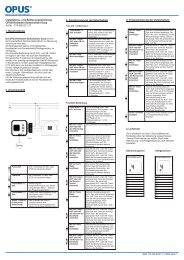
Funktions-Drehschalter<br />
Anschlussbeispiel verschiedener Funkaktoren<br />
nur GN-A-R<strong>12</strong>V-SG/1-10V<br />
nur GN-A-R<strong>12</strong>V-UD<br />
Einlernen der Funksensoren in Funkaktoren<br />
Alle Sensoren, wie Wandsender, Funk-Handsender,<br />
Funk-Sendemodule, Funk-Fenster-<br />
Türkontakte, Funk-Schaltuhren und Funk-<br />
Bewegungs-Helligkeitssensoren, müssen in<br />
<strong>Aktor</strong>en (Empfänger mit Dimmern, <strong>Schalter</strong>n<br />
und Relais) eingelernt werden, damit diese<br />
deren Befehle erkennen und ausführen<br />
können.<br />
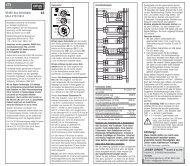
<strong>Aktor</strong> GN-A-R<strong>12</strong>V-LZ einlernen<br />
Bei der Lieferung ab Werk ist der Lernspeicher<br />
leer. Sollten Sie nicht sicher sein, ob bereits<br />
etwas eingelernt wurde, dann müssen Sie<br />
den Speicherinhalt komplett leeren:<br />
Stellen Sie den mittleren Drehschalter auf CLR.<br />
Die LED blinkt aufgeregt. Nun innerhalb von<br />
10 Sekunden den oberen Drehschalter 3-mal<br />
zu dem Rechtsanschlag (Drehen im Uhrzeigersinn)<br />
und wieder davon weg drehen. Die LED<br />
hört auf zu blinken und erlischt nach 2<br />
Sekunden. Alle eingelernten Sensoren sind<br />
gelöscht.<br />
Einzelne eingelernte Sensoren löschen wie<br />
bei dem Einlernen, nur den mittleren Drehschalter<br />
auf CLR anstatt LRN stellen und den<br />
Sensor betätigen. Die zuvor aufgeregt blinkende<br />
LED erlischt.<br />
Das Einlernen der <strong>Lichtszenen</strong> erfolgt nach<br />
der kompletten Elektroinstallation der Anlage.<br />
Für Funktionstests den unteren Drehschalter<br />
aller GN-A-R<strong>12</strong>V-LZ auf 'ON' bzw. 'OFF' stellen.<br />
1. Zunächst wird allen GN-A-R<strong>12</strong>V-LZ, welche<br />
für die <strong>Lichtszenen</strong>steuerung eines Raumes<br />
erforderlich sind, ein gemeinsamer<br />
Richtungstaster eingelernt. Dies ist eine<br />
Wippe eines Wandsenders oder eines Funk-<br />
Handsenders GN-HS-8 bzw. GN-HS-<strong>12</strong>.<br />
1a.Einlernen des "Einlerntasters"<br />
Hierzu den oberen Lern-Drehschalter LRN<br />
auf die Position 5 und den mittleren Drehschalter<br />
auf 'LRN' stellen. Die LED am<br />
GN-A-R<strong>12</strong>V-LZ blinkt gleichmäßig.<br />
Danach die Wippe oben oder unten kurz<br />
drücken und die LED am GN-A-R<strong>12</strong>V-LZ<br />
erlischt.<br />
Von nun an können mit diesem "Einlerntaster"<br />
die gewünschten Helligkeiten der<br />
einzelnen <strong>Lichtszenen</strong> eingestellt werden.<br />
1b.Einlernen des sequenziellen <strong>Lichtszenen</strong>tasters<br />
Hierzu den oberen Lern-Drehschalter LRN<br />
auf die Position 3 und den mittleren Drehschalter<br />
auf 'LRN' stellen. Die LED am<br />
GN-A-R<strong>12</strong>V-LZ blinkt gleichmäßig.<br />
Danach die Wippe oben oder unten kurz<br />
drücken und die LED am GN-A-R<strong>12</strong>V-LZ<br />
erlischt.<br />
Mit dem soeben eingelernten sequenziellen<br />
<strong>Lichtszenen</strong>taster können später die<br />
sequenziellen <strong>Lichtszenen</strong> abgerufen werden<br />
<strong>Lichtszenen</strong>taster können später die<br />
sequenziellen <strong>Lichtszenen</strong> abgerufen werden.<br />
Ein Doppelklick oben schaltet alle Leuchtengruppen<br />
auf volle Helligkeit. Danach können<br />
die <strong>Lichtszenen</strong> wieder in aufsteigender<br />
(Betätigung oben) oder absteigender<br />
(Betätigung unten) Reihenfolge abgerufen<br />
werden.<br />
Der sequenzielle <strong>Lichtszenen</strong>taster kann<br />
nicht zusätzlich mit direkt abrufbaren<br />
<strong>Lichtszenen</strong> belegt werden.<br />
2. Danach bei allen GN-A-R<strong>12</strong>V-LZ den<br />
unteren Drehschalter auf LOCK ('LCK')<br />
stellen.<br />
3. Einlernen der sequenziell abrufbaren<br />
<strong>Lichtszenen</strong><br />
3a.Den mittleren Drehschalter auf 'AUTO' stellen.<br />
3b.Den unteren Drehschalter auf 'MOD' stellen.<br />
3c. Den oberen Drehschalter auf die<br />
gewünschte <strong>Lichtszenen</strong>position (1 bis 10)<br />
stellen.<br />
3d.Mit dem zu Anfang eingelernten "Einlerntaster"<br />
die gewünschte Helligkeit einstellen.<br />
Auch wenn die Leuchtengruppe in einer<br />
Lichtszene ausgeschaltet sein soll, muss<br />
diese jetzt eingelernt werden, indem mit<br />
dem "Einlerntaster" unten ausgeschaltet<br />
wird.<br />
3e. Den unteren Drehschalter auf 'SET' drehen,<br />
die LED am GN-A-R<strong>12</strong>V-LZ leuchtet für 2s<br />
und erlischt.<br />
Um weitere <strong>Lichtszenen</strong> zu speichern<br />
wieder bei 3b. aufsetzen.<br />
4. Einlernen der direkt abrufbaren <strong>Lichtszenen</strong><br />
4a.Den unteren Drehschalter auf 'LS+' stellen.<br />
4b.Den oberen Drehschalter auf die<br />
gewünschte Dimmgeschwindigkeit einstellen.<br />
1 = sehr langsam bis 10 = sehr schnell<br />
Solange hier noch keine eigenen<br />
Erfahrungen vorliegen, empfehlen wir<br />
die Position 5.<br />
4c. Den mittleren Drehschalter auf 'AUTO' stellen.<br />
4d.Mit dem zu Anfang eingelernten "Einlerntaster"<br />
die gewünschte Helligkeit einstellen.<br />
Auch wenn die Leuchtengruppe in einer<br />
Lichtszene ausgeschaltet sein soll, muss<br />
diese jetzt eingelernt werden, indem mit<br />
dem "Einlerntaster" unten ausgeschaltet<br />
wird.<br />
4e. Den mittleren Drehschalter auf 'LS' stellen,<br />
die LED blinkt gleichmäßig.<br />
4f. Den gewünschten <strong>Lichtszenen</strong>taster<br />
betätigen und die LED am GN-A-R<strong>12</strong>V-LZ<br />
erlischt.<br />
Um weitere <strong>Lichtszenen</strong> zu speichern<br />
wieder bei 4b. aufsetzen.<br />
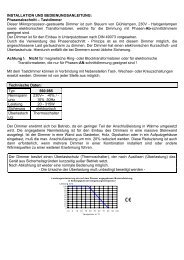
Für den Normalbetrieb anschließend die<br />
mittleren Drehschalter auf 'AUTO' (eventuell<br />
auch 'AUTO ESL' bei Energiesparlampen) stellen<br />
und die oberen Drehschalter alle gleich auf die<br />
Anzahl der eingelernten sequenzielle<br />
<strong>Lichtszenen</strong> stellen.<br />
Mit dem unteren Drehschalter kann je<br />
Leuchtengruppe der Automatikbetrieb<br />
beeinflusst werden:<br />
ON = Licht an mit voller Helligkeit.<br />
LS = <strong>Lichtszenen</strong> sind nur abrufbar und<br />
können nicht verändert werden.<br />
LS+ = <strong>Lichtszenen</strong> sind abrufbar und können<br />
durch den "Einlerntaster" temporär<br />
verändert werden.<br />
OFF = Licht aus.<br />
Sollen einzelne Leuchtengruppen temporär<br />
manuell beeinflusst werden können, so<br />
muss lediglich je ein weiterer Richtungstaster<br />
für einen oder auch mehrere GN-A-R<strong>12</strong>V-LZ<br />
eingelernt werden, wie bei '1a' beschrieben.<br />
Ingesamt können bis zu 4 Taster je<br />
GN-A-R<strong>12</strong>V-LZ eingelernt werden, ohne die 40<br />
Speicherplätze der <strong>Lichtszenen</strong> zu reduzieren.<br />
Werden weniger <strong>Lichtszenen</strong> eingelernt, stehen<br />
entsprechend mehr Taster zur Verfügung.<br />
Zentralsteuerfunktionen werden wie <strong>Lichtszenen</strong><br />
eingelernt. 'Zentral aus' erfordert das<br />
Einlernen aller Leuchtengruppen in der<br />
Stellung 'ausgeschaltet' und 'zentral ein'<br />
erfordert das Einlernen in einer gewünschten<br />
Helligkeit.<br />
Notbeleuchtungshelligkeit: Solange der<br />
Steuereingang NB mit +<strong>12</strong>V DC verbunden<br />
ist, wird auf die maximale Helligkeit geregelt.<br />
Sämtliche Funksignale werden dann ignoriert.<br />
!<br />
Achtung!<br />
Ist ein <strong>Aktor</strong> lernbereit (die LED blinkt<br />
ruhig), dann wird das nächste<br />
ankommende Signal eingelernt.<br />
Daher unbedingt darauf achten, dass<br />
während der Einlernphase keine<br />
anderen Sensoren aktiviert werden.<br />
Achtung!<br />
Diese Geräte dürfen nur durch eine<br />
Elektrofachkraft installiert werden,<br />
andernfalls besteht Brandgefahr oder<br />
Gefahr eines elektrischen Schlages!<br />
08/2009 Änderungen vorbehalten.<br />
JÄGER DIREKT ® GmbH & Co.KG<br />
Hochstr. 6, D-64385 Reichelsheim<br />
Kontakt<br />
Technische Beratung: 06164 9300-549<br />
E-Mail: info@jaeger-direkt.com
GB<br />
561.176<br />
RS485 bus dimming actuator<br />
Light scene controller<br />
GN-A-R<strong>12</strong>V-LZ/UD with<br />
universal dimmer switch<br />
Dimming actuator 1 channel, Power MOSFET<br />
up to 500W, ESL up to 100W. Only 0.3 watt<br />
standby loss.<br />
Stores up to 40 light scenes for a group of<br />
dimmable energy saving lamps ESL,<br />
incandescent lamps and halogen lamps.<br />
Modular device for DIN-EN 60715 TH35 rail<br />
mounting.<br />
1 module = 18mm wide, 58mm deep.<br />
<strong>Universal</strong> dimmer switch for R, L and C loads<br />
up to 500 watts, depending on ventilation<br />
conditions. Dimmable energy saving lamps<br />
ESL up to 100 watts. Automatic detection of<br />
load R+L or R+C.<br />
Zero passage switching with soft ON and soft<br />
OFF to protect lamps.<br />
In case of a power failure the switch position<br />
and the brightness stage are stored and may<br />
be switched on when the power supply is<br />
restored.<br />
Automatic electronic overload protection and<br />
overtemperature switch-off.<br />
Connection to the greenNet RS485 Bus,<br />
terminals RSA and RSB. Up to a total of<br />
<strong>12</strong>8 channels can be added in this way.<br />
Function of GN-A-R<strong>12</strong>V-LZ/UD<br />
All GN-A-R<strong>12</strong>V-LZ in a room can be<br />
switched in series to obtain light scenes. The<br />
brightness of each lamp group is manually<br />
adjustable and the entire light scene can then<br />
be taught-in. Up to 40 light scenes are programmable.<br />
Up to 10 light scenes are retrievable<br />
sequentially with only one pushbutton. Up to<br />
30 additional light scenes are directly retrievable<br />
with single assigned pushbuttons.<br />
Each GN-A-R<strong>12</strong>V-LZ or GN-A-R<strong>12</strong>V-LZ groups<br />
can also be switched and dimmed individually.<br />
There are a total of 35 light scene and individual<br />
pushbuttons on each GN-A-R<strong>12</strong>V-LZ. Retrieving<br />
a light scene overrides an individual setting.<br />
The same function as a light scene pushbutton<br />
has an associated taught-in wireless transmitter<br />
module GN-GW-R8-230V-T-2 or<br />
GN-GW-U8-230V-T-2. Specific light scenes<br />
can then be retrieved with event-dependent<br />
or time-dependent control.<br />
Function rotary switches<br />
Typical connection various wireless actuators<br />
Typical connection various wireless actuators<br />
only GN-A-R<strong>12</strong>V-SG/1-10V<br />
only GN-A-R<strong>12</strong>V-UD<br />
power<br />
supply unit<br />
<strong>12</strong> or<br />
24 watts<br />
Teaching-in wireless sensors in wireless<br />
actuators<br />
All sensors such as wall transmitter, wireless<br />
hand-held transmitters, wireless transmitter<br />
modules, wireless window/door contacts,<br />
wireless timers and wireless motion/brightness<br />
sensors must be taught-in in the actuators<br />
(receivers with dimmers, switches and<br />
relays) so that they can detect and execute<br />
commands.<br />
Teaching-in actuator GN-A-R<strong>12</strong>V-LZ/UD<br />
The teach-in memory is empty on delivery<br />
from the factory. If you are unsure whether the<br />
teach-in memory contains something or not,<br />
you must first clear the memory contents<br />
completely:<br />
Set the middle rotary switch to CLR.<br />
The LED flashes at a high rate. Within the<br />
next 10 seconds, turn the upper rotary switch<br />
three times to the right stop (turn clockwise)<br />
and then turn back away from the stop.<br />
The LED stops flashing and goes out after<br />
2 seconds. All taught-in sensors are cleared.<br />
Clear individual taught-in sensors in the<br />
same way as in the teach-in procedure,<br />
except that you set the middle rotary switch to<br />
CLR instead of LRN, and operate the sensor.<br />
The LED previously flashing at a high rate<br />
goes out.<br />
Light scene teach-in is carried out after<br />
completion of the electrical installation.<br />
Set the bottom rotary switch of all GN-A-<br />
R<strong>12</strong>V-LZ to 'ON' or 'OFF' for function tests.<br />
1. First a shared direction switch is taught-in<br />
for all GN-A-R<strong>12</strong>V-LZ's required to control<br />
the light scenes in a room. This is a wall<br />
transmitter or a wireless GN-HS-8 or GN-<br />
HS-<strong>12</strong> hand-held transmitter.<br />
1a.Teaching-in the "learn pushbutton"<br />
Here set the top learn ('LRN') rotary switch<br />
to position 5 and the middle rotary switch<br />
to 'LRN'. The LED on the GN-A-R<strong>12</strong>V-LZ<br />
flashes at a low rate.<br />
Then briefly press the rocker at the top or<br />
bottom and the LED on the GN-A-R<strong>12</strong>V-LZ<br />
goes out. From then on the required<br />
brightness stages can be adjusted for the<br />
light scenes using this "learn pushbutton".<br />
1b.Teaching-in the sequential light scene<br />
pushbutton<br />
Here set the top learn ('LRN') rotary switch<br />
to position 3 and the middle rotary switch<br />
to 'LRN'. The LED on the GN-A-R<strong>12</strong>V-LZ<br />
flashes at a low rate.<br />
Then briefly press the rocker at the top or<br />
bottom and the LED on the GN-A-R<strong>12</strong>V-LZ<br />
goes out. Using this just taught-in sequential<br />
light scene pushbutton the sequential light<br />
goes out. Using this just taught-in sequential<br />
light scene pushbutton the sequential light<br />
scene can be retrieved later. A double-click<br />
at the top will switch all the lamp groups to<br />
full brightness. The light scenes can then be<br />
called up again in ascending order (top<br />
switch) or descending order (bottom switch).<br />
Additional direct light scene retrieval<br />
functions cannot be assigned to the<br />
sequential light scene pushbutton.<br />
2. Then set the bottom rotary switch to LOCK<br />
('LCK') on all GN-A-R<strong>12</strong>V-LZ's.<br />
3. Teaching-in the sequential retrievable<br />
light scenes<br />
3a.Set the middle rotary switch to 'AUTO'.<br />
3b.Set the bottom rotary switch to 'MOD'.<br />
3c. Set the top rotary switch to the required<br />
light scene position (1 to 10).<br />
3d.Adjust the required brightness, using<br />
the "learn pushbutton" taught-in at the<br />
beginning.<br />
Even if the lamp group in a light scene<br />
needs to be switched off, it must be<br />
taught-in now by switching off the "learn<br />
pushbutton" at the bottom.<br />
3e. Turn the bottom rotary switch to 'SET', the<br />
LED on the GN-A-R<strong>12</strong>V-LZ lights up and<br />
goes out after 2 seconds.<br />
To store further light scenes continue with<br />
step 3b.<br />
4. Teaching-in the directly retrievable light<br />
scenes<br />
4a.Set the bottom rotary switch to 'LS+'.<br />
4b.Use the upper rotary switch to set the<br />
required dim speed.<br />
1 = very slow to 10 = very fast.<br />
We advise you to select position 5 unless<br />
you have your own experiences.<br />
4c. Set the middle rotary switch to 'AUTO'.<br />
4d.Adjust the required brightness, using<br />
the "learn pushbutton" taught-in at the<br />
beginning.<br />
Even if the lamp group in a light scene<br />
needs to be switched off, it must be<br />
taught-in now by switching off the "learn<br />
pushbutton" at the bottom.<br />
4e. Set the middle rotary switch to 'LS', the LED<br />
flashes at a low rate.<br />
4f. Operate the required light scene pushbutton<br />
and the LED on the GN-A-R<strong>12</strong>V-LZ goes out.<br />
To store further light scenes continue with<br />
step 4b.<br />
Then for normal mode set the middle rotary<br />
switches to 'AUTO' (also 'AUTO ESL' may be<br />
set when energy saving lamps are used) and<br />
set all the top rotary switches to the same<br />
number of sequential light scenes which have<br />
been taught in.<br />
The bottom rotary switch can be used to<br />
control the settings in automatic mode for<br />
each lamp group.<br />
ON = light on with full brightness.<br />
LS = light scenes are only retrievable and<br />
can not be changed.<br />
LS+ = light scenes are retrievable and can<br />
only be changed temporarily using<br />
the "learn pushbutton".<br />
OFF = light off.<br />
If individual lamp groups can be influenced<br />
temporarily and manually, only an additional<br />
direction switch in each case need to be<br />
taught-in for one or more GN-A-R<strong>12</strong>V-LZ's as<br />
described in '1a'.<br />
In total up to 4 pushbuttons can be taught-in<br />
for each GN-A-R<strong>12</strong>V-LZ without reducing the<br />
40 storage places of the light scenes.<br />
Accordingly if fewer light scenes are taught-in,<br />
more pushbuttons are available.<br />
Teach-in central control functions in the<br />
same way as light scenes. When teaching-in<br />
'Central OFF' all lamp groups must be in<br />
position 'switched off'. 'Central ON' needs to<br />
be taught-in at a required brightness level.<br />
Brightness for emergency lighting: As long<br />
as the control input NB is connected to +<strong>12</strong>V<br />
DC, it is dimmed to the maximum brightness.<br />
All wireless signals are ignored then.<br />
!<br />
When an actuator is ready for<br />
teach-in (the LED flashes at a low<br />
rate), the very next incoming signal<br />
is taught-in. Therefore, make<br />
absolutely sure that you do not<br />
activate any other sensors during<br />
the teach-in phase.<br />
p<br />
I t t i d !<br />
Important reminder!<br />
This electrical equipment may only be<br />
installed by skilled electricians otherwise<br />
fire hazard or danger of electric shock<br />
exists!<br />
08/2009 Subject to change without notice.<br />
JÄGER DIREKT ® GmbH & Co.KG<br />
Hochstr. 6, D-64385 Reichelsheim<br />
Contact<br />
Technical advice: +49 6164 9300-549<br />
E-Mail: info@jaeger-direkt.com