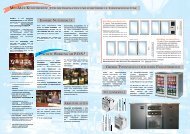
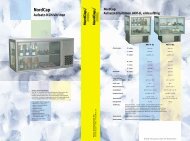
SPR 80 SPR 120 SPR 165
SPR 80 SPR 120 SPR 165
SPR 80 SPR 120 SPR 165

Erfolgreiche ePaper selbst erstellen
Machen Sie aus Ihren PDF Publikationen ein blätterbares Flipbook mit unserer einzigartigen Google optimierten e-Paper Software.
3. Shut close the water shutoff valve on water<br />
line.<br />
4. Remove the top panels to gain access to<br />
the water reservoir.<br />
5. Remove the float reservoir cover and with a<br />
piece of copper wire shunt the two water level<br />
sensors.<br />
6. Place a water pan under the freezer water<br />
inlet port, disconnect the water hose from this<br />
port and allow the water from the freezer to flow<br />
into the pan previously positioned.<br />
Then refit the water hose to the freezer water inlet<br />
port.<br />
7. Prepare the cleaning solution by diluting in<br />
a plastic container two or three liters of warm<br />
water (45°-50°C) with a 0,2-0,3 liters of SIMAG<br />
Ice Machine Cleaner.<br />
WARNING. The SIMAG Ice Machine<br />
Cleaner contains Phosphoric and<br />
Hydroxyacetic acids. These compounds<br />
are corrosive and may cause burns if<br />
swallowed, DO NOT induce vomiting.<br />
Give large amounts of water or milk. Call<br />
Physician immediately. In case of external<br />
contact flush with water. KEEP OUT OF<br />
THE REACH OF CHILDREN<br />
8. Pour the cleaning solution into the water<br />
reservoir.<br />
9. After 15 minutes switch ON the Master<br />
switch to start the unit.<br />
10. Wait till the machine starts to discharge ice,<br />
then continue to slowly pour the cleaning solution<br />
into the water reservoir taking care to maintain<br />
the level just below the overflow.<br />
Page 15<br />
NOTE. The ice made with the cleaning<br />
solution is slushy and coloured also, it may<br />
tend to loose fluidity creating some resistence<br />
in being elevated and extruded; this situation<br />
can be heard by the noise made of the ice.<br />
Should this occure it is recommended to stop<br />
for few minutes the ice machine in order to<br />
allow the ice in the freezer to partially melt<br />
then restart again.<br />
11. When all the cleaning solution has been<br />
used up, open the water shutoff valve to allow<br />
new fresh water to flow into the reservoir. Let the<br />
unit to continue to run until the ice resumes the<br />
normal colour and hardness.<br />
12. Stop the icemaker and pour warm water on<br />
the ice deposited into the storage bin to melt it up.<br />
NOTE. DO NOT use ice produced with the<br />
cleaning solution. Be sure none remains in<br />
the bin.<br />
13. Pour into the water reservoir 1 cc. (approx<br />
20 drops) of Scotsman Sanitiser (Antialgae<br />
P/N 264000.02) then switch the unit ON.<br />
14. Left the unit running for approx 10 minutes<br />
then remove the copper wire used to jump the two<br />
sensors for the water level and place back correctly<br />
the cover on the float reservoir.<br />
NOTE. DO NOT use ice produced with the<br />
sanitising solution.<br />
15. With a sponge moisted with a sanitising<br />
solution, wipe clean all the bin interior surfaces.<br />
REMEMBER. To prevent the accumulation<br />
of undesirable bacteria it is necessary to<br />
sanitize the interior of the storage bin with an<br />
anti-algae disinfectant solution every week.