Projektbeschreibung Project description USB-RS232-Bridge - myAVR
Projektbeschreibung Project description USB-RS232-Bridge - myAVR
Projektbeschreibung Project description USB-RS232-Bridge - myAVR

Sie wollen auch ein ePaper? Erhöhen Sie die Reichweite Ihrer Titel.
YUMPU macht aus Druck-PDFs automatisch weboptimierte ePaper, die Google liebt.
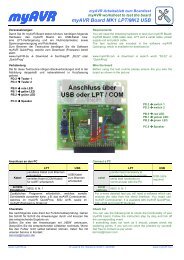
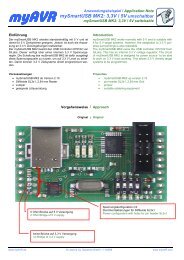
<strong>Projektbeschreibung</strong> / <strong>Project</strong> <strong>description</strong> <strong>USB</strong>-<strong>RS232</strong>-<strong>Bridge</strong> Seite: 7/8FertigungshinweiseBei der Bestückung ist auf die korrekte Polarität derKondensatoren und auf die Einbaurichtung des MAX232Nzu achten. Hilfreich ist es weiterhin mit den flachstenBauteilen zu beginnen. Buchsenleisten, MAX232N,Elektrolytkondensatoren und zuletzt die SUB-D 9 polig,das ist die günstigste Reihenfolge.Production memosAt the equipment you should look after the right polarityand the direction of installation of MAX232N. Furthermoreit is helpful to start with the flat elements. At first thefemale connectors, MAX232N, electrolytic capacitors andat last the SUB-D 9 pin, that is the best order.<strong>USB</strong> Kabel zum PC /<strong>USB</strong> cable to PCAbbildung: <strong>USB</strong>-<strong>RS232</strong>-<strong>Bridge</strong> mit aufgestecktem mySmart<strong>USB</strong> MK2 Programmer und InterfacePicture: to insert the <strong>USB</strong>-<strong>RS232</strong>-bridge on the mySmart<strong>USB</strong> MK2 programmer and interfacewww.<strong>myAVR</strong>.de © Laser & Co. Solutions GmbH - 02/2010 www.<strong>myAVR</strong>.com