Projektbeschreibung Project description USB-RS232-Bridge - myAVR
Projektbeschreibung Project description USB-RS232-Bridge - myAVR
Projektbeschreibung Project description USB-RS232-Bridge - myAVR

Erfolgreiche ePaper selbst erstellen
Machen Sie aus Ihren PDF Publikationen ein blätterbares Flipbook mit unserer einzigartigen Google optimierten e-Paper Software.
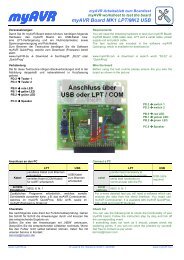
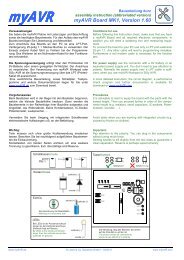
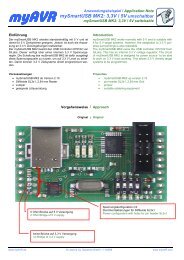
Seite: 4/8<strong>Projektbeschreibung</strong> / <strong>Project</strong> <strong>description</strong> <strong>USB</strong>-<strong>RS232</strong>-<strong>Bridge</strong>HandhabungVor der Benutzung ist sicherzustellen, dass der Treiber fürden CP2102 installiert worden ist. Zur Installation sindAdministratorrechte notwendig. Den Treiber, sowie dieTreiberdokumentation finden Sie unter:www.myavr.deKlicken Sie als erstes auf die Schaltfläche „Shop“, danachgehen Sie auf die Registerkarte „Download“ und geben imSuchfeld den Suchbegriff „Treiber“ ein. Sie finden dannden <strong>USB</strong> Treiber für die <strong>myAVR</strong> Produkte.Den Treiber und die dazugehörigen Informationen findenSie auch unter:www.silabs.comHandlingFor the first use you have to make sure, that vou haveinstalled the driver for CP2102. For this installation youneed administrator rights. You can find the driver, also thedocuments of the driver, on our website:www.myavr.comPlease click at first on the button „Shop“, after that pleaseclick on the register card „Download” and write in thesearch box the keyword “Treiber”. You will find the <strong>USB</strong>driver for the <strong>myAVR</strong> products.You find also the driver and the correspondinginformation on the website:www.silabs.comNachdem der Treiber erfolgreichinstalliert wurde, setzen Sie denmySmart<strong>USB</strong> MK2 Programmer aufdie <strong>USB</strong>-<strong>RS232</strong>-<strong>Bridge</strong> auf.After the end of the installation ofthe driver you have to insert themySmart<strong>USB</strong> MK2 on the<strong>USB</strong>-<strong>RS232</strong>-bridge.Der mySmart<strong>USB</strong> MK2 Programmerist auf den Datenmodus einzustellen.Die DIP – Schalterstellung können Sie mitdem nebenstehenden Bild vergleichen.You have to set the mySmart<strong>USB</strong> MK2programmer to the data mode.You can compare the DIP-switch settingwith the adjacent picture.1 = ON2 = ON3 = OFF4 = OFFZuerst ist das serielle Kabel an denSUB-D-Anschluss anzuschließen.Zuletzt wird der <strong>USB</strong>-Anschluss mitdem Computer verbunden.1. Schritt / first stepAt first you have to connect theserial cable on the SUB-Dinterface.At last you have to connect theadapter with the computer over<strong>USB</strong>.2. Schritt / last stepwww.<strong>myAVR</strong>.de © Laser & Co. Solutions GmbH - 02/2010 www.<strong>myAVR</strong>.com