DMA 35 Portable Density/Specific Gravity/ Concentration Meter - Alber
DMA 35 Portable Density/Specific Gravity/ Concentration Meter - Alber DMA 35 Portable Density/Specific Gravity/ Concentration Meter - Alber
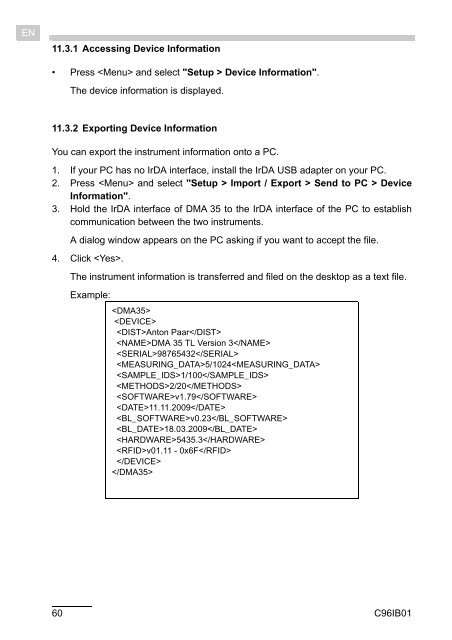
EN11.3.1 Accessing Device Information• Press and select "Setup > Device Information".The device information is displayed.11.3.2 Exporting Device InformationYou can export the instrument information onto a PC.1. If your PC has no IrDA interface, install the IrDA USB adapter on your PC.2. Press and select "Setup > Import / Export > Send to PC > DeviceInformation".3. Hold the IrDA interface of DMA 35 to the IrDA interface of the PC to establishcommunication between the two instruments.A dialog window appears on the PC asking if you want to accept the file.4. Click .The instrument information is transferred and filed on the desktop as a text file.Example:Anton PaarDMA 35 TL Version 3987654325/10241/1002/20v1.7911.11.2009v0.2318.03.20095435.3v01.11 - 0x6F60 C96IB01
11.4 Exporting Adjustment DataENThe currently valid adjustment data are stored on your instrument. You can transferthese to your PC.1. If your PC has no IrDA interface, install the IrDA USB adapter on your PC.2. Press and select "Setup > Import / Export > Send to PC >Adjustment".3. Hold the IrDA interface of DMA 35 to the IrDA interface of the PC to establishcommunication between the two instruments.A dialog window appears on the PC asking you to accept the file transfer.4. Click .The adjustment data are transferred and filed on the desktop as a text file.Example:1.518872E-061.843933E+001.352293E-04-2.457641E-077.068061E-042.739587E-045.822781E-08C96IB01 61
- Seite 10 und 11: EN2 Safety Instructions• Read thi
- Seite 12 und 13: EN• Do not leave sample/rinsing c
- Seite 14 und 15: EN5 Checking the Supplied PartsDMA
- Seite 16 und 17: ENTable 5.2: Optional partsArticle
- Seite 18 und 19: EN2 314Fig. 6 - 2 Top view of DMA 3
- Seite 20 und 21: EN6.3 Display23b3a1412561171098Fig.
- Seite 22 und 23: EN7 Operating the DMA 357.1 Connect
- Seite 24 und 25: EN8 Defining the Basic Settings8.1
- Seite 26 und 27: EN8.7 Allocation of the Softkey Fun
- Seite 28 und 29: ENTo set the time format1. Press a
- Seite 30 und 31: EN• Make sure to carefully clean
- Seite 32 und 33: ENMeas. OptionsDescriptionunitsBaum
- Seite 34 und 35: EN9.2 Selecting Measuring MethodsAp
- Seite 36 und 37: ENMethod list templateThe following
- Seite 38 und 39: EN9.2.6 Selecting a Method1. Press
- Seite 40 und 41: ENSample ID listThe following table
- Seite 42 und 43: EN9.4 Selecting the Measurement Mod
- Seite 44 und 45: EN9.5.3 Programming RFID TagsBeside
- Seite 46 und 47: EN3. Hold the allocated or programm
- Seite 48 und 49: EN9.6.2 Filling with the Plastic Sy
- Seite 50 und 51: EN9.8 Accessing Saved Measuring Dat
- Seite 52 und 53: EN5. Select to export the whole li
- Seite 54 und 55: EN10 Cleaning and Storing the Instr
- Seite 56 und 57: EN11 Maintenance11.1 Changing the B
- Seite 58 und 59: ENFig. 11 - 3Removing the pump lock
- Seite 62 und 63: EN12 ReadjustmentTo ensure accurate
- Seite 64 und 65: EN12.5 Restoring to Factory Adjustm
- Seite 66 und 67: EN14 Technical DataMeasuring range:
- Seite 68 und 69: ENAppendix A: Density of Water 4 (0
- Seite 70 und 71: ENID Measuring unit Minimum Maximum
- Seite 72 und 73: ENAppendix C: CE Declarations of Co
- Seite 74 und 75: ENAppendix D: EC-Type-Examination C
- Seite 76 und 77: ENAppendix E: RFID Module Test Repo
- Seite 78 und 79: ENAppendix F: Firmware VersionsFirm
- Seite 80 und 81: ENSetup Measurement Mode Precise; F
- Seite 82 und 83: DEDieses Dokument wurde mit der nö
- Seite 84 und 85: DE9.1.3 Kundenfunktionen importiere
- Seite 86 und 87: DE1 Zur BetriebsanleitungDiese Betr
- Seite 88 und 89: DE2 Sicherheitshinweise• Lesen Si
- Seite 90 und 91: DESchutzmaßnahmen bei leicht entz
- Seite 92 und 93: DE4 DMA 35 - ein ÜberblickDas DMA
- Seite 94 und 95: DETabelle 5.1: Gelieferte TeileSymb
- Seite 96 und 97: DE6 Beschreibung des Gerätes6.1 Vo
- Seite 98 und 99: DE6.2 Rückansicht123465Abb. 6 - 3
- Seite 100 und 101: DESymbole am DisplayDas Symbol für
- Seite 102 und 103: DE7.3 Gerät einschalten• Drücke
- Seite 104 und 105: DE8.5 HintergrundbeleuchtungDas LC-
- Seite 106 und 107: DE8.8 PasswortschutzSie können Ihr
- Seite 108 und 109: DE8.10 Grundeinstellungen zum PC ex
EN11.3.1 Accessing Device Information• Press and select "Setup > Device Information".The device information is displayed.11.3.2 Exporting Device InformationYou can export the instrument information onto a PC.1. If your PC has no IrDA interface, install the IrDA USB adapter on your PC.2. Press and select "Setup > Import / Export > Send to PC > DeviceInformation".3. Hold the IrDA interface of <strong>DMA</strong> <strong>35</strong> to the IrDA interface of the PC to establishcommunication between the two instruments.A dialog window appears on the PC asking if you want to accept the file.4. Click .The instrument information is transferred and filed on the desktop as a text file.Example:Anton Paar<strong>DMA</strong> <strong>35</strong> TL Version 3987654325/10241/1002/20v1.7911.11.2009v0.2318.03.200954<strong>35</strong>.3v01.11 - 0x6F60 C96IB01


