Kompaktverriegelung 1049 und 1049RR - Ikon
Kompaktverriegelung 1049 und 1049RR - Ikon
Kompaktverriegelung 1049 und 1049RR - Ikon

Erfolgreiche ePaper selbst erstellen
Machen Sie aus Ihren PDF Publikationen ein blätterbares Flipbook mit unserer einzigartigen Google optimierten e-Paper Software.
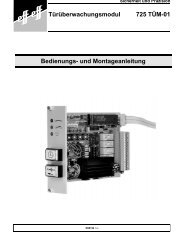
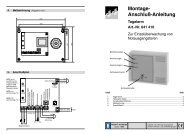
Verrou compactC h i u s u r e e l e t t r i c h e c o m p a t t e<strong>Kompaktverriegelung</strong>enCabinet LocksUnidad de bloqueo compacta1048.101048.10RRMontage<strong>und</strong>InstallationsanleitungMountingandInstallation Instructionspage 10D0020404
InhaltsverzeichnisAllgemeine Beschreibung 3FunktionsprinzipBedeutung von Arbeitsstrom 3Ausrichtung der Rosette 4MontageMaßzeichnung 4Montagehinweise 5Positionierung von <strong>Kompaktverriegelung</strong> <strong>und</strong> Rosette 5Montagebeispiele 6An einer Schublade 6An einem Einbauschrank 6Elektrischer AnschlußAnschlußplan 7Technische Daten 72
Allgemeine BeschreibungDie <strong>Kompaktverriegelung</strong>en 1048.10 bzw. 1048.10 RR wurden speziell zurVerriegelung von Möbeln entwickelt. Sie können anstelle der bisher üblichenmechanischen Verriegelungen oder zusätzlich als elektrische Zugangskontrolleeingesetzt werden. Damit kann verhindert werden, daß Personen unberechtigtZugang zu Wertsachen oder zu sicherheitsrelevanten Unterlagen haben.Das Einsatzgebiet erstreckt sich dabei von Aktenschränken, Einbauschränkenoder Schubladen bis hin zu Schließfächern, Briefkästen <strong>und</strong> Vitrinen.Die <strong>Kompaktverriegelung</strong>en 1048.10 bzw. 1048.10 RR sind ausschließlich fürdie Betriebsart Arbeitsstrom ausgelegt. Die Zugangskontrolle kann im einfachstenFall über einen Schlüsselschalter erfolgen. Soll die Zugangskontrolleelektronisch gesteuert, protokolliert <strong>und</strong> überwacht werden, kann die <strong>Kompaktverriegelung</strong>mit einem Code- oder Kartenlesesystem kombiniert werden.Bei der Entriegelung wird die Rosette, die als Gegenstück an der Tür montiertist, automatisch aus dem Verriegelungselement herausgedrückt <strong>und</strong> damit dieTür etwas geöffnet. Dies ist besonders bei Schließfächern vorteilhaft, da diesezum Öffnen keinen Griff besitzen.Die RR-Version besitzt zusätzlich einen potentialfreien Wechselkontakt, mitdem sich der Öffnungszustand der Tür überwachen läßt.Bedeutung von Arbeitsstrom:Bei der Betriebsart Arbeitsstrom muß die <strong>Kompaktverriegelung</strong> zum Entriegelnbestromt werden.Hinweis:Bei einem Ausfall der Stromversorgung ist eine Entriegelung <strong>und</strong> damitein Öffnen der Tür nicht möglich.Funktionsprinzip:Die <strong>Kompaktverriegelung</strong> 1048.10/1048.10 RR besteht aus zwei Teilen. Teil 1ist das Verriegelungselement, das z. B. am Seitenteil eines Schließfachs befestigtwird. Teil 2 ist die Rosette, die an der Tür befestigt wird.Wird die Tür geschlossen, greift der Verriegelungsbolzender Rosette in das Verriegelungselementein <strong>und</strong> das Schließfachwird verriegelt. Soll das Schließfach geöffnetwerden, muß zuerst das Verriegelungselementelektrisch entriegelt werden.Je nach Anwendungsfall kann die <strong>Kompaktverriegelung</strong>so montiert werden, daßdie Rosette entweder an der Stirnseite oderVerriegelungselement Rosettevon oben in das Verriegelungselement eingreift(siehe Bild Bild 1: Verriegelungsprinzip1).3
Montagehinweise:Bei der Montage sind Verriegelungselement <strong>und</strong> Rosette, wie in Bild 4 gezeigt,bündig zueinander auszurichten. Der Verriegelungsbolzen der Rosette mußbeim Schließen der Tür bzw. Schublade ungehindert <strong>und</strong> vollständig in dasVerriegelungselement eingreifen können. Ferner dürfen keine Zugkräfte seitensder Tür bzw. Schublade auf das Verriegelungselement wirken. Die Rosettekann aufgeschraubt oder eingelassen montiert werden. Die Ausrichtungvon Verriegelungselement <strong>und</strong> Rosette erfolgt durch die Langlöcher des Verriegelungselements.Als Positionierungshilfe für die Rosette wird eine doppelseitigklebende Folie mitgeliefert, die auf die Rückseite der Rosette aufgeklebtwerden kann.Wir empfehlen vor dem nächsten Schritt sicherzustellen, daß das Verriegelungselementangeschlossen <strong>und</strong> elektrisch zu entriegeln ist.!Nach dem Aufkleben der Folie ist die Rosette, mit der Ausrichtung Montagestellung,in das montierte Verriegelungselement einzustecken <strong>und</strong> die Tür zuschließen. Nach dem Öffnen der Tür klebt die Rosette an der richtigen Stelle.Nach dem Anzeichnen der Bohrungen muß die Rosette noch um 180° in dieBetriebsstellung gedreht werden.!Die Rosette darf keinesfalls wie in Bild 5 um 90° gedreht montiert werden.Würde der Verriegelungsbolzen der Rosette so in das Verriegelungselementeingreifen, ließe sich die Tür oder die Schublade nicht mehr öffnen.Richtige Positionierung: Der Verriegelungsbolzen der Rosette kann ungehindert<strong>und</strong> vollständig in das Verriegelungselement eingreifen.Bild 4: MontagehinweisFalsche Positionierung: Die Rosette greift um 90° verdreht in das Verriegelungselementein.Bild 5: Montagehinweis5
Montagebeispiele:Die Bilder 6 <strong>und</strong> 7 zeigen, wie die <strong>Kompaktverriegelung</strong> an einem Schreibtischmit Schubladen oder an einem Einbauschrank montiert werden kann.Der <strong>Kompaktverriegelung</strong> liegt ein Zubehörbeutel bei. Dieser enthält Befestigungsschrauben<strong>und</strong> Unterlegscheiben für Verriegelungselement <strong>und</strong> Rosettesowie Reduzierhülsen für die Montage in vorhandene Fachbohrungen.SchubladeUnterlegscheibeUnterlegscheibeSchubladeBild 6: Anbau an einer Schublademindestens 25 cmBild 7: Anbau bei einem Einbauschrank6
Elektrischer AnschlußDie <strong>Kompaktverriegelung</strong>en 1048.10 <strong>und</strong> 1048.10 RR sind nur für eine Momententriegelungausgelegt. Die Stromversorgung kann durch 12V oder 24V Gleich- oder Wechselspannungerfolgen. Eine Entriegelung durch Wechselspannung wird aber wegendes auftretenden Brummgeräusches nicht empfohlen. Die Verschaltung ist nachAnschlußplan durchzuführen (siehe Bild 8). Die Drahtbrücken, die Sie für den Anschlußbenötigten, sowie die Diode finden Sie im Zubehörbeutel.Die Ausführung 1048.10 RR besitzt zusätzlich einen potentialfreien Wechselkontakt,der den Öffnungszustand der Tür überwacht.Bei der Leitungsauswahl ist der Leitungsquerschnitt so zu wählen, daß die Spannungan der <strong>Kompaktverriegelung</strong> nach Abzug aller Verluste maximal 10% unter der angegebenenBetriebsspannung liegt.Anschlußplan:Vorgehensweise beim Anschluß: Schrauben der benötigten Klemmen durch Linksdrehen (3-4Umdrehungen) öffnen. Leitung in die Klemme einführen. Klemme durch Rechtsdrehen schließen.1 2 3 4 5 6 7Klemmen 5-7 nurin derRR Ausführung12345 6 7Nur bei 1048.10RR* Nur bei Gleichspannung!Wird die <strong>Kompaktverriegelung</strong> aneinem elektronischen Gerät mitGleichspannung betrieben, mußzusätzlich eine Freilaufdiode parallelzur Spule angeschlossen werden.Diode im ZubehörbeutelBild 8: AnschlußmöglichkeitenAnschluß bei 12 VAnschluß bei 24 V1+1+2*2*3344--Kontaktstellungzeigt “Tür offen”Technische Daten:BetriebsartArbeitsstrom, nur MomententriegelungBetriebsspannung12 V WS24 V WS12 V GS Brummgeräusch24 V GS BrummgeräuschAnschlußspannung Betriebsspannung ± 10%Stromaufnahme typ. 900 mA 500 mA 450 mA 230 mAMax. Belastbarkeit desRR-Kontakts25 V/ 1AZugfestigkeit1000 N (100 kp)Schutzart nachDIN 40050IP 20Temperaturbereich-20°C - +60°CMaße in mm (L x B x H) Verriegelungsteil o. Rosette 48 x 42 x 207
Verrou compactC h i u s u r e e l e t t r i c h e c o m p a t t eCabinet Locks<strong>Kompaktverriegelung</strong>enUnidad de bloqueo compacta1048.101048.10RRMountingandInstallation InstructionsD0020404
Contents:General description 11Functional characteristicsFail-locked operation 11Alignment of the rosette 12MountingDimension drawing 12Mounting instructions 13Positioning of compact lock and rosette 13Mounting examples 14Drawer 14Fitted cupboard 14Electric supplyConnecting diagram 15Technical data 1510
General descriptionThe compact locking units 1048.10 and 1048.10 RR have especially beendeveloped for the locking of furniture. They can be used instead of usual mechanicallockings or additionally as an access control system and prevent unauthorizedaccess to valuables or certain documents. The compact lockingunits can be used for locking filing cabinets, fitted cupboards, drawers, postofficeboxes / safe-deposit boxes, letter boxes and glass cabinets, for example.The compact locking units 1048.10 and 1048.10 RR are exclusively designedfor fail-locked operation. The most simple way to operate the access controlsystem is by means of a key switch. If it is necessary to electronically control,register and monitor the access control system, the compact locking unit canbe combined with a code or card reader system.When unlocking, the rosette installed as a counter unit is automatically pushedout of the locking element and the door is slightly opened. This is an advantageespecially with regard to post-office boxes / safe-deposit boxes as theseboxes do not have any handle for opening.The RR version additionally incorporates a change-over contact for monitoringthe state of the door (open/closed).Fail-locked operation:The compact locking unit is exclusively designed for fail-locked operation andmust therefore be energized for opening.Note:In the event of power failure unlocking is impossible and consequentlythe door cannot be opened.Functional characteristics:The compact locking unit 1048.10/1048.10 RR consists of two parts. Part 1 isthe locking element which is, for example, mounted laterally to a post-officebox / safe-deposit box. Part 2 is the rosette which is installed at the door.When the door is closed, the locking boltof the rosette engages the locking elementand the box is locked. If the boxmust be opened, the locking elementmust be unlocked electrically first.Locking elementrosetteAccording to the requirements, the lockingelement can be installed for front ortop engagement of the rosette (see illustration1)illustration 2: locking principle11
Alignment of the rosetteTwo pictograms – fail-unlocked and fail-locked – are printed on the rosette(see ill. 2). The rosette must be aligned accordingly so that during operationthe pictogram “fail-locked” and during installation the pictogram “fail-unlocked”points to the mark of the locking element.orMarklocking elementIllustration 2: Alignment of the rosetterosettefail-unlocked operationposition during mountingfail-locked operationposition during operationMounting!Mounting and adjustment only when the rosette is set to “fail-unlockedOtherwise, it would not be possible to open the door or the drawer anymore after having been closed.Four each cylindrically countersunk mounting holes each are provided formounting the locking element as well as the rosette. Position of mountingholes see drawing. Reducing bushes, screws and washers are included in themounting material supplied.Before fastening the two washers of special steel with screws, they mustbe placed into the elongated holes of the locking element.Dimensioned instructionscylindrical countersinkingdepth 2.5dimensions in mm18.5Illustration 3: Dimensioned drawing12
Mounting instructions:Locking element and rosette must be aligned as shown in illustration 4 (flush).When closing the door or drawer, the locking bolt of the rosette must be ableto engage the locking element unimpededly and completely. Furthermore, notensile force caused by the door respectively the drawer must act on the lockingelement. The rosette can be fixed by screws and is also suitable for flushmounting. The adjustment of locking element and rosette must be effected bymeans of the elongated holes in the locking element. An adhesive film (adhesiveon both sides) is supplied which can be stuck to the back of the rosette.This will help you to find the correct rosette position.Before continuing, it is recommended to make sure that the locking element! is connected and can be unlocked electrically.After fixing the adhesive film, the rosette must be put into the mounted lockingelement in the position “mounting” and the door must be closed. When thedoor is opened again the rosette sticks in the correct position. After markingthe drilling points, the rosette must turned through 180° into the position “operation”.!Under no circumstances must the rosette be mounted as shown in illustration5, i. e. turned trough 90°. If the locking bolt of the rosette engaged thelocking element that way, it would not be possible to open the door ordrawer any more.Correct positioning: The locking bolt of the rosette engages the locking elementunimpededly and completely.Illustration 4: Mounting instructionWrong positioning: The rosette - turned through 90°.Illustration 5: Mounting instruction13
Mounting examples:Illustrations 6 and 7 show the possibilities for mounting the compact locking toa desk with drawers or to a fitted cupboard.An accessories bag is supplied with the compact locking unit. This bag containsfixing screws and washers for the locking element and the rosette as wellas reducing bushes for the installation in existing bore holes.washerdrawerwasherdrawerIllustration 6: Mounting to a drawerminimum 25 cmIllustration 7: Mounting to a fitted cupboard14
Electric supplyThe compact locking units 1048.10 and 1048.10 RR are only designed for momentarycontact making. Current supply can be provided by 12 V or 24 V DC or AC. Currentsupply with AC however is not recommended due to the buzzing so<strong>und</strong> caused. Connectionsmust be effected according to the connecting diagram (see illustration 8). Thenecessary jumpers as well as the diode are included in the accessories bag.Model 1048.10 RR additionally incorporates a change-over contact which monitors thestate of the door (open/closed).When determining the wiring please take into consideration that the supply voltage -measured at the terminals - is not lower than the minimum indicated.Connecting diagram:Instructions for connection: loosen the screws of the required terminals by turning them anticlockwise(3-4 turns). Insert the lead into the terminal. For fastening the terminal retighten thescrews by turning them clockwise.1 2 3 4 5 6 7Terminals 5-7only with RRversion12345 6 7* Only with DC!!If the compact locking unit isoperated at an electronic device withDC, an additional recovery diodemust be connected in parallel to thecoil.connection with 12 V1+2*34-only with 1048.10 RRcontact positionshows“door open”Diode in accessories bag!Illustration 8: Possibilities of connectionconnection with 24 V1+2*34-Technical Data:mode of operationoperating voltagefail-locked operation, only momentary contact12 V AC24 V AC12 V DC24 V DCbuzzing so<strong>und</strong>buzzing so<strong>und</strong>connecting voltage operating voltage ± 10%current consumption typ. 900 mA 500 mA 450 mA 230 mAmax. capacity of theRR-Kontakts25 V/ 1Atensile strength1000 N (100 kp)type of protection accordingto DIN 40050IP 20temperature range-20°C - +60°Cdimensions in mm (L x W x H) locking element w/o rosette 48 x 42 x 2015
effeff Fritz Fuss GmbH & Co.Kommanditgesellschaft auf AktienBildstockstraße 20D-72458 AlbstadtTelefon +49 74 31/1 23-0Telefax +49 74 31/1 23-240info@effeff.comwww.effeff.comAn ASSA-ABLOY Group companyASSA ABLOY