LiSA Baugruppenträger 600 Montage Anleitung - Composites
LiSA Baugruppenträger 600 Montage Anleitung - Composites
LiSA Baugruppenträger 600 Montage Anleitung - Composites

Erfolgreiche ePaper selbst erstellen
Machen Sie aus Ihren PDF Publikationen ein blätterbares Flipbook mit unserer einzigartigen Google optimierten e-Paper Software.
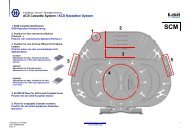
Assembly Instruction / <strong>Montage</strong>anleitungSubrack <strong>600</strong>F for ODR and NGR (Item: 23040046)Baugruppenträger <strong>600</strong>F für ODR und NGR (Artikel: 23040046)For use in ODR <strong>600</strong>:Mount the subrack at the requiredposition with the supplied M6screws.Bei Gebrauch im ODR <strong>600</strong>:Den Baugruppenträger mit Hilfe desBefestigungswinkels und zwei M6Schrauben an der gewünschtenPosition montieren.For use in NGR 6:Mount the subrack at the requiredposition with the supplied M5screws.Bei Gebrauch im NGR 6:Den Baugruppenträger mit Hilfe desBefestigungswinkels und zwei M5Schrauben an der gewünschtenPosition montieren.Pull out the Patchcord managementof the ODR <strong>600</strong>F or the NGR 6 andfix the subrack on the left hand sidewith the supplied M4 screws.Das Patchcordmanagement desODR <strong>600</strong>F oder des NGR 6herausziehen und denBaugruppenträger an der linken Seitemit den mitgelieferten M4 Schraubenfixieren.Fix the cable entry on the right frontside with the supplied screws.The cable entry can be mountedupwards or downwards. Mount it inthe direction where the cables enterthe rack.Die Kabeleinführung an der rechtenvorderen Seite mit der mitgeliefertenSchraube montieren. Diese kann fürKabel von oben oder untenkommend montiert werden.For use in ODR <strong>600</strong>:Bei Gebrauch im ODR <strong>600</strong>:Fit the mounting angles reversed tothe middle of the subrack.Die Befestigungswinkel umgekehrtan der mittleren Position montieren.4. Assembly of loose tubes:4. <strong>Montage</strong> der Schutzrohre:Insert the conduits for 1-6 accordingto the sketch.Anordnung der Schutzrohre auf 1-6,wie im Bild dargestellt.If you are using two conduits perModule, the length of the protectionconduit has to be reduced from 1650to 800mm.4Bei der Nutzung von 2Schutzschläuchen pro Modul, mussdie Schutzrohrlänge von 1650 auf800mm reduziert werden.Created by: Frank BruneDOC-0000238699Rev: Cwww.hubersuhner.com/lisauncontrolled copy3 / 5Assembly Instruction / <strong>Montage</strong>anleitungSubrack <strong>600</strong>F for ODR and NGR (Item: 23040046)Baugruppenträger <strong>600</strong>F für ODR und NGR (Artikel: 23040046)Cut the bend limitation conduit to sixlengths with the loose tube cutteraccording to the table.Nr. Modul ODR/NGR<strong>600</strong>F1. 20502. 21003. 21504. 22005. 22506. 2300Die richtige Länge des Schutzrohresmit Hilfe der Tabelle ermitteln undabschneiden.Mark all conduits 1650mm from oneend. Feed the loose tubes into theconduits from the other end.A=Protection conduitB=Loose TubeC=FibresA B CAlle Schutzrohre 1650mm von einemEnde markieren, anschliessend dieBündeladern vom anderen Ende ausin die Schutzschläuche einschieben.A=SchutzschlauchB=BündeladerC=LWL FasernAlign the conduit mark with the frontof the loose tube and push down toretain.For MCM modules use all positions.For SCM modules use positions 2, 4and 6.Die Schutzrohre mit der Markierungzur Vorderseite derBündeladerzuführung <strong>600</strong>Fpositionieren und in die Aufnahmedrücken.Für MCM Module können allePositionen verwendet werden.Für SCM Module die Positionen 2, 4und 6.ODR <strong>600</strong>/NGR 6:Fix the conduits at the next cablebracket and cable entry with cableties.ODR <strong>600</strong>/NGR 6:Die Schutzrohre an Kabeleinführungund Kabelhalter mit einemKabelbinder befestigen.Mount the bend radius limiter forpatchcords on the right side.Den Radienbegrenzer fürRangierkabel an der rechten Seitedes Baugruppenträgers montieren.Created by: Frank BruneDOC-0000238699Rev: Cwww.hubersuhner.com/lisauncontrolled copy4 / 5
Assembly Instruction / <strong>Montage</strong>anleitungSubrack <strong>600</strong>F for ODR and NGR (Item: 23040046)Baugruppenträger <strong>600</strong>F für ODR und NGR (Artikel: 23040046)If you have a fully populated ODR<strong>600</strong>F/NGR 6 with subracks, a bendradius plate must be fixed to thesubrack in the lowest position.The existing support bracket for theradius plate must be removed beforefixing the radius plate to the subrack.Wenn der Baugruppenträger <strong>600</strong>F imODR <strong>600</strong>F/NGR 6 eingebaut wird,muss ein spezieller Radiusbegrenzerausgestattet mit einem Klettband amuntersten Baugruppenträgerangebaut werden.Dieser Radiusbegrenzer ist bei derLieferung des Schrankes an einemWinkel montert. Bei vollerBestückung des Schrankes mitBaugruppenträgern, wird der Winkelnicht mehr gebraucht und mussdemontiert werden.The picture shows the radius platemounted to the lowest subrack. Afterthat you can fix the cables with thevelcro tie.Den Radiusbegrenzer wie im Bilddargestellt an den unterstenBaugruppenträger montieren und dieKabel mit Hilfe des Klettbandsfixieren.5. Additional Parts5. Zusätzliche Teile:Velcro Strap Item: 84005450Klettband Artikelnummer: 84005450To bind cables and patchcordstogetherUm Kabel und Patchcordszusammen zu halten.Colour blackWidth 16mmDelivered on a reel (25m)Farbe schwarzBreite 16mmLieferung auf einer Rolle (25m)HUBER+SUHNER is certified according toISO 9001 and ISO 14001.HUBER+SUHNER ist nach ISO 9001 und ISO 14001zertifiziert.WAIVERIt is exclusively in written agreements that we provide our customers with warrants andrepresentations as to the technical specifications and/or the fitness for any particularpurpose. The facts and figures contained herein are carefully compiled to the best of ourknowledge, but they are intended for general informational purposes only.HinweisWir gewähren unseren Kunden Produktgarantien hinsichtlich technischerFunktionen und Eignungen zu besonderen Zwecken ausschliesslich in schriftlichenVereinbarungen. Die Informationen in diesem Dokument sind nach bestem Wissenund Gewissen zusammengestellt, sie dienen aber vorab Informationszwecken.Created by: Frank BruneDOC-0000238699Rev: Cwww.hubersuhner.com/lisauncontrolled copy5 / 5