MEDIUM LaserMouse Installations- u. Bedienungsanleitung
MEDIUM LaserMouse Installations- u. Bedienungsanleitung
MEDIUM LaserMouse Installations- u. Bedienungsanleitung

Sie wollen auch ein ePaper? Erhöhen Sie die Reichweite Ihrer Titel.
YUMPU macht aus Druck-PDFs automatisch weboptimierte ePaper, die Google liebt.
<strong>MEDIUM</strong> <strong>LaserMouse</strong><br />
<strong>Installations</strong>- u. <strong>Bedienungsanleitung</strong><br />
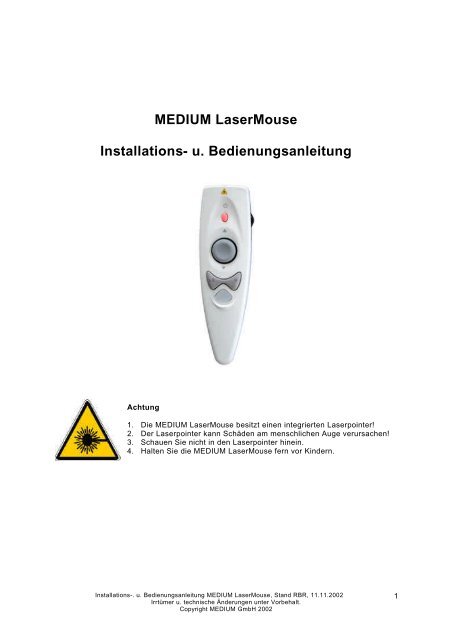
Achtung<br />
1. Die <strong>MEDIUM</strong> <strong>LaserMouse</strong> besitzt einen integrierten Laserpointer!<br />
2. Der Laserpointer kann Schäden am menschlichen Auge verursachen!<br />
3. Schauen Sie nicht in den Laserpointer hinein.<br />
4. Halten Sie die <strong>MEDIUM</strong> <strong>LaserMouse</strong> fern vor Kindern.<br />
<strong>Installations</strong>-. u. <strong>Bedienungsanleitung</strong> <strong>MEDIUM</strong> <strong>LaserMouse</strong>, Stand RBR, 11.11.2002<br />
Irrtümer u. technische Änderungen unter Vorbehalt.<br />
Copyright <strong>MEDIUM</strong> GmbH 2002<br />
1
Installation<br />
Medium <strong>LaserMouse</strong> (Handeinheit)<br />
Einlegen der Batterie<br />
<strong>MEDIUM</strong> <strong>LaserMouse</strong> (USB Empfänger)<br />
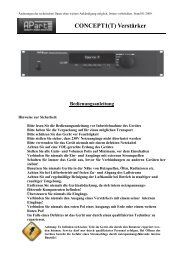
1. Vor Inbetriebnahme der <strong>MEDIUM</strong> <strong>LaserMouse</strong> muß die zum Lieferumfang gehörende<br />
Batterie eingelegt werden. Es können nur Batterien vom Typ CR2450 verwendet werden.<br />
Öffnen sie vorsichtig den Batteriefachdeckel auf der Unterseite der <strong>MEDIUM</strong> <strong>LaserMouse</strong>.<br />
Legen sie die Batterie mit dem Pluspol nach oben in das Batteriefach. Ist die Batterie<br />
eingelegt, muß der Pluspol der Batterie nach oben zeigen (siehe Abbildung). Schließen Sie<br />
den Batteriefachdeckel wieder.<br />
Unterseite <strong>MEDIUM</strong> <strong>LaserMouse</strong> mit eingelegter Batterie, Pluspol nach oben!<br />
2. Eine Ersatzbatterie (5er Pack) erhalten Sie bei <strong>MEDIUM</strong> unter der Artikel-Nr. 200025-1<br />
<strong>Installations</strong>-. u. <strong>Bedienungsanleitung</strong> <strong>MEDIUM</strong> <strong>LaserMouse</strong>, Stand RBR, 11.11.2002<br />
Irrtümer u. technische Änderungen unter Vorbehalt.<br />
Copyright <strong>MEDIUM</strong> GmbH 2002<br />
2
3. Windows XP u. Windows 2000<br />
1. Stecken Sie den USB Empfänger auf einen freien USB<br />
Anschluß Ihres Rechners oder Laptops.<br />
2. Windows XP bzw. Windows 2000 wird beim ersten mal<br />
automatisch den USB Empfänger als neues Gerät<br />
erkennen und den notwendigen Treiber selbst installieren.<br />
Bei der Erstinstallation sollten Sie als Aministrator<br />
angemeldet sein, da Sie sonst evtl. keine Berechtigung<br />
haben eine neue Hardware an Ihrem Rechner zu<br />
installieren.<br />
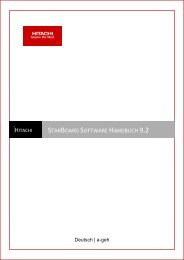
3. Im Gerätemanager von Windows XP bzw. Windows 2000<br />
wird der USB Empfänger als HID konformes<br />
Benutzersteuergerät eingebunden. Wenn Sie den<br />
Gerätemanager öffnen sollte die Installation wie<br />
abgebildet aussehen.<br />
4. Die <strong>MEDIUM</strong> Lasermouse sollte jetzt funktionieren. Ist<br />
dies nicht der Fall, müssen Sie noch die entsprechende ID<br />
einstellen. Informationen hierzu finden Sie unter dem<br />
Punkt Einstellung der ID.<br />
Windows 98 / Windows ME<br />
Für die Installation der <strong>MEDIUM</strong> Lasermouse sollten Sie die Betriebssystem CDROM<br />
bereitliegen haben, da diese evtl. für die Installation benötigt wird.<br />
1. Stecken Sie den USB Empfänger in einen<br />
freien USB Anschluß Ihres Rechners oder<br />
Laptops.<br />
2. Öffnen Sie jetzt das Verzeichnis<br />
Systemsteuerung Ihres Betriebssystems.<br />
Wählen Sie die Funktion Hardware aus. Es<br />
öffnen sich ein Assistent der Ihnen bei der<br />
Installation des Microsoft HID Human Interface<br />
Device Treibers behilflich ist. Folgen Sie<br />
einfach den Anweisungen dieses Assistenten.<br />
3. Nachdem der Assistent den Microsoft HID<br />
Human Interface Device Treiber installiert hat,<br />
sollte die <strong>MEDIUM</strong> Lasermouse einwandfrei<br />
funktionieren. Ist dies nicht der Fall, lesen Sie<br />
bitte unterm dem Punkt Einstellung der ID weiter.<br />
<strong>Installations</strong>-. u. <strong>Bedienungsanleitung</strong> <strong>MEDIUM</strong> <strong>LaserMouse</strong>, Stand RBR, 11.11.2002<br />
Irrtümer u. technische Änderungen unter Vorbehalt.<br />
Copyright <strong>MEDIUM</strong> GmbH 2002<br />
3
Einstellung der ID<br />
Für die sichere Übertragung zwischen Handeinheit und USB Empfänger verwendet die<br />
<strong>MEDIUM</strong> <strong>LaserMouse</strong> eine ID. Die ID von Handeinheit und USB Empfänger müssen<br />
übereinstimmen. Nachfolgend wird beschrieben, wie Sie die ID einstellen können.<br />
Hinweis: Für diese Prozedur muß der USB Empfänger am PC angeschlossen<br />
u. der PC selbst eingeschaltet sein.<br />
1. Drücken Sie die M-Key Taste und den Composite Switch für mindestens 5 Sekunden<br />
gleichzeitig. Als Bestätigung wird die M-Key Taste kurz grün aufleuchten.<br />
M-Key<br />
2. Verwenden Sie einen Kugelschreiber oder einen anderen spitzen Gegenstand um die rote<br />
Taste am USB Empfänger vorsichtig zu betätigen.<br />
rote Taste auf dem<br />
USB Empfänger<br />
3. Drücken Sie eine beliebige Taste außer der M-Key und Laser-Key Taste, um die neue ID zu<br />
speichern.<br />
Linke Maustaste zum<br />
speichern der neuen ID<br />
Composite Switch<br />
4. Die <strong>MEDIUM</strong> <strong>LaserMouse</strong> sollte nun funktionieren. Falls nicht wiederholen Sie bitte die<br />
Punkte 1 bis 3.<br />
5. Die ID bleibt bis zum nächsten Wechsel der Batterie gespeichert. Wird eine neue Batterie<br />
eingesetzt, muß die Einstellung der ID wiederholt werden.<br />
<strong>Installations</strong>-. u. <strong>Bedienungsanleitung</strong> <strong>MEDIUM</strong> <strong>LaserMouse</strong>, Stand RBR, 11.11.2002<br />
Irrtümer u. technische Änderungen unter Vorbehalt.<br />
Copyright <strong>MEDIUM</strong> GmbH 2002<br />
4
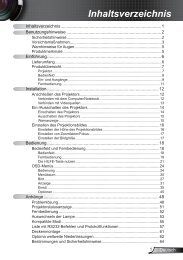
Bedienung der <strong>MEDIUM</strong> <strong>LaserMouse</strong><br />
Maussteuerung<br />
linke Maustaste<br />
M-Key<br />
Taste Modus 1 Modus 2 (Multimedia)<br />
M-Key Grüne LED aus Grüne LED an<br />
Laser Key Laserpointer An/Aus Windows Media Player An<br />
Maussteuerung Positionssteuerung des<br />
Mauszeigers<br />
Auf: letzter Titel<br />
Ab: nächster Titel<br />
linke Maustaste linke Maustaste Play / Pause<br />
rechte Maustaste rechte Maustaste Stop<br />
Composite Switch Auf: Zeile nach oben<br />
Ab: Zeile nach unten<br />
Drücken: Ziehen (Drag)<br />
Im Modus 1 hat die M-Key Taste zwei spezielle Funktionen<br />
Funktion 1: Laserpointer aktivieren bzw. deaktivieren<br />
Auf: Lautstärke lauter<br />
Ab: Lautstärke leiser<br />
Drücken: Lautstärke aus<br />
(Mute)<br />
Durch gleichzeitiges drücken der Tasten M-Key u. Laser-Key für mindestens 5 Sekunden kann<br />
der Laser aktiviert bzw. deaktiviert werden. Erst danach kann der Laserpointer über die Laser-<br />
Key Taste genutzt werden. Solange der Laserpointer aktiviert ist, blinkt die M-Key Taste alle 3<br />
Sekunden rot auf. Wird der Laserpointer für mehr als 30 Minuten nicht verwendet, deaktiviert er<br />
sich automatisch.<br />
Funktion 2: Wechsel der ID<br />
Laser Key<br />
Laser Pointer<br />
Composite Switch<br />
rechte Maustaste<br />
Durch gleichzeitiges drücken der M-Key Taste und des Composite Switch für mindestens 5<br />
Sekunden wird der Vorgang zum wechseln der Geräte ID gestartet. Innerhalb von 40 Sekunden<br />
muß im Anschluß die rote Taste auf dem USB Empfänger u. anschließend eine beliebige Taste<br />
außer M-Key oder Laser Key betätigt werden.<br />
<strong>Installations</strong>-. u. <strong>Bedienungsanleitung</strong> <strong>MEDIUM</strong> <strong>LaserMouse</strong>, Stand RBR, 11.11.2002<br />
Irrtümer u. technische Änderungen unter Vorbehalt.<br />
Copyright <strong>MEDIUM</strong> GmbH 2002<br />
5
<strong>MEDIUM</strong> <strong>LaserMouse</strong><br />
Installation and User Manual<br />
Attention<br />
5. The <strong>MEDIUM</strong> <strong>LaserMouse</strong> has an integrated Laserpointer!<br />
6. The Laserpointer may cause damage to the human eye!<br />
7. Do not look into the Laserpointer.<br />
8. Keep the <strong>MEDIUM</strong> <strong>LaserMouse</strong> away from children.<br />
<strong>Installations</strong>-. u. <strong>Bedienungsanleitung</strong> <strong>MEDIUM</strong> <strong>LaserMouse</strong>, Stand RBR, 11.11.2002<br />
Irrtümer u. technische Änderungen unter Vorbehalt.<br />
Copyright <strong>MEDIUM</strong> GmbH 2002<br />
6
Installation<br />
Battery<br />
Medium <strong>LaserMouse</strong> (Remote unit)<br />
<strong>MEDIUM</strong> <strong>LaserMouse</strong> (USB Receiver)<br />
4. Before you can use the <strong>MEDIUM</strong> <strong>LaserMouse</strong>, you have to insert the battery that is included<br />
in the carton. You can use only batteries with the type number Typ CR2450. Turn the<br />
<strong>MEDIUM</strong> Lasermouse so that you can see the button side. Open the battery case. Insert the<br />
battery with the plus pole up (must be visible for you). Close the battery case.<br />
Bottom side <strong>MEDIUM</strong> <strong>LaserMouse</strong> with battery in, plus pole visible!<br />
5. A set of 5 spare battery’s is available from <strong>MEDIUM</strong>. Please use part number 200025-1 for<br />
your order.<br />
<strong>Installations</strong>-. u. <strong>Bedienungsanleitung</strong> <strong>MEDIUM</strong> <strong>LaserMouse</strong>, Stand RBR, 11.11.2002<br />
Irrtümer u. technische Änderungen unter Vorbehalt.<br />
Copyright <strong>MEDIUM</strong> GmbH 2002<br />
7
Windows XP and Windows 2000<br />
5. Connect the USB receiver with a free USB port of your PC<br />
or laptop.<br />
6. Windows XP respectively Windows 2000 will automatically<br />
recognize the USB receiver as a new device and install<br />
the necessary driver. You should be locked in as<br />
administrator during first installation otherwise you might<br />
not be authorized to install a new hardware in your PC.<br />
7. In the device manager of Windows XP respectively<br />
Windows 2000 the USB receiver will be mounted as HID<br />
compatible device. If you open the device manager the<br />
installation should look like the illustration.<br />
8. The <strong>MEDIUM</strong> Lasermouse should work now. If this is not<br />
the case, you have to set the appropriate ID. For more<br />
information look at Setting the ID.<br />
Windows 98 / Windows ME<br />
For the installation of the <strong>MEDIUM</strong> Lasermouse you should have the CDROM of the operating<br />
system at hand since it might be needed for the installation.<br />
4. Connect the USB receiver with a free USB port<br />
of your PC or laptop.<br />
5. Open the Device Manager of your operating<br />
system. Select the Hardware function. An<br />
assistant will open to help you with the<br />
installation of the Microsoft Human Interface<br />
Device driver. Follow the instructions of the<br />
assistant.<br />
6. After the assistant has installed the Microsoft<br />
Human Interface Device driver the <strong>MEDIUM</strong><br />
Lasermouse should work properly. If this is not<br />
the case continue reading Setting the ID.<br />
<strong>Installations</strong>-. u. <strong>Bedienungsanleitung</strong> <strong>MEDIUM</strong> <strong>LaserMouse</strong>, Stand RBR, 11.11.2002<br />
Irrtümer u. technische Änderungen unter Vorbehalt.<br />
Copyright <strong>MEDIUM</strong> GmbH 2002<br />
8
Setting the ID<br />
For the safe transmission between remote unit and USB receiver the <strong>MEDIUM</strong> <strong>LaserMouse</strong><br />
uses an ID. The ID of the remote unit and the USB receiver has to match. Below is a description<br />
how to set the ID.<br />
Note: This procedure requires the connection of the USB receiver to the PC and the PC<br />
should be switched on.<br />
6. Press the M-Key and the Composite Switch simultaneously for at least 5 seconds. The M-<br />
Key will flash green for confirmation.<br />
M-Key<br />
7. Use a ball pen or another pointed tool to carefully operate the red key at the USB receiver.<br />
Red key at the USB<br />
receiver<br />
8. Press any key except the M-Key and Laser-Key to save the new ID.<br />
Left mouse key to save<br />
the new ID<br />
Composite Switch<br />
9. The <strong>MEDIUM</strong> <strong>LaserMouse</strong> should work now. If not, repeat points 1-3.<br />
10. The ID is stored until the next battery change. If the battery is replaced, a new setting of the<br />
ID is required.<br />
<strong>Installations</strong>-. u. <strong>Bedienungsanleitung</strong> <strong>MEDIUM</strong> <strong>LaserMouse</strong>, Stand RBR, 11.11.2002<br />
Irrtümer u. technische Änderungen unter Vorbehalt.<br />
Copyright <strong>MEDIUM</strong> GmbH 2002<br />
9
Using the <strong>MEDIUM</strong> <strong>LaserMouse</strong><br />
Mouse control<br />
Left Mouse Key<br />
M-Key<br />
Laser Key<br />
Key Mode 1 Mode 2 (Multimedia)<br />
M-Key Green LED Off Green LED On<br />
Laser Key Laserpointer On/Off Windows Media Player On<br />
Mouse Control Position control of the Mouse<br />
Pointer<br />
Up: last title<br />
Down: next title<br />
Left Mouse Key Left Mouse Key Play / Pause<br />
Right Mouse Key Right Mouse Key Stop<br />
Composite Switch Up: Row up<br />
Down: Row down<br />
Press: Drag<br />
In the Modus 1 the M-Key has two special functions<br />
Function 1: Activating and deactivating of the Laserpointer<br />
Up: Volume up<br />
Down: Volume down<br />
Press: Mute<br />
By simultaneously pressing the M-Key and the Laser-Key for at least 5 seconds, the Laser can<br />
be activated or deactivated. Only then the Laserpointer can be used via the Laser-Key. As long<br />
as the Laserpointer is activated the M-Key flashes red every 3 seconds. If the Laserpointer is<br />
not used for more than 30 minutes, it will automatically be deactivated.<br />
Function 2: Changing the ID<br />
Laser Pointer<br />
Composite Switch<br />
Right Mouse Key<br />
By simultaneously pressing the M-Key and the Composite Switch for at least 5 seconds, the<br />
procedure to change the device ID will be started. Within 40 seconds the red key of the USB<br />
receiver and afterwards any key except the M-Key or Laser Key should be pressed.<br />
<strong>Installations</strong>-. u. <strong>Bedienungsanleitung</strong> <strong>MEDIUM</strong> <strong>LaserMouse</strong>, Stand RBR, 11.11.2002<br />
Irrtümer u. technische Änderungen unter Vorbehalt.<br />
Copyright <strong>MEDIUM</strong> GmbH 2002<br />
10
<strong>MEDIUM</strong> <strong>LaserMouse</strong><br />
Notice d'installation et d'utilisation<br />
Attention !<br />
9. La <strong>LaserMouse</strong> <strong>MEDIUM</strong> possède un pointeur laser intégré !<br />
10. Le pointeur laser peut provoquer des lésions sur l'œil humain !<br />
11. Ne cherchez pas à regarder dans le pointeur laser.<br />
12. Tenez le <strong>LaserMouse</strong> de <strong>MEDIUM</strong> hors de portée des enfants.<br />
<strong>Installations</strong>-. u. <strong>Bedienungsanleitung</strong> <strong>MEDIUM</strong> <strong>LaserMouse</strong>, Stand RBR, 11.11.2002<br />
Irrtümer u. technische Änderungen unter Vorbehalt.<br />
Copyright <strong>MEDIUM</strong> GmbH 2002<br />
11
Installation<br />
<strong>LaserMouse</strong> Medium (télécommande)<br />
Mise en place de la pile<br />
<strong>LaserMouse</strong> <strong>MEDIUM</strong> (récepteur USB)<br />
1. Avant de mettre en service le <strong>LaserMouse</strong> <strong>MEDIUM</strong>, il faut mettre en place la pile fournie à<br />
la livraison. Les seules piles pouvant être utilisées sont du type CR2450. Ouvrez avec<br />
précaution le couvercle du compartiment de la pile en face inférieure du <strong>LaserMouse</strong><br />
<strong>MEDIUM</strong>. Insérez la pile dans le compartiment, pôle plus vers le haut. Une fois la pile en<br />
place, le pôle plus de la pile doit être orienté vers le haut (cf. figure). Refermez le couvercle<br />
du compartiment pile.<br />
Face inférieure du <strong>LaserMouse</strong> <strong>MEDIUM</strong> avec pile en place, pôle plus vers le haut !<br />
2. <strong>MEDIUM</strong> offre des piles de rechange (pack de 5) sous la référence article 200025-1<br />
<strong>Installations</strong>-. u. <strong>Bedienungsanleitung</strong> <strong>MEDIUM</strong> <strong>LaserMouse</strong>, Stand RBR, 11.11.2002<br />
Irrtümer u. technische Änderungen unter Vorbehalt.<br />
Copyright <strong>MEDIUM</strong> GmbH 2002<br />
12
6. Windows XP et Windows 2000<br />
9. Branchez le récepteur USB sur l'un des ports USB libres<br />
de votre ordinateur ou de votre portable.<br />
10. La première fois, Windows XP ou Windows 2000<br />
reconnaîtra automatiquement le récepteur USB comme<br />
nouveau périphérique et installera tout seul le pilote<br />
nécessaire. Lors de la première installation vous devez<br />
être déclaré comme Administrateur, car sinon vous ne<br />
disposerez éventuellement pas du droit d'accès pour<br />
installer un nouveau matériel sur votre ordinateur.<br />
11. Dans le Gestionnaire de périphériques de Windows XP ou<br />
Windows 2000, le récepteur USB sera affiché comme<br />
appareil de commande utilisateur compatible HID. Si vous<br />
ouvrez le gestionnaire de périphériques, l'installation<br />
devrait apparaître comme sur la figure.<br />
12. La Lasermouse <strong>MEDIUM</strong> devrait maintenant fonctionner.<br />
Si ce n'est pas le cas, il vous faut encore régler l'ID<br />
correspondant. Vous trouverez tous les détails sur ce sujet au paragraphe Réglage de l'ID.<br />
Windows 98 / Windows ME<br />
Pour installer la souris laser <strong>MEDIUM</strong>, préparez le CD ROM du système d'exploitation, celui-ci<br />
pourrait être nécessaire pour l'installation.<br />
7. Branchez le récepteur USB sur l'un des ports<br />
USB libres de votre ordinateur ou de votre<br />
portable.<br />
8. Ouvrez maintenant le répertoire Panneau de<br />
configuration de votre système d'exploitation.<br />
Sélectionnez la fonction Ajout de nouveau<br />
matériel. Un Assistant s'ouvre pour vous aider<br />
dans l'installation du pilote Microsoft HID<br />
Human Interface Device. Suivez simplement les<br />
instructions données par cet assistant.<br />
9. Lorsque l'assistant a installé le pilote Microsoft<br />
HID Human Interface Device, la souris laser<br />
<strong>MEDIUM</strong> devrait parfaitement fonctionner. Si ce<br />
n'est pas le cas, veuillez lire la suite au<br />
paragraphe Réglage de l'ID.<br />
<strong>Installations</strong>-. u. <strong>Bedienungsanleitung</strong> <strong>MEDIUM</strong> <strong>LaserMouse</strong>, Stand RBR, 11.11.2002<br />
Irrtümer u. technische Änderungen unter Vorbehalt.<br />
Copyright <strong>MEDIUM</strong> GmbH 2002<br />
13
Réglage de l'ID<br />
Pour la transmission sécurisée entre la télécommande et le récepteur USB, la <strong>LaserMouse</strong><br />
<strong>MEDIUM</strong> se sert d'un ID. L'ID de la télécommande doit correspondre à celle du récepteur USB.<br />
Vous trouverez le réglage de l'ID dans la description qui suit.<br />
Remarque : Pour cette procédure, il faut que le récepteur USB soit raccordé sur le PC et que<br />
le PC soit lui-même sous tension.<br />
11. Appuyez sur la touche M-Key et sur le commutateur combiné pendant au moins 5 secondes<br />
simultanément. La touche M-Key s'allume brièvement en vert en confirmation.<br />
M-Key<br />
12. Servez-vous d'un stylo à bille ou autre objet pointu pour actionner délicatement la touche<br />
rouge sur le récepteur USB.<br />
Touche rouge sur le<br />
récepteur USB<br />
13. Appuyez sur une touche quelconque sauf sur les touches M-Key et Laser-Key pour<br />
mémoriser le nouvel ID.<br />
Bouton gauche de la<br />
souris pour enregistrer<br />
le nouvel ID<br />
Commutateur combiné<br />
14. La <strong>LaserMouse</strong> <strong>MEDIUM</strong> devrait maintenant fonctionner. Dans le cas contraire,<br />
recommencez les points 1 à 3.<br />
15. L'ID reste mémorisé jusqu'au prochain remplacement de la pile. Si vous mettez en place<br />
une nouvelle pile, il faut recommencer le réglage de l'ID.<br />
<strong>Installations</strong>-. u. <strong>Bedienungsanleitung</strong> <strong>MEDIUM</strong> <strong>LaserMouse</strong>, Stand RBR, 11.11.2002<br />
Irrtümer u. technische Änderungen unter Vorbehalt.<br />
Copyright <strong>MEDIUM</strong> GmbH 2002<br />
14
Manipulation de la <strong>LaserMouse</strong> <strong>MEDIUM</strong><br />
Commande<br />
de la souris<br />
Bouton gauche<br />
de la souris<br />
Touche Laser<br />
M-Key<br />
Touche Mode 1 Mode 2 (multimédia)<br />
M-Key DEL verte éteinte DEL verte allumée<br />
Laser Key Marche/arrêt du pointeur laser Windows Media Player activé<br />
Commande de la souris commande de la position du<br />
pointeur de la souris<br />
En haut : dernier titre<br />
En bas : titre suivant<br />
Bouton gauche de la souris Bouton gauche de la souris Lecture / Pause<br />
Bouton droit de la souris Bouton droit de la souris Arrêt<br />
Commutateur combiné En haut : ligne au-dessus<br />
En bas : ligne en dessous<br />
Appui : tirer-déplacer<br />
En Mode 1 la touche M-Key possède deux fonctions spéciales<br />
Fonction 1 : activer ou désactiver le pointeur laser<br />
<strong>Installations</strong>-. u. <strong>Bedienungsanleitung</strong> <strong>MEDIUM</strong> <strong>LaserMouse</strong>, Stand RBR, 11.11.2002<br />
Irrtümer u. technische Änderungen unter Vorbehalt.<br />
Copyright <strong>MEDIUM</strong> GmbH 2002<br />
En haut : augmente le volume sonore<br />
En bas : diminue le volume sonore<br />
Appui : coupe le volume (mute)<br />
En appuyant simultanément sur les touches M-Key et Laser-Key pendant au moins 5 secondes,<br />
vous pouvez activer ou désactiver le laser. Ce n'est qu'après cela qu'il est possible d'utiliser le<br />
pointeur laser à l'aide de la touche Laser-Key. Tant que le pointeur laser est activé, la touche M-Key<br />
clignote toutes les 3 secondes en rouge. Si le pointeur laser n'est pas utilisé pendant plus de 30<br />
minutes, il se désactive automatiquement.<br />
Fonction 2 : changement d'ID<br />
Pointeur laser<br />
Commutateur combiné<br />
Bouton droit de<br />
la souris<br />
En appuyant simultanément sur la touche M-Key et sur le commutateur combiné pendant au moins 5<br />
secondes, vous lancez la procédure de changement de l'ID de l'appareil. Il faut ensuite appuyer<br />
dans les 40 secondes sur le bouton rouge du récepteur USB puis finalement actionner une touche<br />
quelconque sauf M-Key ou Laser Key.<br />
15
Notizen/Notes:<br />
<strong>Installations</strong>-. u. <strong>Bedienungsanleitung</strong> <strong>MEDIUM</strong> <strong>LaserMouse</strong>, Stand RBR, 11.11.2002<br />
Irrtümer u. technische Änderungen unter Vorbehalt.<br />
Copyright <strong>MEDIUM</strong> GmbH 2002<br />
16