Anleitung - InstructionManual HandyMan DV 06_06 - ABC Products
Anleitung - InstructionManual HandyMan DV 06_06 - ABC Products
Anleitung - InstructionManual HandyMan DV 06_06 - ABC Products

Erfolgreiche ePaper selbst erstellen
Machen Sie aus Ihren PDF Publikationen ein blätterbares Flipbook mit unserer einzigartigen Google optimierten e-Paper Software.
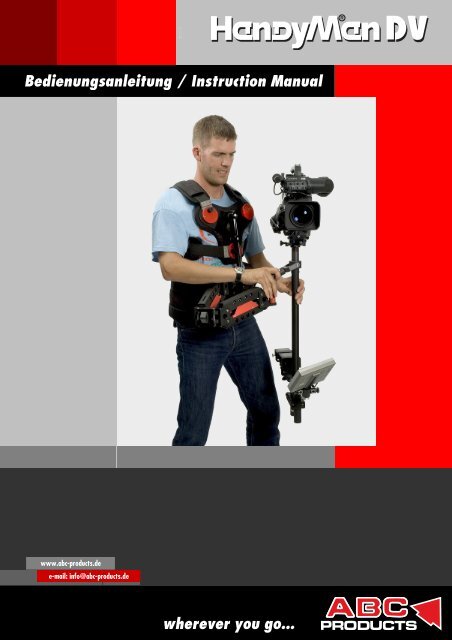
Bedienungsanleitung / Instruction Manual<br />
www.abc-products.de<br />
e-mail: info@abc-products.de<br />
wherever you go...
Willkommen bei <strong>ABC</strong>-<strong>Products</strong><br />
Welcome to <strong>ABC</strong>-<strong>Products</strong><br />
Unsere Vision ist es, unseren Kunden zu helfen, alle Kameratypen in jeder Situation bewegen zu können. Dies ist für uns<br />
eine Herausforderung, der wir uns gerne stellen und die wir nur durch ständigen Dialog mit unseren Kunden meistern<br />
können.<br />
Wir wünschen Ihnen viel Freude mit unseren Produkten und freuen uns über Ihre Wünsche und Anregungen.<br />
Our vision ist to help our customers achieve the moving shot with any type of camera in any situation. This is a challenge<br />
that we are pleased to pursue and that we can only master with constant feedback from our customers.<br />
We wish you great pleasure using our products.
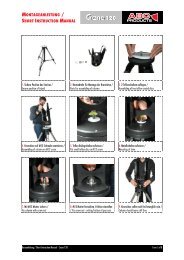
Checkliste // checklist „<strong>HandyMan</strong> <strong>DV</strong>“<br />
Ser.Nr.: _______________________<br />
Monitor Ser.Nr.: _______________________<br />
Im Koffer enthalten // contained in the suitcase:<br />
1) 1 Trimmpost mit Kameraplattform und Sicherungsring //<br />
1 trim-post with camera platform and retaining ring �<br />
2) 1 Federarm // 1 spring-arm �<br />
3) 1 Keilplatte inkl. ¼“ Schraube // 1 wedge plate incl. ¼“ screw �<br />
4) 1 Weste inkl. Brustgurt // 1 vest incl. chest belt �<br />
5) 1 Rückenstütze (Polster) // 1 back support cushion �<br />
6) 1 LCD Monitor mit Halterung // 1 LCD color monitor with mount �<br />
7) 1 Kabel: Klinke 3,5mm stereo auf Cinch male //<br />
1 cable: jack 3,5mm stereo to cinch male �<br />
8) 1 Dreierklemmung // 1 clamping �<br />
9) 2 Gewichtsstäbe (840 g) // 2 additional weights 840 g �<br />
10) 1 Stativplatte // 1 stand plate �<br />
11) 1 Inbußschlüssel Größe 4 // 1 allen key size 4 �<br />
12) 1 Bedienungsanleitung // 1 instruction manual �<br />
13) Trimmstab und Federarm auf Gängigkeit überprüft //<br />
trim-post and spring-arm checked for mobility �<br />
Gepackt am // packed: Unterschrift // signature:<br />
_____________________ _______________________<br />
Bedienungsanleitung // Instruction Manual: <strong>HandyMan</strong> <strong>DV</strong> (<strong>06</strong>/<strong>06</strong>) 1
DEUTSCH<br />
Bedienungsanleitung // Instruction Manual: <strong>HandyMan</strong> <strong>DV</strong> (<strong>06</strong>/<strong>06</strong>) 2
Inhalt:<br />
Vorwort Seite 4<br />
Einführung Handyman <strong>DV</strong> Seite 4<br />
Bestandteile Seite 5<br />
Das Ausgleichen der Kamera Seite 5<br />
Die Benutzung des Handyman <strong>DV</strong> Seite 10<br />
Garantie Seite 12<br />
Bedienungsanleitung // Instruction Manual: <strong>HandyMan</strong> <strong>DV</strong> (<strong>06</strong>/<strong>06</strong>) 3
01. Vorwort<br />
Bitte beachten Sie, dass diese <strong>Anleitung</strong> auf den folgenden Seiten lediglich<br />
beabsichtigt, Ihnen einen technischen Überblick über das Stabilisierungs-System<br />
sowie seine wichtigsten Teile und Zubehörteile zu geben. Die <strong>Anleitung</strong> ist<br />
keineswegs gedacht, Sie in den professionellen Umgang mit dem Stabilisierungs-<br />
System zu unterweisen - eine Aufgabe, die hier nicht geleistet werden kann. Es gibt<br />
aber eine Anzahl von Lehrgängen auf dem Markt, die dies leisten. Wir empfehlen<br />
Ihnen solch einen Kurs, der Sie im professionellen Umgang mit Stabilisierungs-<br />
Systemen unterrichtet. <strong>HandyMan</strong> ist ein benutzerfreundliches System. Sobald Sie<br />
die Grundkenntnisse im Umgang mit Stabilisierungs-Systemen besitzen, sollte Ihnen<br />
das Filmen keinerlei Schwierigkeiten bereiten. Erfahrung ist entscheidend: je mehr<br />
Sie das System nutzen, desto mehr werden Sie sich an das Verhalten bei<br />
Bewegungen gewöhnen. Übung macht den Meister. Üben Sie das Laufen mit Ihrer<br />
Kamera auf dem Stabilisierungs-System, um ein leichtgängiges Filmen zu erreichen.<br />
Experimentieren Sie: laufen Sie Treppen herauf und herunter, um Gegenstände wie<br />
Tische, Stühle usw. herum, folgen Sie einer Person, die vor Ihnen läuft, üben Sie die<br />
Bewegungen, von denen Sie annehmen, dass Sie sie brauchen werden. Probieren<br />
Sie schnelle und langsame Bewegungen.<br />
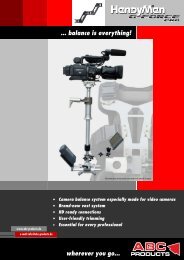
02. Einführung <strong>HandyMan</strong> <strong>DV</strong><br />
Vielen Dank für die Wahl des <strong>HandyMan</strong> <strong>DV</strong>.<br />
Sie haben ein professionelles Stabilisierungs-System für Kameras erworben, das<br />
Ihnen erlaubt Ihrem Dreh kreative bewegte Kamerafahrten hinzuzufügen und das<br />
den Unterschied zwischen stationärem und lebendig-realistischem Filmen ausmacht.<br />
Wir sind überzeugt, dass Sie das Arbeiten mit <strong>HandyMan</strong> <strong>DV</strong> schätzen werden,<br />
einem System, das weltweit viele professionelle Kameraleute wie Sie nutzen.<br />
Eine spezielle Anpassungsvorrichtung ermöglicht Ihnen, das System auch auf<br />
Kamerawagen, verschiedenen Fahrzeugen oder auch auf Hubschraubern zu nutzen.<br />
Fragen Sie dazu bei Ihrem Händler nach.<br />
Handgestützte Kameras sind stets instabil, da die Bewegungen der<br />
kameraführenden Person direkt an die Kamera weitergeleitet werden. <strong>HandyMan</strong> <strong>DV</strong><br />
löst dieses Problem mit den folgenden technischen und physiskalischen Regeln:<br />
� Das Kameragewicht und daraus resultierend das Verhalten des Gewichts bei<br />
Bewegung wird durch ein Erschütterungsdämpfungssystem neutralisiert<br />
� Die Kamera ist von Bewegungen der kameraführenden Person getrennt.<br />
� Der Gewichtsschwerpunkt sammelt sich im Handgriff des Trimm-Stabes<br />
� Die Kamera ruht auf einem einzigen Schwerpunkt<br />
� Der Gelenkarm absorbiert alle vertikalen Erschütterungen<br />
� Die Bildkontrolle erfolgt durch die Verwendung eines Monitors statt eines<br />
Bildsuchers<br />
Bedienungsanleitung // Instruction Manual: <strong>HandyMan</strong> <strong>DV</strong> (<strong>06</strong>/<strong>06</strong>) 4
03. Bestandteile<br />
Das System umfasst die folgenden Bestandteile:<br />
� Tragekoffer<br />
� Gelenkarm<br />
� Weste<br />
� Schulter-Weste<br />
� Rückenstütze<br />
� Hüft-Gurt<br />
� Kamera-Plattform<br />
� Ausgleichsstab (Trimm-Stab)<br />
� Ausgleich-Gewicht<br />
� Farb-Monitor 7 cm Diagonale<br />
� Kupplungsständer-Kopf<br />
04. Das Ausgleichen der Kamera<br />
Das Ausgleichen der Kamera bedeutet, dass Sie das Ausgleichgewicht auf dem<br />
Trimm-Stab in die richtige Höhe bringen. Das Gewicht am unteren Ende des Trimm-<br />
Stabes gleicht dann das Kameragewicht aus. In ausgeglichener Lage bleibt die<br />
Kamera während schneller und langsamer Bewegungen fast stabil. Es gibt keine<br />
Kamerawackler: die Kamera gleitet leichtgängig wie auf einem Kamerawagen.<br />
Wie fahren Sie mit dem <strong>HandyMan</strong> <strong>DV</strong> Kamera-Ausgleich fort<br />
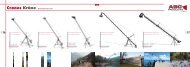
a) Beginnen Sie mit der Vorbereitung des Kupplungständers, indem Sie den<br />
Kupplungsständer-Kopf auf das leichte Stativ anbringen (Sie können einen Manfrotto<br />
MA007U mit einer oberen Öffnung von 30 mm verwenden). Stellen Sie einen festen<br />
Halt sicher.<br />
Für den Ausgleich Kupplungsständer-Kopf Parkzustand<br />
Bedienungsanleitung // Instruction Manual: <strong>HandyMan</strong> <strong>DV</strong> (<strong>06</strong>/<strong>06</strong>) 5
) Setzen Sie den Trimm-Stab auf den Kupplungskopf.<br />
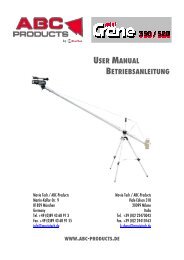
c) Finden Sie den Kamera-Schwerpunkt heraus. Sie können einen Stift unter die<br />
Kamera setzen und und die Kamera balancieren lassen. Setzen Sie die Kamera auf<br />
die Kamera-Plattform, so dass sich der Kamera-Schwerpunkt auf der Plattform<br />
befindet.<br />
Schwerpunkt<br />
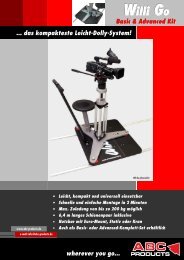
d) Bringen Sie das Gewicht am Ende des Ausgleich-Stabes an. Führen Sie den<br />
Sicherheitsbolzen durch das Loch am Ende des Stabes. Montieren Sie vorsichtig die<br />
Kamera auf den Kamera-Plattform Halter und befestigen Sie - während Sie beide<br />
Enden halten - den Halter durch Festziehen der roten Längsschrauben. Stellen Sie<br />
sicher, dass die Kamera-Plattform fest sitzt. Dies verhindert ein Herunterfallen der<br />
Kamera vom System.<br />
Bedienungsanleitung // Instruction Manual: <strong>HandyMan</strong> <strong>DV</strong> (<strong>06</strong>/<strong>06</strong>) 6
Längsschrauben Längsschrauben<br />
Sicherheits-Bolzen<br />
e) Bewegen Sie nun das Gegengewicht am Trimm-Stab nach oben oder unten bis<br />
die Position finden, an der das System (Kamera + Trimm-Stab sehr langsam auf dem<br />
Kupplungs-Ständer schwingt. Bringen Sie das System vorher in eine 180° Position<br />
und lassen sie es los.<br />
Sehr wichtig für die Stabilisierung ist das exakte Ausgleichen der Kamera auf dem<br />
Trimm-Stab. Dazu wählen Sie die passende Balance-Lage zwischen Kameragewicht<br />
und dem Gegengewicht. Die Lage ist abhängig davon, was Sie beabsichtigen zu<br />
filmen und welche Umstände vorherrschen (z.B. starker Wind, notwendige langsame<br />
oder schnelle Bewegungen).<br />
Bedienungsanleitung // Instruction Manual: <strong>HandyMan</strong> <strong>DV</strong> (<strong>06</strong>/<strong>06</strong>) 7
Allgemein gilt, dass das System so ausgerichtet sein sollte, dass nach dem<br />
Loslassen die Kamera innerhalb von 1 – 2 Sekunden wieder in die vertikale Lage<br />
zurückschwingt.<br />
1 – 2 Sek.<br />
f) Sie können die Balance des Systems anpassen, indem Sie Gewicht hinzufügen<br />
oder wegnehmen. Sie brauchen dies nur im Fall, dass ein Anheben oder Absenken<br />
des Gewichts nicht zur Balance des Systems führt (z.B. der Schwung ist zu<br />
langsam).<br />
g) Fahren Sie nun mit der Anpassung der Längsschrauben fort, indem Sie sehr leicht<br />
die Längs-Feststellschrauben lösen. Achten Sie dabei darauf, dass die Kamera eine<br />
horizontale Lage einnimmt, um das Herunterfallen zu vermeiden. Drehen Sie<br />
vorsichtig beide Längsschrauben in eine Richtung bis Sie eine horizontale Kamera-<br />
Lage entlang einer Achse erreichen. Sie fahren mit der Horizontal-Einstellung des<br />
Systems fort, indem Sie die Seitenschrauben nutzen. Wenn sie die Position<br />
gefunden haben, in der die Kamera horizontal bleibt, ziehen Sie die Längsschrauben<br />
fest.<br />
Bedienungsanleitung // Instruction Manual: <strong>HandyMan</strong> <strong>DV</strong> (<strong>06</strong>/<strong>06</strong>) 8
Nachdem Sie das System vertikal am Trimm-Stab ausgerichtet und Ihre Weste<br />
angelegt haben, bringen Sie den Gelenkarm an Ihrer Weste an. Dazu müssen Sie<br />
einen speziellen Sicherungs-Bolzen nutzen. Bei diesem Vorgang sind Sie eventuell<br />
auf die Hilfe von jemanden anderem angewiesen.<br />
h) Setzen Sie nun die Kamera in die "Parkzustand"-Lage auf dem Kupplungsständer.<br />
Gehen Sie etwas in die Knie und verbinden Sie die Aufhängung mit dem Gelenkarm.<br />
Heben Sie das System vom Kupplungsständer.<br />
i) Gehen Sie etwas umher, um herauszufinden ob der Gelenkarm sich horizontal zu<br />
Ihrem Körper befindet. Der Gelenkarm sollte weder zu tief sinken, noch zu hoch<br />
steigen. Ist dies jedoch der Fall, können Sie die Spannung der Federn einstellen. Die<br />
manuellen Spanner befinden sich an der Ober- und Unterseite des Gelenkarmes. Die<br />
Einstellung können Sie entweder von Hand vornehmen, oder das Spezialwerkzeug<br />
zum Ausgleichen des Trimm-Stabes benutzen.<br />
Bedienungsanleitung // Instruction Manual: <strong>HandyMan</strong> <strong>DV</strong> (<strong>06</strong>/<strong>06</strong>) 9
05. Die Benutzung von <strong>HandyMan</strong> <strong>DV</strong><br />
Es ist nicht möglich eine allgemeine Benutzeranleitung zu schreiben, die den<br />
richtigen Umgang mit <strong>HandyMan</strong> <strong>DV</strong> erklärt. Vielmehr sind Übung und Erfahrung<br />
grundlegend, den Umgang mit <strong>HandyMan</strong> <strong>DV</strong> zu lernen. Das Gefühl für das System<br />
bekommen Sie langsam nur durch Übung. Die Fortschritte, die Sie dabei erzielen<br />
sind jedoch exponentiell.<br />
<strong>HandyMan</strong> <strong>DV</strong> kann nicht einfach angezogen und benutzt werden. Obwohl einfacher<br />
als ein Musik-Instrument zu lernen, benötigen Sie viel Übung um Erfolge zu erzielen<br />
und enttäuschende Ergebnisse zu vermeiden. Und wichtig: haben Sie nicht zu viele<br />
Zweifel. Der Autor selbst hatte anfänglich dieselben Probleme wie Sie. Der einzige<br />
und richtige Weg zum Erfolg geht über den Spass im Umgang mit dem System und<br />
die täglichen Fortschritte. <strong>HandyMan</strong> <strong>DV</strong> ist ein Gerät, mit dem Sie unglaubliche<br />
Aufnahmen erreichen, besonders wenn der Einsatz Ihnen Vergnügen bereitet.<br />
Einige der häufigsten Fehler:<br />
� das System wird zu hoch gehalten und der Bediener vertraut dem Gelenkarm<br />
zu wenig<br />
� die Tendenz den Handgriff zu fest zu halten<br />
� die Tendenz sich nach vorne zu lehnen, und das ganze Gewicht auf die Beine<br />
zu verlagern<br />
� das Gefühl der Unsicherheit aus dem Gewicht des Systems heraus<br />
� die Befürchtung mit den eigenen Beinen an den Gelenkarm zu stossen<br />
� das System wird zu nah zum Körper gehalten und die Kamera stösst mit den<br />
Schultern zusammen<br />
� das System wird zu weit weg vom Körper gehalten<br />
� Probleme mit der Lage und dem Gebrauch der Hände<br />
Die Bedeutung einer bequemen Weste<br />
Eine schlecht sitzende Weste kann <strong>HandyMan</strong> <strong>DV</strong> in eine Foltermaschine<br />
verwandeln. Sie müssen sicherstellen, dass die Weste fest und trotzdem bequem<br />
sitzt, und die Bewegungsfreiheit erhalten bleibt. Die Weste ist ergonomisch und passt<br />
sich den meisten Körperformen an. Ziehen Sie den Hüft- und Schultergurt so fest wie<br />
möglich an.<br />
Bedienungsanleitung // Instruction Manual: <strong>HandyMan</strong> <strong>DV</strong> (<strong>06</strong>/<strong>06</strong>) 10
Pausen<br />
Das Arbeiten mit einem Stabilisierungssystem wie <strong>HandyMan</strong> <strong>DV</strong> gehört<br />
wahrscheinlich zu den anstrengendsten Tätigkeiten bei Video- und Filmproduktionen.<br />
Jede Minute, die man ein Gewicht trägt zählt. In manchen Situationen haben Sie eine<br />
Pause, üblicherweise aber keine. Die Art und Weise wie Sie ausruhen ist wichtig.<br />
Wenn Sie sich immer wieder ab und zu ausruhen können, ist das Arbeiten mit<br />
<strong>HandyMan</strong> <strong>DV</strong> über einen Tag hinweg möglich. Haben Sie keine Möglichkeit zu<br />
Pausen, sind zwei Stunden Arbeiten mehr als genug.<br />
Wir wünschen Ihnen alles Gute für ein erfolgreiches Filmen und hoffen Sie haben<br />
Vergnügen im Umgang mit <strong>HandyMan</strong> <strong>DV</strong>.<br />
Ihr <strong>ABC</strong> <strong>Products</strong> Team<br />
Kontakt:<br />
Movie Tech AG / <strong>ABC</strong>-<strong>Products</strong><br />
Martin-Kollar-Str. 9<br />
81829 München<br />
Tel.: 089 / 4368913, Fax. 089 / 43689155<br />
e-mail: info@abc-products.de<br />
internet: www.abc-products.de<br />
Bedienungsanleitung // Instruction Manual: <strong>HandyMan</strong> <strong>DV</strong> (<strong>06</strong>/<strong>06</strong>) 11
<strong>06</strong>. Garantie<br />
GARANTIE<br />
<strong>ABC</strong> <strong>Products</strong> gibt auf dieses Produkt eine Gewährleistung auf Herstellerfehler für<br />
ein (1) Jahr ab Kaufdatum. Die Garantie auf alle elektronischen Teile beträgt sechs<br />
(6) Monate ab Kaufdatum.<br />
Produkt:<br />
Ser.Nr.:<br />
Datum der Qualitätsprüfung:<br />
Prüfer:<br />
Bedienungsanleitung // Instruction Manual: <strong>HandyMan</strong> <strong>DV</strong> (<strong>06</strong>/<strong>06</strong>) 12
ENGLISH<br />
Bedienungsanleitung // Instruction Manual: <strong>HandyMan</strong> <strong>DV</strong> (<strong>06</strong>/<strong>06</strong>) 13
Index:<br />
Foreword page 15<br />
Introduction to <strong>HandyMan</strong> <strong>DV</strong> page 15<br />
Components page 16<br />
Trimming the camera page 16<br />
Using <strong>HandyMan</strong> <strong>DV</strong> page 21<br />
Warranty page 23<br />
Bedienungsanleitung // Instruction Manual: <strong>HandyMan</strong> <strong>DV</strong> (<strong>06</strong>/<strong>06</strong>) 14
01. Foreword<br />
This manual with the content of the next pages is only intended to give you a<br />
technical overview of the system with the most important parts and accessories. It is<br />
by no means meant to teach you how to work with a balancing system, something<br />
that is not possible to do in writing. There are a number of training courses for the<br />
use of balancing systems on the market and we recommend that you take part in a<br />
course to get accustomed with a balancing system. <strong>HandyMan</strong> is a user-friendly tool,<br />
once you have the basic knowledge of how to use a balancing system you should not<br />
have any difficulty filming with the system. Experience is the most important thing, the<br />
more you use the system, the more you will get used to its reaction to movement.<br />
The most important thing in fact is to train walking with your camera balanced on the<br />
system, trying to achieve smoothest possible filming. Do some experiments: try<br />
walking up stairs, down stairs, around obstacles like tables and chairs etc, follow a<br />
person walking in front of you, train the movements you will be expected to perform.<br />
Try quick and slow movements.<br />
02. Introduction to <strong>HandyMan</strong> <strong>DV</strong><br />
Thank you for selecting <strong>HandyMan</strong> <strong>DV</strong>.<br />
You have purchased a professional balancing system for cameras which will allow<br />
you to integrate your filming with the creative „moving camera“ shots that make the<br />
difference between static filming and lively realistic filming. We are sure you will<br />
appreciate working with <strong>HandyMan</strong> <strong>DV</strong>, a system already used by many professional<br />
cameramen like yourself all over the world.<br />
With a special adapter you may be able to use the system on dollies, vehicles of<br />
different kinds as well as helicopters. Ask your dealer about this.<br />
A Handheld camera is always unstable as the cameraman´s movements are directly<br />
passed on to the camera. <strong>HandyMan</strong> <strong>DV</strong> solves this problem with the following<br />
technical and physical rules:<br />
� The camera´s mass and therefore the behaviour of the mass when moved is<br />
neutralised by a shock dampening system.<br />
� The camera is isolated from the cameraman´s movements<br />
� The point of gravity is concentrated in the Handgrip of the balancing rod<br />
� The camera rests on one balance point<br />
� The spring arm absorbs all vertical shocks<br />
� Picture-control is performed by use of a monitor instead of a viewfinder<br />
Bedienungsanleitung // Instruction Manual: <strong>HandyMan</strong> <strong>DV</strong> (<strong>06</strong>/<strong>06</strong>) 15
03. Components<br />
The system is composed of:<br />
� Carrying case<br />
� Spring arm<br />
� Vest<br />
� Shoulder vest<br />
� Back support<br />
� Waist belt<br />
� Camera plate<br />
� Balancing rod (trim post)<br />
� Trim weight<br />
� Colour Monitor 7 cm Diagonal<br />
� Docking-stand Head<br />
04. Trimming the camera<br />
Trimming the camera means to bring the trim weight on the rod to the right height so<br />
that the camera is counterbalanced by the weight at the bottom end of the balancing<br />
rod, keeping the camera almost firm in the trimmed position during quick and slow<br />
movements: there is no camera shake, the camera glides smoothly as if on a dolly<br />
system.<br />
How to proceed with trimming <strong>HandyMan</strong> <strong>DV</strong><br />
a) Before you start you must prepare the docking stand by mounting the dockingstand<br />
head onto a light tripod (you may use a Manfrotto MA007U with a 30 mm<br />
opening at the top). Make sure it is tightly mounted.<br />
For Trimming Docking Stand Head For Parking<br />
Bedienungsanleitung // Instruction Manual: <strong>HandyMan</strong> <strong>DV</strong> (<strong>06</strong>/<strong>06</strong>) 16
) Place the trim-rod onto the docking head<br />
c) Find the center of gravity of the camera (you may place a pencil under the camera<br />
to do this, let the camera balance on the pencil). Mount the camera plate onto the<br />
camera plate so the plate is in the center of gravity of the camera.<br />
Center of gravity<br />
d) Place weight at the bottom of the balancing rod. Put the safety pin into the hole at<br />
the bottom of the rod. Carefully mount the camera onto the camera plate holder and<br />
tighten it by turning the red fore-aft screws holding both ends. Make sure the camera<br />
plate is well tight, this will avoid the camera from falling off the system.<br />
Bedienungsanleitung // Instruction Manual: <strong>HandyMan</strong> <strong>DV</strong> (<strong>06</strong>/<strong>06</strong>) 17
Fore-Aft screen Fore-Aft screen<br />
Safety Pin<br />
e) Now move the trim weight up or down on the trim-rod till you find the position in<br />
which the system (camera + trim-rod) will swing very slowly on the docking stand<br />
after you have taken it to a 180° position and let it go.<br />
The most important factor for success or failure in fact is the precise trimming of the<br />
camera on the balancing rod. It means choosing the right balance situation<br />
between the camera weight and the counterweight. This depends on what you<br />
intend to film and under what circumstances (e.g. strong wind, slow movements or<br />
fast movements necessary etc.).<br />
Bedienungsanleitung // Instruction Manual: <strong>HandyMan</strong> <strong>DV</strong> (<strong>06</strong>/<strong>06</strong>) 18
In general the system should be balanced so the camera goes back to a vertical<br />
position within 1 – 2 seconds after letting it swing.<br />
1 – 2 sec.<br />
f) To adjust balancing you may need to add weight or take weight off. This is only if<br />
you find that by raising the position of the weight or by lowering it you do not find a<br />
situation in which the system is balanced (i.e. swing is slow).<br />
g) You must now proceed to adjust the fore and aft screws by loosening the fore-aft<br />
blocking screws very slightly (remember to be careful that the camera is horizontal<br />
when you do this to prevent the falling out of the camera). Turn carefully the both<br />
fore-aft screws slowly in one direction, till you reach the position in which the camera<br />
is horizontal in one axis. Now proceed to balancing the system horizontally by use of<br />
the side to side screws. Tighten the fore and aft screws when you have found the<br />
position in which the camera remains horizontal.<br />
Bedienungsanleitung // Instruction Manual: <strong>HandyMan</strong> <strong>DV</strong> (<strong>06</strong>/<strong>06</strong>) 19
Once you have balanced the system on the vertical balancing rod, supposing you<br />
have already put your vest on, you should now proceed to hanging the spring arm<br />
onto the vest. This is done by use of a special safety pin. You may need someone to<br />
help you with this operation.<br />
h) Now place the Camera in the “parking” position on the docking stand. Lower<br />
yourself down a little and connect the gimbal to the spring arm. Lift the system off the<br />
docking stand.<br />
i) Move around a bit to understand whether the spring arm has the right tension.<br />
The spring arm should not sink too low down, and should not be too high. If this is<br />
the case you can vary the tension of the springs by use of the manual tensioners at<br />
the top and bottom side of the spring arm. You can do this either by hand or by use<br />
of the special tool used for trimming the balancing rod .<br />
Bedienungsanleitung // Instruction Manual: <strong>HandyMan</strong> <strong>DV</strong> (<strong>06</strong>/<strong>06</strong>) 20
05. Using <strong>HandyMan</strong> <strong>DV</strong><br />
It is not possible to write a general user manual explaining the correct use of<br />
<strong>HandyMan</strong>. Practice and experience are fundamental in learning how to use<br />
<strong>HandyMan</strong> <strong>DV</strong>. By practicing you will slowly get the feel for the system and therewith<br />
your improvement will be exponential.<br />
<strong>HandyMan</strong> cannot simply be put on and used. Although easier to learn than a<br />
musical instrument, much exercise is required to be successful and to avoid being<br />
disappointed by results. Important: do not have too many doubts, the author himself<br />
had the same problems you are having in the beginning. The only and correct way to<br />
success is to have fun with the system, and improve day by day. <strong>HandyMan</strong> is an<br />
instrument for achieving incredible shots, especially if you enjoy using it.<br />
Some of the most common mistakes:<br />
� The instrument is held too high up, the operator does not trust the spring arm<br />
enough<br />
� There is a tendency to hold the hand grip too tight<br />
� Tendency to bend forward and to rest all the weight in the legs<br />
� Feeling of insecurity because of the weight of the system<br />
� Worrying about hitting the spring arm with your own legs<br />
� The instrument is kept too close to your body, the camera collides with your<br />
shoulders<br />
� The instrument is kept too far away from your own body<br />
� Problems with positioning and use of hands<br />
The importance of a comfortable vest<br />
A badly fitting vest can transform <strong>HandyMan</strong> into a torture machine. You must make<br />
sure the vest fits tightly and is still comfortable enough for free movement. The vest<br />
is ergonomic and can be adjusted to fit most body shapes. Tighten the belt and the<br />
shoulder vest as tightly as possible.<br />
Bedienungsanleitung // Instruction Manual: <strong>HandyMan</strong> <strong>DV</strong> (<strong>06</strong>/<strong>06</strong>) 21
Pauses<br />
Working with a balancing system is probably one of the hardest activities of the video<br />
and film business. Every minute one carries a weight counts. On some occasions<br />
you have a pause, usually you don´t. The way you rest is important. If you have a<br />
rest every now and again you may work a whole day with <strong>HandyMan</strong>. Without any<br />
rest 2 hours may be the most you can take.<br />
We wish you all the best for successful filming and we hope you enjoy using<br />
<strong>HandyMan</strong> <strong>DV</strong><br />
Your <strong>ABC</strong> <strong>Products</strong> Team<br />
Contact:<br />
Movie Tech AG / <strong>ABC</strong>-<strong>Products</strong><br />
Martin-Kollar-Str. 9<br />
81829 Munich<br />
Tel.: 089 / 4368913, Fax. 089 / 43689155<br />
e-mail: info@abc-products.de<br />
internet: www.abc-products.de<br />
Bedienungsanleitung // Instruction Manual: <strong>HandyMan</strong> <strong>DV</strong> (<strong>06</strong>/<strong>06</strong>) 22
<strong>06</strong>. Warranty<br />
WARRANTY<br />
This product is guaranteed by <strong>ABC</strong> <strong>Products</strong> for a period of one (1) year after date of<br />
purchase against manufacturer’s defects. The warranty for all electrical parts is six<br />
(6) months after date of purchase.<br />
Product:<br />
Ser.Nr.:<br />
Date of Inspection:<br />
Inspector:<br />
Bedienungsanleitung // Instruction Manual: <strong>HandyMan</strong> <strong>DV</strong> (<strong>06</strong>/<strong>06</strong>) 23
Unter dem Dach von …<br />
Under the roof of …<br />
Die Movie Tech AG, mit Sitz in München, ist einer der führenden Hersteller von Produkten und<br />
Lösungen für die Filmindustrie. Das Produktangebot der Movie Tech AG umfasst Kamerakräne,<br />
Dollies, Licht Systeme, Remote Heads und umfangreiches Zubehör. Ziel der Movie Tech AG ist es,<br />
mit ihrem professionellem Film-Eqipment die Arbeit von Film-Teams am Set oder im Studio zu<br />
erleichtern. Um die Kundenwünsche zur vollsten Zufriedenheit zu erfüllen, unterhält die Movie<br />
Tech AG auch Niederlassungen in den U.S.A. und Italien.<br />
Movie Tech AG, located in Munich, is one of the leading manufactures of products and solutions<br />
for the film industry. The product line of Movie Tech AG includes the hole range of camera cranes,<br />
dollys, light systems, remote heads and related accessories. Movie Tech AG purpose is to build<br />
professional film equipment to make the work for film teams on the set or in the studios easier.<br />
In order to fulfill customer's requests better, Movie Tech AG has branches in the U.S. and Italy.<br />
<strong>ABC</strong>-<strong>Products</strong> wurde im Januar 2000 von der Movie Tech AG übernommen, mit<br />
dem Ziel den Broadcast-Markt besser und differenzierter bedienen zu können.<br />
Heute ist <strong>ABC</strong>-<strong>Products</strong> eine der führenden Marken im Bereich des leichten und<br />
hochwertigen Broadcast-Equipments.<br />
Movie Tech AG acquired the company <strong>ABC</strong>-<strong>Products</strong> in January 2000 with the<br />
objective to improve the development in the broadcast market. <strong>ABC</strong>-<strong>Products</strong> is<br />
today one of leading brands in the area of extremely light and high-grade<br />
broadcast equipment.<br />
Seit 20<strong>06</strong> ist MTS-Equipment ein weiterer Teil des Portfolios der MovieTech AG. MTS - Media<br />
Technical Systems - ist Hersteller von Premium Studio Equipment, welches Droparme,<br />
Pantographen, Selfclimber und Teleskope beeinhalt.<br />
Since 20<strong>06</strong>, MTS equipment has been added to the portfolio of MovieTech AG. MTS - Media<br />
Technical Systems - manufactures premium studio equipment, including droparms, pantographs,<br />
lighting hoists, and telescopes.<br />
MovieTech AG<br />
Martin-Kollar-Str. 9 · 81829 München · Germany<br />
Tel. +49/89-4368913 · Fax +49/89-43689155<br />
e-mail: info@movietech.de · www.movietech.de www.movietech.de