g30 42 mm - Normstahl
g30 42 mm - Normstahl
g30 42 mm - Normstahl

Sie wollen auch ein ePaper? Erhöhen Sie die Reichweite Ihrer Titel.
YUMPU macht aus Druck-PDFs automatisch weboptimierte ePaper, die Google liebt.
18340_EUR_<strong>42</strong><strong>mm</strong>_TOF_TOR 05-09-14 13.03 Sida 7<br />
1.<br />
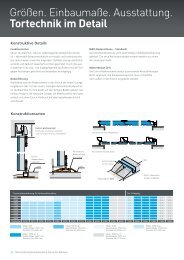
CHECK THE GARAGE OPENING<br />
Check opening measurements A (width) and B (height) to<br />
ensure you have the correct size of door for the opening.<br />
CHECK THE FLOOR LEVEL<br />
Use the spacer bar and spirit-leveller to ensure the bottom<br />
of the wall-tracks are level and that the position of the<br />
door will be centred in the opening. The spacer bar is<br />
supplied to the width required between the tracks.<br />
2.<br />
On the floor of the garage, assemble the wall-tracks for<br />
both right and left hand sides (1-3), by using 3 track<br />
screws and collar nuts per track, tighten the nuts in shown<br />
order (2, 3)<br />
3.<br />
IMPORTANT: It is essential that the wall tracks are<br />
installed level,square and flush to achieve the correct door<br />
operation.<br />
Clamp the right side wall-track to the opening (1); ensuring<br />
the track is at the correct height from the floor. Use<br />
the spacer bar to establish the position of the right hand<br />
track, relative to the left side, to ensure the door will be<br />
central to the opening. (2)<br />
Use a spirit-leveller to ensure the track is vertical. (3)<br />
Drill and fix the track with two 50<strong>mm</strong> screws and washers,<br />
in the centre of slot-hole.<br />
Use only 1 screw in the bottom and 1 screw in the middle<br />
of the wall track to allow for later adjustment (4). Do not<br />
yet enter the screws in the upper wall track profile.<br />
Drill: Timber<br />
Steel<br />
Concrete, bricks<br />
= Ø 3,0 <strong>mm</strong>, no plugs required<br />
= Ø 5,5 <strong>mm</strong>, no plugs required<br />
= Ø 10,0 <strong>mm</strong>, use the blue plugs<br />
Make sure to insert the plugs according to sketch to avoid<br />
cracking of the wall. (5)<br />
An alternative way of fixing the wall tracks is to use side<br />
brackets (option) for behind and inside the reveal<br />
(although this will require 40 <strong>mm</strong> extra side-room), which<br />
allows for adjustment of the wall track in all directions.<br />
Pre punched holes for brackets in the wall track.<br />
4.<br />
Clamp the left hand track to the wall opening. (1)<br />
Use the spacer bar at the bottom to position the left track,<br />
relative to the right hand track. (2)<br />
Drill through the bottom hole and insert a 50<strong>mm</strong> screw<br />
and washer in the centre of the slot-hole. (3)<br />
5.<br />
Move the spacer bar up to the top of the wall track, into<br />
the slot-holes in both right and left hand tracks. This gives<br />
the correct distance between the wall tracks at the top. (1)<br />
Drill and fix the left hand track with one 50 <strong>mm</strong> screw in<br />
centre of the slot-hole, (as previously done on the right<br />
hand side track).<br />
Remove the spacer bar.<br />
6.<br />
Apply the top rubber sealing to the lintel profile (1)<br />
Click the centre clip in place, off centre by approximately<br />
100-150<strong>mm</strong>. (2)<br />
Insert a lintel end bracket at each end of the lintel (3)<br />
Hook the lintel beam on to the wall-tracks, using the slot<br />
at the top of the end bracket. (4)<br />
7.<br />
Start to assemble the ceiling track parts by using 2 x track<br />
screws and collar nuts (1).<br />
Put the angle steel above the joint and then fix by 4 x<br />
track screws and collar nuts (2). At the rear end of the<br />
ceiling-tracks use the 20 <strong>mm</strong> screws. (3)<br />
When lock is supplied fix the lock catch to the right hand<br />
front part of ceiling-track, using 2 x track screws (from<br />
inside the track) and 2 x collar nuts (4).<br />
Place the ceiling tracks at a 90º angle to the floor (5). This<br />
will give you an approximate position to fix the L-angle<br />
track support to the ceiling.<br />
Fix the ceiling profiles approx. 200 <strong>mm</strong> inside from the<br />
ceiling track with 2 x 50 <strong>mm</strong> screws. (6)<br />
Install the L-profile hanger with one coach-bolt M-8 and a<br />
collar nut at the approximate end position of the ceiling<br />
track. (7)<br />
Fix the two spacer bar clips to the hanger L-profile at the<br />
approximate height of the door (one for each track), with<br />
coach-bolt M-8 and collar nuts. (8)<br />
8.<br />
Fix the clips to the two ‘L’ shaped ceiling hangers and to<br />
the spacer bar, using coach-bolt M-8 and collar nuts without<br />
tightening the nuts (1) (At this stage, the spacer bar<br />
does not need to be in its final position. It will be tightened<br />
later). Hook the ceiling-tracks to the wall-track hooks<br />
(2). Hook the ceiling-tracks on to the distance beam by<br />
placing the rear end of the right hand ceiling track to the<br />
spacer bar, fix with a collar nut (3) Fix both ends of the<br />
lintel to the wall-tracks (4). If TORSION REAR, fix the<br />
corner plate by sliding the plate on to the track (5) then<br />
put in the track screw (6) from outside and then the nut. If<br />
TORSION FRONT position track screws in top hole from<br />
outside the track. Use collar nuts. (5)<br />
(Do not tighten the nuts (4, 5) the movement is of use<br />
when fitting the curve. without tightning the nut.)<br />
Complete the fixing of the wall tracks in the centre of the<br />
slotted holes to the wall by 50<strong>mm</strong> screws and washers (7).<br />
Fix the centre clip (and the centre support bracket (9), if<br />
the door has a TORSION FRONT balancing system, by 2<br />
x 50 <strong>mm</strong> screws, including washers. (8)<br />
ENG<br />
7