mySmartUSB MK2: 3,3V / 5V umschaltbar - myAVR
mySmartUSB MK2: 3,3V / 5V umschaltbar - myAVR mySmartUSB MK2: 3,3V / 5V umschaltbar - myAVR
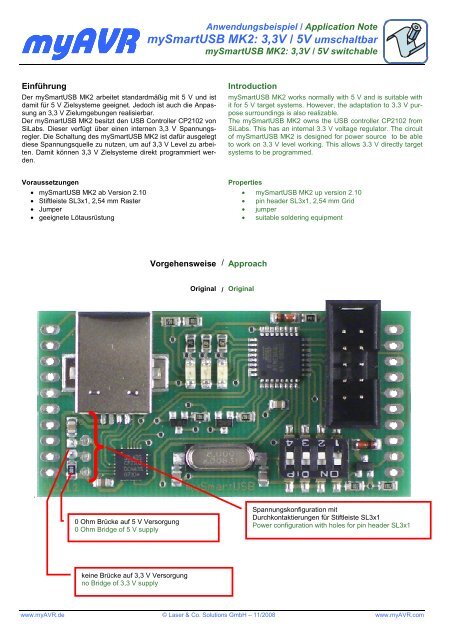
myAVR Anwendungsbeispiel / Application Note mySmartUSB MK2: 3,3V / 5V umschaltbar mySmartUSB MK2: 3,3V / 5V switchable Einführung Der mySmartUSB MK2 arbeitet standardmäßig mit 5 V und ist damit für 5 V Zielsysteme geeignet. Jedoch ist auch die Anpassung an 3,3 V Zielumgebungen realisierbar. Der mySmartUSB MK2 besitzt den USB Controller CP2102 von SiLabs. Dieser verfügt über einen internen 3,3 V Spannungsregler. Die Schaltung des mySmartUSB MK2 ist dafür ausgelegt diese Spannungsquelle zu nutzen, um auf 3,3 V Level zu arbeiten. Damit können 3,3 V Zielsysteme direkt programmiert werden. Introduction mySmartUSB MK2 works normally with 5 V and is suitable with it for 5 V target systems. However, the adaptation to 3.3 V purpose surroundings is also realizable. The mySmartUSB MK2 owns the USB controller CP2102 from SiLabs. This has an internal 3.3 V voltage regulator. The circuit of mySmartUSB MK2 is designed for power source to be able to work on 3.3 V level working. This allows 3.3 V directly target systems to be programmed. Voraussetzungen • mySmartUSB MK2 ab Version 2.10 • Stiftleiste SL3x1, 2,54 mm Raster • Jumper • geeignete Lötausrüstung Properties • mySmartUSB MK2 up version 2.10 • pin header SL3x1, 2,54 mm Grid • jumper • suitable soldering equipment Vorgehensweise / Approach Original / Original . 0 Ohm Brücke auf 5 V Versorgung 0 Ohm Bridge of 5 V supply Spannungskonfiguration mit Durchkontaktierungen für Stiftleiste SL3x1 Power configuration with holes for pin header SL3x1 keine Brücke auf 3,3 V Versorgung no Bridge of 3,3 V supply www.myAVR.de © Laser & Co. Solutions GmbH – 11/2008 www.myAVR.com
- Seite 2: mySmartUSB MK2 umschaltbar / mySmar
<strong>myAVR</strong><br />
Anwendungsbeispiel / Application Note<br />
<strong>mySmartUSB</strong> <strong>MK2</strong>: 3,<strong>3V</strong> / <strong>5V</strong> <strong>umschaltbar</strong><br />
<strong>mySmartUSB</strong> <strong>MK2</strong>: 3,<strong>3V</strong> / <strong>5V</strong> switchable<br />
Einführung<br />
Der <strong>mySmartUSB</strong> <strong>MK2</strong> arbeitet standardmäßig mit 5 V und ist<br />
damit für 5 V Zielsysteme geeignet. Jedoch ist auch die Anpassung<br />
an 3,3 V Zielumgebungen realisierbar.<br />
Der <strong>mySmartUSB</strong> <strong>MK2</strong> besitzt den USB Controller CP2102 von<br />
SiLabs. Dieser verfügt über einen internen 3,3 V Spannungsregler.<br />
Die Schaltung des <strong>mySmartUSB</strong> <strong>MK2</strong> ist dafür ausgelegt<br />
diese Spannungsquelle zu nutzen, um auf 3,3 V Level zu arbeiten.<br />
Damit können 3,3 V Zielsysteme direkt programmiert werden.<br />
Introduction<br />
<strong>mySmartUSB</strong> <strong>MK2</strong> works normally with 5 V and is suitable with<br />
it for 5 V target systems. However, the adaptation to 3.3 V purpose<br />
surroundings is also realizable.<br />
The <strong>mySmartUSB</strong> <strong>MK2</strong> owns the USB controller CP2102 from<br />
SiLabs. This has an internal 3.3 V voltage regulator. The circuit<br />
of <strong>mySmartUSB</strong> <strong>MK2</strong> is designed for power source to be able<br />
to work on 3.3 V level working. This allows 3.3 V directly target<br />
systems to be programmed.<br />
Voraussetzungen<br />
• <strong>mySmartUSB</strong> <strong>MK2</strong> ab Version 2.10<br />
• Stiftleiste SL3x1, 2,54 mm Raster<br />
• Jumper<br />
• geeignete Lötausrüstung<br />
Properties<br />
• <strong>mySmartUSB</strong> <strong>MK2</strong> up version 2.10<br />
• pin header SL3x1, 2,54 mm Grid<br />
• jumper<br />
• suitable soldering equipment<br />
Vorgehensweise / Approach<br />
Original / Original<br />
.<br />
0 Ohm Brücke auf 5 V Versorgung<br />
0 Ohm Bridge of 5 V supply<br />
Spannungskonfiguration mit<br />
Durchkontaktierungen für Stiftleiste SL3x1<br />
Power configuration with holes for pin header SL3x1<br />
keine Brücke auf 3,3 V Versorgung<br />
no Bridge of 3,3 V supply<br />
www.<strong>myAVR</strong>.de © Laser & Co. Solutions GmbH – 11/2008 www.<strong>myAVR</strong>.com
<strong>mySmartUSB</strong> <strong>MK2</strong> <strong>umschaltbar</strong> / <strong>mySmartUSB</strong> <strong>MK2</strong> switchable 2/2<br />
Schritt 1 / Step 1<br />
Brücke vorsichtig auslöten,<br />
ACHTUNG! Leiterbahnen nicht überhitzen!!!<br />
Be cautious while unsoldering Bridge,<br />
ATTENTION! conducting paths not be overheat!!!<br />
Schritt 2 / Step 2<br />
Stiftleiste einlöten.<br />
Beachte:<br />
Den <strong>mySmartUSB</strong> <strong>MK2</strong> können Sie über die gewinkelten Stiftleisten<br />
auf der Unterseite auf ein <strong>myAVR</strong> Board aufsetzen. Dafür sollten Sie<br />
die eben eingelöteten Stifte ggf. kürzen.<br />
To solder the pin header.<br />
Note:<br />
MySmartUSB <strong>MK2</strong> Board you can touch down about the bent pencil<br />
strips on the bottom of <strong>myAVR</strong> Board. For it you should shorten the<br />
just soldered pencils if necessary.<br />
Schritt 3 / Step 3<br />
Jumper auf 5 V Position<br />
Jumper of the 5 V position<br />
Jumper auf 3,3 V Position<br />
Jumper of the 3,3 V position<br />
Hersteller / Producer<br />
Laser & Co. Solutions GmbH · Promenadenring 8 · 02708 Löbau, Deutschland/Germany<br />
Internet: www.<strong>myAVR</strong>.de , www.<strong>myAVR</strong>.com Email: hotline@<strong>myAVR</strong>.de<br />
www.<strong>myAVR</strong>.de © Laser & Co. Solutions GmbH – 11/2008 www.<strong>myAVR</strong>.com


