Startbox Universal 1/8 bis 1/10 Kohledes s - CMC Versand
Startbox Universal 1/8 bis 1/10 Kohledes s - CMC Versand
Startbox Universal 1/8 bis 1/10 Kohledes s - CMC Versand

Sie wollen auch ein ePaper? Erhöhen Sie die Reichweite Ihrer Titel.
YUMPU macht aus Druck-PDFs automatisch weboptimierte ePaper, die Google liebt.
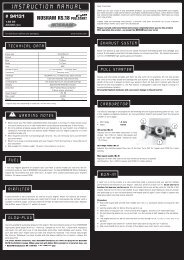
97901 <strong>Startbox</strong> <strong>Universal</strong> 1/8 – 1/<strong>10</strong> Kohlefaserdesign<br />
97901 Starter Box <strong>Universal</strong> 1/8 – 1/<strong>10</strong> Carbon Design<br />
Einführung<br />
Vielen Dank, dass Sie sich für die <strong>Startbox</strong> im Kohlefaserdesign von GM-Racing entschieden haben. Sie<br />
können damit alle Fahrzeuge in den Maßstäben 1:8 <strong>bis</strong> 1:<strong>10</strong> schnell und zuverlässig starten.<br />
Introduction<br />
Thank you for the purchase of this GM-Racing Product. You should enjoy many hours of trouble free use<br />
from this advanced R/C product. GM-Racing strives to bring you the highest level of quality and service<br />
we can provide. We race and test our products around the world to bring you state-of-the-art items.<br />
Techn. Daten/Specifications<br />
Stromversorgung Power source 14.4V DC (2 Racing-Packs mit 7.2V)<br />
14.4V DC (two 7.2V Stickpacks)<br />
Oder/or<br />
12V DC (Bleiakku, Autobatterie, Netzteil…)<br />
12V DC (gel cell, car battery, power supply…)<br />
Motor Motor 775er 12 – 14V DC<br />
Untersetzung Pulley Ratio 4.307:1 (13/56)<br />
Länge Length 375 mm<br />
Breite Width 130 mm<br />
Höhe Height 85 mm<br />
Gewicht Weight 1450 g ohne Akkus, 2160 g mit 2 Racingpacks<br />
1450 g w/o Batteries, 2160 g with two 7.2V Batteries<br />
Pfostenhöhe Post height 8mm
97901 <strong>Startbox</strong> <strong>Universal</strong><br />
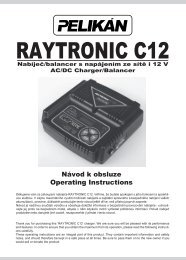
Einstellen der <strong>Startbox</strong> auf das Fahrzeug<br />
1. Überprüfen Sie zuerst die Ausrichtung der Kurbelwelle<br />
Ihres Fahrzeugs. Sie müssen die <strong>Startbox</strong><br />
je nach Ausrichtung und Lage des Schwungrads<br />
am Motor umbauen.<br />
Ist der Motor im rechten Winkel zum Chassis montiert,<br />
muss das Starterrad entgegen der Abb. längs<br />
eingebaut werden. Dazu müssen Sie die Schrauben,<br />
die Startermotor und Starterrad halten, an der<br />
Ober- und Unterseite der <strong>Startbox</strong> lösen anschließend<br />
den Antrieb entsprechend einbauen. Dazu<br />
muss auch die ovale Abdeckung auf einer Seite<br />
demontiert werden und umgedreht wieder eingebaut<br />
werden, um Platz für den Startermotor zu<br />
schaffen.<br />
2. Ist der Motor parallel zum Chassis eingebaut,<br />
muss das Starterrad im rechten Winkel wie in der<br />
Abb. gezeigt eingebaut werden bzw. nichts geändert<br />
werden, da die <strong>Startbox</strong> für diese Konfiguration<br />
ausgeliefert wird.<br />
Starter Box Setup<br />
1. Identify the cars engine´s crankshaft orientation,<br />
and move the starting box flywheel unit according<br />
(by removing and reinstalling the top and bottom<br />
screws). For engine crankshaft perpendicular to<br />
chassis, move startbox flywheel is toward the starting<br />
box side.<br />
2. For engine crankshaft parallel to chassis, move<br />
starting box flywheel unit so that it is sitting crossways<br />
in the box (factory configuration).<br />
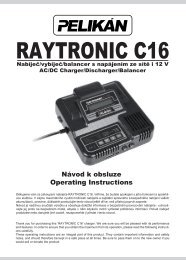
3. Stellen Sie nun Ihr Fahrzeug auf die <strong>Startbox</strong>. Die<br />
Schwungscheibe des Motors muss genau über<br />
dem Starterrad der <strong>Startbox</strong> sein.<br />
3. Line up the chassis/engine flywheel with the starter<br />
box´s flywheel. The chassis needs to line up where<br />
the apex of the engine flywheel meets the apex of<br />
the starter box flywheel in an up and down motion.<br />
4. Nachdem Sie Ihr Fahrzeug auf der <strong>Startbox</strong> ausgerichtet<br />
haben (Abb. 3), müssen Sie zuerst die<br />
hintere Auflage an das Fahrzeug anpassen. Um<br />
sie an die Länge des Chassis anzupassen, kann<br />
sie um 180° gedreht werden.<br />
4. When the chassis lined up like Step 3, adjust the<br />
spring loaded platform to support the rear oft he<br />
chassis. To accommodate length of the chassis,<br />
the platform can be flipped. If needed, disassemble,<br />
turn the platform 180 degrees and reassemble.<br />
2
97901 <strong>Startbox</strong> <strong>Universal</strong><br />
5. Nachdem Sie Ihr Fahrzeug auf der <strong>Startbox</strong> ausgerichtet<br />
haben (Abb. 3), werden nun die vorderen<br />
Halter angepasst. Dazu werden sie gelöst und am<br />
besten hinter die vorderen Querlenker geschoben.<br />
Anschließend schieben Sie sie soweit nach innen,<br />
dass sie seitlich am Chassis anliegen und ziehen<br />
sie fest.<br />
5. When the chassis lined up like Step 3, move the<br />
front posts (loosen and tighten the posts with a<br />
screw driver from top) so that they are located behind<br />
the front lower suspension arms (by moving<br />
them to the front or rear slots). Then, move the<br />
posts inward so that they pinch the chassis loosely<br />
(by moving the posts sideways in the slots).<br />
6. Nachdem Sie Ihr Fahrzeug auf der <strong>Startbox</strong> ausgerichtet<br />
haben (Abb. 3) und die vorderen Halter<br />
eingestellt haben, müssen Sie noch die hinteren<br />
Halter einstellen, damit auch diese seitlich am<br />
Chassis anliegen und sie festziehen, damit das<br />
Fahrzeug eine sichere Position auf der <strong>Startbox</strong><br />
hat.<br />
6. When the chassis lined up like Step 3, and the front<br />
posts already set, move the rear posts located on<br />
the spring loaded platform so that they are pinching<br />
the side of the chassis loosely (by moving the posts<br />
sideways in the slots).<br />
7. Stecken Sie nun den Y-Adapter in den Akkustecker<br />
der <strong>Startbox</strong>. Daran können Sie zwei 7,2V<br />
Racingpacks anschließen (nicht enthalten). Stecken<br />
Sie die Akkus in die Halterung an der <strong>Startbox</strong><br />
und schließen die Verriegelung.<br />
Oder Sie verwenden den Adapter mit den Flachsteckern,<br />
um einen 12V-Bleiakku anzuschließen.<br />
Achten Sie hier auf die richtige Polung.<br />
7. Clip the female end of the three point adapter into<br />
the starter box. Then, clip the remaining two male<br />
ends of the adapter into two 7,2V stick battery<br />
packs (not included). Then, place the battery packs<br />
in the battery holder with one end in the starter<br />
case cap/end, and push down the battery clip.<br />
Or clip the female end of the adapter with alligator<br />
clips into the starter box. Then, clip the alligator<br />
clips of the power cord to the 12V DC source.<br />
Make sure the polarity is correct<br />
8. Drücken Sie nun die hintere Auflage herunter, die<br />
Starterscheibe sollte nun so drehen, das der Motor<br />
gegen den Uhrzeigersinn angelassen werden<br />
kann (von der Schwungscheibe des Motors aus<br />
gesehen). Ist dies nicht der Fall, kontrollieren Sie<br />
die Anschlüsse am Startermotor und polen sie gegebenenfalls<br />
um.<br />
8. Press the spring loaded platform, and the flywheel<br />
should spin so that it spins the engine counterclockwise<br />
(lloking from crankshaft tip to engine<br />
backplate). If the engine spins clockwise, the polarity<br />
of the connection is likely to be wrong.<br />
Double-check the plugs or power cord and reverse<br />
the polarity.<br />
3
97901 <strong>Startbox</strong> <strong>Universal</strong><br />
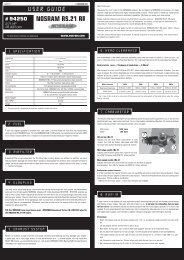
9. Sie sollten die <strong>Startbox</strong> immer etwas “Schwung”<br />
holen lassen, bevor Sie das Fahrzeug auf die<br />
Starterscheibe drücken. Ist dies nicht möglich, weil<br />
der Startermotor erst losläuft, wenn die Schwungscheibe<br />
schon auf der Starterscheibe aufliegt,<br />
können Sie den Schaltkontakt auf der Unterseite<br />
verstellen. Wenn Sie die Schraube hineindrehen,<br />
läuft der Motor später an, beim Herausdrehen früher.<br />
9. The starter box flywheel should start spinning right<br />
before it contacts the engine flywheel. To adjust the<br />
engagement point, properly place the car on top of<br />
the starter box within the posts so that the flywheels<br />
line up. Press down slowly the car until the<br />
starter box flywheel starts spinning. If it starts to<br />
spin too early, turn the engagement screw clockwise.<br />
If the engine and starter box flywheel contact<br />
before it starts to spin, turn the engagement screw<br />
counterclockwise.<br />
Starten des Fahrzeugs<br />
1. Stellen Sie die <strong>Startbox</strong> auf eine ebene, stabile<br />
Fläche.<br />
2. Platzieren Sie Ihr Fahrzeug auf der <strong>Startbox</strong> sicher<br />
in den Haltepfosten.<br />
3. Stecken Sie nun den Glühkerzenstecker auf den<br />
Motor und drücken das Fahrzeug auf der <strong>Startbox</strong><br />
nach unten. Wenn der Motor angesprungen ist,<br />
lassen Sie es los, und nehmen nach ein paar Sekunden<br />
auch den Glühkerzenstecker wieder ab.<br />
Operation instructions<br />
1. Place the starter box on the ground or a<br />
flat/solid/stable surface.<br />
2. Properly place the car on the top of the starter box<br />
within the pre-set posts.<br />
3. Place the glow igniter on the engine. Press down<br />
the car for a few seconds. Release it when the engine<br />
starts. After the engine has started, remove<br />
the glow igniter from the engine and the car from<br />
the starter box.<br />
Achtung<br />
1. Lassen Sie den <strong>Startbox</strong>motor nicht längere Zeit<br />
ohne Last laufen. Das kann die Lebensdauer des<br />
Motors verkürzen.<br />
2. Sollte der Motor nicht sofort anspringen, versuchen<br />
Sie nicht, ihn längere Zeit mit der <strong>Startbox</strong><br />
anzulassen. Dadurch kann der Motor „absaufen“,<br />
d.h. zuviel unverbrannter Sprit sammelt sich im<br />
Motor, was die Glühkerze und den Motor schädigen<br />
kann. Auch kann der <strong>Startbox</strong>motor Schaden<br />
nehmen.<br />
Kontrollieren Sie auch folgendes:<br />
Ist der Glühkerzenstecker geladen, funktioniert<br />
die Glühkerze<br />
Kommt Sprit zum Motor Ist vielleicht<br />
Schmutz in den Spritleitungen<br />
Ist der Motor „abgesoffen“ Drehen Sie<br />
die Glüherze heraus und lassen den Motor<br />
kurz auf der <strong>Startbox</strong> durchdrehen,<br />
damit der überschüssige Sprit herauskann<br />
und schrauben die Kerze dann wieder<br />
fest.<br />
Caution<br />
1. Do not engage the spring loaded switch so that the<br />
motor spins without load and/or engagement to a<br />
cars flywheel. Doing so may cause unexpected<br />
damage or shorten the life of the motor.<br />
2. If the starter box cannot start the engine immediately,<br />
do not press the starter continuously. Doing<br />
so may also cause damage or shorten the life of<br />
the motor. Check the following points:<br />
Check the glow starter. The glow starter<br />
should be fully charged before.<br />
Check the fuel system. Fuel tank and line<br />
should be free of debris.<br />
Check whether the engine is flooded. If the<br />
engine is flooded, remove the glow plug<br />
and press the starter for 5 -<strong>10</strong> seconds to<br />
release the excess fuel. After that, replace<br />
the glow plug and start the engine again.<br />
Check the condition of the glow plug.<br />
4
97901 <strong>Startbox</strong> <strong>Universal</strong><br />
Ersatzteile – Spare Parts<br />
Item No. Graupner Best.-Nr. Bezeichnung Description<br />
901804 97901.1 Halterset für RC-Car Orientation Set<br />
901805 97901.2 Druckschalter Electric Set<br />
901806 97901.3 Antriebsset mit großem Riemenrad Drive Set<br />
9018<strong>10</strong> 97901.4 Ersatzriemen Belt<br />
901811 97901.5 Starterscheibe Gummi Rubber wheel<br />
901807 97901.6 Motor und kleines Riemenrad Motor Set<br />
Service und Reparaturen<br />
In Problemfällen oder bei Fragen und Reparaturen, wenden Sie sich bitte an:<br />
GRAUPNER-Service, Henriettenstrasse 94-96, D-73230 Kirchheim/Teck,<br />
Tel. +49/1805/472876<br />
Service and repair<br />
In problem cases, or for questions and repairs, please contact:<br />
GRAUPNER-Service, Henriettenstrasse 94-96, D-73230 Kirchheim/Teck,<br />
Tel. +49/1805/472876<br />
5