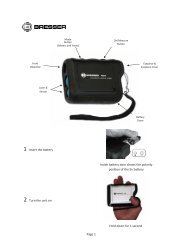
Digitales Spektiv 15x60 LCD Digital Spotting Scope 15x60 ... - Bresser
Digitales Spektiv 15x60 LCD Digital Spotting Scope 15x60 ... - Bresser
Digitales Spektiv 15x60 LCD Digital Spotting Scope 15x60 ... - Bresser

Sie wollen auch ein ePaper? Erhöhen Sie die Reichweite Ihrer Titel.
YUMPU macht aus Druck-PDFs automatisch weboptimierte ePaper, die Google liebt.
The table below shows the possible memory functions:<br />
Memory function Possible settings<br />
Delete Single (delete the image chosen), All (delete<br />
all images)<br />
Copy To Card (only if you have a memory card in use - see<br />
below)<br />
Protect Single (protects the image chosen against<br />
unintentional deletion), All (protects all the<br />
stored images).<br />
Protection of an image is shown by a padlock symbol. If you try<br />
to delete such an image this will be rejected and the reason “File<br />
protect” shown. Protection can be removed for single images chosen<br />
(in Protection / Single) or for all images stored (in Protection<br />
/ All) with “Cancel” and “OK”. After individual deletion the next<br />
image, if any, shows onscreen; after deletion of all stored images<br />
the message “No image” shows and you can then acknowledge<br />
this by pressing OK.<br />
If you press this takes you a step back. Use “Esc” to leave the<br />
entire memory menu. If you press this will take you from the<br />
main page of the memory menu to the device menu referred to<br />
before.<br />
Output and storage of images/recordings<br />
The spotting scope offers three output and storage alternatives<br />
for your stored images. Apart from internal storage as discussed<br />
(memory: M) and playback on the <strong>LCD</strong> screen these are:<br />
a) Install a suitable SD memory card (available retail); slide it into<br />
the slot provided (23) with the contacts uppermost and at the<br />
front. It will click into place softly. If the digital module is on<br />
then this switches off automatically and you will have to restart<br />
it. Available card memory will be shown bottom right (memory:<br />
SD) onscreen.<br />
Copy images from the internal memory to the card by using<br />
the “Copy To Card” function in the memory menu, confirming<br />
the choice with “OK” (Execute) and confirming again with “OK”.<br />
Copying will be done after a brief wait (“One moment”). If you<br />
have made an incorrect choice or decide not to copy after all<br />
confirm “Cancel” with “OK” or press to revert to the memory<br />
menu main page.<br />
Press the card in and release it to extract it after a gentle click.<br />
This makes your stored images mobile.<br />
b) If you’ve connected your scope to your PC with a USB cable<br />
(not included) then the images can be copied onto the PC and<br />
processed/viewed with a suitable graphics programme (e.g. Windows<br />
Media Player for video recordings).