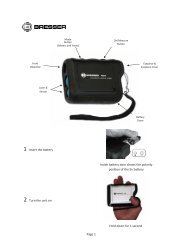
Digitales Spektiv 15x60 LCD Digital Spotting Scope 15x60 ... - Bresser
Digitales Spektiv 15x60 LCD Digital Spotting Scope 15x60 ... - Bresser
Digitales Spektiv 15x60 LCD Digital Spotting Scope 15x60 ... - Bresser

Sie wollen auch ein ePaper? Erhöhen Sie die Reichweite Ihrer Titel.
YUMPU macht aus Druck-PDFs automatisch weboptimierte ePaper, die Google liebt.
Press the Menu button during live image display in video mode to<br />
get a menu similar to the photo menu (video output = recording parameter,<br />
Setup = current settings); this is the video menu. In it you<br />
can adjust video recording settings as in the photo menu.<br />
Parameters Possible settings<br />
Size (Resolution) 800x600, 640x480<br />
EV (Brightness) -2 to +2 in 1/3 stages<br />
If you press this takes you a step back. Use “Esc” to leave the<br />
entire video menu. If you press whilst on the video menu main<br />
page this will take you to the device menu referred to before.<br />
View photos/recordings<br />
Use the stored images list to view memorised photos or videos.<br />
The list of current images/recordings has a yellow edging. If only a<br />
number is shown in the image field then this is a photo; if a camera<br />
symbol is shown it’s a video recording. You can access each using<br />
the control buttons (14). The number of the image currently active<br />
is shown at the bottom again with memory address. Press “OK” to<br />
open it and have it shown onscreen. Use to leaf forwards and<br />
to leaf backwards.<br />
A photo being shown is briefly specified with its memory address,<br />
resolution and brightness. You can view it at various electronic<br />
magnification settings. Set the zoom factor desired from 1.00 (origi-<br />
nal size) to 8.00 using ▲ to increase and ▼ to decrease it. The<br />
current factor is shown top right.<br />
A video to be played is specified similarly; the film length is shown<br />
at top right as total duration in yellow. Playing forwards at normal<br />
speed (displays FW 1x halfway up on the left) is started as symbolised<br />
at bottom left by pressing ▲. Press ▲ again to stop the<br />
playback at the current place, which is shown bottom centre as<br />
a time, and press ▲ once again to continue. Use ▼ to end the<br />
playback at any time.<br />
Administer images<br />
Press the Menu button (16) during playback or whilst the list of<br />
stored images is displayed to have a menu shown in the form of<br />
a table (Play = memory parameters, Setup = current settings); this<br />
is the memory menu. The current memory function has a green<br />
background; others can be accessed using ▲ or ▼. Access<br />
the memory function chosen (e.g. Delete) with “OK”. Within the<br />
selection/s access the desired function/s (e.g. Single, Single/Set,<br />
All/Execute, All/Set) using ▲ or ▼ and accept the choice with OK.<br />
If this isn’t the desired choice press to revert to the main memory<br />
menu page. The Delete All Images choice has a Cancel function for<br />
safety’s sake (Delete / All / Cancel) that is the equivalent of .