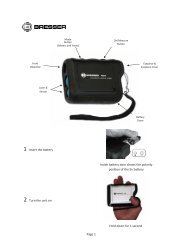
Digitales Spektiv 15x60 LCD Digital Spotting Scope 15x60 ... - Bresser
Digitales Spektiv 15x60 LCD Digital Spotting Scope 15x60 ... - Bresser
Digitales Spektiv 15x60 LCD Digital Spotting Scope 15x60 ... - Bresser

Erfolgreiche ePaper selbst erstellen
Machen Sie aus Ihren PDF Publikationen ein blätterbares Flipbook mit unserer einzigartigen Google optimierten e-Paper Software.
c) At bottom left the resolution is shown in pixels (width x height).<br />
d) At bottom right a meter shows the available memory for pictures<br />
(number of photos, time for videos; M = internal memory, SD<br />
= memory card). The information is approximate. If there is no<br />
memory left the message „Memory full“ shows on the screen.<br />
Press the input button „OK“ (15) to have all the symbols and data<br />
disappear and press it again to have them re-appear.<br />
Press the ▲ or ▼ control buttons (14) to use the zoom - from 1.00<br />
(standard) to 8.00 either upwards or downwards. The setting is displayed<br />
midway left onscreen in a bar diagram with numerical data.<br />
Press the or control buttons (14) to adjust brightness from<br />
–2.0 (dark) to +2.0 (bright) either upwards or downwards (standard<br />
is 0.0); this setting is shown halfway down on the right with numerical<br />
data and a +/- symbol.<br />
Use the „Esc“ toggle button (13) to switch from snap shot mode<br />
to<br />
1. Video (press once), which is shown by a film camera symbol,<br />
2. Press twice to switch to the series photo mode for taking a series<br />
of pictures at set equal intervals; the latter is shown by a camera<br />
over an alarm clock symbol,<br />
3. Three times to switch to the list of stored pictures and<br />
4. Four times to return to the snap shot mode (default).<br />
Taking photos (snap shots or series)<br />
Press the “Snap” button (17) in this mode to take a snap shot of the<br />
live image and store it as a jpg file.<br />
If you want several snap shots of the live image in sequence at equal<br />
intervals (repetition time) switch to the series photo mode. Halfway<br />
down on the left the repetition time (hh:mm:ss) will be shown in red.<br />
Press “OK” to set the seconds (yellow underline blinks); adjust the<br />
desired value using ▲ (increase) or ▼ (decrease). Press once<br />
or twice to get to minutes or hours respectively. Adjust them as<br />
above. Press “OK” to complete input. Automatic picture repetition is<br />
started using “Snap“. The series is then photographed and halfway<br />
down on the left the time since commencement and since the last<br />
snap will be shown in white. Each photo is stored as a jpg file.<br />
Repetition is terminated using “Snap” to end the series.<br />
Video recording<br />
If you want to make a video of the live image switch to the video<br />
mode and start recording with “Snap”. Before and after recording,<br />
the film length that can still be memorised is shown bottom right<br />
as a time in white. During recording the actual duration is shown<br />
in red. End video recording using “Snap”. The video will be stored<br />
as an avi file.<br />
Changing recording/photographing settings<br />
Press the “Menu” button (16) whilst a live image is being shown<br />
in snap or series photo mode. A menu in the form of a table will