Digitales Spektiv 15x60 LCD Digital Spotting Scope 15x60 ... - Bresser
Digitales Spektiv 15x60 LCD Digital Spotting Scope 15x60 ... - Bresser
Digitales Spektiv 15x60 LCD Digital Spotting Scope 15x60 ... - Bresser

Sie wollen auch ein ePaper? Erhöhen Sie die Reichweite Ihrer Titel.
YUMPU macht aus Druck-PDFs automatisch weboptimierte ePaper, die Google liebt.
Setting up the spotting scope<br />
We recommend mounting the spotting scope securely and horizontally<br />
using the fastening piece (7) on the centre ring (6) on<br />
a suitable tripod (not supplied). Level stable ground is especially<br />
important to optimal observation.<br />
The scope image quality is decisively influenced by the observation<br />
location. Observation through a closed window or at high ambient<br />
temperatures yields poor images. Try e.g. early mornings.<br />
Never point the scope straight at the sun or its proximity. Doing so<br />
is dangerous and may even cause blindness apart from damage to<br />
the equipment and environment.<br />
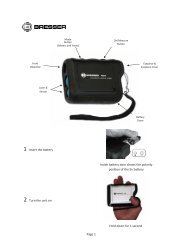
Preparing the scope<br />
Remove the lens protective cap (1). Pull the lens sun shield (2)<br />
forward to the stop. Remove the eyepiece protective cap (10).<br />
To align the main tube undo the knurled screw (8) on the left side<br />
of the black centre ring (6). You can now turn the main tube horizontally<br />
as desired.<br />
General handling of the spotting scope<br />
The high-quality optical element coating is particularly delicate.<br />
Please do not handle the lenses (3, 11). Avoid direct contact of<br />
the lenses with water, dust, grease or dirt. Remove dirt and water<br />
drops only with a special cleaning cloth for optical glass. Clean the<br />
lens only if absolutely necessary. Avoid heavy pressure to prevent<br />
scratching of this coating. Appropriate care should also be taken of<br />
the <strong>LCD</strong> screen surface (19).<br />
Visual observation<br />
Point the scope at a suitable object and look through the eyepiece<br />
(11). Turn the focussing wheel (5) left or right to set the focus.<br />
Observing onscreen<br />
Point the scope at a suitable object and press the On/Off power<br />
button (12) to turn the digital module on. The red control light (18)<br />
will come on. A live image will appear on the <strong>LCD</strong> screen (19) that<br />
you can focus using the focussing wheel (5). To see the screen<br />
better in sunlight install the screen sun shield (20); insert the two<br />
little pins into the holes provided each side of the <strong>LCD</strong> screen and<br />
click into place.<br />
Basic screen displays and settings<br />
Various symbols and data are shown in the screen corners by default.<br />
a) At top left the battery charging status is shown using white<br />
bars on a battery symbol.<br />
3 bars = fully charged<br />
2 bars = partially discharged<br />
1 bar = mainly discharged<br />
Red X = batteries weak, control lamp blinks and the automatic<br />
shut off will soon activate.<br />
b) At top right a camera symbol denotes snap shot mode.