5214 Commuter Train Control - Viessmann Modellspielwaren GmbH
5214 Commuter Train Control - Viessmann Modellspielwaren GmbH
5214 Commuter Train Control - Viessmann Modellspielwaren GmbH

Sie wollen auch ein ePaper? Erhöhen Sie die Reichweite Ihrer Titel.
YUMPU macht aus Druck-PDFs automatisch weboptimierte ePaper, die Google liebt.
6<br />
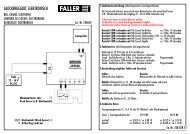
Abb. 5<br />
16 V<br />
Lichttransformator 5200<br />
Primär<br />
Sekundär 10 V<br />
230 V~<br />
0-10-16 V~<br />
Primär 230 V 50 - 60 Hz<br />
Sekundär 52 VA max. 3,25 A<br />
IP 40 ta 25°C<br />
0 V<br />
Nur für trockene Räume<br />
Gefertigt nach<br />
VDE 0570<br />
EN 61558<br />
2 x schwarz<br />
z. B. / e. g.<br />
5200<br />
braun<br />
brown<br />
gelb yellow<br />
4<br />
Überlast<br />
Geschwindigkeit<br />
5<br />
10<br />
Maximale Betriebsspannung 16 V ~/=<br />
an Buchsen 1 und 2<br />
6<br />
Vor Inbetriebnahme unbedingt die<br />
7 Betriebsanleitung lesen!<br />
<strong>Viessmann</strong><br />
8<br />
9<br />
Pendelzugsteuerung <strong>5214</strong><br />
2 x rot<br />
Dioden<br />
diodes<br />
3 x schwarz 3 x schwarz<br />
black black<br />
Bremsabschnitt<br />
braking section<br />
Dieses Symbol<br />
neben dem Gleis<br />
kennzeichnet eine<br />
Trennstelle.<br />
This sign beside<br />
the track indicates<br />
a track insulation.<br />
black<br />
Anschluss für Teilautomatikbetrieb<br />
Abbildung 6 zeigt den Aufbau für Teilautomatikbetrieb.<br />
Mit dem Schalter (z. B. <strong>Viessmann</strong> 6835<br />
oder 5550) erfolgt die Umschaltung zwischen<br />
Vollautomatik (selbstständiges Pendeln gemäß<br />
Zeiteinstellung) oder Teilautomatik (manueller Abfahrbefehl<br />
per Taster). Als Taster eignet sich z. B.<br />
<strong>Viessmann</strong> 5547.<br />
Verbindung der Pendelzugstrecke mit<br />
weiteren Gleisanlagen<br />
Wenn eine Verbindung zwischen der Pendelstrecke<br />
und dem Rest der Gleisanlage hergestellt<br />
werden soll, so ist diese Verbindung elektrisch<br />
beidseitig zu isolieren. Es ist sicher zu stellen,<br />
dass der Zug keinen Kurzschluss zwischen Pendelstrecke<br />
und der weiteren Gleisanlage verursachen<br />
kann. Hier hilft ein Übergangsabschnitt,<br />
in welchen der Zug zunächst einfährt. Sobald der<br />
Zug komplett im Übergangsabschnitt ist, wird dessen<br />
Stromversorgung auf den Zielgleisbereich<br />
umgeschaltet.<br />
5. Betrieb<br />
Mit den 4 Einstellreglern können Sie die Auf-<br />
3<br />
Beschleunigung<br />
Fahrt<br />
red<br />
11<br />
Aufenthaltszeit<br />
Bremsabschnitt<br />
2<br />
1<br />
Aufenthaltszeit<br />
2<br />
1<br />
12<br />
Bremsabschnitt<br />
Fahrstrecke Bremsabschnitt<br />
driving section braking section<br />
Fig. 5<br />
start of the trains). For the push button the <strong>Viessmann</strong><br />
5547 is recommended.<br />
Connection of the commuter train track<br />
with the rest of the layout<br />
If you want to make a track connection between<br />
the commuter train track and the rest of your layout,<br />
you have to make a double-side rail insulation.<br />
You have to take care that no short circuit<br />
between the commuter train track and the rest of<br />
your layout can occure. To ensure this, it´s a good<br />
idea to make a transition section. When the train<br />
is completly in it, you must connect the power<br />
supply for this section to the aim track (commuter<br />
train track or the rest of your layout).<br />
5. Operation<br />
With the 4 control potis you can setup the stop<br />
time at both stations, the acceleration / deceleration<br />
level and the max. speed on the driving section.The<br />
controls (trimming potentiometers) can<br />
be set by a small screw-driver.<br />
“Aufenthaltszeit”: This means “stop time”. With<br />
these two controls you can set the stop time of the<br />
train separately for both terminals (1 and 2) from