Magster-280 4x4,-330 4x4 - Lincoln Electric - documentations
Magster-280 4x4,-330 4x4 - Lincoln Electric - documentations
Magster-280 4x4,-330 4x4 - Lincoln Electric - documentations

Sie wollen auch ein ePaper? Erhöhen Sie die Reichweite Ihrer Titel.
YUMPU macht aus Druck-PDFs automatisch weboptimierte ePaper, die Google liebt.
To mount the electrode wire spool, you should:<br />
Twist off the brake sleeve cap (1).<br />
Put on the spool with the wire (2) in such a way to<br />
unwind the spool clockwise.<br />
Make sure if the guide pin has reached the guide<br />
whole of the spool.<br />
Twist on the brake sleeve cap (1).<br />
Make certain if groves of drive rolls are compatible with<br />
thewirediameter.<br />
Insert the electrode wire into the wire feeder.<br />
Drive Roll Replacement<br />
Adjustment of Braking Torque of the<br />
Sleeve<br />
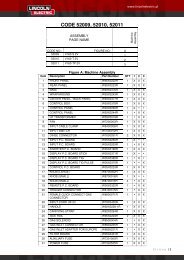
Fig.3<br />
To prevent electrode wire unwinding at the welding<br />
finishing, you should adjust braking torque of the sleeve:<br />
Twist off the brake sleeve cap (1).<br />
To increase the braking torque, you should turn M10 bolt<br />
(2) clockwise.<br />
To decrease the braking torque, you should turn M10<br />
bolt (2) counterclockwise.<br />
Twist on the brake sleeve cap after adjusting finish.<br />
Shielding Gas Connection<br />
To connect shielding gas, you should:<br />
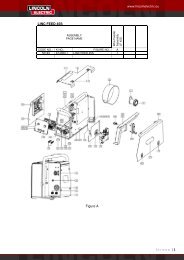
Fig. 2<br />
To replace the drive roll you should:<br />
Release the roll pressure arms (5) of the wire drive.<br />
Twist off the roll fastening caps (4).<br />
Take off the drive rolls (3).<br />
Make sure if the key (2) remained in the gear furrow<br />
(1).<br />
Put on the new rolls (3) with diameter and groove<br />
shape adequate for used wire.<br />
Twist on the roll fastening caps (4).<br />
Cut the end of the wire, making sure if there isn’t any<br />
burr.<br />
Insert the wire into the wire feeder as far as EURO<br />
socket (turning the spool clockwise).<br />
Snap the roll pressure arms (5).<br />
Adjust optimum rolls pressure by means of the roll<br />
pressure arm thumbscrew.<br />
After placing the shielding gas cylinder on the platform,<br />
protect it against to overturn with the chain.<br />
Take off the hub cap of the safety valve of the shielding<br />
gas cylinder.<br />
Install the regulator on the gas cylinder.<br />
Connect the regulator to the <strong>Magster</strong> with gas hose<br />
using band clip.<br />
Welding with CO 2, it is recommended to use the gas<br />
heater. It can be powered from the socket placed on<br />
rear panel.<br />
Controls and Operational Features<br />
Inserting Electrode Wire into the Wire<br />
Feeder<br />
To insert the electrode wire into the wire feeder, you<br />
should:<br />
Match the welding torch with rated parameters<br />
compatible with the power source parameters and<br />
connect it to the EURO socket.<br />
Twist off the nozzle and the contact tip.<br />
Set the WFS control knob in half of the range.<br />
Press the Cold Inch button and hold it until the electrode<br />
wire goes out from the GUN.<br />
Twist on the nozzle and the contact tip again.<br />
ATTENTION<br />
Don’t look into the outlet of the torch during cold<br />
inching - going out wire can seriously injure your<br />
eye.<br />
Fig. 4<br />
1. Power Switch: Turns the machine on/off. Switching<br />
on is indicated by lighting up of the switch button.<br />
2. WFS (Wire Feed Speed) Knob: 10-position scale<br />
enables stepless WFS control in a range of 1-<br />
17.0m/min.<br />
3. Burnback Time Knob: Enables to get desired length<br />
of electrode wire, which protrudes from the contact<br />
tip of the welding gun after welding finishing in a<br />
8