ZE-MU703 - Zenec
ZE-MU703 - Zenec
ZE-MU703 - Zenec

Sie wollen auch ein ePaper? Erhöhen Sie die Reichweite Ihrer Titel.
YUMPU macht aus Druck-PDFs automatisch weboptimierte ePaper, die Google liebt.
MODEL NO:<br />
<strong>ZE</strong>-<strong>MU703</strong><br />
7"/16:9<br />
UNIVERSALMONITOR<br />
INSTRUCTION MANUAL
<strong>ZE</strong>-<strong>MU703</strong><br />
Vielen Dank für den Kauf dieses <strong>ZE</strong>NEC Produktes!<br />
Mit dem Kauf des <strong>ZE</strong>-<strong>MU703</strong> haben Sie sich für ein technisch ausgereiftes Produkt<br />
entschieden, das Ihnen durch die Verwendung von hochwertigen Materialien und Bauteilen<br />
eine lange Lebensdauer garantiert.<br />
Bei dem <strong>ZE</strong>-<strong>MU703</strong> von <strong>ZE</strong>NEC handelt es sich um einen 7“/16:9 TFT-LCD Aktiv-Matrix<br />
Universalmonitor der sich aufgrund seiner Größe und den vielfältigen Anschlussmöglichkeiten<br />
in jede A/V-Anlage integrieren lässt.<br />
Größten Wert wurde bei der Entwicklung auf die Bedienungsfreundlichkeit gelegt. Dennoch<br />
muss der ein oder andere Bedienungsschritt mit Hilfe dieser Bedienungsanleitung näher<br />
erläutert werden. Zusätzlich soll sie dazu beitragen, dass Sie das ganze Potenzial dieses<br />
Produktes nutzen können. Lesen Sie sich vor allem die Garantiebestimmungen genau<br />
durch, um im Falle eines Defektes den optimalen Service und Kundendienst nutzen zu<br />
können. Lesen Sie sich vor allem die Garantiebestimmungen genau durch, um im Falle<br />
eines Defektes den optimalen Service und Kundendienst nutzen zu können. Sollten Sie<br />
dennoch weitere Fragen haben, wenden Sie sich bitte an Ihren <strong>ZE</strong>NEC-Händler oder den<br />
jeweiligen Landesvertrieb.<br />
GERÄTE–FEATURES<br />
■ 7"/16:9 TFT-LCD Aktiv-Matrix Universalmonitor mit hoher Leuchtintensivität<br />
■ TFT-LCD Panel mit 154 x 87 mm Bildgröße und 1440 x 234 Pixel Auflösung<br />
(336'960 Bildpunkte)<br />
■ Großer Betrachtungswinkel, links/rechts > 60° / oben > 30° / unten > 60°<br />
■ Kompaktes und flaches Kunststoffgehäuse<br />
■ Multi-Norm Videosystem mit automatischer PAL/NTSC-Umschaltung<br />
■ On-Screen Menüführung direkt am Gerät<br />
■ A/V-Interface für Stromversorgung und A/V-Eingang<br />
■ 2 x A/V-Eingänge<br />
BESONDERHEITEN<br />
7"/16:9 A-Grade Display:<br />
Der <strong>ZE</strong>-<strong>MU703</strong> verfügt über ein 7" Aktiv-Matrix TFT-LCD Farbdisplay im 16:9 Format. Das<br />
hochauflösende Display verfügt über 336‘960 Bildpunkte für perfekt aufgelöste Bilddetails<br />
mit hoher Leuchtintensivität.<br />
Kompatibilität:<br />
Dieser Monitor ist mit den Videoformaten PAL und NTSC kompatibel und verfügt über einen<br />
interne Videoelektronik mit automatischer Formatumschaltung.<br />
Verwendung:<br />
Der <strong>ZE</strong>-<strong>MU703</strong> kann mit allen Videoquellen kombiniert werden, welche über einen<br />
Composite-Videoausgang (Cinch) verfügen. Dazu zählen alle handelsüblichen DVD-Player,<br />
VCR-Geräte und DVB-T bzw. TV-Tuner.<br />
2
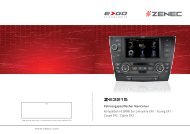
<strong>ZE</strong>-<strong>MU703</strong><br />
DEUTSCH<br />
LIEFERUMFANG<br />
Abbildung Element Menge<br />
Universalmonitor 1<br />
A/V-Interface 1<br />
Montagerahmen 1<br />
Bedienungsanleitung 1<br />
INHALTSVER<strong>ZE</strong>ICHNIS<br />
SICHERHEITSHINWEISE ...............................................................................4<br />
DER UNIVERSALMONITOR ....................................................................... 5-7<br />
DIE EIN<strong>ZE</strong>LNEN TASTEN ............................................................................................. 5<br />
MENÜEINSTELLUNGEN ............................................................................................... 6<br />
INSTALLATION DES GERÄTES .................................................................................... 7<br />
FEHLERSUCHE ........................................................................................................... 8<br />
SPEZIFIKATIONEN ..................................................................................................... 9<br />
GARANTIE ............................................................................................................18-19<br />
3
SICHERHEITSHINWEISE<br />
1. Dieses Gerät ist für den Betrieb an einem Bordnetz mit +12V (DC) und Minus gegen<br />
Masse geeignet und darf auch nur so betrieben werden.<br />
2. Bedienen Sie das Gerät nur so, wie es in dieser Bedienungsanleitung beschrieben wird.<br />
Alles andere kann zum Erlöschen Ihres Garantieanspruches führen.<br />
3. Zerlegen oder modifizieren Sie das Gerät nicht. Dies kann zu einer Beschädigung des<br />
Gerätes führen und Ihr Garantieanspruch erlischt dadurch.<br />
4. Benutzen Sie nur das Originalzubehör um das Gerät zu installieren und zu betreiben, da<br />
ansonsten eine Beschädigung des Gerätes riskiert wird.<br />
5. Bevor Sie eine defekte Sicherung austauschen, sollten Sie erst einmal überprüfen was<br />
der Grund für den Kurzschluss war. Achten Sie dabei besonders auf die Kabel der<br />
Stromversorgung! Wenn der Kurzschluss nicht durch einen Fehler in der Stromversorgung<br />
resultiert, müssen Sie die defekte Sicherung gegen ein neues Exemplar mit identischen<br />
Werten austauschen. Sollte der Kurzschluss immer noch vorhanden sein, wenden Sie<br />
sich bitte an Ihren <strong>ZE</strong>NEC-Händler.<br />
6. Achten Sie bei der Installation des Monitors darauf, dass er den Fahrer des Fahrzeuges<br />
nicht vom Verkehrsgeschehen ablenkt oder ihm in irgendeiner Weise die Sicht versperrt.<br />
Informieren Sie sich deshalb vor der Installation des Gerätes über die in Ihrem Land<br />
geltenden Gesetze und Verkehrsvorschriften, die den Gebrauch eines solchen Gerätes<br />
betreffen.<br />
7. Achten Sie darauf dass bei ausgeschaltetem Motor die Batterie des Fahrzeuges nicht<br />
entladen wird. Da es sich bei dem Gerät um einen Verbraucher handelt und die Batterie<br />
nur bei laufendem Motor aufgeladen wird, kann es passieren dass die Batterie entladen<br />
wird und das Fahrzeug sich nicht mehr starten lässt.<br />
8. Reinigen Sie das Display nicht mit ätzenden Chemikalien oder Lösungsmitteln. Dies<br />
kann zu einer dauerhaften Beschädigung des Displays führen.<br />
9. Achten Sie bei der Installation des Gerätes darauf, dass es nicht dem direktem<br />
Sonnenlicht ausgesetzt ist und auch nicht in der Nähe von Wärmequellen wie z.B den<br />
Öffnungen der Heizung montiert wird. Die Umgebungstemperatur sollte daher zwischen<br />
0°C und 45°C liegen. Sollte die Temperatur im Inneren des Fahrzeuges extrem hoch<br />
sein, ist es empfehlenswert den Innenraum vor der Inbetriebnahme des Gerätes erst<br />
einmal etwas abkühlen zu lassen.<br />
10. Bei extrem kalten Temperaturen kann das Bild etwas dunkel und die Bewegungen<br />
etwas langsam sein. Sobald der Monitor seine Betriebstemperatur erreicht hat, arbeitet<br />
das Gerät bzw. das Display wieder normal.<br />
11. Kleine, schwarze und leuchtende Punkte innerhalb des Displays sind normal für diese<br />
Art von Produkt.<br />
12. Das Display darf keinen harten Stößen oder Erschütterungen ausgesetzt werden, da<br />
dies zu einer dauerhaften Beschädigung führen kann. Falls Sie mit der auslaufenden<br />
Flüssigkeit in Kontakt kommen, sollten Sie gegebenenfalls einen Arzt aufsuchen. Alle<br />
Gegenstände die ebenfalls mit der LCD-Flüssigkeit in Kontakt gekommen sind, sollten<br />
sorgfältig mit Wasser gereinigt werden.<br />
13. Wenn Sie Fragen oder Probleme bei der Installation haben, wenden Sie sich bitte an<br />
einen <strong>ZE</strong>NEC-Händler oder an den jeweiligen Landesvertrieb.<br />
4
DEUTSCH<br />
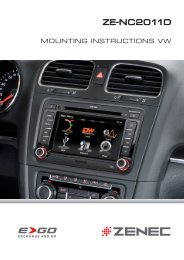
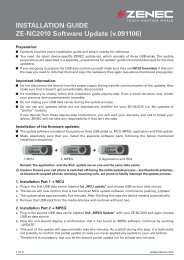
DER UNIVERSALMONITOR<br />
DIE EIN<strong>ZE</strong>LNEN TASTEN<br />
<strong>ZE</strong>-<strong>MU703</strong><br />
➄ ➅<br />
➃<br />
➀<br />
➁<br />
➂<br />
1. [POWER]-Taste<br />
■ Drücken Sie die [POWER]-Taste um das Gerät ein- bzw. auszuschalten.<br />
■ Nachdem Sie den Monitor eingeschaltet haben, können Sie durch drücken der [POWER]-<br />
Taste zwischen den beiden A/V-Eingängen wählen.<br />
■ Halten Sie die [POWER]-Taste gedrückt um das Gerät wieder auszuschalten.<br />
2. [SEL]-Taste<br />
■ Drücken Sie die [SEL]-Taste um das Menü aufzurufen.<br />
3. [6] / [5]-Tasten<br />
■ Drücken Sie eine der Tasten um die Lautstärke des Kopfhörerausgangs zu verändern.<br />
■ Nachdem Sie das Menü aufgerufen haben, können Sie durch drücken einer der Tasten<br />
die jeweilige Einstellung verändern.<br />
4. Kopfhörerbuchse<br />
■ Anschlussmöglichkeit für einen Kopfhörer.<br />
5. AUDIO-IN (A/V-2, 3.5mm Klinkenstecker)<br />
■ Anschlussmöglichkeit für eine externe Audioquelle.<br />
6. VIDEO-IN (A/V-2, 3.5mm Klinkenstecker)<br />
■ Anschlussmöglichkeit für eine externe Videoquelle.<br />
5
MENÜEINSTELLUNGEN<br />
■ Drücken Sie die [SEL]-Taste um das Menü aufzurufen.<br />
■ Drücken Sie eine der [6] / [5]-Tasten um den gewünschten Wert zu verändern.<br />
Operation Menu<br />
Brightness<br />
Contrast<br />
Color<br />
Tint<br />
Wide Mode<br />
Reset<br />
32<br />
35<br />
32<br />
35<br />
Full<br />
4<br />
: Select<br />
: Adjust<br />
CONTRAST: Kontrasteinstellung<br />
BRIGHTNESS: Helligkeitseinstellung<br />
COLOR: Farbeinstellung<br />
TINT: Farbton (nur im NTSC-Modus)<br />
WIDE MODE: Auswahl des Bildformates (16:9 oder 4:3)<br />
RESET: Alle Werte werden in den Auslieferungszustand (Werks einstellung) zurückgesetzt<br />
6
DEUTSCH<br />
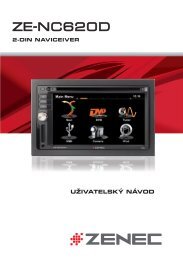
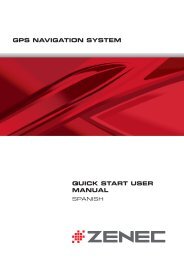
INSTALLATION DES GERÄTES<br />
<strong>ZE</strong>-<strong>MU703</strong><br />
Rot: ACC<br />
Schwarz: GND<br />
Gelb: Videoeingang 1<br />
Weiß: Audioeingang 1<br />
7
FEHLERSUCHE<br />
Problem: Ursache: Lösung:<br />
Kein Bild, obwohl der<br />
Monitor eingeschaltet ist.<br />
Verschwommenes oder<br />
komplett blaues Bild.<br />
Das Bild ist zu dunkel.<br />
1. Die Anschlusskabel sind<br />
nicht richtig angeschlossen<br />
oder eine<br />
Sicherung ist durchgebrannt.<br />
2. Das A/V-Interface ist nicht<br />
richtig angeschlossen.<br />
1. Starke Störsignale (hervorgerufen<br />
z.B. durch<br />
Transformatorstationen,<br />
Hochspannungsleitungen<br />
usw.).<br />
1. Die Umgebungstemperatur<br />
ist zu niedrig.<br />
2. Die Helligkeit ist zu<br />
dunkel eingestellt.<br />
1. Überprüfen Sie die<br />
Anschlusskabel und<br />
wechseln Sie die<br />
Sicherung aus.<br />
2. Überprüfen Sie das<br />
A/V-Interface und<br />
tauschen Sie es gegebenenfalls<br />
aus.<br />
1. Je weiter Sie sich von<br />
der Störquelle entfernen,<br />
desto weniger werden<br />
die Störungen.<br />
1. Dieser Effekt ist typisch für<br />
ein TFT-LCD Panel, wenn<br />
die Umgebungstemperatur<br />
sehr niedrig ist. Nachdem<br />
der Monitor einige Minuten<br />
in Betrieb ist, wird das Bild<br />
wieder normal.<br />
2. Überprüfen Sie die<br />
Helligkeitseinstellung.<br />
8
DEUTSCH<br />
SPEZIFIKATIONEN<br />
Spannungsversorgung:<br />
+10.5V − +16V (DC)<br />
Stromverbrauch:<br />
< 1A<br />
Betriebstemparatur:<br />
-20° C bis +70° C<br />
Lagertemperatur:<br />
-30° C bis +80° C<br />
Abmessungen (mm): 118 x 180 x 28 (H x B x T)<br />
Gewicht (g): 375<br />
■ Änderungen der technischen Daten und des Designs zum Zwecke der Verbesserung<br />
des Produktes vorbehalten.<br />
Sollten Sie dieses Gerät eines Tages entsorgen müssen, beachten Sie<br />
bitte dass elektrische Gerät nicht mit dem Haushaltsmüll entsorgt werden<br />
sollten.<br />
Führen Sie das Gerät wenn möglich dem Recycling zu. Ihre lokalen Behörden<br />
oder Ihr Händler können Sie dementsprechend informieren (Richtlinie über<br />
die Entsorgung elektrischer und elektronischer Ausstattungen).<br />
9
<strong>ZE</strong>-<strong>MU703</strong><br />
Thank you for your purchase of this <strong>ZE</strong>NEC product!<br />
With the <strong>ZE</strong>-<strong>MU703</strong> monitor, you have chosen a technically mature high quality product<br />
that will give you a long service life and very high reliability, since this product has been<br />
assembled using only high quality parts.<br />
Even though this unit has been designed for intuitive and easy operation, it is recommended<br />
that you read this manual learning how to operate this device in detail, so you are able to<br />
use all implemented features and functions. Please retain this operating manual in a safe<br />
place after reading it, for future reference.<br />
Read the warranty conditions at the end of this manual, to make sure you benefit from full<br />
warranty coverage.<br />
If you have further questions about this product, please consult the dealer where it was<br />
purchased, or the <strong>ZE</strong>NEC distributor in your country.<br />
TECHNICAL FEATURES<br />
■ 7“/16:9 aspect ratio TFT-LCD panel of high brightness<br />
■ 1440 x 234 pixels panel resolution with a total count of 336‘960 dots<br />
■ High contrast LCD screen with 154 x 87 mm active display area<br />
■ Large viewing angle left/right > 60° / top > 30° / down > 60°<br />
■ Compact and shallow housing design<br />
■ Multi-norm video system with PAL/NTSC auto switching<br />
■ Setup and picture adjustment by on-screen display menu<br />
■ A/V extension cord with multiconnector for power supply and A/V-input<br />
■ 2 x A/V-input<br />
SPECIAL FEATURES<br />
7"/16:9 A-Grade Display:<br />
The <strong>ZE</strong>-<strong>MU703</strong> is a TFT-LCD active matrix 16:9 video monitor, featuring a 7” high quality<br />
color LCD screen. It deploys a color TFT-LCD panel with 336‘960 dots resolution, to give<br />
you excellent picture details.<br />
Compatibility:<br />
The monitor is compatible with PAL and NTSC video streams – the internal video signal<br />
processing electronics automatically synchronize with PAL or NTSC video signals.<br />
Applications:<br />
The <strong>ZE</strong>-<strong>MU703</strong> will work with any common video source unit, featuring an RCA composite<br />
video output, such as DVD-players, VCR’s and DVB-T resp. TV-tuners.<br />
10
<strong>ZE</strong>-<strong>MU703</strong><br />
ENGLISH<br />
BOX CONTENTS<br />
Appearance Parts Neme Quantity<br />
Monitor 1<br />
A/V-Interface 1<br />
Mounting Frame 1<br />
Manual 1<br />
CONTENT<br />
SAFETY INFORMATION ............................................................................................ 12<br />
THE MONITOR .....................................................................................................13-15<br />
BASIC OPERATIONS ................................................................................................. 13<br />
MENU .......................................................................................................................... 14<br />
INSTALLATION ............................................................................................................ 15<br />
TROUBLESHOOTING ................................................................................................ 16<br />
SPECIFICATIONS ...................................................................................................... 17<br />
WARRANTY ...........................................................................................................18-19<br />
11
SAFETY INFORMATION<br />
1. The unit is designed for using with a DC +12V, negative ground battery power supply, it<br />
may not be connected and/or used differently.<br />
2. Do not operate the unit in any way other than described in this manual. Failure to follow<br />
the instructions will invalidate your warranty.<br />
3. Do not disassemble or alter the unit in any way. Any such attempts my result in damage<br />
to the unit and void your warranty.<br />
4. Use only the supplied accessories to install the unit. The use of any accessories except<br />
for those provided might result in damage to the unit.<br />
5. If the fuse blows, first make sure that the cables have not caused a short circuit, then<br />
replace the old fuse with a new one with the same rating.<br />
6. According to the law in different European countries, driving with monitors in use in the<br />
viewing range of the driver is not allowed. Please respect the traffic regulations of your<br />
country, or you might face penalties in case of an accident.<br />
7. Be careful not to run down the car battery while using the unit! Using this unit stationary<br />
without the engine running may drain the battery, and prevent you from being able to<br />
start the engine later on.<br />
8. To clean this monitor, use a glass cleaning agent with a soft towel or tissue. Do not<br />
use any detergents or organic solvents, as these fluids may damage the surface of the<br />
housing.<br />
9. Avoid installing and operating the unit in direct sunlight or near hot air vents. Please note<br />
that the normal working temperature of the unit is between 0°C to 45°C. If the internal<br />
temperature of the vehicle is extremely high, a short cooling down period is necessary<br />
before operating the unit.<br />
10. If the inside of the car is very cold and the monitor is used soon after switching on the<br />
heater, moisture may form on the panel of the unit. Turn off the unit immediately!<br />
Failure to do so may cause the internal components to short-circuit. Allow the unit to<br />
rest for about one hour to allow the condensation to evaporate before operation.<br />
11. In extremely cold environments, the movement of objects in the picture may be slow and<br />
dark. The unit will resume working normally once it reaches its operating temperature.<br />
12. The appearance of small black, shiny dots inside the liquid crystal panel is normal.<br />
13. Do not drop or hit the LCD panel with hard objects, as it may cause permanent damage<br />
to the unit. If you come into contact with any spilled LCD fluid, wash and clean affected<br />
areas with plenty of water and soap and seek medical attention immediately.<br />
14. Refer to authorized dealers or the distributor in your country, if you have any queries<br />
about the product.<br />
12
ENGLISH<br />
THE MONITOR<br />
BASIC OPERATIONS<br />
<strong>ZE</strong>-<strong>MU703</strong><br />
➄ ➅<br />
➃<br />
➀<br />
➁<br />
➂<br />
1. [POWER]-button<br />
■ Press the POWER-button to turn on the monitor.<br />
■ When the monitor is on, press the [POWER]-button to choose between A/V-1 and<br />
A/V-2.<br />
■ Hold the [POWER]-button to turn off the monitor.<br />
2. [SEL]-button<br />
■ Press the [SEL]-button to enter the system menu.<br />
3. [6] / [5]-buttons<br />
■ Press one of the buttons to adjust the playback volume of a connected headphone.<br />
■ When menu is on, press the one of the buttons to adjust the value of the selected<br />
feature.<br />
4. Headphone jack<br />
■ Connection available for a headphone.<br />
5. AUDIO-IN<br />
■ Connection available for an external audio source.<br />
6. VIDEO-IN<br />
■ Connection available for an external video source.<br />
13
MENU<br />
■ Press the [SEL]-button to enter the system menu.<br />
■ Press one of the [6] / [5]-buttons to adjust the value of the selected feature.<br />
Operation Menu<br />
Brightness<br />
Contrast<br />
Color<br />
Tint<br />
Wide Mode<br />
Reset<br />
32<br />
35<br />
32<br />
35<br />
Full<br />
4<br />
: Select<br />
: Adjust<br />
CONTRAST: Contrast adjustment<br />
BRIGHNTNESS: Brightness adjustment<br />
COLOR: Color adjustment<br />
TINT:<br />
Adjustment of color saturation (only NTSC)<br />
WIDE MODE: Select Full (16:9) / Normal (4:3)<br />
RESET: Reset menu to default value<br />
14
ENGLISH<br />
INSTALLATION<br />
<strong>ZE</strong>-<strong>MU703</strong><br />
Red: ACC<br />
Black: GND<br />
Yellow: RCA video input<br />
White: RCA audio input<br />
15
TROUBLESHOOTING<br />
Problem: Cause: Solution:<br />
No picture when the<br />
display is turned on.<br />
Blurred picture on the<br />
screen.<br />
The picture on the<br />
screen is dark.<br />
1. Power wire is<br />
connected improperly<br />
or fuse blown.<br />
2. System cable is not<br />
connected properly.<br />
1. Interfered by shortdistanced<br />
strong RF<br />
emissions.<br />
(E.g. high voltage wire,<br />
transformation station<br />
or aircraft etc...)<br />
1. The monitor is used<br />
at a low temperature<br />
area.<br />
2. BRIGHTNESS is set too<br />
dark.<br />
1. Check the power wire<br />
and replace the fuse.<br />
2. Check system cable or<br />
replace with a new one.<br />
1. The reception of signal<br />
will get better when<br />
moving away from source<br />
of interference.<br />
1. This is the characteristic<br />
of LCD display at low<br />
temperature, it will restore<br />
to normal brightness after<br />
display is in use for few<br />
minutes.<br />
2. Check BRIGHTNESS<br />
adjustment.<br />
16
ENGLISH<br />
SPECIFICATIONS<br />
Operating Voltage Range: Car Battery (DC +10.5V ~ +16V)<br />
Operating Current:<br />
< 1A<br />
Operating Temperature:<br />
-20° C to +70° C<br />
Storage Temperature:<br />
-30° C to +80° C<br />
Dimensions (mm): 118 x 180 x 28 (H x W x D)<br />
Weight (g): 375<br />
■ Specification and design of this model is necessarily subject to changes without<br />
notice.<br />
If at any time in the future you should need to dispose this product<br />
please note that waste electrical products should not be disposed of<br />
with household waste. Please recycle where facilities exist. Check with<br />
your Local Authority or retailer for recycling advice. (Waste Electrical and<br />
Electronic Equipment Directive)<br />
17
2 YEARS LIMITED WARRANTY<br />
Dear customer<br />
Thank you for purchasing this <strong>ZE</strong>NEC product. It is advisable to keep the original packing material<br />
for any future transporting of the product.<br />
Should your <strong>ZE</strong>NEC product require warranty service, please return it to the retailer from whom<br />
it was purchased or the distributor in your country.<br />
This <strong>ZE</strong>NEC product is warranted against defective materials or workmanship for a period of<br />
TWO years from date of purchase at retail.<br />
Warranty Limitations<br />
This warranty does not cover any damage due to:<br />
1. Improper installation, incorrect audio or mains connection(s).<br />
2. Exposure to excessive humidity, fluids, heat sun rays or excessive dirt or dust.<br />
3. Accidents or abuse, unauthorized repair attempts and modifications not explicitly<br />
authorized by the manufacturer.<br />
This warranty is limited to the repair or the replacement of the defective product at the<br />
manufacturer’s option and does not include any other form of damage, whether incidental,<br />
consequential or otherwise. The warranty does not cover any transport costs or damages<br />
caused by transport or shipment of the product. Warranty work will not be carried out unless this<br />
warranty certificate is presented fully completed with model, serial number, purchaser’s address,<br />
purchasing date and dealer stamp together with the original sales slip!<br />
2 JAHRE GARANTIE<br />
Sehr geehrter Kunde,<br />
Vielen Dank, dass Sie sich zum Kauf dieses Produktes von <strong>ZE</strong>NEC entschlossen haben. Wir<br />
bitten Sie, die Originalverpackung aufzuheben, z.B. für den Transport bei einem Garantiefall.<br />
Wenn Sie Garantie-Leistungen für dieses <strong>ZE</strong>NEC Produkt beanspruchen, wenden Sie sich bitte<br />
direkt an den Händler, bei dem das Gerät gekauft wurde.<br />
Dieses <strong>ZE</strong>NEC Produkt ist durch eine Werksgarantie von 2 Jahren ab Kaufdatum im Fachhandel<br />
gegen Material- oder Herstellungsfehler geschützt.<br />
Garantie-Einschränkungen<br />
Nicht unter Garantie fallen Schäden infolge von:<br />
1. unsachgemässem Einbau oder inkorrektem Audio- oder Stromanschluss.<br />
2. Einwirkung von übermässiger Feuchtigkeit, Flüssigkeit, Hitze, Sonneneinstrahlung<br />
oder starker Verschmutzung.<br />
3. mechanischer Beschädigung durch Unfall, Fall oder Stoss; Schäden durch nicht autorisierte<br />
Reparaturversuche und/oder Modifikationen.<br />
Die Garantie dieses Produkts bleibt in jedem Fall auf die Reparatur bzw. den Ersatz (Entscheidung<br />
beim Hersteller) des <strong>ZE</strong>NEC Produktes beschränkt. Transportschäden und die Kosten des<br />
Rücktransportes sind durch diese Garantie nicht abgedeckt. Jeder über diese Garantie-Erklärung<br />
hinausgehende Anspruch und Haftung für direkte / indirekte Folgeschäden werden ausdrücklich<br />
abgelehnt. Garantie-Ansprüche können nur mit einer korrekt und vollständig ausgefüllten<br />
Garantie-Karte und dem Original-Kaufbeleg geltend gemacht werden.<br />
18
WARRANTY/GARANTIE<br />
<strong>ZE</strong>NEC MODEL: <strong>ZE</strong>-<strong>MU703</strong><br />
Serial Number: ..............................................................................................................................<br />
Date of Purchase: .........................................................................................................................<br />
Your name: ...................................................................................................................................<br />
Your address: ...............................................................................................................................<br />
City: ..............................................................................................................................................<br />
State: ................................... ZIP or Postal Code ........................................................................<br />
Country: .......................................................................................................................................<br />
Dealer’s address & stamp<br />
19